Showing posts with label garden. Show all posts

Thursday, July 7, 2022

My Flowers Bring All the Bees to My Yard


Y'all, this might be my least incompetent gardening year yet!

I mean, not because I'm increasing in skill or anything, but more because every year I'm figuring out even more plants that can thrive in my garden in spite of me.

May brings flowers to my homestead lilac, which does not like me to do anything but clear the honeysuckle vines off it every spring:


This lilac is one of the oldest growing things on our property that was intentionally planted (see also: persimmon trees), and every now and then it inspires me to take a break from doing anything productive to instead deep dive into figuring out how to figure out the history of this property. I'm currently working my way through scans of a tiny, gossipy little local newspaper circa 1908 to see if I can find mention of the place or its owners, and annoying everyone around me by reading baffling tidbits:


If you can find a gossipy little newspaper over a hundred years old from your area, I highly recommend it. It is surprisingly engrossing to read about some guy's watermelon harvest, or the ladies' picnic, or the big snake somebody found, or the buggy accident in which all lives were lost.

The deck plants are staying classy, as always, with the addition of the toilet that used to be in the kids' bathroom:

But the real champions of the garden are the perennials that I ignore.

Look at my milkweed!


This is Asclepias syriaca, or common milkweed, the last remnant of Will's old butterfly garden. It's so aggressive that it pops up even in my raised flower beds, and I just plant around it because I'm a pushover for anything nice that wants to live here. The milkweed blooms in June, and the bees LOVE it:


June also brings flowers to the comfrey, and they are also beloved by the bees:


In July, the oregano flowers--


--and so does the lavender:


Late August will bring flowers to our perennial sunflower, and by September I'll have monarch babies to tend to. My plan is to try to bring this year's babies in as eggs--last year, I brought them in as teeny cats, and didn't know until they all died in their pupal stage that every single one had been parasitized by tachinid flies. It was a monumental tragedy, and one that I'd prefer to never repeat again.

Every summer I think about how, during our first summer in this house, the kids and I did a unit study on bees. As part of that, we wanted to find bees and try to identify them, and... couldn't. There were no bees that we could find on our property, no bees for the entire summer. Our property then was all mown lawn, invasive multiflora rose, evergreen shrubs, and invasive rose of Sharon--nothing that a bee would exactly want to visit. Will's the one who brought the bees the next year with her butterfly garden, and since then, even if I can't get a veggie to grow, at least I always have plenty of flowers for the bees.

Maybe next year I should drop the veggies altogether and just go full-on Monarch Waystation

Wednesday, July 7, 2021

She Earned Another Made-Up Badge: The Girl Scout "Homesteading" Badge


When my Girl Scouts were younger, I'd hear the leaders of older Girl Scouts gripe about the small selection of badges available for Cadettes, Seniors, and Ambassadors. I didn't get it at the time, because goodness, there were more badges around than my Brownie and Junior could ever possibly earn, and a whole slew of retired badges and fun patches, to boot!

But now that I have a Senior and an Ambassador Girl Scout, I see that the problem isn't so much the smaller selection, because there are still more official badges than my kids could do during their time in Girl Scouts, but the variety. Kids are always going to be super excited about some stuff and not excited at all about other stuff, but if you take out the not-so-exciting badges from the official GSUSA line-up... well, those gripey leaders had a point.

So I've been happily, unabashedly letting my entire troop remix or just plain make up badges. GSUSA doesn't have a current older-level basic camping badge, so I bought a set of retired Camping IPs and we made up the requirements to earn it. GSUSA doesn't have a badge for encouraging kids to have an immersive experience with books, so when a subset of my troop was into Percy Jackson, we bought a made-up Percy Jackson badge and made up the requirements to earn it. GSUSA doesn't have a travel badge for Ambassadors, so I'm right now in the process of collecting some retired Traveler IPs and later this year... yep, we'll make up the requirements to earn it!

Will is interested in various homesteading skills at the moment. Some much older retired badges do cover some of those skills, but there was nothing that was affordable, not too precious to put on a busy Girl Scout vest, and covering the skill set that interested Will the most. However, we thought this made-up badge would work quite well as a Homesteading badge, so I bought it--and we made up the requirements to earn it!

And here they are!

1. Research the square-foot gardening concept. Create and grow a square-foot garden for one season. 

For this step, I gave Will several cinderblocks, bags of soil, and newspapers, and showed her how to make a quick-and-dirty raised bed garden. She raised herself a fine crop of strawberries in it!

Other possibilities for this step were creating and growing container gardens, or helping an adult build a cold frame and using it to grow out-of-season greens.

2. Learn how to make your own jam. 

What to do with that fine crop of strawberries? Make jam, of course!

For this step, I taught both kids how to make freezer jam and cooked, canned jam, and the additional trick of laying out washed, topped strawberries on a cookie sheet, freezing them, and then tumbling them into a larger freezer container. Since they're already frozen, they won't stick together in that larger container, and you can just scoop some out whenever you want smoothies or muffins.

It's that life hack that has become an unconscious standard practice!

3. Learn how to use the dehydrator. 

I'd thought that Will might like to learn how to dehydrate her own dried fruit and fruit leather, but instead she ended up helping me deal with a sudden bounty of herbs and greens. I'm going to be really happy this winter that I have so much raw kale in the freezer and all those jars of dehydrated kale and dehydrated oregano in the pantry. 

Other possibilities for this step were learning how to make pickles or sauerkraut, both of which are super easy to do, and my kids LOVE them. 

4. Carve something useful from wood.

Here's Will at our most recent troop camping trip working on her wooden spoon:

She used her pocket knife while at camp, but mostly she used this wood carving kit that is probably the best gift the Easter Bunny's ever brought the kids!

She carved herself a quite serviceable spoon, lightly polished with olive oil and beeswax and absolutely perfect for all of our rustic culinary adventures. 

Other possibilities for this step were learning how to knit or crochet and making a washcloth to prove it!

5. Learn how to make cold-process soap from scratch.

This was definitely our most time-consuming project! I came into it with a big head on my shoulders, having made cold-process soap a few times before, and having taught Syd to make it just a few years ago, but I definitely got knocked down ALL the pegs when our first TWO batches of soap didn't turn out!

What I finally learned after doing the Googling that I should have done in the beginning is that it was my decade-old lye's fault. And now I own a brand-new five-dollar giant bottle of lye, so I guess my goal is to use it up in soapmaking sometime BEFORE the next decade...

Well, we got a good start this summer!


Will made a lovely soap with olive oil, coconut oil, and powdered milk--


--and that lye, of course! Check out its pH, because you KNOW we never pass up a chance to test some shocking pH:


If you don't try to use sus lye, cold-process soap actually IS very simple. It's mostly stirring--


--until you reach trace--


--pouring it into an empty oatmeal canister to finish saponifying--


--removing it from the container when it's hardened and slicing it--


--and then leaving it to cure, every so often admiring how beautiful it is:


Isn't it gorgeous? It's actually inspired me to want to try some different recipes, but I've got to figure out what I'd put it in, because that was our only oatmeal container!

6. Bake bread from scratch.

Have you noticed yet that most of Will's activities are ones that are suspiciously very helpful to ME?!? Mwa-ha-ha! But yeah, I hate to cook, so I am always looking for ways to encourage someone else to cook instead of me. I taught Will to make this no-knead bread, which also happens to be the easiest, most delicious bread in existence, so now that she knows how to make it, I hope she makes it for us lots!

Other possibilities for this step were learning about rain barrels and helping her dad reinstall and maintain ours, or letting me teach her how to sharpen knives. I would appreciate having someone else around who can sharpen knives, but it's also nice to eat homemade bread that I didn't have to bake myself!

7. Level up your animal husbandry skills.

I left this option kind of open, mostly because there are, in my opinion, SO MANY animal husbandry tasks that need to be done around here! The pets are about as feral as the kids!

Will chose to focus on her chickens. She spent a lot of time making a nursery area to keep the pullets away from the big chickens (they defeated her gatekeeping system almost immediately, but so far the big chickens just seem to ignore the little ones), and then giving the whole flock more entertainment options for those days when she doesn't allow them to free-range. Got to be unpredictable so you foil the foxes!

And that's how Will spent part of her summer learning some very useful skills! Now she can start and grow a garden, preserve what she grows, bake herself delicious bread, make herself gourmet soap, and carve the spoon she can use to spread that homemade jam on that delicious bread.

OMG and now I'm realizing that I should totally go and have her do exactly that! If you can celebrate completing a badge by eating bread and jam, then you really HAVE made up the perfect badge!

Saturday, June 5, 2021

The Easiest DIY Newspaper Seed Starting Pots

This tutorial was originally published on Crafting a Green World in 2017.

Seriously, y'all, these are the easiest seed starting pots on the planet. There's no origami involved. No fancy tools. Heck, making these seed starting pots is even easier than opening the packaging on store-bought seed starting supplies! 

 I LOVE these DIY newspaper seed starting pots, because you can make them as-needed, and there's no waste-you plant your sprouted seedlings right in this pot, which decomposes to enrich the soil and allow your baby plant's roots to spread. No trauma to the babies, nothing to carry to the trash bin--it's a double win!

DIY Newspaper Seed Starting Pots


All you need are: 

  newspaper. If you don't take the newspaper yourself, just ask around. A single day's paper is enough to give you plenty of pots to start out with. 
  beer bottle. A hardship to obtain, I know. If you don't have one, I know for a fact that you have something similar on hand. Check your pantry. Check your fridge. I know you can do this! 
  plant markers (optional). You can write the name of the plant directly onto the newspaper pot with Sharpie, and the writing will last long enough for you to get the pot into the ground, but I paid my kid a penny a pop to write me a bunch of plant markers onto popsicle sticks, and you know what? Those work just as well as the cuter plant markers. 

 1. Rip your newspaper right down the middle. Don't use the ad flyers, and don't use the Sunday comics (because you're saving those for wrapping paper, right?). But all the other sections? Just go ahead and rip them all right down the middle. 


 2. Wrap a strip of newspaper around your beer bottle. You want about two inches of of the strip to hang off of the bottom of the bottle, so I find that lining the top of the strip up along the top edge of the beer bottle's label works well. Keep wrapping the strip around the bottle until it's all wrapped up--you'll overlap it on the bottle a few times, which will make your pot stronger. 

 3. Fold in the bottom of the newspaper cylinder. Neatly fold it up against the base of the bottle, all the way around. 


  4. Slide the newspaper seed starting pot off of the beer bottle. When it's free, give the bottom fold a good crease all the way around. Once you set it in a tray and fill it with damp soil, it will learn to keep that fold, and by the time you're ready to plant, you may have to rip it or snip it with scissors to open the bottom back up. 

 These newspaper seed starting pots don't last forever, obviously, what with staying damp and being filled with dirt, but they will last for more than long enough to grow your plants from seed to good, sturdy plant start. If you set them in a tray, you'll also be able to gently water them by putting water only in the tray and letting the newspaper wick the water up to the rest of the pot.

Saturday, March 13, 2021

Make a Wood Burned Stick Plant Marker

This tutorial was originally published on Crafting a Green World.

My favorite plant markers are the simplest ones you could make--they're just wood burned sticks! I've experimented with more decorative and elaborate plant markers over the years, and some of them ARE really fun to create and display, but I haven't found anything more eco-friendly, easier to make and use, or sturdier than wood with a wood burned label. 

 These wood burned stick plant markers have no paint to fade, no glue to lose its adhesion, no sketchy materials to worry about leaching into the ground, no artificial substances that will sit around forever if I neglect to collect them from the garden! A nice, thick stick will stay serviceable for several years, it will never lose its contrast with its wood burned label, and when I'm done with it, it'll happy decompose wherever I leave it, benefiting the soil as it does.

Supplies

To make your own wood burned stick plant marker, here's what you'll need:
  • Stick. Look for a stick that's around 1" diameter, and cut it to lengths approximately 8"-10". If you find the stick somewhere other than your own property, you might want to also bake it using the same method that you use with acorns. I might be the garden version of a helicopter mom, because I worry about introducing random fungi, parasites, or insects to my plants from outside sources, but baking will kill anything that grows.
  • Carving knife. You don't need a full-on set of wood carving knives (although my kids and I use ours all the time!), but you do want some sharp knife that you can do a little whittling with. Don't be scared, because it's easy and fun!
  • Wood burner. Wood burning kits are easily available and fairly inexpensive, but if you don't see yourself using one often, it's worth it to ask around among friends and family to find one to borrow.

Directions

1. Prepare Your Stick


 Cut it to size, if you haven't already, and peel the bark off if you prefer that look. 

  2. Carve The Stake 


 Choose one end of the stick to be the bottom, and use your carving knife to begin carving that end of the stick into a point. It's pretty messy, so do this outside, and it's somewhat slow going, so I highly suggest working your way through an audiobook or becoming obsessed with a podcast to help the time pass. 


 Eventually, though, you'll have shaved that end down to a nice point. You don't have to make the tip sharp, of course, unless you think it might be helpful to have some vampire-slaying stakes disguised as plant markers. I, personally, do find this helpful.

3. Flatten One Side For a Label

 
Use your carving knife to shave away one side of the top half of the stick, creating a flattened area for your plant marker's label. This is a little trickier than carving the stake, but the good news is that this flattened area does not have to be at all perfect for you to be able to wood burn the label. If you get really frustrated, you can cheat by using a palm sander and your most abrasive sandpaper to even out the surface. 


 I warned you that wood carving is messy!

4. Wood Burn the Label


 Follow the instructions on your wood burner to attach the appropriate tip and heat it up, then use it like you would an unwieldy sort of pen--it's really that easy! Going slowly helps, and don't be afraid to go over the same line a couple of times to make it deeper and darker. Try not to let the tip just sit in one spot, however, as that will add a large, burned blot to your work. 

 When your label is wood burned on, your plant marker is ready to go to work! Unlike most projects that you use outdoors, you don't need to seal these plant markers; wood ages well and each plant marker will easily last several years in its spot before it needs to be replaced. 

 I like to place these markers next to my perennial plants, especially the ones that I don't have confined to garden beds. My milkweed, for instance, tends to pop up late and likes to spread out, so a permanent marker to remind me where it keeps me from trying to put an annual on top of it. 


  In the photo above, my brand-new sunflower plant marker is going to help me remember that I transplanted some of my perennial sunflowers into that narrow bed this year. They LOVE it there, but until they get tall and start to bud they tend to look kind of weedy, the poor dears, so that nice sturdy plant marker will (hopefully) keep me from absentmindedly pulling them next spring. 

Monday, March 1, 2021

Some New Festive Pegasus Festival Flags

 I've been thinking spring lately! 

I've been thinking about gardening, and sitting outside with Matt drinking cocktails and working crossword puzzles. Hanging out on a quilt, reading and eating snacks. Minding my own business inside while the kids have actual human friends over outside, keeping their distance and keeping their masks on.

Maybe even backpack camping, just my family and our dog way out in the woods, far away from all the fretful things!

Thinking about gardening and camping got me in the mood to sew cute things for gardening and camping. A little earlier, I'd also gone down a random rabbit trail of looking at festival flags online (I miss going to concerts!), so there I found myself, making miniature festival flags that will be easy to mount in my garden, on the kids' treehouse, or to mark my tent stakes. 


Fortunately, since it's pouring outside today, they also look particularly nice popped into a painted soda bottle!


Since I have plenty of this fabric, I've got a few of these pennant flags listed in my Pumpkin+Bear shop. I think it would be really fun to do a whole set of mythological beasts, fitting right in with my current Rick Riordan-inspired mythology obsession.

If I ever do it, I'll post it on my Craft Knife Facebook page!

Saturday, October 24, 2020

How to Make a Fairy Garden

A fairy garden is easy to make, and nope, it actually doesn't require any of those porcelain or plastic store-bought fairy garden accessories.

After all, the fairies don't go to Hobby Lobby for their furniture--they MAKE it!

Fairy gardens also don't have to be as elaborate as the ones that you see showing off all of their store-bought fairy accessories. Sure, a fairy garden wonderland is cute, but not everyone likes "cute."

But I promise everyone can like a fairy garden!

All you really need to make a fairy garden are a couple of small plants and suitable potting soil, a container, and appropriate handmade, found, recycled, or natural embellishments. The fairy garden becomes a magical place based on these elements alone... that's kind of WHY it's magical, you know? Simplicity is, indeed, beauty.

So scavenge up some recycled and natural materials, and let's make a fairy garden!

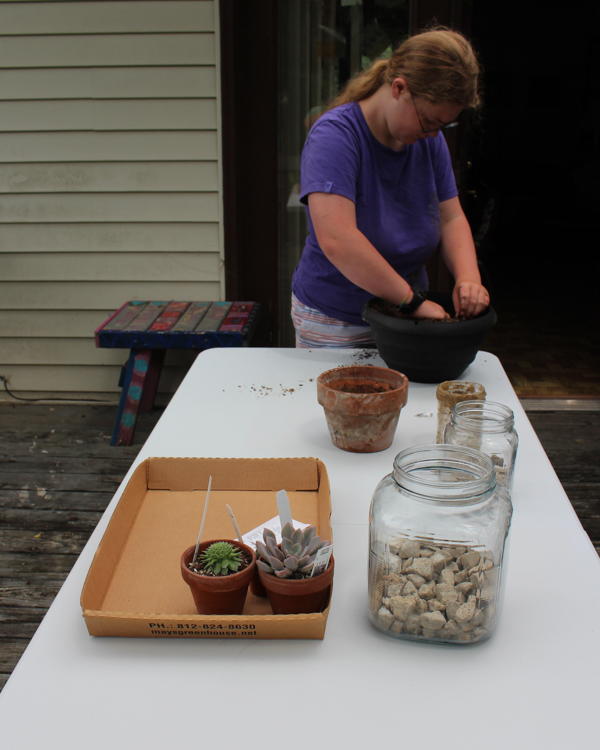
1. Prepare an appropriate growing environment for your plants. This step is the key to the entire fairy garden--you need the right plants, the right container, and the right soil. Make a garden that looks pretty but doesn't take care of your plants the right way, and it'll be dead within the month.

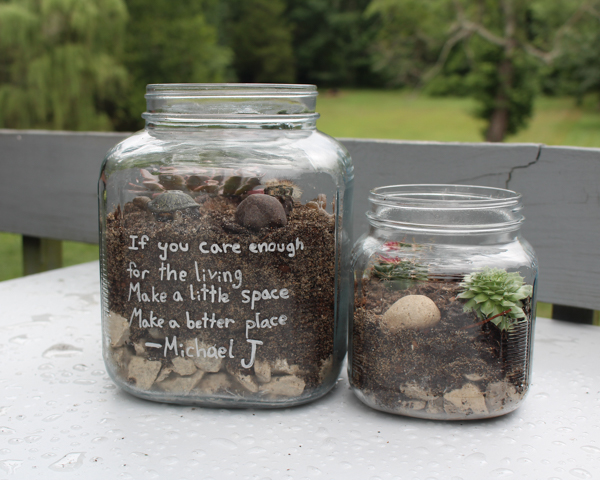
I like to start with the container. For the set of fairy gardens that I made last week, I knew that I wanted to use some old glass storage jars whose lids are... well, I don't know. Maybe the fairies took them.

For a glass container like that, I didn't want plants that would spread a ton, or get too bushy. Moss would have been cute, or a little bonsai, but after wandering around the greenhouse, and learning that they were randomly out of the venus flytraps that I'd REALLY wanted, I decided that a little desert fairy garden would be cute, like a fairy terrarium.

That meant succulents and cacti! Succulents and cacti both need a lot of drainage, so I put in a bottom visible layer of gravel (you could use aquarium gravel for this, or decorative river rocks, or shells, etc.), then the kid helped me mix up an appropriate potting soil for succulents and cacti--basically, potting soil plus playground sand plus peat moss or perlite. I'm ashamed to say that I used peat moss, even though I loathe buying it because its harvesting is VERY problematic, because I couldn't find the alternatives that I wanted and I needed to get the fairy gardens finished so that they could be birthday presents.

Rushed shopping and crafting is often not eco-friendly shopping and crafting, dang it.

2. Add potting soil and plants to the container. Just like in a real garden, bigger plants go in the back and smaller plants go in the front, and offsetting them to each other allows them all to be seen.

As you place the plants, begin visualizing what fairy garden embellishments you want to add, so that you'll be sure to have room.

3. Decorate your fairy garden. This is the fun part! To decorate your garden, check out these handmade fairy garden decorations for inspiration, or look around your home and yard and repurpose found items. Since my kids have been small, they've adored using their little toy animals as fairy garden decorations, and dollhouse furniture also often works well.

As you're embellishing, don't forget the container itself! One of our fairy garden birthday presents needed to be Michael Jackson-themed, and I thought about making Shrinky Dinks or polymer clay models, but it turned out that a relevant quote from one of his songs, written on in paint pen, was all that was really needed to make it perfect.

If you give your fairy garden as a gift, don't forget to include care instructions for the plants, and the appropriate fertilizer, if necessary. Giving the recipient a bottle of distilled water, a little bottle of liquid fertilizer, and a handwritten sheet of when and how much to water can be all the difference between a birthday present that's a huge hit and one that's an eventual source of guilt and self-recrimination.

Looking for more fairy garden inspiration? Check out my kid's junkyard fairy garden here, and this super easy, super magical chia sprout fairy garden that's perfect for preschoolers.

Friday, September 11, 2020

Perennial Sunflowers, all the Bees, and I am a Monarch Foster Mom

And to think that once upon a time, during the first full summer on our new-to-us property, we could not find a single bee.

Look at my yard today!

A few years ago, I failed in saving the seeds from our beloved Mexican sunflower, and instead, I impulse-purchased a perennial sunflower from an online seed company. It's even better than the Mexican sunflower, because not only is it big and beautiful and bright, but it also comes back to me every year without me having to have the very specific seed-saving skill-set!

Also, as I discovered just this spring, it transplants like a dream! When I was first planting things, I didn't understand at ALL how different my property's sun exposure would be in different seasons--that entire half of the yard that was sunny as hell all spring was... not sunny as hell after the elms leafed out, sigh. So even though I was terrified of killing it, I took a big leap of faith and tried to transplant some of that years-old perennial sunflower clump that was still beautiful and bright, but not getting so big anymore.

This whole sunflower garden lives on the other side of the house now, and it's flourished all summer, getting at least twice as tall as its sunflower sisters back over in the shadow of the elm trees:


Look at my BEES!!!


Way back in 2015, Will created a butterfly garden in this area of the yard, and although the rest of that garden is long-gone, the milkweed comes back every year, and every year we carefully weed around it and let it spread. It's a happy coincidence that right by this sunflower garden, then, is lots of lovely milkweed!

Every year, I also admire the monarchs that visit my flowers, and the monarch caterpillars that I see munching on my milkweed, but this year, I got the advice from my local native plants Facebook group that it's good to bring those little monarch caterpillars inside and feed them up in captivity, safe from predators. So when I went outside last weekend and saw monarch caterpillars all over my milkweed, never mind the fact that we were expecting a couple of friends of Syd's to come over for a socially-distanced backyard camp-out in just a couple of hours and I had not yet made our yard look like trash people do not live here, I nevertheless got a mask, got in the car, and went out solely to buy this exact kind of mesh hamper. It's perfect because it zips fully up and has openings in two sides, so it's easy to give my foster babies fresh noms twice a day. 

Look how much they love their noms!


I currently have one chrysalis at the top of my hamper, and four constantly-chewing caterpillars at the bottom of my hamper. I am so invested in their welfare, you guys!