A fairy garden is easy to make, and nope, it actually doesn't require any of those porcelain or plastic store-bought fairy garden accessories.
After all, the fairies don't go to Hobby Lobby for their furniture--they MAKE it!
Fairy gardens also don't have to be as elaborate as the ones that you see showing off all of their store-bought fairy accessories. Sure, a fairy garden wonderland is cute, but not everyone likes "cute."
But I promise everyone can like a fairy garden!
All you really need to make a fairy garden are a couple of small plants and suitable potting soil, a container, and appropriate handmade, found, recycled, or natural embellishments. The fairy garden becomes a magical place based on these elements alone... that's kind of WHY it's magical, you know? Simplicity is, indeed, beauty.
So scavenge up some recycled and natural materials, and let's make a fairy garden!
1. Prepare an appropriate growing environment for your plants. This step is the key to the entire fairy garden--you need the right plants, the right container, and the right soil. Make a garden that looks pretty but doesn't take care of your plants the right way, and it'll be dead within the month.
I like to start with the container. For the set of fairy gardens that I made last week, I knew that I wanted to use some old glass storage jars whose lids are... well, I don't know. Maybe the fairies took them.
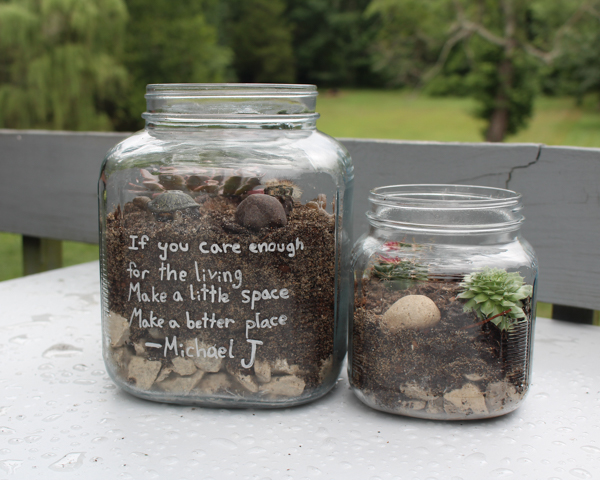
For a glass container like that, I didn't want plants that would spread a ton, or get too bushy. Moss would have been cute, or a little bonsai, but after wandering around the greenhouse, and learning that they were randomly out of the venus flytraps that I'd REALLY wanted, I decided that a little desert fairy garden would be cute, like a fairy terrarium.
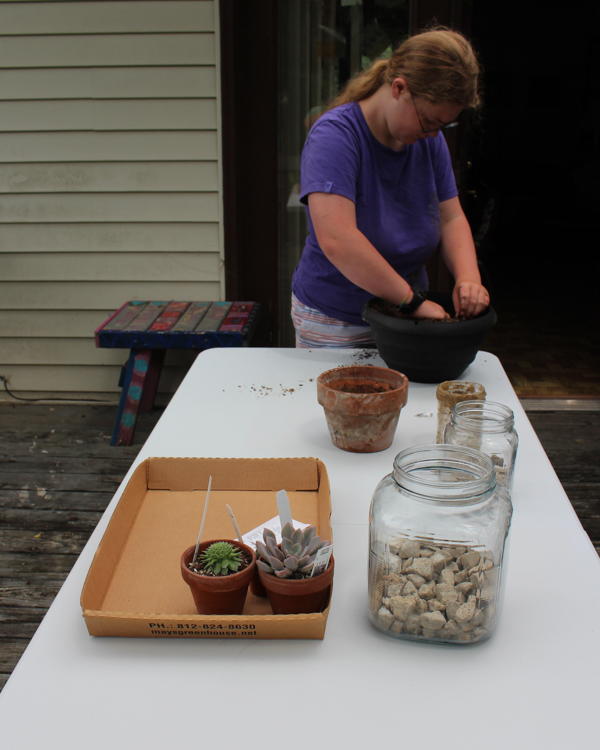
That meant succulents and cacti! Succulents and cacti both need a lot of drainage, so I put in a bottom visible layer of gravel (you could use aquarium gravel for this, or decorative river rocks, or shells, etc.), then the kid helped me mix up an appropriate potting soil for succulents and cacti--basically, potting soil plus playground sand plus peat moss or perlite. I'm ashamed to say that I used peat moss, even though I loathe buying it because its harvesting is VERY problematic, because I couldn't find the alternatives that I wanted and I needed to get the fairy gardens finished so that they could be birthday presents.
Rushed shopping and crafting is often not eco-friendly shopping and crafting, dang it.
2. Add potting soil and plants to the container. Just like in a real garden, bigger plants go in the back and smaller plants go in the front, and offsetting them to each other allows them all to be seen.
As you place the plants, begin visualizing what fairy garden embellishments you want to add, so that you'll be sure to have room.
3. Decorate your fairy garden. This is the fun part! To decorate your garden, check out these handmade fairy garden decorations for inspiration, or look around your home and yard and repurpose found items. Since my kids have been small, they've adored using their little toy animals as fairy garden decorations, and dollhouse furniture also often works well.
As you're embellishing, don't forget the container itself! One of our fairy garden birthday presents needed to be Michael Jackson-themed, and I thought about making Shrinky Dinks or polymer clay models, but it turned out that a relevant quote from one of his songs, written on in paint pen, was all that was really needed to make it perfect.
If you give your fairy garden as a gift, don't forget to include care instructions for the plants, and the appropriate fertilizer, if necessary. Giving the recipient a bottle of distilled water, a little bottle of liquid fertilizer, and a handwritten sheet of when and how much to water can be all the difference between a birthday present that's a huge hit and one that's an eventual source of guilt and self-recrimination.
Looking for more fairy garden inspiration? Check out my kid's junkyard fairy garden here, and this super easy, super magical chia sprout fairy garden that's perfect for preschoolers.


No comments:
Post a Comment