Showing posts with label chickens. Show all posts

Wednesday, July 7, 2021

She Earned Another Made-Up Badge: The Girl Scout "Homesteading" Badge


When my Girl Scouts were younger, I'd hear the leaders of older Girl Scouts gripe about the small selection of badges available for Cadettes, Seniors, and Ambassadors. I didn't get it at the time, because goodness, there were more badges around than my Brownie and Junior could ever possibly earn, and a whole slew of retired badges and fun patches, to boot!

But now that I have a Senior and an Ambassador Girl Scout, I see that the problem isn't so much the smaller selection, because there are still more official badges than my kids could do during their time in Girl Scouts, but the variety. Kids are always going to be super excited about some stuff and not excited at all about other stuff, but if you take out the not-so-exciting badges from the official GSUSA line-up... well, those gripey leaders had a point.

So I've been happily, unabashedly letting my entire troop remix or just plain make up badges. GSUSA doesn't have a current older-level basic camping badge, so I bought a set of retired Camping IPs and we made up the requirements to earn it. GSUSA doesn't have a badge for encouraging kids to have an immersive experience with books, so when a subset of my troop was into Percy Jackson, we bought a made-up Percy Jackson badge and made up the requirements to earn it. GSUSA doesn't have a travel badge for Ambassadors, so I'm right now in the process of collecting some retired Traveler IPs and later this year... yep, we'll make up the requirements to earn it!

Will is interested in various homesteading skills at the moment. Some much older retired badges do cover some of those skills, but there was nothing that was affordable, not too precious to put on a busy Girl Scout vest, and covering the skill set that interested Will the most. However, we thought this made-up badge would work quite well as a Homesteading badge, so I bought it--and we made up the requirements to earn it!

And here they are!

1. Research the square-foot gardening concept. Create and grow a square-foot garden for one season. 

For this step, I gave Will several cinderblocks, bags of soil, and newspapers, and showed her how to make a quick-and-dirty raised bed garden. She raised herself a fine crop of strawberries in it!

Other possibilities for this step were creating and growing container gardens, or helping an adult build a cold frame and using it to grow out-of-season greens.

2. Learn how to make your own jam. 

What to do with that fine crop of strawberries? Make jam, of course!

For this step, I taught both kids how to make freezer jam and cooked, canned jam, and the additional trick of laying out washed, topped strawberries on a cookie sheet, freezing them, and then tumbling them into a larger freezer container. Since they're already frozen, they won't stick together in that larger container, and you can just scoop some out whenever you want smoothies or muffins.

It's that life hack that has become an unconscious standard practice!

3. Learn how to use the dehydrator. 

I'd thought that Will might like to learn how to dehydrate her own dried fruit and fruit leather, but instead she ended up helping me deal with a sudden bounty of herbs and greens. I'm going to be really happy this winter that I have so much raw kale in the freezer and all those jars of dehydrated kale and dehydrated oregano in the pantry. 

Other possibilities for this step were learning how to make pickles or sauerkraut, both of which are super easy to do, and my kids LOVE them. 

4. Carve something useful from wood.

Here's Will at our most recent troop camping trip working on her wooden spoon:

She used her pocket knife while at camp, but mostly she used this wood carving kit that is probably the best gift the Easter Bunny's ever brought the kids!

She carved herself a quite serviceable spoon, lightly polished with olive oil and beeswax and absolutely perfect for all of our rustic culinary adventures. 

Other possibilities for this step were learning how to knit or crochet and making a washcloth to prove it!

5. Learn how to make cold-process soap from scratch.

This was definitely our most time-consuming project! I came into it with a big head on my shoulders, having made cold-process soap a few times before, and having taught Syd to make it just a few years ago, but I definitely got knocked down ALL the pegs when our first TWO batches of soap didn't turn out!

What I finally learned after doing the Googling that I should have done in the beginning is that it was my decade-old lye's fault. And now I own a brand-new five-dollar giant bottle of lye, so I guess my goal is to use it up in soapmaking sometime BEFORE the next decade...

Well, we got a good start this summer!


Will made a lovely soap with olive oil, coconut oil, and powdered milk--


--and that lye, of course! Check out its pH, because you KNOW we never pass up a chance to test some shocking pH:


If you don't try to use sus lye, cold-process soap actually IS very simple. It's mostly stirring--


--until you reach trace--


--pouring it into an empty oatmeal canister to finish saponifying--


--removing it from the container when it's hardened and slicing it--


--and then leaving it to cure, every so often admiring how beautiful it is:


Isn't it gorgeous? It's actually inspired me to want to try some different recipes, but I've got to figure out what I'd put it in, because that was our only oatmeal container!

6. Bake bread from scratch.

Have you noticed yet that most of Will's activities are ones that are suspiciously very helpful to ME?!? Mwa-ha-ha! But yeah, I hate to cook, so I am always looking for ways to encourage someone else to cook instead of me. I taught Will to make this no-knead bread, which also happens to be the easiest, most delicious bread in existence, so now that she knows how to make it, I hope she makes it for us lots!

Other possibilities for this step were learning about rain barrels and helping her dad reinstall and maintain ours, or letting me teach her how to sharpen knives. I would appreciate having someone else around who can sharpen knives, but it's also nice to eat homemade bread that I didn't have to bake myself!

7. Level up your animal husbandry skills.

I left this option kind of open, mostly because there are, in my opinion, SO MANY animal husbandry tasks that need to be done around here! The pets are about as feral as the kids!

Will chose to focus on her chickens. She spent a lot of time making a nursery area to keep the pullets away from the big chickens (they defeated her gatekeeping system almost immediately, but so far the big chickens just seem to ignore the little ones), and then giving the whole flock more entertainment options for those days when she doesn't allow them to free-range. Got to be unpredictable so you foil the foxes!

And that's how Will spent part of her summer learning some very useful skills! Now she can start and grow a garden, preserve what she grows, bake herself delicious bread, make herself gourmet soap, and carve the spoon she can use to spread that homemade jam on that delicious bread.

OMG and now I'm realizing that I should totally go and have her do exactly that! If you can celebrate completing a badge by eating bread and jam, then you really HAVE made up the perfect badge!

Friday, May 14, 2021

The Backyard Chickens Glow Up


It's been a long time since I made chick portraits with the kids.

How long has it been exactly?

THIS long!!!


It was so long ago that Syd, who now fears and loathes the backyard chickens in equal capacities, happily posed with a chick on her wrist. 

Syd won't go near even the bitty babies anymore, alas, but Will still has an infinite adoration for chickens both big and small. Early this spring she started to work on me and Matt about adding more chicks to our small flock. I kept a pretty hard line for a change, so obviously it was Matt's turn to be a sucker and spoil our child.

I mean, one of us HAS to, right?!? That's surely a rule somewhere...

So off Will and Matt went to buy four chicks, then a couple of days later they turned right around, for reasons that surely made sense to them, and they bought two more. And now we have six, on top of the four hens and two roosters we've already got. It's not exactly the farm that Will dreamed of having when she was four, but it's certainly closer to it!

This is Whistleblower:


And this is Whistleblower one month later!


This is Smol Bean:


And this is Smol Bean one month later!


Smol Bean is living proof of my kid's loving heart, as she lets me name one of the chicks each time she gets new ones, and she absolutely HATES this name. HATES. IT. And yet we still have a Smol Bean, because a Smol Bean was what I wanted:


This is Poppy:


And this is Poppy one month later:


This is Quetzalcoatlus: 


And this is Queztlcoatlus one month later, looking not entirely unlike her namesake!


This is Blitz:


And this is our baby Blitz one month later:


This is Hadrian:


And this is lanky Hadrian one month later:


The chicks just moved from their indoor palace into their outdoor nursery coop this week. I'm happy that their dust and smell and noise are out of the house, but I miss being able to pop into the playroom and visit with them, too. There's a metaphor in there somewhere, something about how fast young creatures grow and how wonderful and hard it is to have them when they're small, and how wonderful and hard it is when they leave the safety of your home. How their lives become so much more interesting in the wider world of the backyard, but you stop knowing them as well as you did when they were contained. How they become so different. How they stay so very much the same. 

Every day I think about how this incredible, funny, generous, bright, witty, thoughtful, and kind kid of mine is going to leave for the wide world so soon now, herself. Sometimes I feel excited about that--I'll find every brownie right where I left it! Sometimes I feel worried--How on EARTH can I monitor her from far away? What if there's an emergency, and nobody knows that my child must be evacuated before all the other children because she is the most special? Sometimes I make anxious to-do lists in my head of all the things I still have to teach her--physics, how to drive, the mandatory nature of daily showers, when to stop arguing one's point. 

Mostly, though, I think about how much I'm going to miss her every single second, and how much magic and newness and adventure and possibility she's brought into my life so far, and how I hope she keeps that and shares that as she makes her own way in the world. I hope she finds others who will participate with interest every single time she's reading a book and pops her head up wanting to discuss an important piece of information from it. I hope she finds others who love travel and adventure, who also want to go kayaking and skiing and hiking and climbing and target shooting and every other cool thing, but I hope she also isn't afraid to find new adventures and go on them all by herself, either. 

I hope she keeps this heart that loves animals of all kinds more than she loves most people, who treasures wolverines as much as she does puppies. I hope that her place in the world is filled with dogs of indeterminant breeding, ever-replenishing flocks of chickens, and fields of content horses. And I hope that every time she has a new batch of chicks, I'm close enough by that I can make their portraits for her.

Saturday, September 12, 2020

How to Make a Bean Bag Chicken

I originally published this tutorial on Crafting a Green World.

These cute chickens make great little gifts, and since you can sew them up quickly completely from scraps, no two are alike! So search your scrap fabric stash, then sew yourself up an entire flock of lovable, snuggable, and highly-giftable bean bag chickens.

Supplies

  • Scrap fabric: 2 squares, 4.5"
  • Felt or fleece scraps, red and yellow/orange (you want a fabric that doesn't ravel for this, or you can get creative by upcycling plastic grocery bags or feed sacks)
  • Two matching buttons
  • A small piece of chalk
  • Stuffing or fiberfill
  • Any combination of dry rice/beans/peas/popcorn kernels
  • Cutting and sewing supplies, hand-sewing needle and embroidery floss

Directions

1. Cut two squares of fabric to the dimensions 4.5" x 4.5". I always use two identical prints, but you certainly don't have to.

2. Pin on the chicken parts. From the yellow or orange felt, cut a square that's about 1" x 1". Fold it in half diagonally, and pin it about two-thirds of the way up the right side of one fabric square. Notice in the above pic that the diagonal fold is on top and the two edges of the felt triangle are parallel to the sides of the fabric. Pin in place.

From the red felt, cut another square that's also about 1" x 1". Scallop the top to look like the top of a chicken's comb. Pin it with the scallops facing in and the opposite edge aligned with the top of the fabric square, about a fourth of the way from the top right corner.

Also from the red felt, cut a final 1" x 1" square. Fold it in half, and cut out two wattles. Angle these to be parallel to the diagonal fold on your chicken's beak, and pin them just below the beak, facing in.

3. Sew three sides of the beanbag. Put the two fabric squares together, right sides facing, and sew three sides together. You'll start with the top side, beginning with the end furthest away from the chicken's beak. Sew along the top, taking away the pin that holds the comb before you sew over it, then down the front, removing the pins and sewing the chicken's beak and wattle, then sew the bottom. Don't sew that fourth side!

Turn the beanbag right side out and iron flat.

4. Sew on the button eyes. It would be easier to do this step before you sew the three sides of the bean bag together, but I had a lot of trouble getting my eyes to line up nicely when I did that. Instead, I sew them on after the three sides are sewn and all the rest of the chicken features are in place. Feel free to try both ways and choose what works best for you.

To place the eyes, first, play with the placement of one eye until you're satisfied, then mark that spot with chalk. Use a pencil point or your finger to make a bump in the fabric at that spot so that you can feel where to make your mark on the other side of the chicken. Sew on each eye individually using embroidery floss.

Pro tip: Fold the open edge of the bean bag over a couple of times so that you have less fabric to deal with as you're trying to sew the button eyes on inside the bean bag. It gets much easier with practice!

5. Crease the hem. Fold the raw edges of the hem inside about a quarter of an inch, and iron.

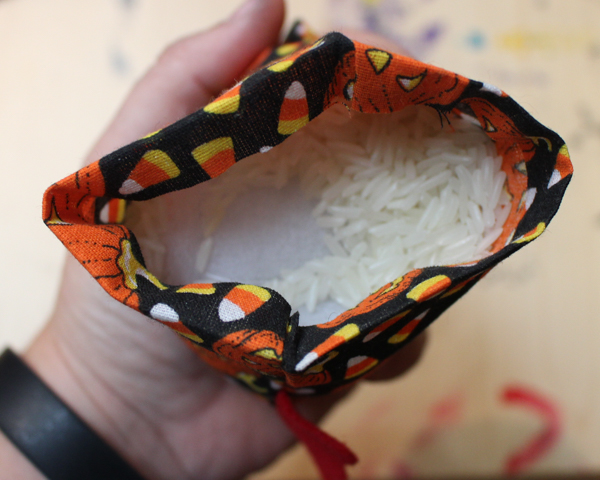
6. Stuff the bird. Grab an amount of fiberfill about the size of your fist, and use it to fill the top of the chicken. Fill the bottom with one or two handfuls of dry rice or beans or popcorn kernels. Stuff the fiberfill down as tightly as you can, to make sewing the last side shut easier. It will loft back out over the course of several minutes.

7. Sew the final seam. You're going to sew this last side in an unusual way, so read carefully!

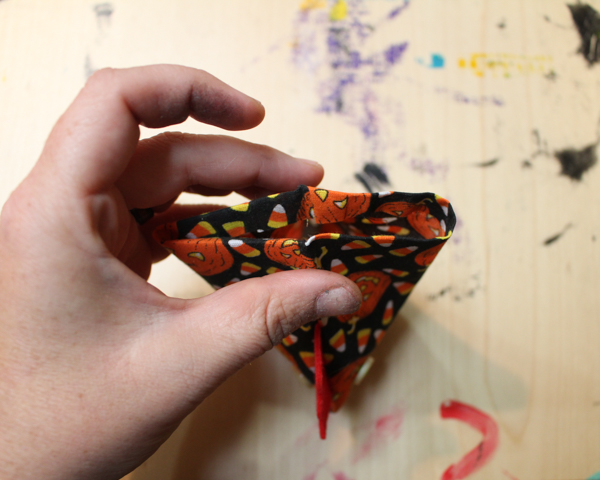
Take the two side seams and fold the opening so that these two side seams touch in the middle:

This is cattywampus to the way that you sew a regular bean bag, so make sure you've got it figured out before you start sewing. You'll know you've got it right when the bean bag looks like a pyramid, not a square. Edge stitch that final seam closed and sit your bean bag chicken down. It will sit on its flat butt, that final seam is its tail, and the top of the pyramid is its adorable chicken face!

8. Tidy up the beak. This is optional, but I find that for nearly every chicken I sew, I want to trim the beak just a bit to make a cuter shape. Usually, I give the bottom a bit of a curve or a slightly different angle so that the shape is more sophisticated and natural-looking than just a triangle with straight sides.

Once you've gotten the hang of these chickens, you'll find that they sew up quite quickly. 

They make great presents, and since you're using a varied combination of fabric scraps and stash buttons, each one has its own unique personality!

Monday, October 21, 2019

Every Single Kitschy Stuffed Chicken

Why do I have so many stuffed chickens in my Pumpkin+Bear etsy shop?

Ask a weird question, and you're going to get a weird answer!

When my Girl Scout troop wanted to participate in a craft fair (spoiler alert: I DO NOT recommend this as a troop fundraiser. The kids had fun, but we cleared the minimum amount that we were hoping to, and it was a LOT OF WORK. Like, A LOT OF WORK. Hold a garage sale instead!), Syd made ornaments, Will made fire starters, and I wanted to make something, too.

I wanted something that I could sew with all of the various fabrics that I have on hand.

I wanted something that I could sew in small batches, as the holiday craft fair season is a VERY busy time of year when you've got a kid dancing in the Nutcracker.

I wanted something that I could sew a lot of, because the girls wanted to make a lot of money!

I wanted something not too uniquely to my taste, because, as I learned selling at craft fairs many years ago, the things that make me go "YAAAASSSS!!!!" generally make the average citizen smile nervously and back away while maintaining eye contact in case I make any sudden moves.

While I was thinking about those craft fairs of years past, I remembered the year that the grumpy old ladies set up a table with an umbrella at a craft fair that I'd been selling at for months. They were rude to me, had bad craft fair etiquette in general, and gave me a bad case of sour grapes because people were seriously shoving past my quilts and necklaces and record bowls in order to mob around their little table and buy their...

STUFFED CHICKENS!

Kitschy stuffed chickens sewn from mismatched fabric!

Kitschy stuffed chickens easy to sew in batches!

Kitschy stuffed chickens that, while they're still not exactly to my taste, are now at least in the realm of ironically hanging out in the vicinity of my taste, on account of how many actual, literal chickens I now have and how much I foolishly love them.

Friends, I sewed a lot of chickens. They didn't exactly sell like hotcakes, because apparently rural Indiana is over stuffed chickens and is now super into fence posts or banisters or whatever painted to look like Santa Claus, but that's how it goes with craft fairs--as soon as you make something just kitschy enough to have sold last year, somebody else has figured out something even kitschier to sell this year.

And that's the long answer for why I have so many stuffed chickens in my Pumpkin+Bear etsy shop! The Halloween and Christmas stuffies are already gone, but here are some other fine, feathered, favorites:

This chicken has polka dots

You can't buy this chicken, because I'm keeping her for myself. I have officially jumped the shark in my own home, but damn it if she doesn't, indeed, make me smile!

This chicken is made of a vintage blue flowered sheet. It's the absolute last bit of the same vintage sheets that I once sewed my girls and I matching outfits from, because I used to be that cool. 

This chicken is made of mottled grey quilting cotton

This chicken is upcycled from brown courderoy that used to be a skirt. The rest of that brown courderoy is part of the couch slipcovers that I'm sewing. 

This is my fancy Independence Day chicken

This is my fancy Valentine's Day chicken

This chicken is sewn from a beautiful batik print leftover from the fabric that I used to sew my bedroom curtains back in our previous house. I wish it was still being made so that I could sew even more curtains from it for our current house!

This chicken is actually a giant tapestry that hangs in my bedroom right now. This is part of the margins that I trimmed away before I mounted it.

This is my other fancy Independence Day chicken!

This is my other fancy Valentine's Day chicken!
 And here are all the chickens looking at you and judging you for what's in your heart:


Hey. If you've got a secret tip for what might be THE hot kitschy craft of the 2019 holiday season, whisper it into my ear--I'd love to finally be in the know for once!