Monday, March 29, 2021

Cooking with Teenagers: Fancy Coffee Drinks

 Sometime during the pandemic, one of my kids became a coffee drinker.

She's a teenager, so it's not, like, "real" coffee, or rather, not anything like the black coffee that I drink out of my French press every morning. Instead, her mid-morning coffee break consists of a carefully crafted beverage that does contain a goodly amount of either instant coffee or cold-brew, but also has so much sugar and milk in it that when she sometimes makes me a cup, too, because she's a generous kid, it tastes exactly like coffee candy in liquid form.

I don't know, you guys. Was I supposed to forbid her coffee until she's all grown up? I feel like maybe I was, but ugh. There is just so much to remember about being a parent! 

Anyway, it's more fun to find fancy coffee drinks on social media and make them with her.

You guys! I know this half-drunk mess in a Mason jar does not look appetizing, but it is that whipped coffee all the...

Posted by Craft Knife on Friday, April 24, 2020

Whipped coffee was definitely our gateway drink.

As much as I have the sinking sensation that I ought to be discouraging my growing child from polluting herself with caffeine, it IS pretty fun to have the love of fancy coffee drinks in common with her, and I do keep an eye out for delicious-looking recipes to try with her.

I mean, I would NEVER go to all the trouble to make myself, alone, a fancy coffee drink, not when black coffee is so quick and easy and gives me that same knot of anxious energy in the pit of my stomach. But when I make a fancy coffee drink with my teenager? Well, that's just us bonding!

Here's the latest recipe that we tried:

@cowlover3000

this is how i make the starbucks brown sugar shaken espresso yes i use a pasta jar for my coffees ##starbucksdrinks ##starbucksrecipes

♬ original sound - robyn

We made it a little too sweet--


--but look how deliciously frothy it got! Definitely going to try the shaken coffee method again:


And look how it encourages the teenager to drink her (free public school) milk! Yay, calcium!


Ooh, this was another really good recipe:

@littlebeancoffee

Reply to @ashleypummel I added peppermint because I’m still in a holiday mood 😍🎄##coffee ##frappuccino ##mocha ##starbucks ##christmas ##fyp

♬ The Girl - City and Colour
I even bought peppermint syrup for this! Syd doesn't always love chocolate, so for hers we used this salted caramel sauce instead of chocolate (and skipped the peppermint, I think? Peppermint and salted caramel don't seem like they'd be friends), although now that I'm thinking of it I bet we could substitute homemade dulce de leche. 

And because I was IN A MOOD, I found a totally different recipe that told me how I could make homemade whipped cream in my cocktail shaker, and then I did it, and then our gorgeous chocolate peppermint/salted caramel coffees were both beautiful AND delicious!


The mess that they made in the kitchen was less so...

But whatever. One thing that I now know about pandemics is that they leave plenty of time for housecleaning!

P.S. If you're doing a better job of keeping your teenagers away from caffeine than I am, I highly recommend DIY hot chocolate bombs as another great cooking with teenagers project!

Saturday, March 27, 2021

How to Frost Glass

This tutorial was originally posted on Crafting a Green World.

Whether you want to upcycle a Mason jar to look like sea glass or alter a window so that it no longer offers a picture-perfect view directly into your bathtub, frosted glass is a beautiful way to make glass opaque while maintaining translucency. 

 Frosted glass is easy to DIY, and there are a ton of different methods to do it. The easiest method, and the one that I'm going to show you here, is as simple as adding a couple of coats of spray paint to a squeaky clean glass surface. Here are my two vintage Coca-Cola bottles before being frosted. One I've left clear, and the other I've already spray painted a color that turned out to be WAY brighter than I wanted. It would be nice if the flower vases didn't outshine the flowers! 

 This is for sure a project for making sure that your spray painting technique is on point--it's very important to hold the spray paint 10-12" from the object you're painting, and to coat it with light, overlapping sprays. Here's the clear glass bottle after one coat of frosted glass spray paint

 You don't have to wait any specific time before you can recoat the object, but it takes about ten minutes for the full frosted glass effect to show up, so don't get too impatient. Here's my bottle after two coats of frosted glass spray paint: 

 As you've gathered, you can use this frosted glass spray paint even on a surface that isn't already clear, but the result won't look like frosted glass. Here's my red bottle after two coats of frosted glass spray paint: 

 I do really like how the frosted glass paint mutes the shine and saturation of this painted surface--it's definitely not a look I'd want for everything, but it's a nice look for a vase for spring flowers. 

Thursday, March 25, 2021

That One Blessed Week of Snow This Year

 Now that we're far enough into spring that writing about snow shouldn't call it back down upon us (it's in the mid-60s and calling for thunderstorms today--it's SPRING!!!), I'm safe to brag about the beautiful week of snow we had this winter!

This winter's Week of Snow was especially precious, because last winter we had none! We didn't make a single snowbeast, or skate outside one single time. There were two full years' of dust on the sleds when Matt brought them down from storage. It was a big, noticeable bummer that year, so we made extra sure we got our snowy memories made this year.

Syd let me take many photos of her in her beat-up pointe shoes in the snow, as well as a few of these still-lifes of her nice, new pointe shoes:


Will, who hasn't stepped skate into an indoor ice rink in over a year, got to skate to her heart's content on a nearby frozen lake:


And then she and I took Luna out for a nice wander on the ice:


Alas, we returned with our coat pockets absolutely stuffed with trash, because not only did the iced-over lake make it manageable to find and remove all of the various tangled fishing lines and lures and hooks from all the branches overhanging the lake, but when we finally stepped back on shore, we discovered that some monstrous evil had staged a... Promposal, perhaps? Or engagement photo shoot?... on the path, and had simply left an absolute zillion fake flower petals just lying there. If you look closely, you can also see whole strings of dead LED lights on both bannisters, but Will convinced me I could leave those for a park ranger to remove, since we'd already spent all of our remaining allotted free time picking faux flower petals out of the snow. 


And for our remaining allotted time with the last of the snow, we finally got to make our snowbeasts!


We even made our very first fort EVER:


It was wonky, fit Matt and Syd together only if they sat up very straight and didn't breathe too deeply, and melted nearly completely overnight when the weather turned, but it perfectly topped off the most perfect winter week we've had in year.

Tuesday, March 23, 2021

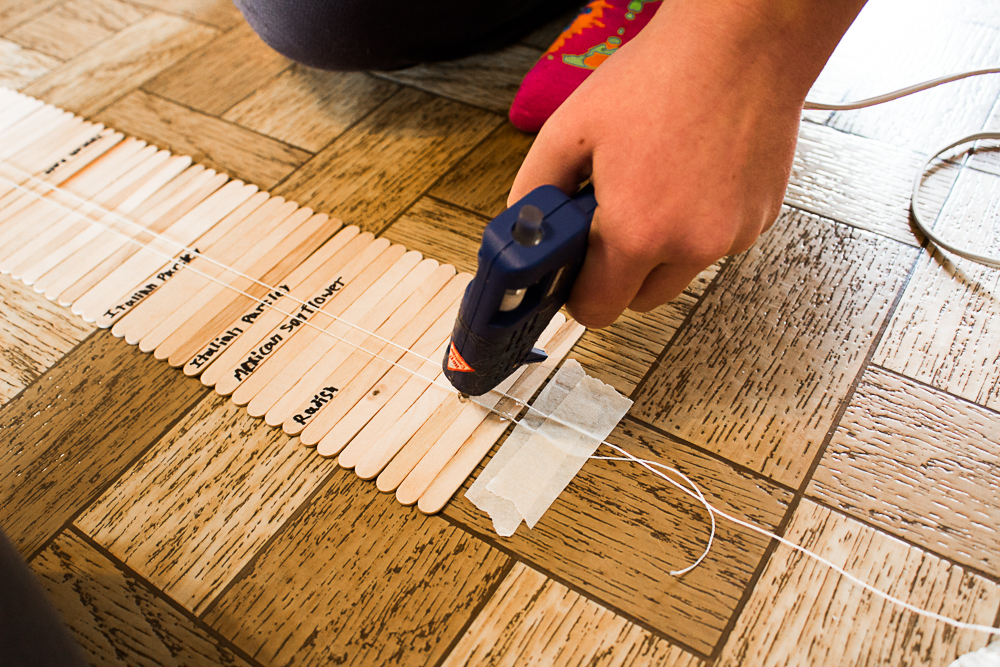
Homeschool STEM: Our Popsicle Stick and Kite String Wave Machine


Because energy travels in waves, and we can prove it!

This DIY popsicle stick and kite string wave machine is one of many hands-on projects that Will and I are doing as part of the spectroscopy chapters in her astronomy study, but we're both completely obsessed with it. It is really fun, and really fascinating to watch. It both soothes and stimulates (if that's possible? Is that possible? It feels possible!) both of our pattern-loving brains, and we can each entertain ourselves endlessly just by flicking a little popsicle stick and watching the energy cascade down the line.

To make our wave machine, Will and I followed this tutorial


I don't exactly know why I randomly always seem to have 1,000+ popsicle sticks just hanging about in the homeschool closet (some clearly leftover from failed seed starting projects of yore), but they do come in handy!


The real fun, though, is in playing with it!


See the wave move, even though each popsicle stick stays glued to its place? That's how all energy moves, whether it's light, sound, or tsunamis. Beyond just that demonstration, though, there's a lot of visual interest in simply playing with and watching the patterns that emerge through various manipulations of the wave machine. That kind of play and exploration builds intrinsic understanding, which is a very real way to build concrete knowledge and skills. As part of Will's AP Human Geography study, we've been thinking about the ancient stick maps of Micronesia. These maps represented not geography as we conventionally think about it now, but instead a model of the waves around the islands, which is also a very real aspect of geography, but one that most people would find it impossible to comprehend, much less use as a navigation tool. It's likely that sensory experience of the ocean waves provided the intrinsic understanding that made it possible to use the waves in such a way. 

It is FASCINATING to see energy travel so concretely, and there's a lot of scope for play and experimentation. I wish I'd made this with the kids when they were young, as I think it would be a picture-perfect hands-on STEM project for upper elementary!

Nevertheless, we have it now, and it hangs in homemade honor from a ceiling hook in our family room. I mean, it's not like we put any effort into tasteful decorating; a popsicle stick wave machine isn't even the oddest homemade thing on display in that room. 

And when it's hanging in easy reach, we can still play with it!

Our wave machine, as I mentioned, was a quick little demo for spectroscopy, but understanding how energy travels in waves is also crucial for some of these other studies:
  • CALDER AND KINETIC SCULPTURE. Mobile-making and kinetic sculptures of all kinds are a great way to explore physics, as well as to add an art history component to a STEM study. Here's a great resource on the physics of mobiles, and an interesting history of kinetic sculptures, with a lot of images for inspiration. 
  • SOUND AND HEARING. Vibration is another word for waves, and there are a lot of fun ways to explore how sound travels through space and how our ears work to sense it and our brains work to process it. Use tangible demonstrations like this one with a speaker and salt, this one in which you measure the distance of a signal, and the DIY wave machine, along with a study of the anatomy of the ear. 
  • TSUNAMIS. Is my kid the only one fascinated by natural disasters? I think we've done deep dives into just about all of them by now! Anyway, use the wave machine along with this TED-Ed video on tsunamis and this DIY diagram of tsunamis to explain the physics behind that particular natural disaster. 
This isn't a comprehensive list, of course--it's literally just what's happening to occur to me from our own studies as I'm writing this--and so I'd love, as always, to hear your ideas and suggestions, too. I LOVE multi-disciplinary connections!

Saturday, March 20, 2021

How to Make a Decoupaged Cardboard Tray

This tutorial was originally published on Crafting a Green World.

Do you have a lot of little bits and bobs that like to clutter up some particular surface in your home? A lip balm, three different remote controls, matchbook, and erasable pen that all want to live on the exact same 12"x18" surface of your nightstand, say? 

 Here's a little pro tip for you: toss all that nonsense in a nice tray, and it's no longer clutter. Because it's CONTAINED! 

 Bonus points if the tray is handmade, and double bonus points if it's handmade from upcycled materials! Tidying up is MUCH more fun if Wolverine is helping! 

 These decoupaged cardboard trays are some of my favorite things to make. Other than the glue, all the supplies come from the recycling bin, but you'd never know it because these trays are as cute as they're handy. The decoupaged paper makes them surprisingly sturdy, and I LOVE being able to embellish them exactly the way I like. You do have to wait for stuff to dry a few different times, but the actual hands-on time for this project is also quite low, making it easy to make multiples or to spend a little extra time to make one crazy-elaborate, fancily perfect tray.

Supplies & Tools

 Here's what YOU need to make your own decoupaged cardboard tray!
  • Corrugated cardboard. Look for pieces that are clean and uncreased. I use Girl Scout cookie cases for EVERYTHING, so that's what's going on here, but I've also spent my pandemic staycation being kind of grossly consumerist, so I can also tell you that Zappos and Amazon boxes work well, too.
  • Cutting and measuring tools. I use a self-healing cutting mat, metal ruler, x-acto knife, and scissors.
  • Hot glue. I've just realized that the hot glue gun I've used for my entire adult life is a low-temp version. What magic can one do with a high-temp glue gun?!?
  • Papers for decoupage. You can decoupage nearly any paper, although for this project since we're partly relying on the paper to add to the tray's strength, you'll want to avoid tissue paper, napkins, or paper products of similar weight.
  • White glue. I use Mod Podge or Elmer's with a little water mixed in.
  • Polyurethane sealant. Look for a water-based, clear sealant

Directions

1. Cut Your Pieces from Corrugated Cardboard


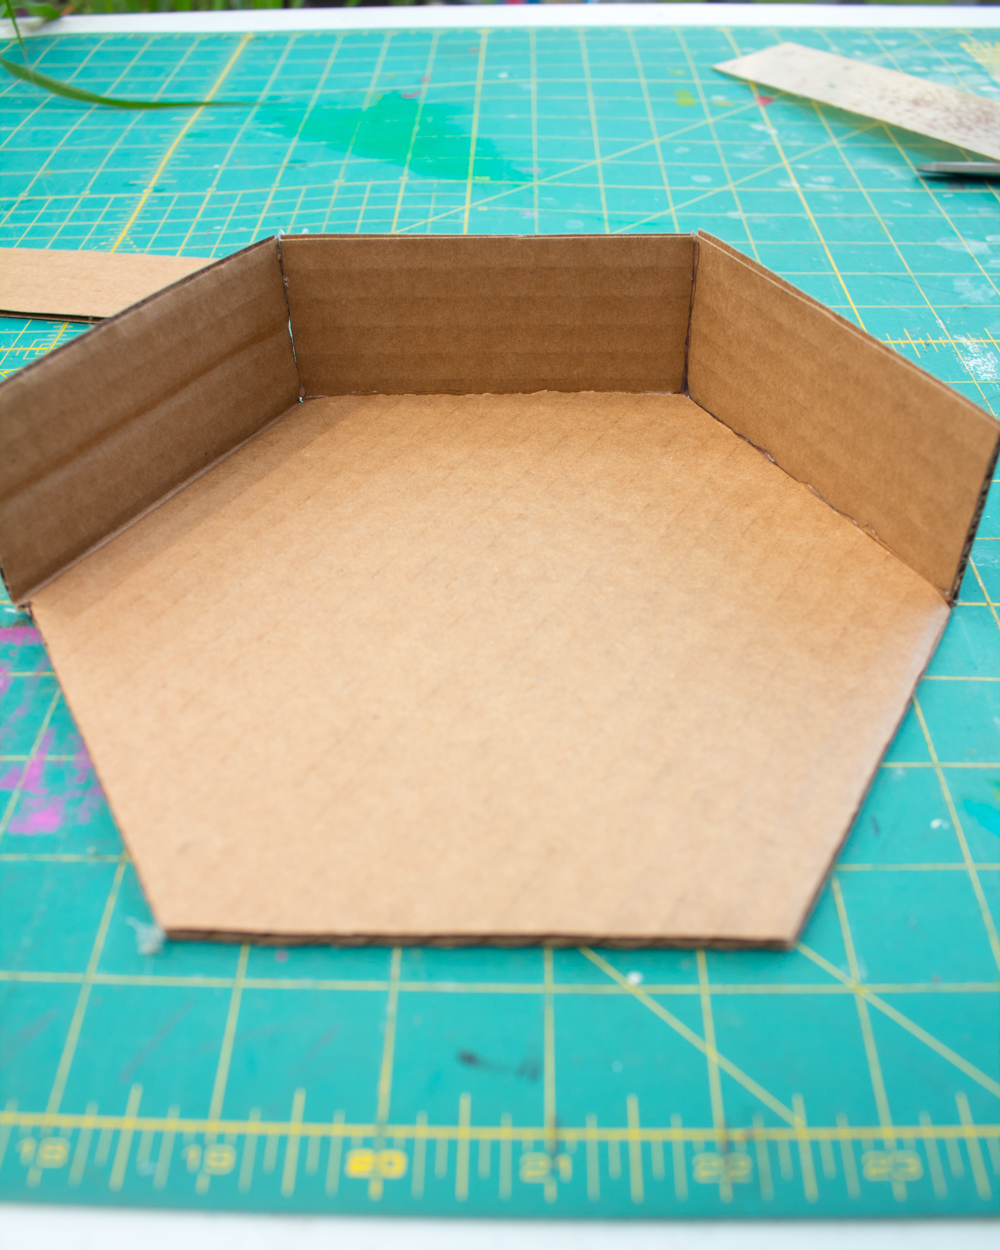
 One of the coolest things about these trays is that you can make them just about any shape, but I'm being kind of lame here and making a simple hexagon-shaped tray, with a 2" rim. Cut your rim pieces to the height that you want the rim to be, but don't bother trying to cut their lengths to match the tray bottom yet; I'll show you a neat trick for that in a minute! If you can cheat like I did, though, and use the natural bend in a cardboard box to cut your tray's bottom with a side already attached, go for it!


2. Cut the Rim Pieces to Size

 
This is SUPER easy to do. Just line up the piece against the side, mark the cutting line, and cut it!

3. Hot Glue All the Sides to the Tray Bottom

 
Corrugated cardboard lives for hot glue, so this is also an easy step. Your hot glue will adhere best if you have the patience to let the glue gun get nice and hot, and if you hold the pieces together for a few seconds after you glue them. 


 Don't worry if you've got a few see-through cracks at the joins, because the decoupage will cover that completely! 


4. Decoupage the Tray

 
This project works best when you cover the cardboard tray completely in glue, then paper, then glue. The easiest way to do this is to treat it like papier-mache; I dip each piece in white glue, squeegee it off with my fingers, apply it to the tray and smooth it down, and repeat with a new piece of paper. It's not a tidy activity, so make sure you don't have too many closed doors between you and the nearest sink! No matter which kind of white glue you used, let the entire tray cure for at least 24 hours before you seal it. It sucks to wait, but you want that tray to be bone dry!

5. Seal the Tray


 Coat the entire tray in 4-5 layers of clear, water-based, polyurethane sealant. I don't generally recommend polyurethane sealant for, say, a solely decorative project, just because it's not eco-friendly, but you're going to get a lot of use out of this tray, and you want it to last. Again, let the tray cure for at least 24 hours after its final coat before you start tossing all your clutter into it.     


I think this cardboard decoupaged tray is an easy way to neaten up any surface in your home. And if you have too much clutter for one tray to hold... 

 ...stack another tray on top of it!

Wednesday, March 17, 2021

30 Ways to Decorate Wood Easter Eggs

 Want to know my hands-down favorite holiday crafting supply?


Unfinished wood Easter eggs!

I first bought wood Easter eggs on a bit of a whim over a dozen years ago, and we have absolutely loved them every year since. We end up embellishing several every Easter, and if we decide we don't like the look of one, we just cover it up with more paint and re-embellish it the next year! 

Because we did more Easter stuff than usual last year (thanks to a global pandemic!), I restocked us this year. Don't get me wrong--we do NOT need more Easter eggs; I mean, least year I hid over a hundred for the kids' egg hunt!--but we enjoy decorating them so much that I can't imagine not having some on hand. 

AND while I was buying just our favorite sizes from Casey's Wood Products (hen eggs with flat bottoms for most of our projects, but a few jumbo eggs for the really special stuff), I saw that they've got a new style of egg this year: basswood eggs suitable for carving!

The kids' woodcarving kit was a hit last Easter, so it's extra fun that this Easter they can use it to carve some of our decorations.

Below is a list of our favorite ways to decorate wood Easter eggs. There are activities for little kids, activities for bigger kids, and activities that are equally fun and lovely for any age. The kids and I have done most of these--some of them we do every year!--but there are also a few that are here because they're on our to-do list. 

  • wood burned Easter egg with watercolor stain. Wood burning is lovely on its own, but it's extra special when combined with a watercolor stain, or careful watercolor painting. Eggs that are wood burned are still quite hardy, but the watercolor stain can bleed if it gets wet, so you'll want to keep it away from most Easter mischief.
  • galaxy eggs. I made a couple of these last year with jumbo wood eggs, and it went exactly the way the tutorial said it should! They're some of my absolute favorite eggs now.
  • Lichtenstein-style painted eggs. I love how this is also sneakily an artist study!
  • yarn-wrapped eggs. A method that completely covers the wood egg is a great way to re-use an egg that had an unfortunate paint or marker job done to it in a previous year.
  • eggshell mosaic egg. I haven't tried this tutorial yet, but I'm really intrigued by it. I think that if I wash the shells well, they should be archivally-safe. I mean, I've got blown-out eggs that I've had on display for years and they're still nice!

  • felted wool Easter egg. If you felt the wool roving directly onto the wood egg you won't be able to remove it, but I think it gives the felted wool egg a pleasingly realistic weight. If you do want to remove the roving, perhaps to make an egg that you can open and shut, put plastic wrap around the wood egg before you felt onto it.
  • hot glue raised embellishments. I tried this a couple of years ago with jumbo wood eggs, and I really love the look of the hot glue! Instead of the silver leaf that this tutorial uses, I spray painted my egg light blue, and then coated it in glitter spray. It looks not at all homemade!
  • pen-and-ink eggs. These are the pens that I also use for rock painting, so it makes sense that they'd work great on Easter eggs!
  • cactus egg. I am going to make a couple of these this year just because I think it'll be funny to perch them in my potted plants for the egg hunt!
  • chalk painted eggs. I'm really curious to try out chalk paint sometime.

  • chalkboard Easter egg. This project is less about the final result than about creating a process-oriented, open-ended Easter activity. Coat a wood Easter egg in a few layers of smooth chalkboard paint, and it can be decorated over and over again! Our favorite supplies for this are chalk pastels and chalk markers.
  • spin art eggs. This is a perfect project for little ones. The heft of the wood eggs makes them work especially well with spin art, and if you offer a kid only two or three color options, they'll be able to enjoy the sensory and process-oriented experience of spin art egg decorating... AND the eggs will still be suitable for display afterwards!
  • bunny and chick painted eggs. These are ridiculously cute.
  • speckled eggs. These are also ridiculously cute, and I'm obsessed with how weirdly realistic they are!
  • unicorn eggs. They're too delicate for an egg hunt, so they can supervise from the table set for Easter dinner.

  • Sharpie-embellished Easter eggs. As you can tell, this is the first method we ever used for decorating our wood eggs. Look at my little Syd baby! She's always been so artistic. In subsequent years, I sometimes first put a white base layer on the eggs to make them look a little more realistic under their Sharpie embellishments. If you pick up some paint pens, you can put any color down as a base layer, because paint pens will show up well on top of anything.
  • coloring page decoupaged eggs. Decoupage of all kinds works especially well with wood Easter eggs. This project is a fun way to upcycle part of a coloring page onto an egg.
  • Mandalorian and Baby Yoda painted eggs. It's my second-year-in-a-row tradition to treat myself to a month of Disney+ after closing out Girl Scout cookie season. There's something about watching Moana every day for 30 days that just washes away all the Girl Scout cookie stress! I LOVE The Mandalorian, too, so I'm stoked to make myself a little Mandalorian Easter egg!
  • book page decoupaged egg. This would be so awesome to do with a beat-up copy of a book that the kids and I have read together. If I can find a Percy Jackson at the very tag-end of its life Syd would be thrilled!
  • acorn eggs. I love how this tutorial uses pinecones and hemp twine to make eggs that look like acorns. Paired with the unfinished wood eggs, it makes for a completely natural project!

  • watercolor-dyed Easter eggs. This is absolutely the easiest method to make some extremely bright and colorful wood Easter eggs! Liquid watercolors are beautiful on their own, but you can also add Sharpie or pain pen embellishments for even more fun.
  • painted babouchka eggs. Painting projects of all kinds work great on wood eggs, so I have a lot of fun and random ones. No reason for me having a babouchka egg other than that I think it's cute!
  • painted animal eggs. I really like the felt and pipe cleaner embellishments that make these animal eggs look even cuter!
  • gold foil eggs. I have been longing for an excuse to play with gold leaf!
  • stained wood eggs. I have no idea why this had not occurred to me at ALL until I saw this tute, but I am seriously about to go drag out all the wood stain I own and try it. This would look really pretty on top of a wood burned egg. 

  • tissue paper-decoupaged Easter eggs. The kids and I didn't know what to expect when we first tried this project, but the result is surprisingly lovely! Tissue paper is so thin that you can actually blend the colors, and the ample application of Mod Podge makes the finished eggs super shiny with colors that have depth and seem slightly translucent.
  • stamped tissue paper-decoupaged eggs. You can get all kinds of cool details by stamping onto tissue paper. If you want to try this, don't use the dyed craft tissue paper that we use for the previous tutorial--that stuff bleeds like crazy!
  • mood eggs. Syd actually has some thermochromic powder leftover from her years-long passion for slime-making. I wonder if the paint would stay working well for multiple years in a row on our wood eggs?
  • painted ice cream egg. Here's another niche but weirdly adorable painted egg project.
  • masking fluid and watercolor eggs. I had never heard of masking fluid before, but Syd likes painting with watercolors, so it might be a useful purchase in general for her--and then I could play with it by making Easter eggs!

P.S. If you know of a good way to decorate a wood Easter egg, please tell me about it in the Comments. I can always use another happily-embellished Easter egg in our stash!

Monday, March 15, 2021

Girl Scout Cookie Recipes: Samoa Cheesecake


In between selling over 1,500 Girl Scout cookies so far this season, Will has been helping me with the other project that I always start to crave at the first of every year: making recipes using Girl Scout cookies!

This Samoa Cheesecake is literally just a traditional cheesecake recipe with a food processor full of Samoa cookies substituted for graham crackers. I think I overbaked the crust and therefore made the caramel in the cookies pretty stiff, but otherwise they were a perfect substitute:

I had intended to top the cheesecake with dried coconut flakes and drizzled caramel, but as you can see, people started digging in before I got to it!

Cheesecake is my favorite dessert, but this is the first time I have ever made it myself--for some reason, I had it in my head that cheesecakes are fiddly and difficult to make, but this cheesecake was super easy! It wasn't too sweet, although next time I'll DEFINITELY add the coconut and caramel, because "too sweet" isn't actually a problematic descriptor for me. The Samoa crust was chewy due to the caramel, and it was VERY yum. 

Want to make more recipes using Girl Scout cookies? A few years ago, I created a whole list of Girl Scout cookie recipes!