Want to know my hands-down favorite holiday crafting supply?
Unfinished wood Easter eggs!
I first bought wood Easter eggs on a bit of a whim over a dozen years ago, and we have absolutely loved them every year since. We end up embellishing several every Easter, and if we decide we don't like the look of one, we just cover it up with more paint and re-embellish it the next year!
Because we did more Easter stuff than usual last year (thanks to a global pandemic!), I restocked us this year. Don't get me wrong--we do NOT need more Easter eggs; I mean, least year I hid over a hundred for the kids' egg hunt!--but we enjoy decorating them so much that I can't imagine not having some on hand.
AND while I was buying just our favorite sizes from Casey's Wood Products (hen eggs with flat bottoms for most of our projects, but a few jumbo eggs for the really special stuff), I saw that they've got a new style of egg this year: basswood eggs suitable for carving!
The kids' woodcarving kit was a hit last Easter, so it's extra fun that this Easter they can use it to carve some of our decorations.
Below is a list of our favorite ways to decorate wood Easter eggs. There are activities for little kids, activities for bigger kids, and activities that are equally fun and lovely for any age. The kids and I have done most of these--some of them we do every year!--but there are also a few that are here because they're on our to-do list.
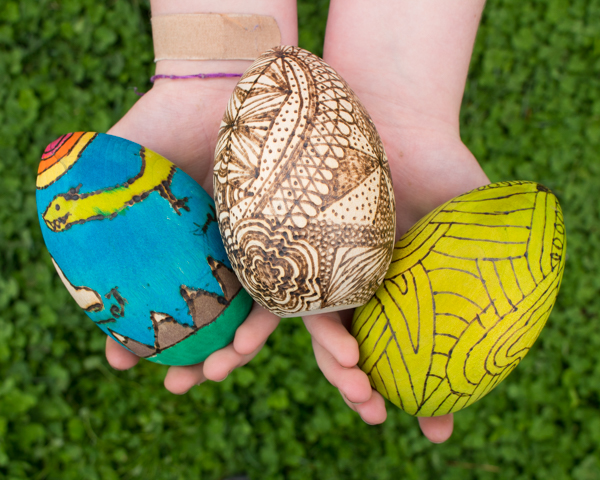
- wood burned Easter egg with watercolor stain. Wood burning is lovely on its own, but it's extra special when combined with a watercolor stain, or careful watercolor painting. Eggs that are wood burned are still quite hardy, but the watercolor stain can bleed if it gets wet, so you'll want to keep it away from most Easter mischief.
- galaxy eggs. I made a couple of these last year with jumbo wood eggs, and it went exactly the way the tutorial said it should! They're some of my absolute favorite eggs now.
- Lichtenstein-style painted eggs. I love how this is also sneakily an artist study!
- yarn-wrapped eggs. A method that completely covers the wood egg is a great way to re-use an egg that had an unfortunate paint or marker job done to it in a previous year.
- eggshell mosaic egg. I haven't tried this tutorial yet, but I'm really intrigued by it. I think that if I wash the shells well, they should be archivally-safe. I mean, I've got blown-out eggs that I've had on display for years and they're still nice!

- felted wool Easter egg. If you felt the wool roving directly onto the wood egg you won't be able to remove it, but I think it gives the felted wool egg a pleasingly realistic weight. If you do want to remove the roving, perhaps to make an egg that you can open and shut, put plastic wrap around the wood egg before you felt onto it.
- hot glue raised embellishments. I tried this a couple of years ago with jumbo wood eggs, and I really love the look of the hot glue! Instead of the silver leaf that this tutorial uses, I spray painted my egg light blue, and then coated it in glitter spray. It looks not at all homemade!
- pen-and-ink eggs. These are the pens that I also use for rock painting, so it makes sense that they'd work great on Easter eggs!
- cactus egg. I am going to make a couple of these this year just because I think it'll be funny to perch them in my potted plants for the egg hunt!
- chalk painted eggs. I'm really curious to try out chalk paint sometime.

- chalkboard Easter egg. This project is less about the final result than about creating a process-oriented, open-ended Easter activity. Coat a wood Easter egg in a few layers of smooth chalkboard paint, and it can be decorated over and over again! Our favorite supplies for this are chalk pastels and chalk markers.
- spin art eggs. This is a perfect project for little ones. The heft of the wood eggs makes them work especially well with spin art, and if you offer a kid only two or three color options, they'll be able to enjoy the sensory and process-oriented experience of spin art egg decorating... AND the eggs will still be suitable for display afterwards!
- bunny and chick painted eggs. These are ridiculously cute.
- speckled eggs. These are also ridiculously cute, and I'm obsessed with how weirdly realistic they are!
- unicorn eggs. They're too delicate for an egg hunt, so they can supervise from the table set for Easter dinner.

- Sharpie-embellished Easter eggs. As you can tell, this is the first method we ever used for decorating our wood eggs. Look at my little Syd baby! She's always been so artistic. In subsequent years, I sometimes first put a white base layer on the eggs to make them look a little more realistic under their Sharpie embellishments. If you pick up some paint pens, you can put any color down as a base layer, because paint pens will show up well on top of anything.
- coloring page decoupaged eggs. Decoupage of all kinds works especially well with wood Easter eggs. This project is a fun way to upcycle part of a coloring page onto an egg.
- Mandalorian and Baby Yoda painted eggs. It's my second-year-in-a-row tradition to treat myself to a month of Disney+ after closing out Girl Scout cookie season. There's something about watching Moana every day for 30 days that just washes away all the Girl Scout cookie stress! I LOVE The Mandalorian, too, so I'm stoked to make myself a little Mandalorian Easter egg!
- book page decoupaged egg. This would be so awesome to do with a beat-up copy of a book that the kids and I have read together. If I can find a Percy Jackson at the very tag-end of its life Syd would be thrilled!
- acorn eggs. I love how this tutorial uses pinecones and hemp twine to make eggs that look like acorns. Paired with the unfinished wood eggs, it makes for a completely natural project!

- watercolor-dyed Easter eggs. This is absolutely the easiest method to make some extremely bright and colorful wood Easter eggs! Liquid watercolors are beautiful on their own, but you can also add Sharpie or pain pen embellishments for even more fun.
- painted babouchka eggs. Painting projects of all kinds work great on wood eggs, so I have a lot of fun and random ones. No reason for me having a babouchka egg other than that I think it's cute!
- painted animal eggs. I really like the felt and pipe cleaner embellishments that make these animal eggs look even cuter!
- gold foil eggs. I have been longing for an excuse to play with gold leaf!
- stained wood eggs. I have no idea why this had not occurred to me at ALL until I saw this tute, but I am seriously about to go drag out all the wood stain I own and try it. This would look really pretty on top of a wood burned egg.

- tissue paper-decoupaged Easter eggs. The kids and I didn't know what to expect when we first tried this project, but the result is surprisingly lovely! Tissue paper is so thin that you can actually blend the colors, and the ample application of Mod Podge makes the finished eggs super shiny with colors that have depth and seem slightly translucent.
- stamped tissue paper-decoupaged eggs. You can get all kinds of cool details by stamping onto tissue paper. If you want to try this, don't use the dyed craft tissue paper that we use for the previous tutorial--that stuff bleeds like crazy!
- mood eggs. Syd actually has some thermochromic powder leftover from her years-long passion for slime-making. I wonder if the paint would stay working well for multiple years in a row on our wood eggs?
- painted ice cream egg. Here's another niche but weirdly adorable painted egg project.
- masking fluid and watercolor eggs. I had never heard of masking fluid before, but Syd likes painting with watercolors, so it might be a useful purchase in general for her--and then I could play with it by making Easter eggs!
P.S. If you know of a good way to decorate a wood Easter egg, please tell me about it in the Comments. I can always use another happily-embellished Easter egg in our stash!
No comments:
Post a Comment