Showing posts with label comic books. Show all posts

Friday, September 5, 2025

How to Make a Comic Book Bookmark

I originally wrote this tutorial for Crafting a Green World way back in 2017.

Don’t you dare dog-ear that book! That’s what bad people do.

To make it even easier to not deface great works of literature, you can make yourself a set of bookmarks out of my *other* favorite genre of reading, the comic bookComic books or any other upcycled papers, are easy to turn into sturdy, fun, useful bookmarks. Here’s how:

1. Source some comic books. My local comic book shop has a back room full of comic books that are a quarter each. There are no diamonds to be found in this rough, you can be sure, but it’s pretty easy to find a bad comic book featuring your favorite characters (you can’t tell how 70s corny Tony Stark is drawn if he’s in his Iron Man suit!), or a comic book so awful that it’s awesome again (those dinosaur mercenaries *might* have seemed cool to kids, but they also dated strippers, soooo… yeah) there. 

Another great place to find comic books is any garage sale, anywhere, and that’s also where you can find other great books that would also make good bookmarks. Seriously, wouldn’t you love a bookmark made from a page from Sweet Valley High? Or that Harry Potter with its cover ripped off? It needs to be made into bookmarks!

2. Fussy cut bookmark fronts. On a piece of scratch cardboard, draw a simple rectangle that’s about 2″x6″. Cut it out, round the corners if you’d like, and use it as a template to trace and cut out bookmark fronts.

Cut outside the lines of the bookmark fronts, and you’ll be able to neatly trim them after they’re attached to the bookmark backs.

3. Adhere the bookmark fronts to cardstock backs. The quickest, easiest method is to stick the bookmark fronts to adhesive-backed cardstock, then cut inside the lines of the bookmark to cut out the complete bookmark, front and back together.

You’ll have more options for cardstock, however, if you use glue or adhesive spray. You could use the cardboard from cereal boxes or other food packaging, record album covers, file folders, or anything with cardstock consistency that will give the needed sturdiness to the paper bookmark fronts.

Once the fronts and backs of the bookmarks are attached, and you’ve given enough time, if needed, for any adhesive to dry, cut just inside the lines of the bookmark front to neatly trim both front and back together.

4. Add a tassel. Use a hole punch with a small diameter to punch a hole in the top center of the bookmark, then add a tassel. Options for the tassel include embroidery floss, yarn, twine, necklace chains, or strips cut from T-shirts or plastic grocery bags.

No matter the material you use, cut it to twice the length of the bookmark, thread it through the hole, then double knot it at the top of the bookmark. Pieces such as embroidery floss or yarn will also need to be knotted at the other end to keep them from unraveling.

5. Seal the front? Maybe! If you’re worried about the fact that your bookmark front is likely made from a non-archival material, you may choose to seal it. I wouldn’t worry about it too much, though.

I think it’s better to have too many bookmarks rather than too few, so make as many of these bookmarks as you’d like, and to get buy-in from the kids, be sure to make some bookmarks out of their favorite things, too–that’s how our bookmark collection now includes Harry Potter, Thor and Iron Man, Garfield, G.I. Joe, Sherlock Holmes, and Spider-man.

And I'm always on the lookout for a super beat-up copy of The Hunger Games, if you've got one!

P.S. Want to follow along with my craft projects, books I'm reading, road trips to weird old cemeteries, looming mid-life crisis, and other various adventures on the daily? Find me on my Craft Knife Facebook page!

Monday, August 2, 2021

We Left the Kids at Home and Went to Chicago: Day 3 at the Museum of Science and Industry

I know I said that I vowed to myself that I wouldn't spend my entire time in Chicago in museums (again), but I can't travel someplace with awesome museums and go to none of them!

Matt and I really like Marvel stuff, comics, and costumes, so we were stoked to go to the traveling Marvel exhibit in the Museum of Science and Industry. It was especially apropos since our hotel's TV had randomly been playing a constant stream of Avengers movies on two different channels the entire time we were there--like, if you wanted to turn off one movie because you hate the sad part with Bucky, you could just turn to the other channel with a different movie and enjoy the antics of Thor for a while.

Here are a billion photos of exhibit!

first Marvel comic

Here are the interior pages of the first Marvel comic, including Namor's origin. I LOVE the Sub-Mariner, firstly because I love to pronounce his name wrong, and secondly because his inconsistent plotlines over the decades have turned him into a chaos goblin. When you encounter him, is he going to try to genocide you for the good of the ocean or invite you to his underwater palace to marry him? 


Matt had to be cajoled into taking this photo, but the dudes in line right behind us did the exact same pose so see, it's NOT weird!

Fantastic Four #1

Here's some original cover art. I really like the way that additions were literally pasted onto the page.

Sometimes those additions are ripped from the headlines!

And they got the quote right! I wonder when popular media began to incorrectly quote Armstrong, because it was definitely said the wrong way when I was a kid.

Some more original art. You know how much I love Captain America!

test artwork for Into the Spider-Verse

This is the first Spider-Man cover. They had a really cool display contrasting it with the original cover art, which is very different, and the critiques of Spider-Man's posture in that art that caused the changes.

cover art by Todd McFarlane, who Matt really likes

I, meanwhile, had NO PROBLEM doing the upside-down Spider-Man kiss pose, even though I look like an ass.


This costume was really cool. The sign said that all the little bumps on it were 3D-printed, but it didn't say if the signs of wear were intentional or resulted from literal wear-and-tear during filming. I'm so curious!

Winter Soldier costume! Thanks to the museum lighting plus my phone's camera, I can't get the tone right here. Bucky wears BLACK techwear, not grey!

I'm obsessed with the Bucky/Captain American plotline in the films. I hadn't read any Captain America comics before I watched the first Captain America movie, and I kind of suspect that Matt kept any comic-related spoilers away from me on purpose, because I got SO sucked in! 

I mean, I possibly got sucked in because I kept waiting for Steve and Bucky to kiss at any moment, but whatever. 

Like, I was biting my nails during all the World War 2 fighting scenes, and then Bucky! DIED!!!!! WTF?!?!?!? And Steve was so grief-stricken that he flew a literal plane into the literal ocean! OMG!!! But then he didn't even get to die and be reunited with his One True Love in the afterlife, because he got defrosted a billion years/three days later, and basically sent right back to the fighting that he'd just tried to escape from out of grief! And he's all trying to cope with a whole new world where everything looks different and smells different and tastes different and nothing is familiar and everyone he loves is gone, at the same time as people are, like... making fun of him for it? Like, "Ha, ha! The style of clothes you feel safe and comfortable in aren't stylish anymore! The music that calms you and feels familiar is gross! Go fight some aliens!"

So Steve adapts, because at this point he's pretty much learned that even death isn't an escape, and attempts to move on with his life even while being surveilled and used as a weapon and forced to continue with the dancing monkey act. Did anyone even ask if he maybe wanted to retire and go to art school? Get this guy some GI Bill! And a therapist who's not secretly Hydra!

Anyway, so Matt and I are in the theater watching Steve's Depressing Life 2.0, when up jumps the Big Baddie, the Winter Soldier. And there's a super great chase scene, and some awesome fighting, and the Winter Soldier is all decked out in black techwear head to toe except for his silver Soviet arm and his hair falling in his face. Somebody find this guy a ponytail ring. I'm super into it. 

So in this particular scene that I will never forget until the second I die--like, I will probably be contentedly playing it in my head AS I die--the Winter Soldier is fighting Steve, who's wearing literal khakis and a plain shirt and a kind of windbreaker thing exactly like my Pappa, and Steve's just doggedly fighting on, as he represses all his emotions from his entire life ALSO just like my Pappa.

They're fist-fighting. The Winter Soldier's got a knife. It is GREAT. I am having an amazing time.

We're all up close in the fight, and they're punching each other hard and the Winter Soldier keeps just barely almost knifing Steve in the face and they're tossing each other around, etc. And then Steve throws the Winter Soldier, who hits the pavement and rolls, and in the process his mask gets knocked off and is just lying there on the street. So when the Winter Soldier turns around to face Steve again, we can finally see his face.

And Steve stops, stunned, and is all, "Bucky?"

And from the middle of the packed theater, surrounded by a crowd of strangers, I'm all, "BUCKY?!?!?!?" with my fists to my mouth and my brain on pause and Matt snickering in the seat next to me. It is the absolute only time in my life that I have ever been sucker-punched by a movie twist like that. History's greatest moment of cinema, in my opinion. 

Not gonna lie, though: they really missed out by not staging a display that mimicked the Smithsonian Captain America uniform display in the movie.

Also this reminds me of the Marvel Zombies comics.

Mark 1 from Iron Man


Loki! Don't spoil me for the Disney+ series, because I haven't seen it yet. 

That's me, just trying to fit the reflection of my head into Loki's helmet!

Original cover art for the Vision's first comic appearance. I DID watch WandaVision on Disney+, and I'd be happy to natter on endlessly about it with you!

Mock-ups for the credit sequence in the Winter Soldier movie.

costume for Luke Cage, whose show I have not seen, but I like the idea of creating rips/holes in a hoodie this way. Perhaps with another fabric reverse appliqued underneath?

Eye of Agamotto from the Dr. Strange movie


Wolverine #1


Groot is so realistic!


I really love all the details on his jacket. Those pins!

Check out all the lines of stitching. That's a really interesting way to embellish something, and I'm going to try it!

After Marveling ourselves out, Matt and I checked out the rest of the Museum of Science and Industry--


--and then drove four hours back home to the kiddos. Syd had planned to make us a special lasagna soup as a homecoming dinner, but we all realized around Indianapolis, when she texted me asking where the ground beef was, and I replied that it was in the... wait, where was it?!?... that Kroger hadn't given us the ground beef that we'd paid for in our ClickList order (and that's how I learned the basic skill of actually double-checking your pick-up receipt when you get home from the grocery store!), so we picked up a pizza instead.

Syd made us lasagna soup the next day, don't worry. Tastes just like lasagna in a bowl, 10/10, highly recommend.

Saturday, March 20, 2021

How to Make a Decoupaged Cardboard Tray

This tutorial was originally published on Crafting a Green World.

Do you have a lot of little bits and bobs that like to clutter up some particular surface in your home? A lip balm, three different remote controls, matchbook, and erasable pen that all want to live on the exact same 12"x18" surface of your nightstand, say? 

 Here's a little pro tip for you: toss all that nonsense in a nice tray, and it's no longer clutter. Because it's CONTAINED! 

 Bonus points if the tray is handmade, and double bonus points if it's handmade from upcycled materials! Tidying up is MUCH more fun if Wolverine is helping! 

 These decoupaged cardboard trays are some of my favorite things to make. Other than the glue, all the supplies come from the recycling bin, but you'd never know it because these trays are as cute as they're handy. The decoupaged paper makes them surprisingly sturdy, and I LOVE being able to embellish them exactly the way I like. You do have to wait for stuff to dry a few different times, but the actual hands-on time for this project is also quite low, making it easy to make multiples or to spend a little extra time to make one crazy-elaborate, fancily perfect tray.

Supplies & Tools

 Here's what YOU need to make your own decoupaged cardboard tray!
  • Corrugated cardboard. Look for pieces that are clean and uncreased. I use Girl Scout cookie cases for EVERYTHING, so that's what's going on here, but I've also spent my pandemic staycation being kind of grossly consumerist, so I can also tell you that Zappos and Amazon boxes work well, too.
  • Cutting and measuring tools. I use a self-healing cutting mat, metal ruler, x-acto knife, and scissors.
  • Hot glue. I've just realized that the hot glue gun I've used for my entire adult life is a low-temp version. What magic can one do with a high-temp glue gun?!?
  • Papers for decoupage. You can decoupage nearly any paper, although for this project since we're partly relying on the paper to add to the tray's strength, you'll want to avoid tissue paper, napkins, or paper products of similar weight.
  • White glue. I use Mod Podge or Elmer's with a little water mixed in.
  • Polyurethane sealant. Look for a water-based, clear sealant

Directions

1. Cut Your Pieces from Corrugated Cardboard


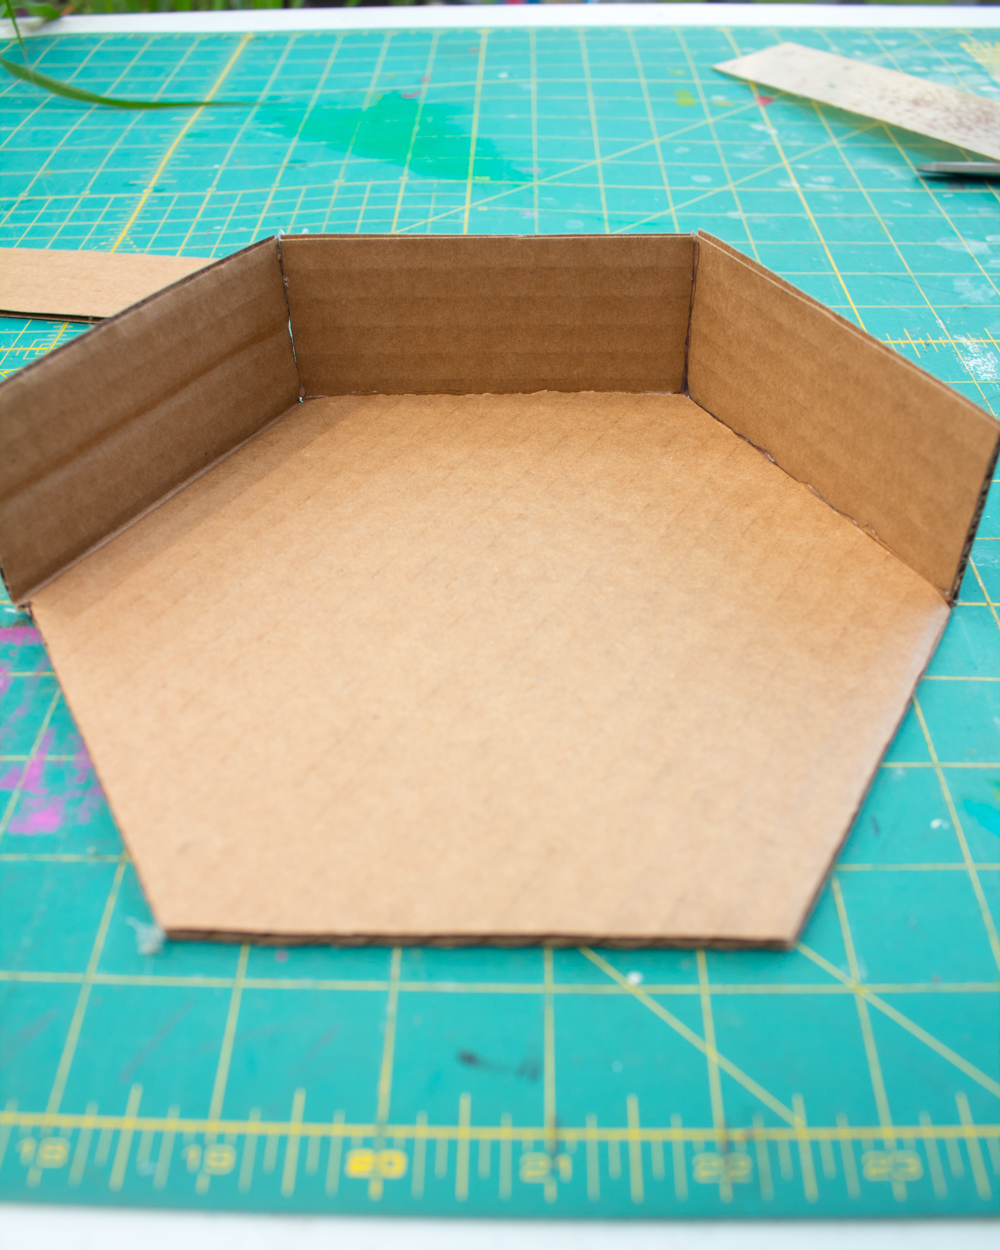
 One of the coolest things about these trays is that you can make them just about any shape, but I'm being kind of lame here and making a simple hexagon-shaped tray, with a 2" rim. Cut your rim pieces to the height that you want the rim to be, but don't bother trying to cut their lengths to match the tray bottom yet; I'll show you a neat trick for that in a minute! If you can cheat like I did, though, and use the natural bend in a cardboard box to cut your tray's bottom with a side already attached, go for it!


2. Cut the Rim Pieces to Size

 
This is SUPER easy to do. Just line up the piece against the side, mark the cutting line, and cut it!

3. Hot Glue All the Sides to the Tray Bottom

 
Corrugated cardboard lives for hot glue, so this is also an easy step. Your hot glue will adhere best if you have the patience to let the glue gun get nice and hot, and if you hold the pieces together for a few seconds after you glue them. 


 Don't worry if you've got a few see-through cracks at the joins, because the decoupage will cover that completely! 


4. Decoupage the Tray

 
This project works best when you cover the cardboard tray completely in glue, then paper, then glue. The easiest way to do this is to treat it like papier-mache; I dip each piece in white glue, squeegee it off with my fingers, apply it to the tray and smooth it down, and repeat with a new piece of paper. It's not a tidy activity, so make sure you don't have too many closed doors between you and the nearest sink! No matter which kind of white glue you used, let the entire tray cure for at least 24 hours before you seal it. It sucks to wait, but you want that tray to be bone dry!

5. Seal the Tray


 Coat the entire tray in 4-5 layers of clear, water-based, polyurethane sealant. I don't generally recommend polyurethane sealant for, say, a solely decorative project, just because it's not eco-friendly, but you're going to get a lot of use out of this tray, and you want it to last. Again, let the tray cure for at least 24 hours after its final coat before you start tossing all your clutter into it.     


I think this cardboard decoupaged tray is an easy way to neaten up any surface in your home. And if you have too much clutter for one tray to hold... 

 ...stack another tray on top of it!