Showing posts with label crafting. Show all posts

Saturday, July 31, 2021

How to Sew an Upcycled Denim Skirt from Your Old Blue Jeans

This tutorial was originally published on Crafting a Green World in 2017.

 If you sew, and especially if you love to upcycle, the upcycled denim skirt is a rite of passage. Here's how to make one! 

 You will need: 

  well-fitting pair of blue jeans. Maybe they have holes in the knees that you don't want to patch. Maybe they're too short, and you don't want to sew on a cuff or a ruffle. Whatever the reason for converting them into a skirt, they should fit well in the waist. 

  thread and sewing needle for denim. I like using the extra-strong thread made especially for denim, and you'll need an extra-sharp needle for your sewing machine

  decorative fabric scrap (optional). You can piece together the front and back panels of your skirt using the legs from your jeans, but it's also possible, as I did in the photo above, to use a contrasting fabric. Flannel is a good choice to better match the weight of the denim, but anything will work.

  double-fold bias tape (optional). In the image above, you'll also see that I bound the bottom hem with scrap bias tape. It's optional, as you can also simply hem the bottom. 

 1. Measure and cut off the legs of your jeans. Measure from your waist to your desired hemline, then add a couple of inches for hem allowance and shaping. Place your jeans flat onto a cutting mat (iron them first if you need to), with the front and back waistband aligned and the crotch seam centered. See the image above for what that should look like. Cut the legs of the jeans straight across at your measurement, and set them aside for later. 

 2. Pick apart the inseam. You can use a seam ripper for this step, but I actually prefer a sharp pair of thread scissors. Either way, don't be surprised if it makes your hands sore--this step can be a lot of work! 

 3. Sew up the crotch overlap. Iron the jeans again, flattening them and adjusting them so that the outside leg seams are straight. This should shape the jeans into a natural A-line, but there should also be a triangle-shaped flap of fabric at the crotch that you'll have to overlap. You can pick apart the seam there to overlap it more smoothly, but with these thin, child-sized jeans, I just folded the flap over, pinned, then sewed it down. Here's what it looks like from the inside, with contrasting thread so you can see it: 

 Repeat for the back side of the jeans. 

  4. Add a panel of fabric to the front and back. Again shape and flatten the jeans as you did in step 3, then place a panel of fabric behind the legs, to cover the large, triangular-shaped hole in the front of the jeans. Pin it in place-- 

 --then sew around the raw edges of the jeans legs. Turn the jeans inside out and cut away the excess fabric on the outside of that stitching line. The visible raw edges of the jeans legs will fray slightly with washing, but won't fray past your stitching line. It'll look pretty! 

 Repeat for the other side of the jeans.

  5. Shape the skirt. Once again flatten, shape, and align your denim skirt on top of a cutting mat. Use a piece of chalk to shape the bottom edge of the skirt into a more pleasing curve, then trim it to that shape. 

  6. Hem or bind the bottom edge of the skirt. There are a few ways to do this. If your skirt is all denim, you can again stitch around the bottom hem, leaving it to fray up to but not past that stitching line. If you prefer a neat edge, you can fold the entire bottom edge up to the back twice, then sew it to make a traditional hem. 

 I got my daughter's approval to use up a couple of leftover pieces of bias tape to bind around the bottom of the skirt. She likes the extra pop of color, and I think that a bias tape hem is easier to do than folding denim over twice and trying to sew it. 

 Once you've got this method down, you'll find that there are a lot of fun ways to alter, embellish, and otherwise play with this simple design.

Saturday, July 10, 2021

How to Upcycle a Coloring Book Page into a Bookmark

This tutorial was originally published on Crafting a Green World in 2017.

Need another idea for how to upcycle a coloring book page? Here's how to turn it into a sturdy bookmark, the easy way! 

 My kids and I love coloring books, as I'm sure you can tell from all of the tutorials that I post on ways to upcycle coloring book pages. Well, here's one more for you! 

 This coloring book page bookmark looks especially nice when made from one of those adult coloring book pages with lots of patterns, or when fussy cut to pick out an extra-cute detail from a larger coloring book page. It's also a good way to upcycle a coloring book page that the artist has abandoned partway through--you know they NEVER go back to finish those old pages. 

 If you use a page that's colored by a kid, these also make great little handmade gifts to family and friends. When going through the latest stack of finished coloring pages, for instance, I found a couple of springtime pages that will look great made into bookmarks and tucked into Easter cards for the grandparents. Want to try it out for yourself? Read on! 

 You will need: 

  coloring page. You can use anything that you want for this, although remember that coloring books made from cheap paper are NOT acid-free. They're fine for short-term use in a book, but you wouldn't want to put one of those bookmarks in a book and then forget about it for twenty years. 

Many adult coloring books advertise that they use acid-free paper, however, and because I have two kids, we have a family rule that if you want to color something from a "nice" coloring book, you have to photocopy it first. This increases the playability of the coloring book, makes for a more satisfying coloring experience, as the kids usually choose to copy their page onto cardstock so that they can use permanent markers or our artist-quality colored pencils, and generally means that the finished product will be acid-free. 

  backing material. Again, you've got a lot of choice in this. You want a sturdy back to your bookmark, because wishy-washy bendy bookmarks SUCK, and also because your coloring book page probably has another drawing on the back or bleed-through from the front. My favorite backing material is adhesive card stock, although you'll see that I use duct tape for a couple of the bookmarks below. Other options include any sort of card-weight paper and your own adhesive. 

  hole punch and embroidery floss or yarn. This adds the perfect last detail to your bookmark. Feel free to also add beads! 
 1. Back and fussy cut the bookmark. I like to apply my backing paper first, even though it does make the placement less accurate.

Applying the backing first, though, makes the bookmark easier to trim without getting adhesive onto your scissors. 

Cut the bookmark to shape and then add the backing and THEN trim, however, if fussy cutting the absolutely perfect bookmark is your highest priority. 

  2. Hole punch and add yarn or embroidery floss. I like to use double the length of my bookmark in embroidery floss. I knot it at the bookmark, then knot each of the threads near the end to prevent unraveling. You can use several pieces of embroidery floss at one time, if you want. It makes the bookmark look even nicer!

Saturday, July 3, 2021

Turn a Coloring Book Page into a Postcard

This tutorial was originally published on Crafting a Green World in 2017. 


 Drowning in cute, completed coloring book pages? Here's a fun way to give those pages another life while spreading some joy around. All you need to transform your coloring book pages into fun postcards are: 

  completed coloring book pages. As I've probably mentioned before, we photocopy all of our coloring book pages onto cardstock before we color them, but I've also made a postcard out of a vintage Archie comic book page, at the bottom of the pic, so that you can see how this method will work even with thin, cheap paper. 

  cardboard/thick card stock and adhesive. Adhesive-backed cardstock makes this job even quicker and easier, but almost all of it that you'll find has a texture that means you'll have to write your postcards using ballpoint pen. If you want to use your own cardstock or cardboard, choose a thin, even adhesive for this. I have an emergency can of spray mount (which is not eco-friendly) that I try to whip out only when it's absolutely necessary, but you can use regular glue, if you apply it lightly then press the postcard between pieces of waxed paper with a weight on top. 

 The only thing that you need to do to turn your coloring book pages into postcards is apply an adhesive backing (I do this first, making sure to cover a larger dimension than I'll want, so that I don't have to painstakingly match two perfectly-sized pieces afterwards), then fussy cut your postcard to the correct dimensions. There's even a little wiggle room in postcard dimensions, so you can be sure to capture the perfect part of your graphic. 

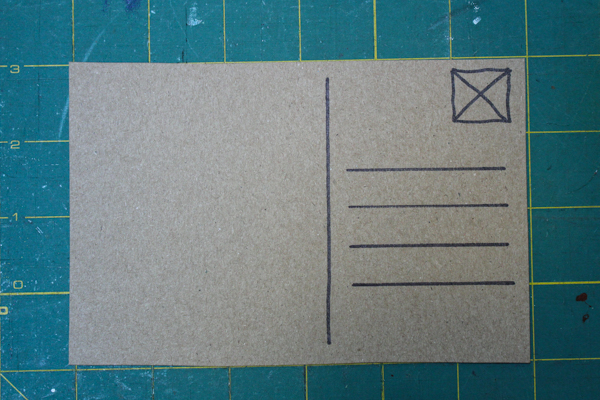
 If my kids are going to be using the postcard, I'll flip the finished postcard over and then, with a ruler and a pen, draw the line separating the address from the message, and the lines for the address. Sometimes I'll even ink in a little square for the stamp. If I don't do this, the kids will be sure to run over the space for the address, and it sucks. 

 These quick-and-easy little postcards are especially nice for sending to loved ones who will appreciate your beautiful artwork--I like to build up a stash,  then let my kids use them for thank-you notes and quick messages to grandparents.

Saturday, June 26, 2021

How to Make Postcards from Food Packaging

This tutorial was originally published on Crafting a Green World in 2017.

Save those empty cookie and cake mix boxes! Here's how to make postcards from your empty food boxes. Ones that you can really mail! 

 If you thought that my DIY coloring postcards were easy, then you're in for an even bigger treat, because postcards made from food packaging? Kind of the easiest thing EVER. Seriously, you don't even need a tutorial for this business. All you have to do is grab yourself some cardboard food packaging, the dorkier the better (check out my Funfetti, Friends! I can't tell my daughter no!).

How to Make Postcards from Food Packaging

Cut the postcard to any of the dimensions allowable in the USPS postcard regulations. These regulations call for a postcard height between 3.5" and 4.25", and a length between 5" and 6". Cardboard food packaging already meets the USPS regulations for postcard thickness. 

 As long as your postcard stays within these allowable dimensions, you can play a bit with the edges. I like to round the corners (although if you don't have a corner rounder, which is, I admit, a kind of ridiculous tool to own, it can be tricky to get these rounded corners to look completely even). You can also very lightly scallop the edges of your postcard (check out this postcard of the Grand Canyon to see what that looks like), although be sure that you stay within the allowable dimensions. 


I like to draw a line separating the message of the postcard from the space for the address, and sometimes I like to also draw guidelines for the address and a square for the stamp, just to make it look more balanced. If you have Sharpies or paint pens, you could also embellish the front of your postcard--doesn't Tony the Tiger want to wear a golden crown on his head? 

Saturday, June 5, 2021

The Easiest DIY Newspaper Seed Starting Pots

This tutorial was originally published on Crafting a Green World in 2017.

Seriously, y'all, these are the easiest seed starting pots on the planet. There's no origami involved. No fancy tools. Heck, making these seed starting pots is even easier than opening the packaging on store-bought seed starting supplies! 

 I LOVE these DIY newspaper seed starting pots, because you can make them as-needed, and there's no waste-you plant your sprouted seedlings right in this pot, which decomposes to enrich the soil and allow your baby plant's roots to spread. No trauma to the babies, nothing to carry to the trash bin--it's a double win!

DIY Newspaper Seed Starting Pots


All you need are: 

  newspaper. If you don't take the newspaper yourself, just ask around. A single day's paper is enough to give you plenty of pots to start out with. 
  beer bottle. A hardship to obtain, I know. If you don't have one, I know for a fact that you have something similar on hand. Check your pantry. Check your fridge. I know you can do this! 
  plant markers (optional). You can write the name of the plant directly onto the newspaper pot with Sharpie, and the writing will last long enough for you to get the pot into the ground, but I paid my kid a penny a pop to write me a bunch of plant markers onto popsicle sticks, and you know what? Those work just as well as the cuter plant markers. 

 1. Rip your newspaper right down the middle. Don't use the ad flyers, and don't use the Sunday comics (because you're saving those for wrapping paper, right?). But all the other sections? Just go ahead and rip them all right down the middle. 


 2. Wrap a strip of newspaper around your beer bottle. You want about two inches of of the strip to hang off of the bottom of the bottle, so I find that lining the top of the strip up along the top edge of the beer bottle's label works well. Keep wrapping the strip around the bottle until it's all wrapped up--you'll overlap it on the bottle a few times, which will make your pot stronger. 

 3. Fold in the bottom of the newspaper cylinder. Neatly fold it up against the base of the bottle, all the way around. 


  4. Slide the newspaper seed starting pot off of the beer bottle. When it's free, give the bottom fold a good crease all the way around. Once you set it in a tray and fill it with damp soil, it will learn to keep that fold, and by the time you're ready to plant, you may have to rip it or snip it with scissors to open the bottom back up. 

 These newspaper seed starting pots don't last forever, obviously, what with staying damp and being filled with dirt, but they will last for more than long enough to grow your plants from seed to good, sturdy plant start. If you set them in a tray, you'll also be able to gently water them by putting water only in the tray and letting the newspaper wick the water up to the rest of the pot.

Saturday, February 20, 2021

Woodburned Easter Eggs with Watercolor Stain

This tutorial was originally published on Crafting a Green World in 2017.

 A great way to avoid buying plastic Easter eggs is to make your own stash of eco-friendly Easter eggs that you can re-use year after year, or embellish store-bought Easter eggs made with natural materials, such as wood, ceramic, or papier mache. 

 We've done all of the above, including making DIY papier mache Easter eggs and wool felted Easter eggs, but I enjoy adding to our stash every year--for one thing, I've got two kids to whom I'm hoping to pass down our beautiful handmade eggs, so I need a good stash, and for another, I'm never quite sure that we get *every* single egg back from every single Easter egg hunt... 

 One of the easiest ways to have a beautiful stash of heirloom Easter eggs is to buy wooden eggs and then embellish them. To wood burn and stain them, you'll need just the following: 

  wooden Easter eggs. I'm a HUGE fan of Casey's Wood Products, and I've purchased a ridiculous number of wooden objects from them over the past several years, including pretty much every size of wooden egg. I look for the items made in Maine, and of second-quality. 

  wood burner. I own this one, and although I don't love it, the price was certainly right, and it's worked for me for probably six years by now, so I certainly don't have much to complain about. I really want these alphabet brands that you can use with a wood burner, and if they fit mine, then that would certainly raise my opinion of it! 

  watercolors. Use liquid watercolors if you're wanting to stain the wood, and any watercolors if you're wanting to paint on details. The method itself is super easy, and a great family activity. 

1. Draw your design in pencil. This is something the the whole family can do while sitting around the table together. Add in some music or an audiobook and you've got the perfect hour before bedtime in my family! 

My kids prefer to draw scenes onto their eggs (I have one kid who draws dragons on everything, including every holiday decoration for the past three years), but I think these eggs look really interesting with little designs and patterns,  zentangle-style, done all over them. I especially like it because it's something that you simply can't do with most eggs, so it adds to their interest and appeal.

 You might want to watch against penciling in too many tiny details, as you'll soon be wood burning them, but I've actually found that my wood burner can get quite a bit of detail if I use a light touch. 

 2. Wood burn your design into the egg. If you're wood burning noobs, you can designate a "practice egg" for yourself so that you can play around with the wood burner and get a feel for it. It doesn't really work to use any old scrap of wood for practice, because the wood burner will burn each type of wood differently. 

 My kids have been using the wood burner since they were both pretty small; they still don't totally have the hand for it--they tend to press too hard and have a lot of stop-and-starts--but they're quite capable of doing it, and they love it. 

  3. Embellish with watercolor. If you're looking to stain your egg all over, you can do it with any color of liquid watercolor--my tutorial for that is here

If you want to paint details onto your egg, you can do that with any watercolors and a small paintbrush. Manage your expectations by realizing that the watercolor will flow along the grain of the wood, often unexpectedly, so don't expect rigid lines demarcations except where you've wood burned. 

  Optional: Seal the completed Easter egg. Oh, my gosh, y'all, I get so many questions about this! People really, really, REALLY want a non-toxic, eco-friendly, food-grade wood sealant that will stand up to a kid putting a stained and sealed toy into her mouth. 

I am sitting right here and killing that dream for you. Your sealant can be non-toxic, eco-friendly, and food-grade, OR it can stand up to a kid putting it into her mouth. If your kid is still putting her toys in her mouth, just... don't stain it those beautiful watercolor colors until she's older. If a kid mouthing your Easter eggs is not a concern for you--and if you're head-scratching right now, I promise you that it's such a concern for SO many people that I had to write it first--then check out the following options for sealing your wooden Easter egg. 

  1. Don't seal it. It doesn't really need it if it's just coming out to play around Easter time. 

  2. Use this homemade beeswax wood polishTest it on your practice egg first. I, personally, don't love sealing stuff with beeswax polish, but a lot of people do, so there you go. 

  3. Use a polyurethane alternative. Here are a few to play with

  4. Use a non-eco-friendly product. I know, I know, but it's my personal philosophy that if we use eco-friendly products whenever possible, then we have the wiggle room to use something not eco-friendly whenever it's legitimately the best solution. Sealant and aerosol spray mount are two products that I do own and use, simply because I haven't yet found acceptable, eco-friendly alternatives. If YOU know of great, eco-friendly alternatives, let me know right this second! 

 I store our stash of Easter eggs year-round with our other holiday decorations, and bring them out sometime after St. Patrick's Day every year, when they once again strike us as new and colorful and festive and fun. Sometime after Easter, I might buy a few more plain wooden eggs to have on hand, because the next year, we're for sure going to want to decorate some more!

P.S. Need even more Easter crafts? Here are all my Easter tutorials right there in one place!

Saturday, November 28, 2020

How to Make Mason Jar Lid Ring Christmas Ornaments

I originally published this tutorial on Crafting a Green World.

If you enjoy canning, don't you have SOOOOO many Mason jar lid rings?

Those Mason jar lid rings, also called screw bands, can be re-used (unlike the lid tops, which you aren't supposed to re-use at all), but only until they start to rust or get bent or dinged, something that seems to happen with my rings, at least, after very few uses.

Sigh.

Fortunately, there are loads of ways to repurpose these rings so that you're not just adding them to the waste stream. And since it's December, my favorite way to repurpose ANYTHING this month has to be Christmas ornaments!

These Mason jar lid ring Christmas ornaments look a lot harder to make than they are. If you're artistic, you'll love using these to show off your skills, but even if you're not--hey, that's why clip art, stickers, and patterned paper were invented!

Supplies

To make these ornaments, you will need:

  • Mason jar lid rings. Repurpose ones that are no longer suitable for canning. Don't can? You know someone who does, or check on Freecycle or Craigslist--there is someone out there who would LOVE to give you their dinged-up canning supplies.
  • Ribbon. Stash ribbon is fine, but twine, hemp cord, or even thin chain would work.
  • Mat board or thick cardboard. For these particular ornaments, I used mat board scraps (does it still count as hoarding if you really do use the stuff someday?), but thick cardboard--something thicker than card stock or food packaging--would also be fine.
  • Decorative paper. Use scrapbook paper, old book pages or sheet music, or even wrapping paper.
  • Image for the ornament's front. My daughter traced the inside edge of a Mason jar lid ring, then created several pieces of original artwork for our ornament fronts, all of which I photocopied onto card stock so that we could make multiples. Anything fun and creative would make a beautiful ornament, however. If you've got scrapbook supplies, dig them out!
  • Spray paint (optional). It's not eco-friendly, but if you want to change the color of your Mason jar lid ring from rusted metal, this is your best option. I've made these ornaments both ways, and while I do like the painted ornaments better, it's not necessarily worth the time that it takes to paint them.
  • Glue. You need an archival glue suitable for paper and a separate, sturdier glue for the rings. I used spray mount for the former and hot glue for the latter.

Directions

1. Trace the inside edge of a Mason jar lid ring. This will be your template for cutting the decorative paper back, the mat board middle, and the featured image on the front.

2. Make a beautiful ornament front. The Mason jar lid ring makes the perfect frame for your original art. Whatever medium you prefer, whether it's watercolors, acrylics, markers, or charcoal, it will look adorable in this simple round frame. But don't forget that you can also use stickers, cut-outs, clip art, or anything else you'd like in order to embellish these ornament fronts.

3. Cut all pieces to size. The ornament front, mat board or card stock, and ornament backing paper should all be cut to your template. You can pop them into the Mason jar lid ring to check the fit--sometimes I've found that I haven't cut a piece carefully and have to trim it a bit. Better to do that now than when you're racing the hot glue gun!

4. Glue the ornament front, middle, and back together. Spray mount gives the most archival result, but an ordinary glue stick is also perfectly serviceable.

5. Do you want to paint the Mason jar lid ring? If so, do it now! Spray clear sealant, with or without painting the rings, is another option.

6. Tie ribbon onto the Mason jar lid ring. A lark's head knot is just about the easiest and most attractive of knots, and that's what you're going to do here. Tie the ends of the ribbon into a bow, and there you have your ornament hanger!

7. Glue the ornament piece to the Mason jar lid ring. I've tried several types of glue with this ornament, and none are really ideal. The most full-proof glue is hot glue, but you'll have to work quickly. Lay out the ornament, face-down, and the Mason jar lid ring, flat side down and with the ribbon at the top, and then quickly dispense hot glue around the inside edge of the lid ring. Immediately set the ornament into the lid ring and press it down so that it's flush against the flat side of the lid ring.

These ornaments are a great way to show off a kid's artwork--or your own! A matching set of complementary ornaments also makes a nice handmade gift.

But of course, I like them best on my own tree, displaying all of our homemade love for the season.

Saturday, November 21, 2020

How to Make Chalkboard Coasters

I originally published this tutorial on Crafting a Green World.

Here's an easy (and cheap!) project to spice up your holiday events: chalkboard coasters! You can use them every day just as they are because black goes with everything, but when guests come over, hand them the chalk and let them personalize their own coasters. It's fun AND avoids accidentally drinking from someone else's cup!

Supplies & Tools

You will need:

  • Tiles. Even brand-new, plain white tiles cost pennies at the big-box hardware store. And if you've got a ReStore near you, you can nab them for far fewer pennies. I used white tiles in this particular project, but don't be afraid to snap up super ugly tiles if they're even more of a steal, because the primer will cover all the tackiness for you.
  • Primer. You want a no-sand primer for sure, but color doesn't matter unless you're using tinted chalkboard paint. You can see in these photos that I'm actually using the tinted primer that I used to paint my daughters' bedroom this summer. Paint doesn't keep forever, so I'm using this stuff wherever I can!
  • Chalkboard paintUse any non-aerosol brand of your choice, but expect to paint on a few layers.
  • Felt. Feel free to be creative with this material, which will cover the bottom of your coaster. Felted wool sweaters, fleece, leather, old vinyl, etc., could all be used. Include the correct glue for your material; for felt, hot glue works well.

Directions

1. Prime your tiles.

Make sure they're clean, then coat the tiles with no-sand primer and let dry completely.

2. Cover the tiles with several coats of chalkboard paint.

This project is time-consuming in that it requires several coats of paint overall, each of which needs enough time to dry before the next coat, but it takes up little of your hands-on time:

3. Let the chalkboard paint cure.

This is an easy step to miss because the curing time for your chalkboard paint will be written in small type on the container. It's absolutely crucial to allow the paint to cure for the required time in order to have a nice-looking, long-lasting finished product.

4. Glue on the coaster bottoms.

There are three other humans who live in my house, and none of them can really be relied on to take a decent photo of me working. At least this one is in focus!

You can do this while the chalkboard paint is curing if it's at least dry to the touch:

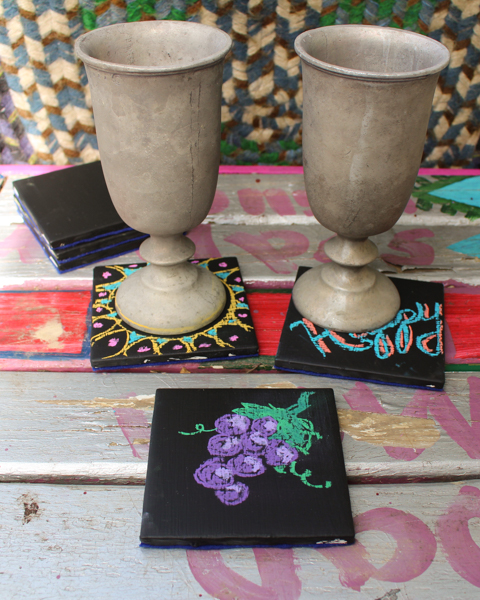
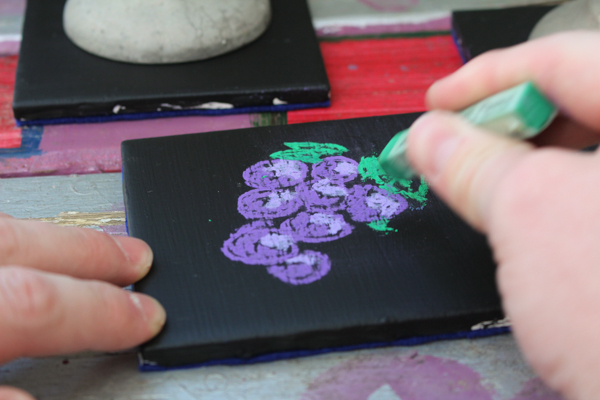
After the chalkboard paint has cured, your chalkboard coasters are ready to go! If you want to prepare them ahead of time, you can use a set of artist-quality chalk pastels to draw on designs that are as elaborate as you like:

Another option is to set up a few pieces of chalk with the tiles at your drinks station so that people can decorate their own coasters.

If you give your tiles as a present, include a piece of chalk and some brief written instructions--writing them on the coasters themselves would be cute! I've given these as presents a few times, and I've found that as obvious as it seems to me (because in my mind, if something holds still for long enough then, of COURSE, it's going to be turned into a chalkboard...), my recipients invariably look a little puzzled at first to be gifted with black coasters and a piece of chalk.

Tell them what the coasters do yourself, and watch their faces light up!

Saturday, November 14, 2020

How to Make a Wine Bottle Cloche

I originally published this tutorial on Crafting a Green World.

Even a light wind can ruin your candlelit outdoor dinner. To successfully have a candlelit dinner outdoors (whether you're roughing it or just being romantic), what you need for each candle is a cloche that serves as a windbreak while still letting in oxygen.

Fortunately, that type of cloche is as easy to come by as the wine bottle at your elbow!

This is a super quick and easy project, if you've got the right supplies. You will need:

  • empty wine bottle. Feel free to experiment with sizes here, upgrading to growlers or gallon jugs to make larger cloches--a gallon jug cloche is large enough to also shield food from pesky pests.
  • permanent marker and measuring tools.
  • Dremel with diamond bit cut-off wheel.
  • goggles and a dust mask. Safety first!

1. Remove the labels from your wine bottles. If you have plenty of time, you can use my method for cleaning old glass bottles, namely, a hot vinegar soak followed by some gentle scrubbing, to more easily remove the labels from your wine bottles. If you're crunched for time, however, you can get by with warm water, dish soap, a non-abrasive scrubby, and plenty of elbow grease. It sucked, but I got all the labels off of these bottles in less than half an hour:

2. Mark a cutting line on the bottle. All you need to do is cut off the bottom and top of your bottle to make the cloche, but getting a perfectly level line all the way around is annoyingly trickier than it looks. One day I'll buy myself a set of calipers, but until then, wrap a measuring tape around the bottle and adjust it, with the help of a ruler, until it's level:

When the measuring tape is level all the way around, use it to trace a line in Sharpie directly onto the bottle. This will be your cutting line, and whatever of the marker still remains afterward can easily be wiped away with rubbing alcohol or sanded away when you smooth the cloche's edges.

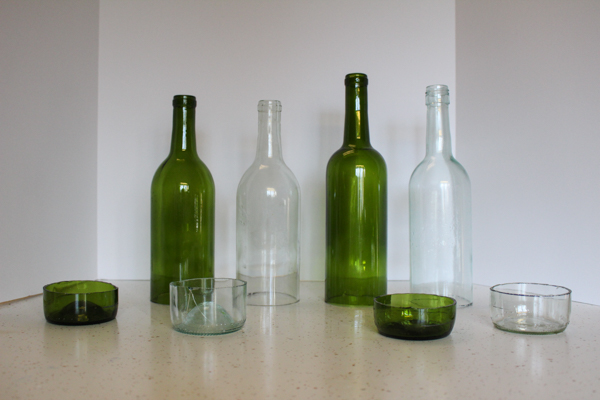
3. Cut the bottom off of each wine bottle using a Dremel with a diamond-bit cutting wheel. There are hundreds of tutorials for bottle cutting online, most of which rely on some sort of method to etch the bottle, then physical force or a temperature change to crack it along the etching line. These methods all fail too often to be worth it. Instead, buy or borrow a Dremel with a diamond-bit cutting wheel, and check out how quick and easy bottle cutting really can be:

See, doesn't that look nice?

You also need to cut the neck off of each wine bottle, or your candle won't get enough oxygen to stay lit. This cutting line doesn't have to be perfect like the bottom line, which determines how straight your cloche stands, so you can just eyeball your Sharpie line. The cut is much quicker, too--yay!

Discard the bottle top and bottom, sand down the edges with regular old sandpaper, and what's left is a useful wine bottle cloche. For the best results, make sure that your candle is shorter than the top edge of the cloche.

Feel free to play around with embellishing your cloche to make a luminary, making decorative cuts to the bottle's top edge, or choosing particular bottle colors for particular effects, etc.

Saturday, October 31, 2020

How to Make Clear Slime

I originally published this tutorial on Crafting a Green World.

Slime is a wonderful sensory experience, and I'm thrilled that so many young people are embracing the joy of exploring interesting textures (there are no interesting textures on their phones!). Making slime is also a terrifically educational activity, with problem-solving and reading and following instructions combined with quite a lot of chemistry and not a little bit of physics, as well.

To make clear slime, I consulted my own resident slime-making expert. She's put in hundreds of hours making slime, and is here with us today to teach you how to make clear slime, the Holy Grail of slimes. Syd's clear slime isn't your ordinary, everyday "clear" slime that's actually milky or white, she tells me. When she says that her slime is clear, she means it is CLEAR.

As in crystal!

So read along as the world's slimiest kid takes the task of making clear slime and breaks it down so simply that even the average non-slimer adult can follow it.

To make clear slime, you will need:

  • Clear Elmer's glue. I used to be able to buy this by the gallon, but lately, I've only found smaller containers for sale. I sure hope the gallon size comes back soon!
  • Hot water. The water should be hot, but still, a comfortable temperature for a kid to touch. For mobile slime-making (yes, this is something that she does...), Syd boils a kettle of water, then pours it into a thermos for transport.
  • Contact lens solution. Buy the cheapest on the market for this project, making sure that it contains boric acid.
  • Baking soda.
  • Two mixing bowls, a spoon, and a resealable container for storage.

1. Pour 1/2 cup of clear glue into a bowl. Remember that kids do this, so don't worry about trying to make your measurements too fussy. The important thing is that you're using CLEAR glue, not white. You can use white glue for other slimes, but then your slime won't be clear!

2. Mix in 1 tbsp of saline solution. This is also known as contact lens solution.

So here's a thing that I want to tell you about: we're going to talk about borax. When slime-making first got big, there was an actual backlash as people started FREAKING OUT that their kids were touching borax. As alternatives, people started posting slime recipes that don't use borax. Some of those recipes are great, some are not, and lots of them use contact lens solution as their substitute for borax.

Y'all, contact lens solution and borax both come from boron! They're pretty much the same, just that one is in powder form and the other is dissolved into a solution.

Not that I think that you should even force your kids to avoid borax, because I don't think that at all. Heck, my kids were making laundry soap from borax with their bare hands at the age of eight (they probably should have been wearing gloves, but still). Borax is FINE, Friends. Sure, if they bathe in it every day for a month it'll irritate their skin, but so will pool water.

3. In a separate container, dissolve 1/2 tsp of baking soda into 1/2 cup of hot water. Stir it well and make sure that it dissolves completely.

4. Once the baking soda is completely dissolved, pour it into the glue mixture. Try to pour it over the entire surface of the glue mixture.

5. Wait approximately a minute, then stir. Knead if necessary. 

At first, the mixture will be a goopy mess but continue stirring and you'll be able to see when the slime activates because it will start to ball up. It will still be sticky when you start to knead it but keep working it and it will become ever more elastic and non-Newtonian until it's the perfect slime.

You will have some of your baking soda and water solution left in the bowl, and that's perfectly fine and normal.

One thing that your slime will not start out as is perfectly clear, for the simple fact that you just kneaded a ton of bubbles into it.

If you really want perfectly clear slime, then pop it into an airtight container and let it sit for a day. The next day, it will be clear!

Note that as soon as you start playing with it, though, you'll start kneading bubbles back into it. This picture is of the clear slime that Syd has played with for a while, and you can see the bubbles:

Pro Tip: Syd stores her slime in small plastic deli containers to keep it fresh--and off of my carpet! She tells me that this particular slime will lose its bounce after several days, but it's easy to reactivate it. To reactive this clear slime, dissolve 1/2 tsp baking soda in 1/2 cup hot water. Pour the older slime mixture into this solution, stir, and then knead it when it becomes firmer. Keep the reactivated slime and discard the excess water.

Saturday, October 24, 2020

How to Make a Fairy Garden

A fairy garden is easy to make, and nope, it actually doesn't require any of those porcelain or plastic store-bought fairy garden accessories.

After all, the fairies don't go to Hobby Lobby for their furniture--they MAKE it!

Fairy gardens also don't have to be as elaborate as the ones that you see showing off all of their store-bought fairy accessories. Sure, a fairy garden wonderland is cute, but not everyone likes "cute."

But I promise everyone can like a fairy garden!

All you really need to make a fairy garden are a couple of small plants and suitable potting soil, a container, and appropriate handmade, found, recycled, or natural embellishments. The fairy garden becomes a magical place based on these elements alone... that's kind of WHY it's magical, you know? Simplicity is, indeed, beauty.

So scavenge up some recycled and natural materials, and let's make a fairy garden!

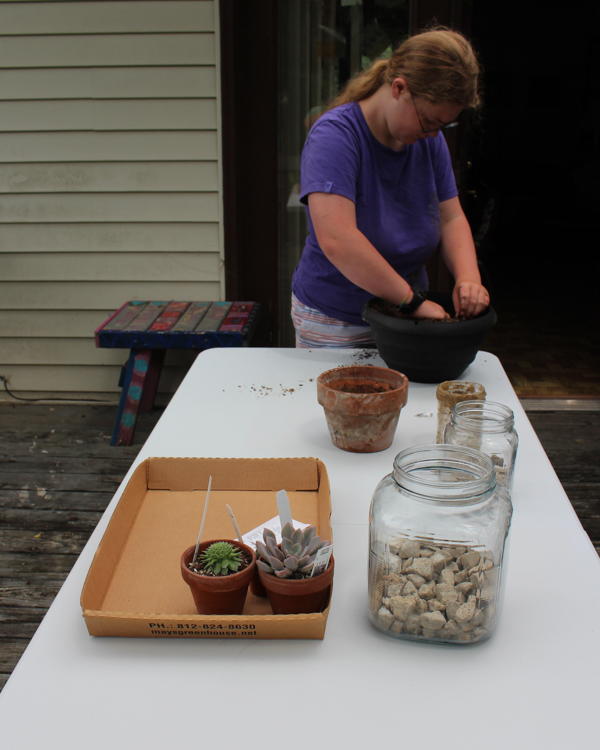
1. Prepare an appropriate growing environment for your plants. This step is the key to the entire fairy garden--you need the right plants, the right container, and the right soil. Make a garden that looks pretty but doesn't take care of your plants the right way, and it'll be dead within the month.

I like to start with the container. For the set of fairy gardens that I made last week, I knew that I wanted to use some old glass storage jars whose lids are... well, I don't know. Maybe the fairies took them.

For a glass container like that, I didn't want plants that would spread a ton, or get too bushy. Moss would have been cute, or a little bonsai, but after wandering around the greenhouse, and learning that they were randomly out of the venus flytraps that I'd REALLY wanted, I decided that a little desert fairy garden would be cute, like a fairy terrarium.

That meant succulents and cacti! Succulents and cacti both need a lot of drainage, so I put in a bottom visible layer of gravel (you could use aquarium gravel for this, or decorative river rocks, or shells, etc.), then the kid helped me mix up an appropriate potting soil for succulents and cacti--basically, potting soil plus playground sand plus peat moss or perlite. I'm ashamed to say that I used peat moss, even though I loathe buying it because its harvesting is VERY problematic, because I couldn't find the alternatives that I wanted and I needed to get the fairy gardens finished so that they could be birthday presents.

Rushed shopping and crafting is often not eco-friendly shopping and crafting, dang it.

2. Add potting soil and plants to the container. Just like in a real garden, bigger plants go in the back and smaller plants go in the front, and offsetting them to each other allows them all to be seen.

As you place the plants, begin visualizing what fairy garden embellishments you want to add, so that you'll be sure to have room.

3. Decorate your fairy garden. This is the fun part! To decorate your garden, check out these handmade fairy garden decorations for inspiration, or look around your home and yard and repurpose found items. Since my kids have been small, they've adored using their little toy animals as fairy garden decorations, and dollhouse furniture also often works well.

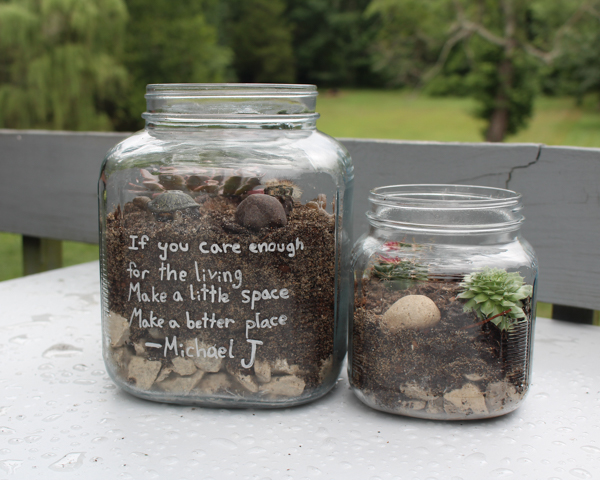
As you're embellishing, don't forget the container itself! One of our fairy garden birthday presents needed to be Michael Jackson-themed, and I thought about making Shrinky Dinks or polymer clay models, but it turned out that a relevant quote from one of his songs, written on in paint pen, was all that was really needed to make it perfect.

If you give your fairy garden as a gift, don't forget to include care instructions for the plants, and the appropriate fertilizer, if necessary. Giving the recipient a bottle of distilled water, a little bottle of liquid fertilizer, and a handwritten sheet of when and how much to water can be all the difference between a birthday present that's a huge hit and one that's an eventual source of guilt and self-recrimination.

Looking for more fairy garden inspiration? Check out my kid's junkyard fairy garden here, and this super easy, super magical chia sprout fairy garden that's perfect for preschoolers.