Saturday, August 29, 2020

How to Sew a Poodle Skirt

I  originally published this tutorial on Crafting a Green World.

You guys, if you have never read about the history of the poodle skirt, I need to start you off with the information that it is just about the most fascinating thing EVER.

Basically, back in 1947, a woman wanted something awesome to wear to a holiday party. Being of a DIY mindset, she made herself a circle skirt out of felt (no seams!), then decorated it with cute appliques.

As you can imagine, knowing how ubiquitous the term "poodle skirt" is today, her creation went over very, very, very well.

What you might not have imagined before, however, is that it's not just poodles that were on the poodle skirt. In fact, that first Christmas skirt didn't even have poodles on it at all! Throughout the poodle skirt's massive popularity in the 1950s, people felt free to personalize it in whatever ways that appealed to them.

Think cacti. Or horses. Or Elvis Presley silhouettes. Cartoon mice. The Eiffel Tower.

So when you think of a poodle skirt, you really should be thinking of a simple felt circle skirt with novelty felt appliques.

Easy to make. Endlessly customizable. NOW you want to make one, don't you?!? So let's do it!

Tools & Supplies

To make a poodle skirt of your own, you will need the following:

  • Felt. In Step #1, you'll do the calculations to learn how much felt you'll need for the skirt. You'll also want felt in the appropriate colors for all of your appliques.
  • Matching thread. I don't use interfacing when I sew, because it's costlier and less eco-friendly than doing without, so you'll want a matching thread to sew your appliques to the skirt.
  • Measuring supplies. Get yourself one of those yardsticks with a hole at one end (or just drill the hole yourself). You also need chalk and scissors.
  • Stencils and templates. I freehanded some of the appliques on the particular skirt that I'm showing you in this tute, but other appliques came from Google Image searches. I'm not selling the skirt, so it's cool.
  • Sewing notions. See Step #1 for these, too.

Directions

1. Calculate the measurements for your skirt. A circle skirt is exactly what it sounds like--a skirt in the shape of a perfect circle, with another circle, cut out for the waist.

So first, stop and think about how you want to get the skirt onto your body and keep it there. The skirt in this tute has an elastic waist, which means that I cut the center hole large enough for my kid to pull it up over her hips, and then I sewed 2" elastic to it for the waistband. This is a great solution for a kid or a teenager because as the kid grows, it's possible to remove the waistband, enlarge that center hole (provided that you've left the room and the skirt is long enough), and add new elastic. I  fully expect my kid's poodle skirt to last her through adulthood.

If you're already an adult, however, you can instead cut that center hole to size and install a zipper. It's more work, but the skirt would be less bulky at the waist and you could make it with a smaller piece of felt.

Either option is totally up to you!

So decide that first, so that you know the measurement for the center hole. The measurement will be the circumference of the circle that you want. In this case, I want a measurement of 24" so that my little noodle can get the skirt up over her little noodle hips.

Now, either do the math or plug that number into this circle calculator. The number that you want to get from this calculator is the radius. A circle that is 24" in circumference has a radius of 3.8". If you're going with the elastic waistband method, go ahead and round up to the nearest inch, which makes my new radius 4".

Next, decide how long you want the skirt to be, measuring from the waist to where you want the bottom hem to hit. I wanted another 20" of length. To find the total radius of the circle that you need to cut, you need to add that radius to the radius of the center hole. In this case, the total radius of my circle is 24". Double that number, and you'll have the total dimension of felt that you need in both length and width. Fortunately, felt comes in up to 72" widths, so you can make a pretty good-sized skirt from a single piece of felt.

Once you have your yardage, fold it into quarters. The very center of the piece of fabric will now be one of your corners. Place the hole in the yardstick right at this corner, and use it as the pivot to mark your total radius measurement in chalk. You'll see a perfect quarter of a circle marked out. Do the same thing, this time measuring the radius of the center hole. Cut them both through all four layers of fabric, then unfold the fabric and marvel at your perfectly-measured and cut circle skirt!

2. Add felt appliques. With the skirt unfolded, create and lay out the appliques until you're happy with their placement. You can also add other embellishments, such as the necklaces that I put on both of the unicorns, and a rope ladder from one of the caves.

When you're happy with the placement, pin all of the appliques to the skirt.

3. Sew the appliques to the skirt. Felt doesn't unravel, so you don't have to satin-stitch these appliques in place. With matching thread installed, I set my sewing machine to a stitch length of 3 and a width of 3, then zig-zagged around each applique. I highly recommend a walking foot for this.

4. Add a bias tape hem, if you'd like one. Again, felt won't unravel, so any kind of hem is completely optional. However, I thought that this skirt did look much more finished with the addition of a double-fold bias tape hem in a complementary color. I'd have had to stitch the appliques all around the hem, anyway, so it wasn't that much more work to add it.

5. Add the waistband of your choosing. For the elastic waistband on this skirt, I cut a piece of 2" elastic in a complementary color to the exact waist measurement (22.75"). I lapped the ends, marked both the elastic and the skirt waist at the quarters, pinned them together at the marks,  then zig-zag stitched them together, stretching the elastic to match the skirt as I sewed. It took less than ten minutes!

While felt is a very sturdy fabric, if I were you I'd remind whoever plans to wear the skirt that felt is also quite delicate. I know people were wearing these all throughout the 1950s, but people took better care of their clothes then, and also Velcro wasn't commercially available until the late 1950s. Velcro will pull at felt something terrible, so be careful when it's around.

Felt also doesn't wash well in a washing machine and doesn't dry well in a dryer. It'll be okay if you wash it on cold and hang it to dry, but it's better yet if you pretend like you're wearing your poodle skirt to a sock hop every time you put it on and treat it accordingly.


Thursday, August 27, 2020

My New DIY Treadmill Desk is Everything that is Awesome


I guess one of the okay things about living safe and sound at home during a pandemic is that various projects that we have put off for a variety of months and years are occasionally finally getting done.

Will incubated eggs like she wanted to last summer but didn't get around to doing before it got cold (I bought her this incubator for her birthday last year). I made the Christmas tree topper whose pattern I printed out probably this time last year. I'm almost finished with the quilt that I wanted to give to my kid last winter. Hell, I even just finished up two months of physical therapy to fix the shoulder that I busted almost exactly a year ago to this day!

One of the reasons why my shoulder got so bad (other than, you know, me ignoring my chronic pain...), suggested one of my physical therapists, was likely my professed habit, as I told them, of "spending most of my days hunched like a gremlin over either a keyboard or a sewing machine." I feel like over the course of my many visits, at one time or other every single physical therapist in the practice gently suggested to me that, you know, I NOT do that.

So now I spend some of that time sitting on a yoga ball instead, or standing with my laptop propped up on a big cushion--there's really not a great way to make a laptop ergonomically correct, it turns out, since the screen and the keyboard are so compressed together.

But the need to get some variety into my sedentary occupations reminded me that I LOVE vibing on my treadmill, and I have wanted a treadmill desk for probably a decade (Noel, when did you trade me your old treadmill for my old DVD player? Was that a whole decade ago?). 

And wouldn't you know it, but like many of my most procrastinated-against projects, my brand-new DIY treadmill desk took probably five minutes to make, maybe twenty if you count the time it took to pick out the materials in the big-box hardware store (I'm not going to count the drive there and back as time spent on the project, because we were there buying stuff for probably fourteen different projects, and also I was a little tipsy so I bought some plants I didn't need, too). 

Matt and I bought one finished board longer than my treadmill is wide but about as wide as the treadmill's horizontal handrails are long. We also bought two bungee cords the same length as the board.

Our sophisticated mounting system is to lay the board across the handrails and stretch the bungee cords underneath it, bungeeing it to the handrails and hooking the ends over the short ends of the board. Matt was all prepared to do more stuff to make it sturdy, but that's all it took! It's totally sturdy!

As I type this I'm trundling along at a happy 1 mph, my posture for sure not perfect (shoulders BACK, Julie!!!) but also for sure not hunched forward and slumped over in a way that makes the state of my scapulas absolutely shocking for a physical therapist to witness. It feels really nice to get some restless energy out when I've got a lot of writing to be going on with, and the desk is big enough that I can make myself a whole magpie's nest on top of it with all my stuff. 

It's a DIY win! I kind of even have the urge to go flip through all my planners from the past decade and find the one where I wrote "DIY treadmill desk" in some random to-do list next to some random week...

...AND CROSS IT OFF!!!!!!!

Monday, August 24, 2020

The Summer of the (DIY) Wooden Stars

You guys, I have been without a working sewing machine for SOOOO LOOOOONG!!!!!

Fortunately, my "good" sewing machine didn't break until AFTER I'd sewn plenty of cloth masks for everyone, but when it broke, it broke for good.

(See what I did there?)

The day that I heard that my sewing machine was unrepairable, I switched it out at the repair shop (I drive to one in the next town, now, on account of I'm still scared of the people who run the one in my own town) with my beat-up old sewing machine, the one that Matt replaced for me as a present a few years ago when IT broke, but I still keep it around because it has an awesome bobbin-winder.

In another piece of good luck, my beat-up old sewing machine is old enough that its parts are mostly metal, which means that it WAS repairable... or at least, that's what the repair shop has told me. They've also tell me, every time we call (once a week!) for an update, that they've finished their repair and all they need to do is test it.

You would think that a sewing machine repair shop, when faced with a machine that they've already repaired and are now simply storing and not being paid for, would be eager to do the very last thing that they have to do to that machine before they can 1) get it out of their workshop and 2) get paid money in exchange for their goods and services. If you think that, though, you're likely not mentally or emotionally suited to run a sewing machine repair shop.

And that's why, in all my new-found non-sewing time, I've been experimenting with a wide variety of non-sewing productive things to do with my hands.

And somehow in that process, I became obsessed with making wooden stars?

I don't know. It's weird. The whole thing started out being normal--I figured I'd make our Christmas tree a nice wooden star tree topper. Then I made a smaller one as an ornament. Then I had some wood leftover, so I made a couple more. Then I found some more wood. Then I thought that maybe I could paint some of the stars, so I found some more wood.

At this point, I'm basically out of scrap wood, so I'm about to go and tear apart a wooden pallet and see if I can also make stars out of pallet wood. If I can--I'll just be frank with you; I'll probably make a LOT more.

To be fair, though, the process is quite satisfying! Here's one star just after I cut it out of some super old board that was probably in our garage when we moved here:


Here I am about to sand the snot out of it (pro tip: get a quarter-sheet palm sander because it's cheaper to buy full sheets of sandpaper and tear them to size yourself)--


--but then deciding that it would be terrible to ruin that gorgeous patina and instead just sanding the sides and curving the edges:


Here's a larger version of the star from that same wood. Check out the old nail holes!


Here I am spending some art time with Will. She's coloring the world's most epic fantasy landscape, I'm gluing wooden stars together, and we're both listening to Welcome to Night Vale:


I cut some other stars out of such clean, nice wood that I didn't bother priming them before I painted them:


I want all that nice wood to show between the layers of my rainbow!


Here's the finished tree topper, all set up and ready to go in my Pumpkin+Bear etsy shop!


It was SO MUCH FUN to make. The second that I scrounge some more wood out of nowhere I'm going to make another!

Our Christmas tree is already so busy that I forced myself to make this very sedate, lightly stained and sealed only, tree topper for our home:
It's a weensy bit wonky, but it was the very first one that I made!

I am, however, right this minute working on painting a galaxy onto yet another giant wooden star, so who knows if our tree topper will stay regal and sedate and simple this year, or if it will be conquered by galaxies or rainbows--or both!

Saturday, August 22, 2020

How to Make Stamped Clay Seed Bombs

I originally published this tutorial on Crafting a Green World.

I used to think that seed bombs do not work, full stop.

And to be fair, I had a good reason for my opinion, because most of the seed bomb tutorials that you see online just do NOT work! Here's why:

  • If the seed bomb is too big, it's not going to be able to dissolve in good time and release the seeds.
  • If the seed bomb recipe calls for too much liquid, the seeds will germinate prematurely and then die.
  • If the seed bomb recipe calls for too many seeds, they'll crowd each other out before they can grow.
  • If the seed bomb gets tossed out at anything other than JUST the right time, it won't get the proper amount of rainfall required to dissolve the bomb and nurture the seeds.

When there are so many things wrong with so many of the seed bomb tutorials that you see, it's easy to think that the whole concept is a bad one.

But done properly, and distributed carefully, seed bombs CAN work.

Here's what you'll need to do it right.

Ingredients & Supplies

  • Air dry clay. I'd suggest something non-pigmented and natural-looking, not something like Model Magic, which is super fun and my kids play with it but I have NO idea what it's made of. If you don't know what it's made of, you certainly don't want it in your garden!
  • Seed starting mix or other potting soil. Your favorite seed starting mix will work well here, but any kind of nutritious potting soil will do.  And again, avoid potting soils with "moisture retention beads" or "water crystals" included; those are just fun names for the same kind of polymer that's used in disposable diapers. You don't want that in your garden, either!
  • Native seed mix. Not all greenhouses are ethical providers of native seeds, so check with your local native plant society before you buy a packet. Better yet, save your own seeds from your favorite native plants and use those.
  • Small stamp. A regular scrapbooking stamp is exactly what you need. Scrapbooking used to be big business, so you should be able to find any stamp design you can dream of.

Directions

1. Get your hands dirty

Pinch off an amount of clay the size of a large marble--remember that the best seed bomb is a SMALL seed bomb, so don't overdo it.

2. Roll the clay into a ball between the palms of your hands

Might as well go ahead and get a little dirtier! Use the tip of a finger to make an indentation in the clay ball, and fill the indentation with as much potting soil or seed starting mix as will fit.

3. Add the seeds

Be very stingy with the number of seeds that you put in your seed bomb because you don't want them to crowd each other out of existence. Three to four seeds is plenty!


4. Seal the potting soil and seeds inside the bomb

Pull the sides of the seed bomb over the top to seal in the potting soil and seeds, then roll it around your palms again to make it back into a nice, smooth sphere.

5. Stamp the top of the seed bomb

Press hard with the stamp; you'll slightly flatten the seed bomb, but will make your stamped impression stand out nicely.

6. Let air dry

Let the seed bombs air dry for at least as long as the package of air-dry clay instructs. Thanks to the potting soil center, the seed bomb might take even longer to dry.

When the seed bombs are dry, you can store them in the same cool, dry, dark spot where you store the rest of your garden seeds. To use them, toss them onto the ground whenever the growing conditions outside match the seed packet's specifications AND there's a lot of rain in the forecast for the next week or so.

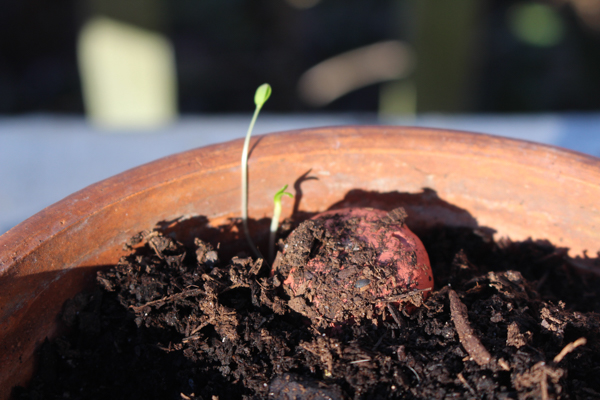
Another option is to simply press a seed bomb down into the dirt in your garden or a flowerpot and water regularly. I planted a seed bomb in a pot in my windowsill just for fun (I don't think the native plants will last inside all winter, but it's worth the experiment), and look how cute my little seedling babies are, growing out from under the safety net of their seed bomb!

My watering can didn't exactly mimic the right rainfall conditions to properly dissolve the clay exterior of the seed bomb, but even so, it was enough to get a couple of sturdy little seeds germinated and growing happily.

Imagine how happy they'll be when I toss them around the garden!


Friday, August 21, 2020

A Small Social Justice Study


This summer, I think that a lot of us felt the need to start getting a lot more informed about social justice issues. The kids clearly felt this need, too, and we had a lot of great conversations... which led to a lot of great questions...

...which I did not feel equipped to answer. 

I did what I generally do, then, when asked a question I do not know the answer to--I suggested that we look it up!

Rather, I suggested that we rewrite two of the Girl Scout badges at the kids' levels--the Cadette Finding Common Ground badge and the Senior Social Innovator badge--to encompass a short study on social justice, during which we could research the answers to our most pressing questions and find out more about the issues that we felt most called to.

There are so many--too many!--social justice issues to be able to give them all our careful attention during one short study, so we decided that we'd focus on just Black Lives Matter and the LGBTIA+ pride movement for the moment. 

The National Museum of African American History and Culture has a LOT of helpful information for thinking and talking about racial identity, bias, our country's history of racism, and how to be activity anti-racist. The kids and I went through a couple of their topics together, and then we each explored the rest of the topics separately and came together for conversation about them.

We spent another interesting afternoon working on a giant puzzle and listening to interviews of people who represent important moments in LGBTQIA+ history. Or rather, the kids got to work on our puzzle, while I stayed at the laptop and ready-referenced the questions that they continually peppered me with. AIDS activism in the early 1980s and the Stonewall Riots are the only historical events that I feel confident lecturing off-the-cuff about to the kids, so thank goodness for Wikipedia!

If you're interested in the history of the AIDS epidemic (it has a lot of modern parallels!), I highly recommend this book:

It's intense, and so, so, so sad, but it's also a vivid example of the extreme amount of social activism that's required to achieve even a starting point of social justice. AIDS activists sacrificed their careers, their reputations, and sometimes their lives just to get to a point where our government could begin to consider that perhaps we should not deliberately let entire swathes of people succumb to a pandemic.

On another afternoon, we popped popcorn and watched this documentary on the Stonewall riots:

It's a good example of how yes, you DO sometimes have to commit civil disobedience to right a social wrong that's been legislated into existence.

Here's another good example:

There IS a Book Three, but we're still on hold for it at the library!

John Lewis' story is epic. I'm ashamed to admit that I knew nothing about the Freedom Riders until I read his story. I'm sure my school system failed me in not teaching this, and then I failed myself by still not learning it after I was grown up and supposed to teach myself everything I'd missed out on learning as a kid. 

As another project on another day, the kids looked up book lists featuring POC and LGBTQIA+ people. There are several book lists referenced in this article about things white people can do to advance racial justice. There are a ton more great books in this list of children's and middle-grade LGBTQIA+ literature. The kids requested all the ones that looked interesting to them from our public library, and if there were any that the library didn't already own, they were to fill out a Suggest a Purchase form for it. Our library is awesome, and I think that Will only managed to find one book on all of these lists that the library didn't own! We got a bunch of new stuff to read for ourselves, though--I was especially excited to see that Jazz, whose picture book I always recommend to people as THE way to explain what it means to be transgender to anyone young or old, has a memoir now!

The Cadette Finding Common Ground badge wanted Syd to explore civil debate. Watching protest march footage certainly covers that, but at that point in the summer I didn't want to actually take the kids to anything in-person, but I did want to find something that showed how anyone can agitate for social justice, so we also spent another afternoon working on our paint-by-numbers and listening to protest poetry and protest songs. Here's an extensive list of protest poetry--shout-out to Paul Laurence Dunbar, who we previously met while learning about flying machines!

The kids sat with all of the research that we'd done for a few days, then came together to create a list entitled "How to be an Ally." Here's part of it:

They did pretty well, although their list shows that I didn't do enough to help them feel empowered and able to take direct action, perhaps, as much of the list is more about amplifying the message or showing support for the message, etc. Or maybe that's a product of this pandemic, when I don't feel comfortable encouraging the kids to attend protests or physically volunteer their time, so then they don't think of those options. But ultimately, their list is do-able and kid-friendly, and they each chose an item from it to do right then:


Syd intends to make digital copies of her hand-drawn pinback buttons (in the top photo), so that anyone with a 1" pinback button maker can download them and make them, too, but then high school started, and her algebra and biology teachers are definitely making up for the lack of work that her French and art teachers are giving her. So pinback button designs might have to wait until she learns everything there is to learn about algebra and biology first...

In other news, Will's teen police club, run by our local law enforcement officers, had a meeting (in the brief window when our community was starting to get back to doing stuff like that, before they stopped again) specifically to discuss Black Lives Matter and the instances of police brutality that have been so much in the news. Will came prepared (because I'd given her a list of these instances and required her to research them, summarize them, and then write her opinions), and although overall the discussion wasn't the absolute greatest, it wasn't terribly awful, either. I don't think that the officers who volunteer their time to work with the community's children are bad-hearted, but I don't think that they're exactly the wokest, either. And at one point, when an officer was discussing our farmer's market controversy and told the children that there was no proof that the Schooner Creek farm was run by Nazis, Will spoke right up and told everyone there that our family knows them and they're definitely Nazis.

Technically, I think they're actually "white identitarians" who refuse to admit that they're racist and instead insist that they just want to evict all POC from this entire country that was originally stolen from its indigenous people, but whatever. Everyone knew what she meant.

And I guess if I was looking for direct action towards social justice, then stepping up to contradict a police officer and tell a group of your peers a bit about your own experience with racism is pretty direct!

Thursday, August 20, 2020

Homeschool STEAM: An Introduction to Designing Robots (and Badly-Designed Robots!)

After you learn how to program robots, you can focus on how to design them to both meet specific challenges AND be pleasing for others to experience. 

The kids learned a LOT about robots during our Programming Robots study, and I'm excited for them to be able to make use of that knowledge while they develop creative solutions to problems that they find interesting.

First, though, we've got to figure out what it means to "design" a robot, what the qualities of good design are, and how to think about problem-solving in a way that encourages good design.

To that end, we explored this website on Design Thinking, and watched the related TED Talk:


I really love the emphasis, here, on research to find out what the intended users' needs and experiences are. Skipping that step results not just in bad design, but bad charity projects, bad business start-ups, bad Christmas gifts, bad social justice efforts... bad everything! Putting people first, and really taking the time and effort to meet them where they actually are, so that you can serve them in the ways that most benefit them, is crucial. It's the first step in everything from solving world hunger to fighting racism.

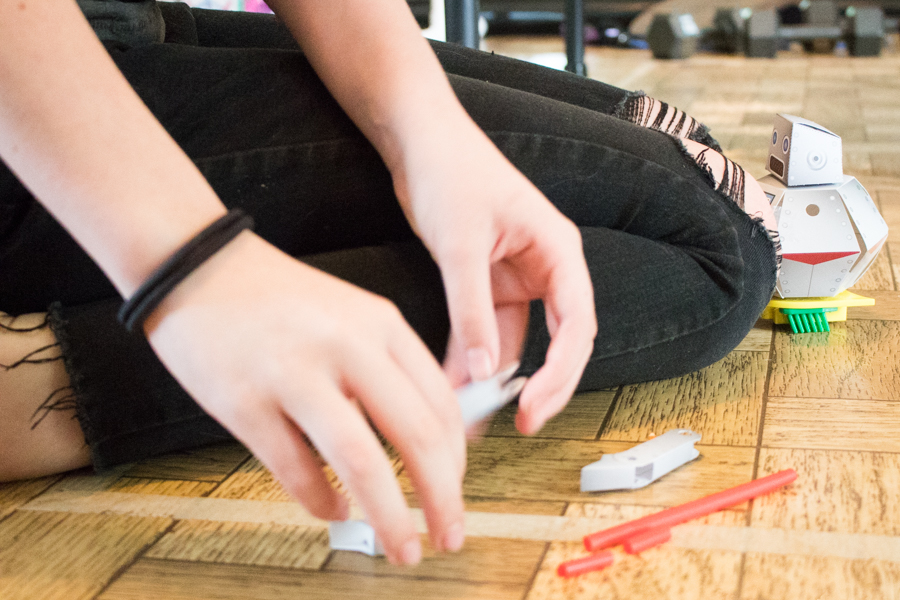
Before we get started on designing robots for real, I wanted the kids to have the chance to play around with some fun and easy designs, just to get the idea of how design can transform an object. I gave them this recycled robots kit (that I checked out from the LIBRARY!!!!!)--


--and told them to build me any kind of automaton that they wanted.

Their automatons turned out useless and adorable, just they way we wanted them to be!


As well as being cute and fun, this activity is a good example of "bad" design. Sure, the little automatons are cute and fun, but they're also useless, and their designs are meaningless. There's no particular reason for any given design feature, and although aesthetics IS a good reason for some design decisions, each decision should still have a reason for why you did it that way.

If I had this lesson to do again, I'd have the kids make their recycled robots first, then constructively critique them after learning about the Design Thinking process, and THEN redesign them on paper or as a model so that they actually DO fulfill a purpose or solve a problem.

...Actually... I may do that last part as our next robotics lesson!