I originally published this tutorial on Crafting a Green World.
I used to think that seed bombs do not work, full stop.
And to be fair, I had a good reason for my opinion, because most of the seed bomb tutorials that you see online just do NOT work! Here's why:
- If the seed bomb is too big, it's not going to be able to dissolve in good time and release the seeds.
- If the seed bomb recipe calls for too much liquid, the seeds will germinate prematurely and then die.
- If the seed bomb recipe calls for too many seeds, they'll crowd each other out before they can grow.
- If the seed bomb gets tossed out at anything other than JUST the right time, it won't get the proper amount of rainfall required to dissolve the bomb and nurture the seeds.
When there are so many things wrong with so many of the seed bomb tutorials that you see, it's easy to think that the whole concept is a bad one.
But done properly, and distributed carefully, seed bombs CAN work.
Here's what you'll need to do it right.
Ingredients & Supplies
- Air dry clay. I'd suggest something non-pigmented and natural-looking, not something like Model Magic, which is super fun and my kids play with it but I have NO idea what it's made of. If you don't know what it's made of, you certainly don't want it in your garden!
- Seed starting mix or other potting soil. Your favorite seed starting mix will work well here, but any kind of nutritious potting soil will do. And again, avoid potting soils with "moisture retention beads" or "water crystals" included; those are just fun names for the same kind of polymer that's used in disposable diapers. You don't want that in your garden, either!
- Native seed mix. Not all greenhouses are ethical providers of native seeds, so check with your local native plant society before you buy a packet. Better yet, save your own seeds from your favorite native plants and use those.
- Small stamp. A regular scrapbooking stamp is exactly what you need. Scrapbooking used to be big business, so you should be able to find any stamp design you can dream of.
Directions
1. Get your hands dirty
Pinch off an amount of clay the size of a large marble--remember that the best seed bomb is a SMALL seed bomb, so don't overdo it.
2. Roll the clay into a ball between the palms of your hands
Might as well go ahead and get a little dirtier! Use the tip of a finger to make an indentation in the clay ball, and fill the indentation with as much potting soil or seed starting mix as will fit.
3. Add the seeds
Be very stingy with the number of seeds that you put in your seed bomb because you don't want them to crowd each other out of existence. Three to four seeds is plenty!
4. Seal the potting soil and seeds inside the bomb
Pull the sides of the seed bomb over the top to seal in the potting soil and seeds, then roll it around your palms again to make it back into a nice, smooth sphere.
5. Stamp the top of the seed bomb
Press hard with the stamp; you'll slightly flatten the seed bomb, but will make your stamped impression stand out nicely.
6. Let air dry
Let the seed bombs air dry for at least as long as the package of air-dry clay instructs. Thanks to the potting soil center, the seed bomb might take even longer to dry.
When the seed bombs are dry, you can store them in the same cool, dry, dark spot where you store the rest of your garden seeds. To use them, toss them onto the ground whenever the growing conditions outside match the seed packet's specifications AND there's a lot of rain in the forecast for the next week or so.
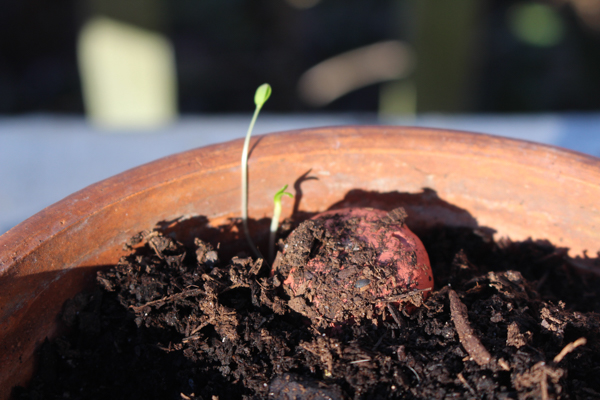
Another option is to simply press a seed bomb down into the dirt in your garden or a flowerpot and water regularly. I planted a seed bomb in a pot in my windowsill just for fun (I don't think the native plants will last inside all winter, but it's worth the experiment), and look how cute my little seedling babies are, growing out from under the safety net of their seed bomb!
My watering can didn't exactly mimic the right rainfall conditions to properly dissolve the clay exterior of the seed bomb, but even so, it was enough to get a couple of sturdy little seeds germinated and growing happily.
Imagine how happy they'll be when I toss them around the garden!


No comments:
Post a Comment