Monday, January 11, 2021

Earning the Girl Guides of South Africa Tourism Badge


Yes, you can wear a Girl Guide badge as a Girl Scout. But no, you cannot wear that badge on the front of your Girl Scout uniform. Even though both you and the Girl Guides of South Africa are members of the World Association of Girl Guides and Girl Scouts (WAGGGS, lol), you are not a member of the Girl Guides of South Africa.

Fortunately, Girl Scout uniforms have just the place for a "non-official" patch: the back! And that's how Will's brand-new Tourism badge from the Girl Guides of South Africa is now happily ensconced between her voting fun patch and the patch she earned for donating some of her fall product prizes to the sloths at the Indianapolis Zoo, instead, and on top of that Wildflowers of Ohio patch that we had so much fun earning back before the world went nuts.

I miss road trips!

I own a few Girl Guides of South Africa badges, but this is the first one that Will has worked through. I really love the different perspectives that another country's Girl Guide badges offer: the South Africa paddling badge is SO hard-core that I don't know how on earth I'm going to help Will earn it, and their baking badge, which the kids worked on this summer, required them to memorize enough terms to discernibly improve their cookbook literacy. 

The Tourism badge is one of the most interesting. It makes sense, because I'm sure that a LOT of tourists to South Africa take guided tours in some capacity during their visit, and when we were in Greece, our tour guide there, Militsa, told us just some of the strenuous education and certification required to be a Greek tour guide. It's an impressive career option if you live in a place with a thriving tourism industry, and it's just so interesting to me that it's a career that doesn't really exist in the same capacity, or nearly the same frequency, in the US. 

I rewrote the Tourism badge requirements a bit, but I couldn't decide if I wanted to treat the badge as a study of the way that international travelers view the United States, or as a useful primer on planning international travel of one's own... so I sort of did both. Here's my take on the badge:

GIRL GUIDES OF SOUTH AFRICA TOURISM BADGE

  1. Browse through 2-3 US guide books marketed to visitors from outside the US (hint: search Overdrive for USA guide books!).

  2. Make a list of qualities/characteristics/areas of expertise that a visitor from outside the US should look for in a tour guide.

  3. Read and be prepared to discuss the following article: https://www.theatlantic.com/international/archive/2012/06/welcome-to-america-please-be-on-time-what-guide-books-tell-foreign-visitors-to-the-us/257993/

  4. Research at least three tour companies and the group or guided tours that they offer. For each company, choose one tour that YOU would like to go on.
  5. Create a chart that compares/contrasts the following information about each tour/tour company:

    1. Cost of tour vs. value of tour (YOU determine what makes the tour a good value!)

    2. Type of tour/quality of tour (eco tour, luxury tour, adventure tour, etc. Give each tour a category that you create!)

    3. Tour amenities, evaluated on a scale that YOU determine based on what is important to YOU

    4. sites/activities/adventures on each tour

    5. Additional costs--is travel insurance included? Airfare? All meals or just some? Extra visas required?

  6. You are a tour guide and have a visitor from overseas. Plan a 2-day trip around your state showing off its natural beauty, history, and culture.

    • This trip should include several highlights and places to visit, including iconic sites, engaging activities, and interesting places to eat.
    1. Sites to see and what they cost (eg. entrance fees)

    2. Transportation and cost (are you driving and will need gas? Taking a bus or train? Uber?)

    3. Restaurants and copies of their menus, if possible

    4. Photos of places being visited, with appropriate attribution

    5. Accommodations, their amenities, and costs

    6. Itinerary/timetable for the trip, including accurate transportation times

  1. Research a 10-day African tour for our Girl Scout troop.

    • Include travel dates, costs, accommodation, modes of transport, destinations, etc.
    • Write a complete and detailed itinerary, including the same information from Step 2.
  1. Research the different types of passports and their costs.

    • What information is required to apply for a passport?
    • What countries might one travel to that have additional requirements?
    • Find your own passport and examine it. When do you need to renew it?
For the comparison of tour companies, I was interested to see that Will chose to compare Greece tours. Very sensible, as the only time that we've taken a guided group tour was our trip to Greece! Here's some of her work:

PRICE vs. VALUE
  1. Odysseys Unlimited Ancient Greece
    • $385.15 per night. Meals included. 12 nights in fancy accommodations. Small group size. Many interesting sites. Good value.
    • Athens monuments and museums, Delphi, ancient Corinth, Mycenae, Nafplion, Hydra, Heraklion, palace of Knossos, olive farm, Santorini town and sites.
  2. Cosmos Greece and Aegean Islands Cruise
    • $166.67 per night. Meals included. 14 nights in fancy accommodations. Unknown group size. Many standard sites. Good value. 
    • Athens, Mycenae, Citadel of Mystra, Olympia, Delphi, Meteora, Aegean cruise, Ephesus, Patmos monastery, Rhodes, Heraklion.
  3. Expat Explore Best of Greece
    1. $163.75 per night. Meals included. 12 nights in acceptable accommodation. Large group size. Many standard sites. Neutral value.
    2. Athens, traditional art workshop, Kalambaka, Delphi, Trizonia, Olympia, Mycenae, Nafplion, Mykonos, Santorini.
This turned out to be a useful project, because price vs. value is entirely dependent on your own priorities. Do you prefer to make your own way through a country, figuring things out on your own, or do you prefer having your itinerary and the details of travel arranged for you? What budget do you need to set, and what would you rather give up to meet that budget? What do you absolutely have to see, and what do you not give a flip about seeing?

Even though I always feel like I include the kids in my travel planning, I definitely make all of those price vs. value decisions for us, and I probably never even told them that we were deliberately staying in lousy hotels and eating packed groceries to save our budget for sightseeing, and we were wearing all our clothes and carrying just backpacks onto planes because the hundred bucks that we don't spend on checked luggage is the hundred bucks that we CAN spend on experiences. So it was interesting to see what Will prioritized--she seems to care more about hotels and meals than I do, but I was glad to note that what you get to see and do, and not just how comfy you are while you see and do them, is also important to her.

After that practice researching and evaluating other group tours, it was time to ask Will to create her own. Here's half of Will's 10-day African tour for a Girl Scout troop. We're going to explore Namibia!

Day 1:

10:00  Fly into Windhoek

           Rent a car

           Drive 30 minutes

11:00  Check into UrbanCamp.net

11:30  Visit National Museum of Namibia

           Eat at rooftop restaurant

           Drive 20 minutes

7:00  Have dinner at Xwama

         Drive back


Day 2:

9:00  Go to Lemon Tree for breakfast

         Drive 30 minutes

10:30 Go to Namibia Craft Center

           Drive 20 minutes

1:00  Horseback tour with Equitrails Namibia

         Drive 15 minutes

7:30  Dinner at Joes Beerhouse


Day 3: 

9:00  Check out

         Breakfast at Royal Kitchen and Take Away

         Drive 3 hours

1:00  Visit the Cheetah Conservation Fund

         Drive 40 minutes

7:30  Eat dinner at Crocodile Ranch

9:30  Check in to Out of Africa


Day 4:

9:30  Go to Bean Tree Cafe for breakfast

         Drive 2 hours

11:30  Erindi Private Game Reserve

2:30  Lunch at Camp Elephant

4:30  Erindi guided safari

7:00  Dinner at Camp Elephant


Day 5: 

9:00 Packed breakfast

11:30Drive back to Windhoek

Packed lunch

7:00 Take flight to next destination


I love that we're going to spend half the time glamping, and that we get to go horseback riding. It's a very whirlwind visit to Namibia, but I think it would work well combined with visits to at least one or two other countries in Africa--I mean, you're going to spend all that time just getting to Africa; might as well stay for a while!


This ended up being an interesting and unique badge to earn, with some practical, real-world activities that Will hadn't ever tried out before. You could argue that this Tourism badge, or at least the way that I rewrote it, is similar to the Senior Traveler badge, but I'd argue that while the purpose of the Senior Traveler badge is to plan an actual trip for the Senior Girl Scout to actually go on, this badge was a way for Will to dream big and research trips anywhere in the world, and in particular places that we definitely aren't going to anytime soon.

Although, to be fair, at this point in the pandemic we aren't even in the position to take that two-day tour of Indiana that Will planned for Step 4... One day, when we're all four vaccinated and safe to travel, may I never again take for granted our ability to actually go on the trips that we plan!

Here are some of the resources that we used for this badge:

Tuesday, January 5, 2021

We Earned the Girl Scout Space Science Badge (after I completely rewrote it...)


To be fair, the Girl Scout Space Sciences badges at every level are more than fine as they are. They offer a good progression from Daisy and Ambassador, don't have so much overlap with school curricula that they'd be repetitive and boring, and are a fun combo of activities, academics, and hands-on work.

However, as the leader of a CSA troop during a pandemic, I have a couple of special circumstances:

  • Since the badge is offered at every level, I wanted to lead the badge in such a way that each kid could earn it at their level, and wouldn't have to repeat any activities to earn it at the next level. So basically, I had to invent new activities that met the same goals as the activities recommended in the badge books.
  • We'd planned to have an entirely outdoor meeting in November to earn this badge, which... brrr! Mind you, Girl Scouts can deal with the cold, but I thought it would be more productive to hybridize the badge, and have some activities that the kids could complete at home, while saving the must-be-outdoors activities for our meeting. 
I ended up really liking that hybrid method, by the way. As the kids get older, their badges take more work to earn, as they should! But my troop does not meet so often or for so long that we can easily do all the badge activities together and still earn badges with any regularity. Giving them the at-home kits worked well to make sure we accomplish the pedagogical and skill goals of the badge, while making the best use of our limited meeting time. Even better that it puts more of the responsibility of actually finishing the badge on their shoulders! It's a fairly low-stakes, high-interest project for practicing those crucial time management skills.

Here, then, is the agenda of activities to earn the Girl Scout CSA Space Science badge at your level:

  1. SEE THE STARS IN A NEW WAY (from the Cadette Space Science Researcher badge)

    1. Make a planisphere.

  2. DISCOVER TELESCOPES AS LIGHT COLLECTORS (from the Senior Space Science Expert badge)

    1. Look through Ms. Julie’s telescope.

  3. DISCOVER WORLDS BEYOND EARTH (from the Ambassador Space Science Master badge)

    1. Make a postcard or tourist brochure (Use NASA tourist posters for inspiration)

      1. Include graphics, explanation, postcards, and postcard stamp in at-home package

  4. DIVE INTO NASA SCIENCE (from the Ambassador Space Science Master badge)

    1. Model rockets!

      1. Drop off early in October; should be assembled, with glue cured, painted by meeting time.

    2. Can we see the ISS during our meeting?

  5. EXPLORE YOUR INTERESTS (from the Ambassador Space Science Master badge)

    1. Light Pollution

      1.  Bortle Dark-Sky Scale

        1. https://www.delmarfans.com/educate/basics/lighting-pollution/

    2. Globe at Night Citizen Science Project: https://www.globeatnight.org/

Our main theme was the ways that we explore and observe space. Many of the kids had never stargazed with any intention before, so for Step 1, I wrote everyone a lesson about naked eye observation of the night sky, in particular the regularity of the constellations, and their use as celestial calendars. I gave the kids the supplies to construct this cardstock planisphere as a paper celestial calendar/night sky viewer, and I showed the kids who brought theirs with them to our in-person meeting how to use them, and also shared around the night sky app on my phone as a comparison. The kids pretty much all preferred my night sky app, but with their analog planispheres they'll never be lost in the sky!

Step 2 was my favorite, because my favorite thing to do is to look through my telescope! While the kids and our other chaperone were finishing up their campfire dinner, I set up my telescope; it's fiddly, takes a billion years to get just right, and trying to do it while people watch me makes me nervous. It was fully dark by the time everyone had finished eating, which was perfect timing! In early November, great things to see through a telescope include Jupiter and its moons, Saturn (and its rings!), and, of course, the Moon:

And since it was right there, we looked at Mars, even though it's not exactly the most mind-blowing planet to observe through an at-home telescope. I would have loved to have shown them the Andromeda Nebula, which is my current favorite thing to look at, but I'm still learning my telescope and I'm lucky if I can find it when it's just me in a field with all the time in the world and nobody looking at me.

I didn't do so much of a guided lesson for the telescope step, but we did talk a lot about what we were looking at, what else we might look at, and about good old Galileo. The canals of Mars! How he probably burned out his retinas! You know, all that good, educational stuff!

I wanted the kids to know that most space observation is indirect, but still results in interestingly detailed descriptions of what's being observed, AND I wanted something that they could do completely at home, so for Step 3, I decided to have them make souvenir postcards for a space object of their choice. I gave them postcard blanks that I wrote, color copies of several of these NASA Exoplanet Travel Postcards as inspiration (I had Matt tile several at a smaller scale onto a single page so the kids could see lots of examples without the troop paying for lots of color printing!), a stamp, and the address of their "secret Girl Scout," i.e., another kid in the troop. I wrote them a lesson on exoplanets, the methods of indirect observation that give us information about them, and the ways that the artists of the NASA postcards used that information to construct creative visuals of them. 

Each kid's assignment, then, was to choose absolutely anything in space that humans have not stepped on or sent cameras to the surface of. They were to research their space object, creatively interpret that information to make their own travel postcard for it, then mail that postcard to their secret Girl Scout along with the name of their object and some cool facts about it. 

Here is Will's:

I love how she even included a cute slogan for her exoplanet with three suns!

Okay, Step 4 could easily be a badge of its own--and why are there no Girl Scout rocketry badges?!? I did want the kids to learn more about direct exploration of space, but mostly I wanted a super-fun, super-exciting activity that would really sell space science to them, AND I wanted it to be outdoors and social-distancing friendly.

Rockets it is, then!

I bought a bulk set of these easy-to-assemble rockets, and a variety pack of engines. I put the rockets and build instructions into the kids' at-home kits, and told them what step to stop at, because I planned for us to finish them as a group during our in-person meeting. The instructions that came with the package were... not great, unfortunately. Some kids texted me for troubleshooting advice, some kids found their own tutorial videos on YouTube, some more or less got it right on their own, and some I helped at the meeting. 

Everybody DID end up with a launchable rocket, although there were... some issues. Some kids who misread the instructions had rockets that basically blew up on the launch pad. Other kids glued their fins into very creative configurations--I should definitely have covered fin placement in my lesson!--and had rockets that spiraled off alarmingly upon liftoff. Of course it had to be my own kid's rocket that lifted off, rose about five feet, then turned 90 degrees and screamed directly at one of our chaperones. She and all the kids leapt away, the rocket landed basically where she'd been standing a half second previously, smoked quietly for several seconds, then exploded.

But most of the kids had awesome launches!


There were so many cool, technical things that the kids practiced and learned during this activity, from the build instructions to fin placement (oops!) to engine size to the practicalities of hooking up the rocket to make a complete circuit to why we always do a countdown to launch that, yeah. There should seriously be a badge for that. It was the FUNNEST!

Girl Scouts always want to make the world a better place, so for our final step, I introduced the kids to the Bortle Dark-Sky Scale. We live in an interesting location, with very dark and rural areas just a few minutes from our town, but also with a large university that also leaves the lights on at its large football stadium way too often for my liking. In other words, do NOT GET ME STARTED about light pollution!

I gave the kids an at-home copy of the Bortle Dark-Sky Scale, and we talked about it and about light pollution while we took turns looking through the telescope. I had really wanted to also do this Globe at Night Citizen Science Project with them, but it wasn't the correct time of month when we met, alas, and I didn't want to turn it into one more at-home assignment. I guess I'll save it for the next time I run this badge and need all new activities!

I think the kids all had a fun time with this badge. We had the perfect combination of activities for their different personalities--active stuff, outdoor stuff, hands-on stuff, art stuff, experiential learning stuff, and, of course, campfire and hot dog and s'mores stuff. It was one of the very few times we've met in person since the pandemic began, so I think they were all thrilled to see each other, and I'm very hopeful that rocketry and telescope observation were exciting events even for those jaded teenaged hearts. 

Next up: we navigate Girl Scout cookie season in a pandemic, maybe go kayaking in a cave, and also maybe have an entire meeting based solely on Percy Jackson.

Sunday, January 3, 2021

How Much Foaming Soap Can One Reasonably Have, and Why Do I Keep Wanting to Do Hipster Things with Mason Jars?

I made a few new batches of DIY foaming soap, and I'm so pleased that I took that break from eating cookies, drinking eggnog spiced with rum, and working crossword puzzles that I had to photograph my glowing accomplishment!


Don't let's talk about the facts that 1) making said batches of soap took less than five minutes, and 2) I've nevertheless been putting the chore off since late November.

About the time of year that I baked the holiday season's first batch of sugar cookies... Coincidence, I'm sure.

These Mason jar foaming soap dispenser lids are still working great, and because I'm currently obsessed with consumer math I did the calculations to figure out I'm using approximately $1.29 worth of Dr. Bronner's soap in that pint Mason jar. I'd be spending $3.50 more to buy that same amount of Method foaming soap, times the three sinks in our house, so I suppose that's more than worth the less than five minutes that it takes to make a few new batches of homemade foaming soap every few weeks!

I mean, at least for me. Do y'all get excited about saving $10.50 on soap, or is that weird?

Speaking of things that I shouldn't get excited about, please tell me that I do NOT need the following products that I also want to make from Mason jars:

I mean, we use a spoon for honey, nobody's making more lemonade or cocktails than we can drink in one sitting (if you've never made this strawberry lemonade before, go make it and then reassure me that your family, too, emptied the blender within minutes), and I'm sure not INFUSING anything, but... Mason jars!

Honestly, though, considering we drink out of our Mason jars as well as use them for food storage, all our Mason jars already have jobs and don't even really need to be turned into syrup infusers or more foaming soap dispensers. What I REALLY need are attachments that will allow me to turn vintage soda bottles into useful stuff. Let me know if you see THAT unicorn out in the real world!

Sunday, December 27, 2020

I Rented a Pottery Wheel for a Week, and It Did Not Go as I'd Expected

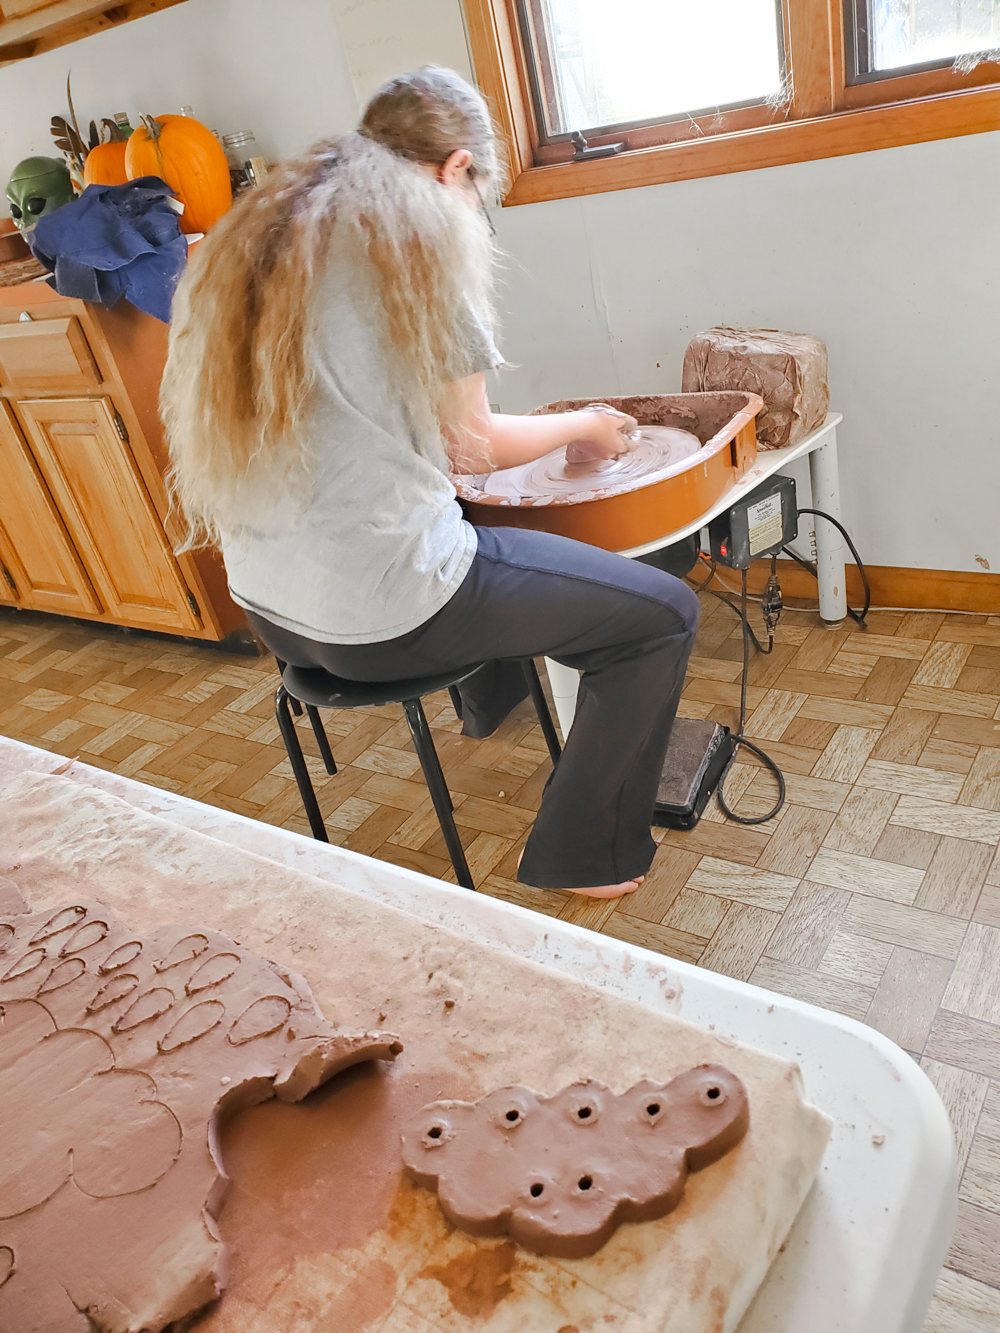
 For one, I thought I'd get the hang of the pottery wheel right away, or at least after a few tries.

Or maybe after watching a few YouTube videos with titles like "How to Center Clay on the Pottery Wheel."

Or possibly after watching a few more YouTube videos with titles like "Can't Center Your Clay on the Pottery Wheel? Watch This Video and You'll Definitely Get It!"

Yeah... no. I'm a big proponent of autodidacticism, but I just could not seem to get the knack of using that dang pottery wheel. Matt and Will also tried a couple of times--


--but that pottery wheel was not about to give up its secrets to any of us. 

Ah, well... we could still hand-build.

Which leads me to another misconception: Okay, fine, I did not poll the entire family before I committed to renting us a pottery wheel plus supplies for a week, but to be fair, WHO WOULD NOT BE INTERESTED IN SPENDING A WEEK GOOFING AROUND WITH CLAY?    

Yeah, my family. Would not. Be. Interested. In. That. 

Will might have been more interested if she'd gotten the hang of the wheel, but are these really the same babies who used to sit for hours and make entire dinner sets out of air-dry clay? I don't even think Syd consented to look at the clay setup for the entire week it lived in our front hallway, and she's the kid who once upon a time spent most of a week making an elaborate headband created from a zillion individually sculpted polymer clay flowers as a birthday gift for a kid she barely knew!

We're just going to call this the week that I played Arctic Monkeys really loud on constant repeat and felt sorry for myself while hand-building weird things out of clay.

Originally, my main thought was, "Shit! I paid $70 for this! I'm going to get my money's worth if it kills me!" But you know what? I got WAY more into hand-building weird things out of clay than I thought I would! I generally always had an idea or two of something that I wanted to make, and with the Arctic Monkeys blaring, the Thanksgiving vacation enabling me to take a break from homeschooling/supervising online schooling, and the rest of my family quietly pretending that the entire front hallway didn't exist, I had plenty of time to get on with it:


I made a lot of little pots that inexplicably have tentacles--


--and a bunch of plant markers that I got all my scrapbooking stamps dirty labeling--


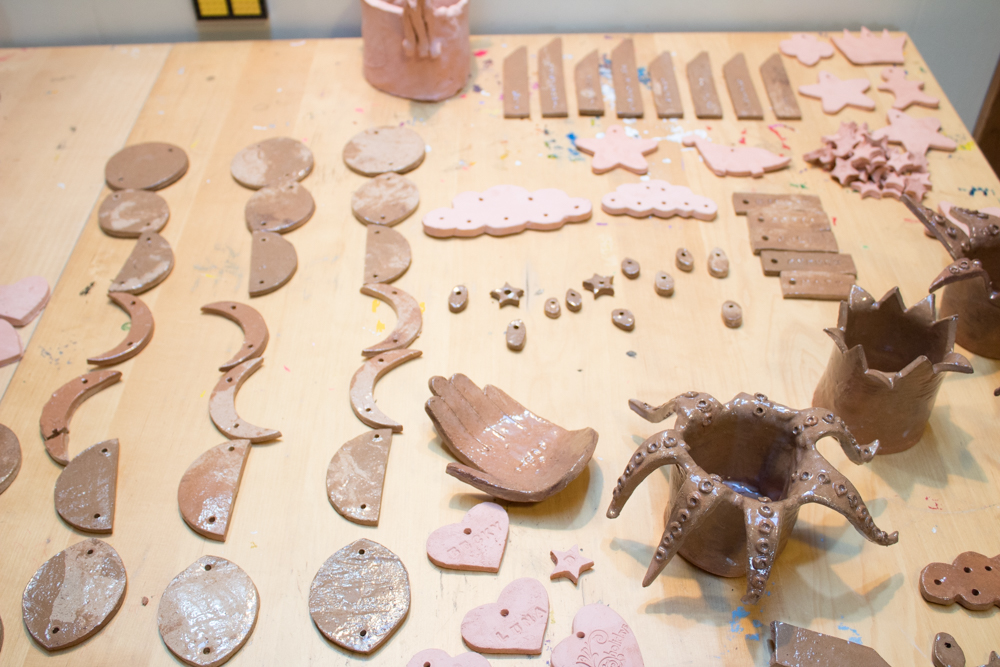
...and a bunch of other stuff. Like, a BUNCH:


I've got Christmas ornaments and gift tags and coasters and phases of the moon hangings, and raincloud hangings and soap dishes and little magnets...

...and little pots with tentacles!


I LOVE them.

I love my plant markers, too, and now I can stop stupidly confusing my lavender and rosemary plants:


And now I'm left with lots of fun things to paint, to add twine and hangers to, to glue magnets on, and to give away or sell or add to my cluttered house's cluttered decor.

I can't say that I'm not always bummed whenever my cool idea for how everyone else in my family should spend their time doesn't pan out (you'd think that I'd therefore stop trying to plan out how everyone in my family should spend their time, but I swear my ideas are always super cool!), and I can't say that I'm not VERY much over this reality in which 2020 as a whole is pretty much just one super-sized class session in which the lesson reads, "Expectations are plans for future disappointments," but now I can also say the following things:

I enjoy hand-building things out of clay.
I am capable of adding tentacles to anything.
I have all of my scissors, and all of my sturdy glues, and all of my favorite pens nicely organized.
If required, I can entertain myself endlessly with the Artic Monkeys, a knife and a rolling pin, and 20 pounds of mud.

Saturday, December 26, 2020

Two Ways to Make an Upcycled Journal

This set of tutorials was originally published on Crafting a Green World.

Is it your New Year's Resolution to write more? Draw more? Keep better track of what you need to do?

You can make an easy upcycled journal to meet all those needs, or to do whatever you want it to do. I'm going to show you three different methods to turn stash and found materials into journals that you can design exactly the way you've always dreamed of. Pick your favorite, or try them all!

Five-Hole Pamphlet

If you love those little Moleskine books, then you're going to love the five-hole pamphlet. I keep a couple of these kicking around in my backpack so that I have one whenever I need one, and I encourage my kids to make and use them for sketching and nature journals. Their lay-flat pages and small size make them a terrific on-the-go notebook.

To make a five-hole pamphlet, you will need:

paper As you can tell in the above image, you really can use anything. One of the journals pictured is made from brown paper bags, and another has pages made from old sheet music.

heavier-weight paper for the pamphlet's cover Think cardstock rather than cardboard for this. The cardstock should be .25" to .5" longer on both sides than the regular paper.

paper clips and paper cutter I use a guillotine paper cutter to keep all my cuts perfectly even.

awl, sewing needle, embroidery floss Waxed thread is the typical go-to for bookbinding, but you'll find embroidery floss much easier, and it's perfectly fine for these books. Upgrade to the good stuff if you want to make heirloom-quality journals.

1. Cut your paper to size Imagine the finished size of your journal--what are your ideal dimensions? 4"x 6"? 5"x 7"? The inside pages of your journal should be cut to twice that width by that exact height; the cover of your journal should measure an extra .5" on both the width and the height.

Also, imagine your journal's pages--how many would you like? The number of pages that will comfortably fit in a pamphlet depends on the thickness of paper that you're using. The brown paper bags, for instance, are pretty heavy-weight, so I've cut seven of them for my pamphlet. Play around with what feels comfortable to you, but 6-10 pieces of paper will give you plenty of pages in your upcycled journal.

After you've got your inside pages cut to size, align them perfectly and hold them together with paperclips on each side of the center line.

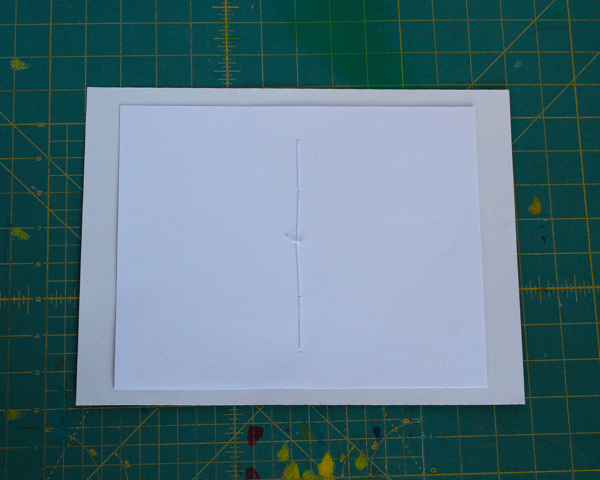
5. Make a stitching guide Another reason to limit the number of pages in your journal--you're going to use your awl to put five holes through the paper along the center line, where you'll be sewing the journal together. Use a ruler to evenly space the five points.

Once you have the five holes pierced, put the cover page centered behind the stack, hold it to the stack with more paper clips, and go through the holes once more with your awl. All of your stitching points should be nicely lined up now!

6. Sew the pamphlet. Start from the inside of your book, and sew first through the center hole, leaving a long tail in the middle. The sewing diagram looks like this:

Image Credit: Sewing Diagram for Pamphlet Stitch via The University of Iowa Libraries

 However, it's almost easier to remember that you start in the center, go in and out the holes all the way up and all the way down, skipping the center hole on your way back down. Go in and out the holes back up to the center, where you'll find yourself where you started. Both ends of the embroidery floss will be on the same side of the book, so tie them in a square knot and cut off the excess.

Fold your pamphlet in half and it's complete!

Accordion-Fold Book

This book is not sewn but instead made by gluing. It's another project suitable for all ages and makes excellent use of upcycled materials.

To make the accordion-fold book you'll need:

paper Your book will be one looooong piece of paper. You can glue pages together to make this piece--I'll show you how later!--but still, I like to start off with wide-format paper. Newsprint or pages from large sketch pads are both good choices.

cardboard Food packaging is my favorite material to upcycle for the covers of these books.

glue Use a good-quality white glue; a name-brand school glue is fine. To attach the covers to this book, I used double-sided tape to save time; this is not an archival choice, but it did get my book ready to use in record time!

cutting and measuring supplies

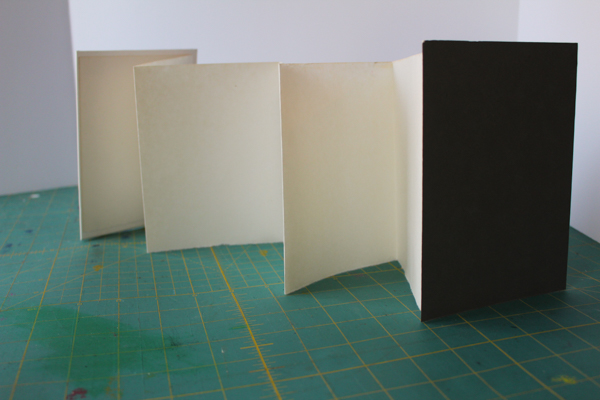
1. Cut and glue the pages of the book. Your book will consist of a front and back cover, with a long, accordion-folded piece of paper sandwiched between. Decide on the dimensions that you want for each page, and then cut several long pieces of your paper that are the correct height. Accordion fold the paper so that the width of each page is correct.

To attach two pieces of paper so that your book can be longer, simply cut the last page of one piece of paper off so that it's no longer the full width, but instead only 1" wide. Glue that tab to the first page of the next piece of paper, and continue to accordion fold for as long as you'd like!

2. Glue on the front and back covers. Cut two covers that are approximately 1/4" wider on each side than the pages, then center the first page on the back of the front cover and glue. Repeat for the back cover.

Pro tip: every time I glue paper, I put parchment paper over and under what I'm gluing, and then a heavy book on top. I let it sit until the glue has dried.

As a quick option, you can use double-sided tape here instead of glue. The tape will eventually erode the paper, but if you're making an everyday sketch or workbook, you'll appreciate the time-saver.

3. Glue on endpapers (optional). If you'd like decorative endpaper, you can glue pretty, handmade paper (our favorite is to marble paper with shaving cream!) on top of the page that you glued to the back of each cover. It's not necessary, but I think it makes the books more decorative.

These books make wonderful family timelines, travel journals, and doodle books. If you use a heavy-weight paper for the pages, you can also make your accordion book into an art journal or photo album.

Saturday, December 19, 2020

How to Sew a Reversible Skirt

I originally published this tutorial on Crafting a Green World.

It's business on one side, and a party on the other!

Or in this case--it's Girl Scout khaki on one side, and pretty pink on the other!

My kiddo wanted a dressier version of her Girl Scout uniform, but I also know good and well that she is simply not going to wear a khaki skirt for any reason other than a dressy Girl Scout occasion. I'm not one to enjoy sewing something that will get little use, so yes, I made her the khaki skirt that she wanted, but I made it reversible, with some pink prints from my stash that I know she'll enjoy wearing every other day.

Want to make your own reversible skirt? It's not hard, and it's a great stash buster!

You will need:

up to 2 yards of two different fabrics. I'm afraid that I went overboard and sewed this skirt too large, but to be fair, Girl Scouts wear those khaki uniforms from the 6th grade until they graduate high school and bridge to adults. It was boring enough to pick out khaki fabric the first time--I don't want to do it every year until my kid graduates! This particular skirt used two fabrics that were 22" x 72", but I could have halved both measurements and still had a fine skirt for an eleven-year-old.

1/2" elastic

measuring and sewing supplies.

1. Measure and cut two identical skirt pieces. Each should be the desired length of skirt + 1.5" and the desired width (two to three times the wearer's waist measurement) + 1.5". To make sure that the two pieces are absolutely identical, I like to lay one on top of the other and cut them simultaneously.

2. Measure and mark the hem/waistline. You will overlap these skirt panels when you sew them together, with one skirt panel folded over the other to make the skirt's hem, and the other skirt panel folded over to make the skirt's elastic waistband casing. You will see, then, a different-colored bias hem on one skirt and a different-colored waistband on the other.

Measure and mark 1.5" from the bottom edge of the skirt panel that you'd like to use for the bottom hem, and 1.5" from the top edge of the skirt panel that you'd like to use for the elastic waistband casing.

3. Sew both skirts. Sew each skirt panel into a tube by sewing the short sides together and finishing the seams.

4. Sew the hem and waistband. Place the two skirt pieces wrong sides together, and overlap them by 1.5" inches. The skirt that will be folded over and sewn to make the bottom hem should overlap the other skirt piece by 1.5" at the bottom, and the skirt that will be folded over and sewn to make the elastic waistband casing should overlap the other skirt piece by 1.5" at the top--the marks that you made in step 2 should help you with this.

Fold the bottom hem up, crease it, then fold it again to the inside and edge stitch it, encasing the raw edge of the other skirt panel.

Turn the skirt inside out, then fold the top waistband hem up and crease it, then fold it over again and edge stitch it down, leaving an opening to insert the elastic.

Attach a safety pin to the elastic, feed it through, sew the ends together, and sew the opening in the casing closed.

And now you have a reversible skirt! You can use this method to alter the matching skirts from this tutorial, and outfit a whole troop of Girl Scouts.

Friday, December 18, 2020

My DIY Rainbow Sierpinski Triangle Quilt


I'm probably supposed to tell you that the best thing I've ever made is my children. 

And don't get me wrong, because they're super great, but 1) I'm pretty sure that they actually made themselves out of nonsense, candy, and pig-headedness; and 2) they are NOT a completed rainbow Sierpinski triangle patchwork quilt!

I LOVE this thing. It's, like, the perfect distillation of most of my favorite things: colors lined up nice and orderly, sewing, math, and picky little details that it's almost but not quite possible to get absolutely perfect.

If only I could somehow combine it with reading, cats, and hot chocolate spiked with matcha and Bailey's, I'd be gone right now because I'd have reached Nirvana. Oh, and literal Nirvana would be there playing for me, too.

When you last left me thisclose to Nirvana, I had completed the beautiful rainbow quilt top. I was pretty pleased with myself for being so far ahead in my homemade Christmas gift game that I then complacently did other things for a month, then was all, "Crap! Christmas is this month and the Incompetent Narcissist in Chief has made a shambles of the post office! I should probably get my gifts in the mail so that I can start fretting about them being lost in the mail!"


To finish my rainbow Sierpinski triangle quilt, I sewed a .5" sash to the perimeter, added a cotton batting layer, and then backed it with one piece of black Kona cotton (I LOVE extra-wide fabric!). I added an extra 2" to the backing fabric on all sides so that I could make a back-to-front binding on the quilt. 

I really, really, REALLY struggled with what thread color to use for quilting--first-world problems, amiright? I consulted my teenagers, who were sarcastic and unhelpful--thanks a LOT, Kids!--and with Matt, who was probably helpful but I didn't like anything that he said. I finally decided to stitch-in-the-ditch around every triangle with white thread on the top and black thread on the bobbin...


...and now what I wish I'd ACTUALLY done was use black thread on the top and bottom and only stitch-in-the-ditch around the black triangles. The problem is that I don't super love the look of quilting--gasp, I know!--and I always want the lowest-profile, least-distracting-to-the-patchwork method. 

It might have worked if I wasn't shitty loose with my stitching in the ditch, but I don't like seeing the white thread breaking up my rainbow triangles:


Oh, well. It's done now. And I'd probably be a little sad if I didn't have an excuse to make another entire quilt just to have another go at one small and fiddly detail.

Anyway, what I actually feel is total love for the pretty quilt that I have accomplished! Here, have some more photos of it!


I am 100% going to make myself one of these now, both as an excuse to make it even more perfect this time, and because *I* want one! And then I'm probably going to list one in my Pumpkin+Bear etsy shop, because I quite enjoyed the challenge of sewing this and wouldn't mind making some more.

I think I want to play with different rainbow patterning to see if I can achieve true rotational symmetry, and I might see if I can come up with a more creative rainbow pattern than just rotational symmetry, as well. I also sort of want to buy this coloring book and try to recreate some of the mathematical patterns in it, because if Sierpinski triangles make an awesome quilt, then what else might?!?

And I am for SURE going to try quilting my next one with black thread on the top and bottom. My new rule of thumb is that whenever I'm debating between black thread or not-black thread, I should choose black thread.

Thursday, December 17, 2020

DIY Hot Chocolate Bombs, Because Bonding with Teenagers. And Also Chocolate.


"I just don't know why my body is falling apart this year," I say to no one as I sip my pre-dinner hot chocolate...

Or, you know, eat my after-breakfast cookie...

Seriously, I don't even know if what I'm consuming at any given moment is a depression snack, pandemic snack, or holiday treat. Some ever-evolving combination of all-three, I'd guess.

I blame it entirely on my children. If it was just Matt and I, our kitchen would contain nothing but lunch meat, sliced bread, apples, peanut butter, and store-brand Pizza Rolls. Well, and alcohol, because we have nobody but ourselves to blame for 5:00 Cocktails and Crossword Puzzles. But with one kid who's an adventurous eater, one kid who seems to cruise Instagram Reels looking for the latest on-trend cooking project, and my parental obligation to feed them vegetables and protein and, like, calcium and whatever,  and make a pandemic suck as little as I'm able to while everything is sucking SO MUCH...

Let's just not think about it right now. Instead, let's make hot chocolate bombs with Syd!

These turned out so perfect and so cute, and were super easy, too! I highly recommend them as a fun project to bond with your kid, and they would definitely make good handmade holiday gifts.

You will need:

  • chocolate or candy for melting. I used straight chocolate chips, because apparently I'm basic, but Syd, who's weird in that she loves hot chocolate but hates "food" chocolate, used candy melts and they worked just as well. As a bonus, she used Funfetti candy melts, and the resulting hot chocolate bomb is ADORABLE.
  • basting brush. We have a silicone one that we got god knows where, considering how anti-silicone I used to be when it came to food-related items, but dang, is it easy to clean after getting melted chocolate ALL over it!
  • hot chocolate mix. Use some kind of powdered mix. Most years, I make my own from cocoa powder, sugar, and powdered milk, but not gonna lie--this year, we're drinking a store-brand mix and honestly, the kids probably like it better.
  • marshmallows. You've gotta have some mini marshmallows or it ain't a real hot chocolate bomb!
  • silicone or other flexible mold. This item seems to be the sticking point for most people to be able to make hot chocolate bombs. Silicone sphere molds are hot sellers right now! You don't have to have that exact item, however. Here's a short round-up of stuff that you might have that would work equally well:

The only two qualities that your mold requires are that it 1) is flexible, so you can peel it away from the chocolate shell without cracking it, and 2) is large enough that it can hold the hot chocolate mix and a few marshmallows.

1. Make your candy shells. Melt your chocolate chips or candy melts in the microwave, because you're still being just that basic. Stop to stir them every 20 seconds or so until they're nice and liquid.

Using a basting brush, coat two identical molds with the melted chocolate. Syd got hers right the first time, but I had to put a second coat on my shells because I made them too thin the first time. To be honest, I got overexcited and probably made them too thick that second time, but they still dissolved in the hot milk.

After you've coated the molds, put them in the refrigerator for about five minutes, until they've solidified and feel cool to the touch. At that point, you should be able to carefully peel the mold away from the chocolate. It's a little fiddly, so if it cracks just try again until you've got the hang of it. 


2. Fill one half of the mold with hot chocolate mix and marshmallows. Pile it in and mound it up, if you need to, because when you fuse the two parts of your hot chocolate bomb together it will have twice the space inside.


3. Fuse the two halves of the hot chocolate bomb. You can do this a couple of different ways. On TikTok, everyone seems to like to hold one half of the hot chocolate bomb edge-down on a hot surface, then stick it to the other half, but Syd and I both first used a knife to trim away any jagged bits from the edges of both mold halves, then we simply stuck them together and painted more melted candy across the seams until they were fused together and all sealed up. Since you only have to put the molds in the freezer for a few minutes before you can fill and seal them, the candy we'd originally melted to make the shells was still liquid enough that we could also use it to paint the seam closed, and it was super easy.


And look how cute they look! At this point, you could drizzle the finished hot chocolate bomb with more melted chocolate, then add sprinkles, more mini marshmallows, or crushed peppermint, but Syd and I both decided that our hot chocolate bombs were pretty enough as-is (and anyway, we were ready to drink them!).


To use the hot chocolate bomb, you just literally pour hot milk over it. But make the milk really, really, REALLY hot! The hotter it is, the easier the hot chocolate bomb's shell will melt, and anyway, you're going to sit there and admire the whole thing for a few minutes before you even think about drinking it, and nobody likes lukewarm hot chocolate.


Check out how delightful it is!

If you've got teenagers AND the opportunity to make them squeal with happiness, take that opportunity!