Wednesday, December 28, 2011

An Overhead Projector Christmas Tree


Probably anyone who owns an old-school overhead projector knows how much free play they get. Sure, we use the projector for map tracing, copywork of all sorts, and all sorts of math and science activities, but with just the clear plastic sheets and a nice set of overhead markers, the kids dream up all sorts of fun play--during a playdate a couple of weeks ago, one little kid drew at least a dozen scenery pages on the plastic sheets and then projected an entire play that she'd just made up, using her fingers as all of the characters.

If you have any other accessories, such as translucent pattern blocks, then you're perfectly set up. I bring out the overhead projector as an actual party activity, especially for little siblings or friends on the younger side of the guest list, but my own kids will still spend entire quiet mornings or afternoons engrossed in play with the projector.

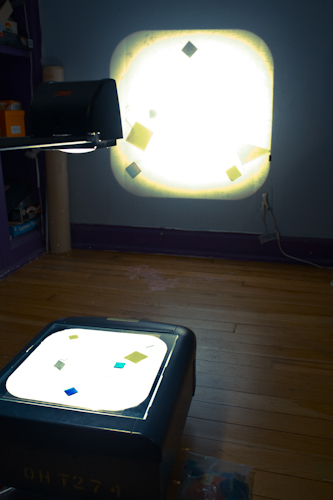
Only rarely, outside of helping out with some academic activity related to one of their areas of interest, do I set up an actual "activity" involving the overhead projector, but recently I invited Syd to create an overhead projector Christmas tree.

She drew a tree on a clear plastic page:


She set the page on our projector, and decorated it with translucent geometric shapes:


She enjoyed its projection on the wall, and then took it apart and did it again!

Unfortunately, we only have a small amount of wall space suitable to using the overhead projector in our living room, although as wall space it is ideal, since you can tape a large piece of paper onto it and copy from the projector:


One day, however, the finished basement playroom will become a place that the children do not fear to tread (something about a monster with lots of arms, and one of them is really long and has a pincher on it...), and therefore a place where it gets more use than as a dumping ground for out-of-favor toys, and then, I tell you, THEN we'll have tidy shelves of art supplies and books and toys, and plenty of room in the middle for active play, and a TV so that I have room to use my old-school workout videos...

...oh, and a much larger wall space for the overhead projector.

Tuesday, December 27, 2011

The Secret to Life's Happiness is Baked Doughnuts

Because doesn't this just look like perfection?

Willow has made the baked doughnuts from Knead It, Punch It, Bake It!: The Ultimate Breadmaking Book for Parents and Kids a few times now, and every time I swear they turn out tastier! This time we refrigerated the dough overnight before rolling it out, simply because Willow ran out of time to finish that evening, and I do believe that it made the dough much easier to work with--less sticky, easier to cut, etc.

But of course, who cares about the baking instructions? Everybody knows that the real treat is dunking them in melted butter, rolling them in cinnamon-sugar--

--and munching them up while they're still warm:

Fabulous, yes?

Even better that they're made by the seven-year-old.

Sunday, December 25, 2011

Tutorial: Popsicle Stick Christmas Ornaments (or Wands!)

When the holidays become most bustling--to and fro to winter gymnastics camp, to and fro to playdates with schooled children who are temporarily out of school, to and fro for last-minute bits and bobbles, to and fro to the library to appease the child who CANNOT take a major car trip without several dozen novels, back to gymnastics camp for the winter show, shitfire we have to make one more trip to the grocery store for cookie dough and oranges, not to mention, you know, the TEN-HOUR car trip--that, to me, at least, is when simple Christmas crafts are the most magical. Everyone settles down, everyone slows down, everyone relaxes back into the home and back into the process, not the product, of the winter holidays.

While, due to the bustling, some of our most favorite Christmas crafts, such as baking cherry bread with Daddy and decorating gingerbread houses with me, have actually been relegated to post-road trip New Year's activities, we made the time every day to come together for some simple special activities every day, such as these painted and glittered popsicle stick ornaments.

To start, you'll need plain popsicle sticks and glue--yes, you can use plain white glue for these, but you'll have to let them dry for several hours before you paint if you do, and if you use hot glue, you'll be painting five minutes later. A Star of David is two triangles--

 --with one upside-down and on top of the other:

A tree is one triangle and one stick--

--placed vertically from top to bottom:

Of course, after an ornament or two, the girls were done with that nonsense and fully focused on popsicle stick wand-making. This is why we only have a half-dressed tree at the best of times.

After the glue is dry on the popsicle stick creations, paint them--

--and then, while the paint is still wet, sprinkle the glitter right on:


Wait, did I say sprinkle? I meant douse. Liberally.

When the paint is dry, hang up your obligatory two ornaments onto the tree, and then spend the rest of the evening wielding your wand:


She was turning me into something not very complimentary, alas, on account of I had just told her that it was time for bed. Such is life for a young wizard...

Tuesday, December 20, 2011

Candy Christmas Trees

We're doing gingerbread houses just as a family this year, so in lieu of last year's larger gingerbread house party (which was well worth it, as everyone had a fabulous time, but did require me to pre-bake and assemble a half-dozen gingerbread houses), this year the girls had over a little buddy and his mama (my buddy) to make far simpler candy Christmas trees.

The Christmas trees really are quite simple, requiring only waffle cones that Willow trimmed with kitchen scissors to sit evenly upside down, green frosting (I used white chocolate melted in our fondue pot and dyed green, similarly to what I do with gingerbread houses, but I quickly realized when the kids all got to work that this was major overkill), and loads of yummies.

They were messy--

--a little ugly (and yes, of course, that's mine below that I'm calling ugly)--

--and absolutely wonderful.

Saturday, December 17, 2011

Beeswax Ornaments: Honey on the Tree

For a couple of days it seemed the crafts-only crock pot was always hot, keeping beeswax melty, spreading that honey scent throughout the entire house, while we all took our turns (many turns!) making beeswax ornaments for our Christmas tree, and the trees of our family and friends.

So simple, so satisfying, so sweet(!) to make:


To make your own, check out my beeswax and fabric scrap ornament tutorial over at Crafting a Green World.

Thursday, December 15, 2011

Caution!!! Elves at Work!

with beeswax
and silicon molds
fabric scraps
and a sewing machine
bias tape
and waffle cones
red and green M&Ms
and cardstock
kite paper
and glue
a guillotine paper cutter
and FIMO clay
Photoshop
and digital scrapbook supplies
Sharpies
and, of course, a well-used box of

Christmas is busily, happily, (and quite inefficiently) being crafted. And photographed, and written about, of course--but not for now! Everyone knows that Christmas craft revelations have to come AFTER Christmas!

Monday, December 12, 2011

Beeswax Paper in Bee Culture Magazine

One of my favorite things about writing for Crafting a Green World is the fact that I retain ownership of my own work. That means that when the editor of Bee Culture magazine, having seen my beeswax paper tutorial posted at Crafting a Green World, writes me to ask if I could submit that tutorial to their magazine for publication, I may say yes!


I wish that getting my work in print was ALWAYS this easy!

P.S. Want to follow along with my craft projects, books I'm reading, dog-walking mishaps, and other various adventures on the daily? Find me on my Craft Knife Facebook page!

Friday, December 9, 2011

On Horseback

I have a mental list of practical skills that are, while not actually so much practical in the strictest sense of the word, are nonetheless skills that are, rather, useful to have, since they involve activities that we may be called upon to participate in off and on throughout our lives on a casual basis, and that can also be quite dangerous if we participate without knowing what the hell we're doing.

Short and incomplete list:

  • lighting a bonfire, fireplace, or grill
  • swimming
  • ice skating
  • shooting a rifle or pistol
  • using a chain saw, wood chipper, or other large power tool
  • driving a stick shift
  • steering a boat
  • horseback riding
  • using a pocket knife
Sure, ice skating is more merely painful, and absolutely no fun, if the first time you've ever been on the ice is in a group outing with some of your buddies from college, but I know of plenty of idiots who got themselves seriously injured because they didn't know how to light a fire properly (hint: it doesn't involve a Dixie Cup full of gasoline), and I know of one wonderful child who was killed his first time on horseback, on a poorly-run, unsafe trail ride at a state park in Missouri that his parents didn't realize was unsafe because they were unfamiliar with horses, too.

But forget the fear-mongering--call my list, instead, a life skills bucket list, or a list of accomplishments for the well-rounded person. Whatever you call it, and lengthy intro aside, what I am wanting to tell you is that my little girls were basically living the dream last Friday:

First horseback riding lesson? Mark it off the bucket list, and you might as well just go ahead and skip Christmas after that, because it does not even compare.

The girls' horseback riding class at PALS featured a well-fitted helmet that each child wore at all times when around the horse (not just when upon it)--

--and a dedicated side-walker for each child, and a second walker holding a lead rope:

In addition, since PALS is primarily a riding-therapy program for people with special needs, the horses are invariably, calm, kind, patient, and well-trained. The absolute only thing that I had issue with is that they didn't require students to wear a heeled boot (just a closed-toe shoe), but I put my kids in heeled boots anyway, so no problem.

The girlies learned how to mount their horses, how to start them walking (with Willow's lazy horse Splash, this involved a big kick!), how to hold the reins and balance-- 


--how to steer--


--how to stop--


--how to hang on when they work up a little speed--


--how to take off their tack and groom them and make them comfy--

--how to talk about them using all the right words, croup and forelock and barrel and such--

--how to wait patiently, still and quiet--

--and how to put away all their tack and gear in just the right place, even if it's REALLY heavy:

Along with always looking out for things that I want the kiddos to know, I'm always looking out for sports and activities that have value for building them into the types of people that they'll want to be.

Forget the discipline, patience, affinity with another creature, willingness to grub and muck stuff that are of such value--it took a total of one lesson before the girls informed that they want to grow up into the type of person who was good with horses!

Well, okay.

Wednesday, December 7, 2011

Rainbow Waffles = Nom

Near-ish lunchtime the other day, the girlies seemed hungry for a big lunch and an elaborate project--you know, that sort of wandering, opening and closing the refrigerator, declaring that they want something to eat but all suggestions are deemed unacceptable, wanting me to do "something" with them but they don't know what, kind of behavior.

Inspired by these rainbow pancakes from my Our Favorite Family Foods pinboard, but personally finding standing at the stove and cooking pancake after pancake to be the worst form of torture, I re-translated the recipe into rainbow waffles (because I find standing in front of a waffle iron and cooking waffle after waffle to be a very slightly milder form of torture).

The girls had a gorgeous time dyeing the divided waffle batter:


I know, Sydney looks totally beat up in that above photo. We'd gone to a pumpkin patch the day before (Freeman Family Farms, I'm looking at YOU!), where they'd set up a little barnyard petting zoo, in which there was a miniature Shetland pony, who bit my child ON. THE. FACE.

Yeah, we'll be visiting a different pumpkin patch next year. Anywho...

Since I loathe using the waffle iron, and I happen to have, if I do say so myself, two quite competent children, I set the waffle iron up on the living room table instead of the kitchen counter, demonstrated its use to the little people, and let them have at it. There were a couple of burned fingers, sure, but the kiddos? They  LOVED it:

They did themselves a pretty darn good job, too:

Since my other thing about waffles is that I refuse to believe that they contain enough nutrition or protein or filling power to sustain a meal, I used my break from the waffle iron to cook up the remaining parts of a big ole' breakfast:

We've got yogurt, and bananas, and bacon, and eggs (cooked with a little bacon grease, obviously), and waffles with maple syrup. When I showed the girls how to use up the dregs of each bowl of colored batter to make a few last super-rainbow waffles, you could tell that they totally wished that they'd thought of doing that for every single waffle they'd made.

That's a giant breakfast on my plate there, right?

Well, if you think that's giant, you should see my five-year-old's breakfast:

Well, it was breakfast, and then morning snack, and then lunch, and then afternoon snack, but you get the idea.

And that's the story of how I no longer have to be the one who works the waffle iron!

Tuesday, December 6, 2011

Saturday Morning, Baking Bread

add honey from the honey farm

to the bowl with yeast and warm water, and set aside.

in a separate bowl, measure bread flour

and salt

mix by hand

Not literally!!!

Oh, okay...literally


pour in the frothy yeast mixture, and mix some more

knead for ten long minutes, to make your muscles strong


Let it rest, let it rise, punch it down, let it rise.

pat it into greased loaf pans

Let it rest, let it rise.

bake it in the oven for a long, LONG time

I make bread often, and when I'm solo, I make my bread solely using the easy five-minute method

But that, of course, is because when I bake bread solo, I only care about the product, those rolls or that pizza crust or the next day's sandwiches and toast.

When my little girls ask to bake bread, they're not asking to bake bread because they want to eat bread (at least not solely). They're asking to bake bread because they want to measure, and mix, and taste honey and salt on their tongues, and sift bread flour between their fingers, and knead bread dough with all their strength, and warm their feet on the oven door while they watch their loaf rise, and burn their fingers because they just can't stop themselves from touching that brown crust before it's cooled.

Baking bread...when I tell you that it's the process, not the product, when I seethe so hard that my heart speeds up as I watch a dad take the glue bottle from his daughter's hand and micro-manage her craft project at the library, when I let my girls make big messes and big mistakes, when they draw on themselves with permanent marker, when they do a terrible job of brushing their hair, when we spend an entire day together and don't "do" anything...well, then that's when I want you to think about baking bread. Sure, that bread that my girls baked tasted delicious, tasted even more delicious to me because they'd baked it, but that wasn't really the point of the activity, was it?

The point of the activity was the process.

P.S. We use the bread recipe from here, and we love it: