Showing posts with label woodwork. Show all posts

Wednesday, July 7, 2021

She Earned Another Made-Up Badge: The Girl Scout "Homesteading" Badge


When my Girl Scouts were younger, I'd hear the leaders of older Girl Scouts gripe about the small selection of badges available for Cadettes, Seniors, and Ambassadors. I didn't get it at the time, because goodness, there were more badges around than my Brownie and Junior could ever possibly earn, and a whole slew of retired badges and fun patches, to boot!

But now that I have a Senior and an Ambassador Girl Scout, I see that the problem isn't so much the smaller selection, because there are still more official badges than my kids could do during their time in Girl Scouts, but the variety. Kids are always going to be super excited about some stuff and not excited at all about other stuff, but if you take out the not-so-exciting badges from the official GSUSA line-up... well, those gripey leaders had a point.

So I've been happily, unabashedly letting my entire troop remix or just plain make up badges. GSUSA doesn't have a current older-level basic camping badge, so I bought a set of retired Camping IPs and we made up the requirements to earn it. GSUSA doesn't have a badge for encouraging kids to have an immersive experience with books, so when a subset of my troop was into Percy Jackson, we bought a made-up Percy Jackson badge and made up the requirements to earn it. GSUSA doesn't have a travel badge for Ambassadors, so I'm right now in the process of collecting some retired Traveler IPs and later this year... yep, we'll make up the requirements to earn it!

Will is interested in various homesteading skills at the moment. Some much older retired badges do cover some of those skills, but there was nothing that was affordable, not too precious to put on a busy Girl Scout vest, and covering the skill set that interested Will the most. However, we thought this made-up badge would work quite well as a Homesteading badge, so I bought it--and we made up the requirements to earn it!

And here they are!

1. Research the square-foot gardening concept. Create and grow a square-foot garden for one season. 

For this step, I gave Will several cinderblocks, bags of soil, and newspapers, and showed her how to make a quick-and-dirty raised bed garden. She raised herself a fine crop of strawberries in it!

Other possibilities for this step were creating and growing container gardens, or helping an adult build a cold frame and using it to grow out-of-season greens.

2. Learn how to make your own jam. 

What to do with that fine crop of strawberries? Make jam, of course!

For this step, I taught both kids how to make freezer jam and cooked, canned jam, and the additional trick of laying out washed, topped strawberries on a cookie sheet, freezing them, and then tumbling them into a larger freezer container. Since they're already frozen, they won't stick together in that larger container, and you can just scoop some out whenever you want smoothies or muffins.

It's that life hack that has become an unconscious standard practice!

3. Learn how to use the dehydrator. 

I'd thought that Will might like to learn how to dehydrate her own dried fruit and fruit leather, but instead she ended up helping me deal with a sudden bounty of herbs and greens. I'm going to be really happy this winter that I have so much raw kale in the freezer and all those jars of dehydrated kale and dehydrated oregano in the pantry. 

Other possibilities for this step were learning how to make pickles or sauerkraut, both of which are super easy to do, and my kids LOVE them. 

4. Carve something useful from wood.

Here's Will at our most recent troop camping trip working on her wooden spoon:

She used her pocket knife while at camp, but mostly she used this wood carving kit that is probably the best gift the Easter Bunny's ever brought the kids!

She carved herself a quite serviceable spoon, lightly polished with olive oil and beeswax and absolutely perfect for all of our rustic culinary adventures. 

Other possibilities for this step were learning how to knit or crochet and making a washcloth to prove it!

5. Learn how to make cold-process soap from scratch.

This was definitely our most time-consuming project! I came into it with a big head on my shoulders, having made cold-process soap a few times before, and having taught Syd to make it just a few years ago, but I definitely got knocked down ALL the pegs when our first TWO batches of soap didn't turn out!

What I finally learned after doing the Googling that I should have done in the beginning is that it was my decade-old lye's fault. And now I own a brand-new five-dollar giant bottle of lye, so I guess my goal is to use it up in soapmaking sometime BEFORE the next decade...

Well, we got a good start this summer!


Will made a lovely soap with olive oil, coconut oil, and powdered milk--


--and that lye, of course! Check out its pH, because you KNOW we never pass up a chance to test some shocking pH:


If you don't try to use sus lye, cold-process soap actually IS very simple. It's mostly stirring--


--until you reach trace--


--pouring it into an empty oatmeal canister to finish saponifying--


--removing it from the container when it's hardened and slicing it--


--and then leaving it to cure, every so often admiring how beautiful it is:


Isn't it gorgeous? It's actually inspired me to want to try some different recipes, but I've got to figure out what I'd put it in, because that was our only oatmeal container!

6. Bake bread from scratch.

Have you noticed yet that most of Will's activities are ones that are suspiciously very helpful to ME?!? Mwa-ha-ha! But yeah, I hate to cook, so I am always looking for ways to encourage someone else to cook instead of me. I taught Will to make this no-knead bread, which also happens to be the easiest, most delicious bread in existence, so now that she knows how to make it, I hope she makes it for us lots!

Other possibilities for this step were learning about rain barrels and helping her dad reinstall and maintain ours, or letting me teach her how to sharpen knives. I would appreciate having someone else around who can sharpen knives, but it's also nice to eat homemade bread that I didn't have to bake myself!

7. Level up your animal husbandry skills.

I left this option kind of open, mostly because there are, in my opinion, SO MANY animal husbandry tasks that need to be done around here! The pets are about as feral as the kids!

Will chose to focus on her chickens. She spent a lot of time making a nursery area to keep the pullets away from the big chickens (they defeated her gatekeeping system almost immediately, but so far the big chickens just seem to ignore the little ones), and then giving the whole flock more entertainment options for those days when she doesn't allow them to free-range. Got to be unpredictable so you foil the foxes!

And that's how Will spent part of her summer learning some very useful skills! Now she can start and grow a garden, preserve what she grows, bake herself delicious bread, make herself gourmet soap, and carve the spoon she can use to spread that homemade jam on that delicious bread.

OMG and now I'm realizing that I should totally go and have her do exactly that! If you can celebrate completing a badge by eating bread and jam, then you really HAVE made up the perfect badge!

Saturday, May 15, 2021

How to Make a Scroll Party Invitation

This tutorial was originally posted on Crafting a Green World.

 A great theme party starts with a great themed invitation! 

We always do fun, themed invitations for my kiddos' birthday parties--check out the message in a bottle invitation to the pirate-themed birthday party and the giant Minecraft block invitation to the Minecraft-themed party

 This year, my soon-to-be eleven-year-old is having a fairy tale-themed birthday party, so we made each invitee a party invitation in the shape of a royal scroll. It was easy to do, used mostly stash, and was a great way to introduce the party's theme to all the little guests. 

Here's how we did it! 

  1. Obtain a couple of thin dowels. Because this was a royal decree, the kid wants the scroll handles to look nice and finished, so she vetoes my suggestion that we use twigs found in the yard. I maintain that twigs would look adorable, however--perhaps for a woodland fairy party? Dowels are sold in several widths--we chose the narrowest, for these small scrolls, but you could just as easily obtain one wide enough for the largest scroll that you could handle. 

  2. Paint the dowels. The kid claims that a royal scroll would obviously have gold handles, so I leave her to it. Unfinished wood takes paint easily, so she is able to make the dowels beautifully gold with two coats of paint

  3. Compose and design the text of the scrolls. Because I am a mad genius, I compose an invitation in poem form, with an ABCB rhyme scheme. My shining moment is when I am able to rhyme a request for an RSVP with my email address. You'd think this would encourage people to actually RSVP, but be assured--it doesn't. 

 My husband lays the poem out in fancy font, with two invitations to a page. My kiddo reminds him that the invitation should be long, so that you have to unscroll it to read it, and so he indulges her by leaving a little more space between stanzas. If she ever gets married, she's going to spend a LOT of time planning her wedding. 

 An optional next step would be to coffee stain these scrolls to make them look aged. 

  4. Cut the dowels to size. The scroll handles should be longer than the scroll, so the kid measures them out at a couple of inches past the scroll on each side, and makes sure that they are even:  

My older kid has just finished earning her Woodworker badge in Girl Scouts, and so she delights in "offering assistance to a younger Scout," as she puts it, by cutting the dowels to size: 

 5. Attach the scroll to the handles. There are several ways that one could do this--pretty washi tape, double-sided tape, hot glue--but I'm stoked that the children have taken over the project, and so I hand them the simplest solution, Scotch tape, and move on with my life: 

 Super cute, right? Also in the planning stages are games of Pin the Kiss on the Frog Prince and Toilet Paper Princess (I'm banking that most of the young guests have never been to a bridal shower before; they are going to flip OUT over this game!), sandwiches cut into the shapes of crowns and ponies, and the ubiquitous castle cake. 

 That castle cake, by the way, is going to need all of your positive intentions sent my way!

Saturday, April 17, 2021

How to Make a Ribbon Wand

 This tutorial was originally published on Crafting a Green World.

Have a dowel? Have a ribbon? 

 You can make a ribbon wand! 

 Kids love these sweet, floaty wands made for dancing and leaping and running. You'll mostly find them in the hands of the preschool set, but my eleven-year-old rediscovered the ribbon wand during a recent trip to a local children's museum, and rather than buy her the lovely but expensive one in the museum gift shop, I promised her that I'd help her make one of her own when we got home. 

 And so I did, and so can you! 

 To make your own ribbon wand, you will need: 

  dowel. We always have some dowel or other in our garage, left over from some project or other, but if you don't, just go to the hardware store and find one that feels good in your kid's hand--around 1/4" should do. You can stain or paint it (my kid painted hers gold), or leave it plain. Cut it to a good size for your kid, and put the rest of the dowel back in your garage for another project.

  screw eyesIf you've got one in your garage, use that one; otherwise, buy the smallest that you can find. Ours are 15/32", and they were super cheap.

  barrel swivelThis one you can likely get for free if you know anybody who fishes, but again, they're cheap. Ours are size 10, and they work great with the 15/32" screw eyes. 

  ribbon. We used stash 1/2" silk ribbon, and my kiddo vat dyed it pink. I like silk because it floats so well; satin would be another good choice. My eleven-year-old put six feet of ribbon on her wand, but if you do have someone in the preschool set, you'll probably want to start with a shorter length, or resign yourself to untangling ribbon every two minutes. 

 1. Assemble the ribbon wand hardware. Using needle nose pliers, slightly open the eye of the screw eye, and insert one end of the barrel swivel. Tie one end of the ribbon to the other end of the barrel swivel. Check out the above pic to see the set-up. 

  2. Attach the hardware to the dowel. I had thought that I was going to have to use an awl to get the screw eye started, but my kiddo just twisted it right into one end of the dowel. It's so secure that we didn't even need to use glue, although you certainly could secure it with a good epoxy glue. Use the pic below as a reference: 

 These ribbon wands are so quick and easy that older kids can make them completely independently. They'd make a great kid-made birthday gift for another kid, or a simple project for a group of kids to make together. If you've got a group of kids marching in a parade this summer, they'd all look super cute waving matching ribbon wands as they marched!

Saturday, April 10, 2021

Make a Pegboard Cookie Cutter Holder

 This tutorial was originally published on Crafting a Green World.

Trying to store a bunch of cookie cutters is the pits. For several years, I'd been using a drawer underneath our kitchen table to hold our cookie cutters, because that's where they all seemed to fit on the day that I first unpacked them. Of course, we've acquired more cookie cutters since then, dragons and castles and Girl Scout trefoils, and not only did they no longer really fit, but the kids were unconcernedly smashing them in their overarching goal of simply getting that drawer closed again whenever they dared to open it

 Also, we had to dig through the whole thing just to find, say, the big snowflake, or to see if we had a star that would make a good size for a cookie wand topper. 

 Fortunately, our kitchen also has a large, accessible, and out of the way space above the kitchen cabinets. My husband and I turned the whole area into an easy open storage system just for cookie cutters, and I couldn't be happier with it. 

 Here's what you need to make your own! 

  pegboard. Pegboard, otherwise known as perforated hardboard, is a decently eco-friendly choice of material. It's generally made of sawmill waste or other residual wood fibers, is adhered with resin, and doesn't tend to contain formaldehyde. That being said, it's a good rule of thumb to always know the provenance of your materials, so that you can double-check that you approve of the manufacturer of the specific pegboard that you're looking at. 

  pegboard pegsYou can buy all kinds of cute varieties of peg; just make sure that you're buying the correct size for your pegboard. 

  wood glue (optional). I had this at hand,  but my dowel pins fit so snugly that I didn't need them. In fact, I had to use a rubber mallet to tap the dowel pins into the pegboard, they fit so well. 

  paint. Spray paint is not great for the environment, but I'm selective in my use of non-eco-friendly materials, and painting all of those little dowel pins and all of that square footage with all of those little holes? Yeah, I used spray paint. To make the project more eco-friendly, choose a brush-on zero VOC paint, perhaps with a paint sprayer

  wall hanging supplies. We tapped in nails at the corners of each pegboard, but you use the method that you prefer. 

 1. Cut the pegboard to size. Adjust your sizing a little so that you cut between the rows and columns of perforations. We had to piece together three sections of pegboard to cover the entire space that I wanted, so we had the additional annoying job of trying to cut the pieces so that the holes would line up perfectly across them. If you can accurately bisect the rows and columns, it works, but ours were a little uneven, so I just hung them to be even, and I didn't care if their tops didn't perfectly line up. 

  2. Add the pegs. Take your time so that you can figure out a pattern for the pegs, then push them in so that the back of each peg is flush with the back of the pegboard. I actually brought some cookie cutters out to the driveway so that I could test how they'd look with various spacing. 

 3. Paint the pegboard. I did my painting out on the driveway while my kid was running a bake stand out by the road and the drive-in next door had just opened for the evening--it was an absolute circus. Pro tip: if you want everyone in the universe to look at you, paint something weird in your driveway and then get people to drive by. Bonus points if you're also taking pictures as you work, because that's apparently also REALLY interesting to look at. 

 4. Mount the finished cookie cutter holder. This was too high for me, so my husband did the mounting while I stood below and assured him that he was NOT lining the perforations up correctly. I'm the only person who can tell, though, so whatever. 

 I LOVE our cookie cutter holder! 

The cookie cutters would look tidier if I'd hung them all myself, but the kids actually really wanted to do it, and who am I to stand in the way of a child wanting to do a chore? It reassured me, as well, that both kids can reach even the tallest cookie cutters with our step stool, so they can still bake independently. And we're all baking more, for the time being, while the ability to see what cookie cutters we have is still a novel thing, and the kids have rediscovered cute shapes that they'd forgotten we had. 

 It may not be great for our ideally anti-consumerist stance, however, as the kids have also figured out what cookie cutters we DON'T have and apparently desperately need. We don't have a dog cookie cutter, for instance, nor a cat one. The horror! It's possibly time to try out that DIY cookie cutter tutorial that I've been eyeing for a while now...

Thursday, April 1, 2021

How to Make a Glittered and Embossed Easter Egg


This is a fun Easter craft to do with giant Easter eggs! I created this last year when I was on a Zentangles kick, but I think it would work well with any kind of design, abstract or realistic.

I use the largest wooden eggs available from Casey's Wood Products (and I buy them in bulk, because the younger kid, especially, LOVES to decorate wooden eggs and wooden peg people), although I've seen larger plastic Easter eggs, and I'm sure you could upcycle those, or even use papier mache Easter eggs exactly ("egg-sactly"--UGH, I can't stand myself!) the way that you do these wooden ones.

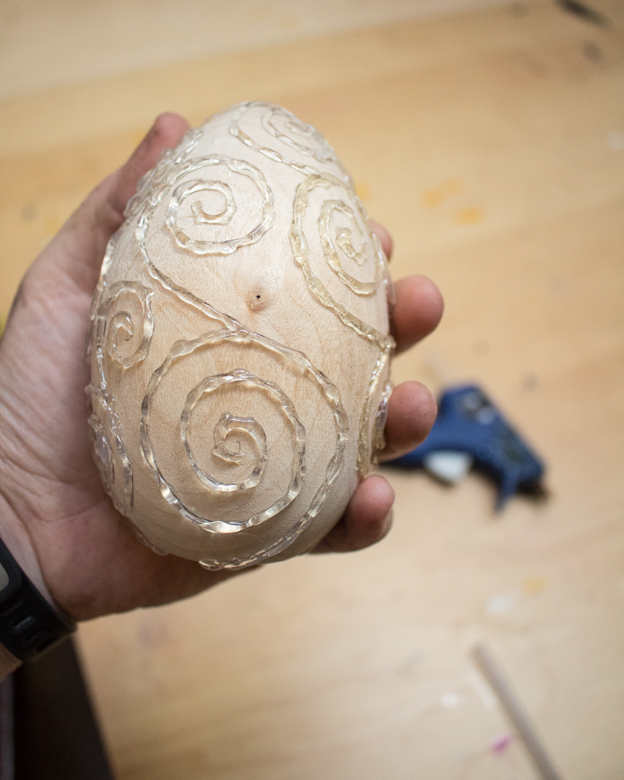
To make the glittered and embossed Easter egg, first you draw a design directly onto the egg. With my wooden Easter eggs, I draw the design on in pencil--


--but if you were upcycling a plastic Easter egg, you should use a Sharpie.

Next, trace over your drawing with hot glue:

Try to do a better job than I did keeping your lines even by keeping the pressure on the glue gun's trigger nice and steady. You might want to practice on cardboard first.

I sure should have!

Pull off all the little hot glue strings, then use spray paint to prime and paint the egg a base color. This is basically the same thing that the big kid and I did when we made our spooky potion bottles, but then, because we were going to mess with the embossing a lot more, we painted on the base layer and THEN did the hot glue. 

OMG I just realized that you could make these EXACTLY (egg-sactly!) the way you make the potion bottles! Hello, spooky embossed Easter eggs!

Okay, pace yourself, Julie. Finish this blog post, wash the dishes, edit your kid's English essay, answer a zillion emails, go to your Zoom meeting, and TOMORROW you can make spooky embossed Easter eggs.

ANYWAY, you want that base layer to be a color similar to the color of glitter spray paint that you're using. For one thing, it adds depth, and for another, it'll hide any thin spots if you don't do a perfect job with the glitter spray.

Spray this glitter spray OUTSIDE (I feel like you were already outside; I mean, you just spray painted your egg and I hope you were outside for that, but seriously, this glitter spray means business!), let it dry for the recommended time period, and then admire your beautiful Easter egg!


I hate that you can't see how awesomely sparkly this Easter egg is. Here, though--I'll zoom in, and you can see all the billion bits of glitter that make it so sparkly:


It's. So. SPARKLY!!!

I've mentioned before that we are fierce, ferocious, take-no-prisoners Easter egg hunters at our house, and so pretty, precious-looking eggs like these aren't for Easter egg hunts, because I would be absolutely beside myself to lose this, then hit it with the lawnmower five months later. 

Honestly, the lawnmower wouldn't be that excited, either. This baby is BIG!

P.S. Want to follow along with my craft projects, books I'm reading, road trips to weird old cemeteries, looming mid-life crisis, and other various adventures on the daily? Find me on my Craft Knife Facebook page!

Tuesday, March 23, 2021

Homeschool STEM: Our Popsicle Stick and Kite String Wave Machine


Because energy travels in waves, and we can prove it!

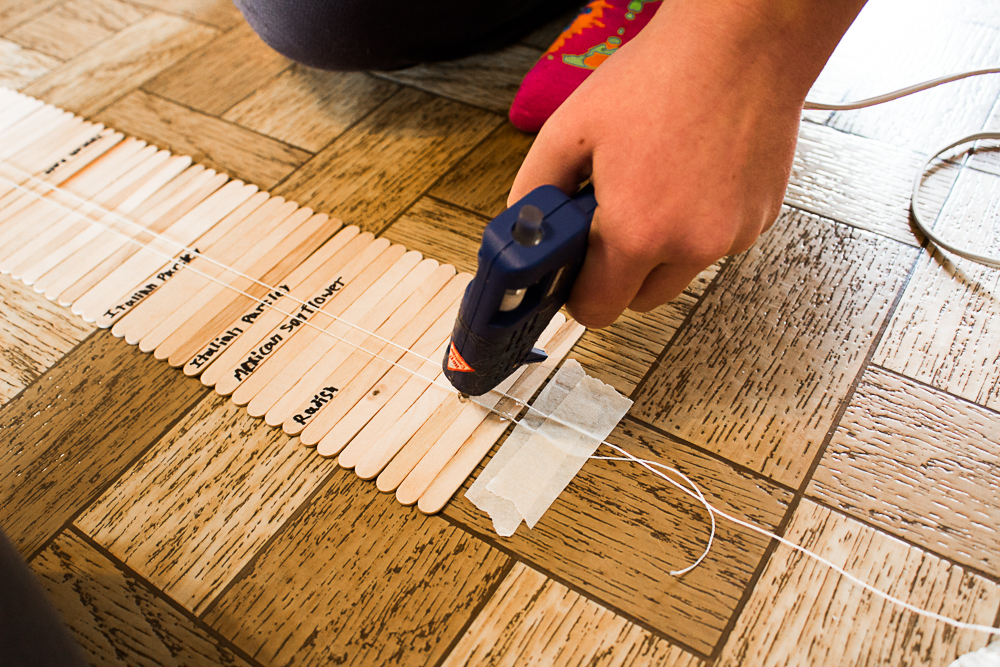
This DIY popsicle stick and kite string wave machine is one of many hands-on projects that Will and I are doing as part of the spectroscopy chapters in her astronomy study, but we're both completely obsessed with it. It is really fun, and really fascinating to watch. It both soothes and stimulates (if that's possible? Is that possible? It feels possible!) both of our pattern-loving brains, and we can each entertain ourselves endlessly just by flicking a little popsicle stick and watching the energy cascade down the line.

To make our wave machine, Will and I followed this tutorial


I don't exactly know why I randomly always seem to have 1,000+ popsicle sticks just hanging about in the homeschool closet (some clearly leftover from failed seed starting projects of yore), but they do come in handy!


The real fun, though, is in playing with it!


See the wave move, even though each popsicle stick stays glued to its place? That's how all energy moves, whether it's light, sound, or tsunamis. Beyond just that demonstration, though, there's a lot of visual interest in simply playing with and watching the patterns that emerge through various manipulations of the wave machine. That kind of play and exploration builds intrinsic understanding, which is a very real way to build concrete knowledge and skills. As part of Will's AP Human Geography study, we've been thinking about the ancient stick maps of Micronesia. These maps represented not geography as we conventionally think about it now, but instead a model of the waves around the islands, which is also a very real aspect of geography, but one that most people would find it impossible to comprehend, much less use as a navigation tool. It's likely that sensory experience of the ocean waves provided the intrinsic understanding that made it possible to use the waves in such a way. 

It is FASCINATING to see energy travel so concretely, and there's a lot of scope for play and experimentation. I wish I'd made this with the kids when they were young, as I think it would be a picture-perfect hands-on STEM project for upper elementary!

Nevertheless, we have it now, and it hangs in homemade honor from a ceiling hook in our family room. I mean, it's not like we put any effort into tasteful decorating; a popsicle stick wave machine isn't even the oddest homemade thing on display in that room. 

And when it's hanging in easy reach, we can still play with it!

Our wave machine, as I mentioned, was a quick little demo for spectroscopy, but understanding how energy travels in waves is also crucial for some of these other studies:
  • CALDER AND KINETIC SCULPTURE. Mobile-making and kinetic sculptures of all kinds are a great way to explore physics, as well as to add an art history component to a STEM study. Here's a great resource on the physics of mobiles, and an interesting history of kinetic sculptures, with a lot of images for inspiration. 
  • SOUND AND HEARING. Vibration is another word for waves, and there are a lot of fun ways to explore how sound travels through space and how our ears work to sense it and our brains work to process it. Use tangible demonstrations like this one with a speaker and salt, this one in which you measure the distance of a signal, and the DIY wave machine, along with a study of the anatomy of the ear. 
  • TSUNAMIS. Is my kid the only one fascinated by natural disasters? I think we've done deep dives into just about all of them by now! Anyway, use the wave machine along with this TED-Ed video on tsunamis and this DIY diagram of tsunamis to explain the physics behind that particular natural disaster. 
This isn't a comprehensive list, of course--it's literally just what's happening to occur to me from our own studies as I'm writing this--and so I'd love, as always, to hear your ideas and suggestions, too. I LOVE multi-disciplinary connections!

Wednesday, March 17, 2021

30 Ways to Decorate Wood Easter Eggs

 Want to know my hands-down favorite holiday crafting supply?


Unfinished wood Easter eggs!

I first bought wood Easter eggs on a bit of a whim over a dozen years ago, and we have absolutely loved them every year since. We end up embellishing several every Easter, and if we decide we don't like the look of one, we just cover it up with more paint and re-embellish it the next year! 

Because we did more Easter stuff than usual last year (thanks to a global pandemic!), I restocked us this year. Don't get me wrong--we do NOT need more Easter eggs; I mean, least year I hid over a hundred for the kids' egg hunt!--but we enjoy decorating them so much that I can't imagine not having some on hand. 

AND while I was buying just our favorite sizes from Casey's Wood Products (hen eggs with flat bottoms for most of our projects, but a few jumbo eggs for the really special stuff), I saw that they've got a new style of egg this year: basswood eggs suitable for carving!

The kids' woodcarving kit was a hit last Easter, so it's extra fun that this Easter they can use it to carve some of our decorations.

Below is a list of our favorite ways to decorate wood Easter eggs. There are activities for little kids, activities for bigger kids, and activities that are equally fun and lovely for any age. The kids and I have done most of these--some of them we do every year!--but there are also a few that are here because they're on our to-do list. 

  • wood burned Easter egg with watercolor stain. Wood burning is lovely on its own, but it's extra special when combined with a watercolor stain, or careful watercolor painting. Eggs that are wood burned are still quite hardy, but the watercolor stain can bleed if it gets wet, so you'll want to keep it away from most Easter mischief.
  • galaxy eggs. I made a couple of these last year with jumbo wood eggs, and it went exactly the way the tutorial said it should! They're some of my absolute favorite eggs now.
  • Lichtenstein-style painted eggs. I love how this is also sneakily an artist study!
  • yarn-wrapped eggs. A method that completely covers the wood egg is a great way to re-use an egg that had an unfortunate paint or marker job done to it in a previous year.
  • eggshell mosaic egg. I haven't tried this tutorial yet, but I'm really intrigued by it. I think that if I wash the shells well, they should be archivally-safe. I mean, I've got blown-out eggs that I've had on display for years and they're still nice!

  • felted wool Easter egg. If you felt the wool roving directly onto the wood egg you won't be able to remove it, but I think it gives the felted wool egg a pleasingly realistic weight. If you do want to remove the roving, perhaps to make an egg that you can open and shut, put plastic wrap around the wood egg before you felt onto it.
  • hot glue raised embellishments. I tried this a couple of years ago with jumbo wood eggs, and I really love the look of the hot glue! Instead of the silver leaf that this tutorial uses, I spray painted my egg light blue, and then coated it in glitter spray. It looks not at all homemade!
  • pen-and-ink eggs. These are the pens that I also use for rock painting, so it makes sense that they'd work great on Easter eggs!
  • cactus egg. I am going to make a couple of these this year just because I think it'll be funny to perch them in my potted plants for the egg hunt!
  • chalk painted eggs. I'm really curious to try out chalk paint sometime.

  • chalkboard Easter egg. This project is less about the final result than about creating a process-oriented, open-ended Easter activity. Coat a wood Easter egg in a few layers of smooth chalkboard paint, and it can be decorated over and over again! Our favorite supplies for this are chalk pastels and chalk markers.
  • spin art eggs. This is a perfect project for little ones. The heft of the wood eggs makes them work especially well with spin art, and if you offer a kid only two or three color options, they'll be able to enjoy the sensory and process-oriented experience of spin art egg decorating... AND the eggs will still be suitable for display afterwards!
  • bunny and chick painted eggs. These are ridiculously cute.
  • speckled eggs. These are also ridiculously cute, and I'm obsessed with how weirdly realistic they are!
  • unicorn eggs. They're too delicate for an egg hunt, so they can supervise from the table set for Easter dinner.

  • Sharpie-embellished Easter eggs. As you can tell, this is the first method we ever used for decorating our wood eggs. Look at my little Syd baby! She's always been so artistic. In subsequent years, I sometimes first put a white base layer on the eggs to make them look a little more realistic under their Sharpie embellishments. If you pick up some paint pens, you can put any color down as a base layer, because paint pens will show up well on top of anything.
  • coloring page decoupaged eggs. Decoupage of all kinds works especially well with wood Easter eggs. This project is a fun way to upcycle part of a coloring page onto an egg.
  • Mandalorian and Baby Yoda painted eggs. It's my second-year-in-a-row tradition to treat myself to a month of Disney+ after closing out Girl Scout cookie season. There's something about watching Moana every day for 30 days that just washes away all the Girl Scout cookie stress! I LOVE The Mandalorian, too, so I'm stoked to make myself a little Mandalorian Easter egg!
  • book page decoupaged egg. This would be so awesome to do with a beat-up copy of a book that the kids and I have read together. If I can find a Percy Jackson at the very tag-end of its life Syd would be thrilled!
  • acorn eggs. I love how this tutorial uses pinecones and hemp twine to make eggs that look like acorns. Paired with the unfinished wood eggs, it makes for a completely natural project!

  • watercolor-dyed Easter eggs. This is absolutely the easiest method to make some extremely bright and colorful wood Easter eggs! Liquid watercolors are beautiful on their own, but you can also add Sharpie or pain pen embellishments for even more fun.
  • painted babouchka eggs. Painting projects of all kinds work great on wood eggs, so I have a lot of fun and random ones. No reason for me having a babouchka egg other than that I think it's cute!
  • painted animal eggs. I really like the felt and pipe cleaner embellishments that make these animal eggs look even cuter!
  • gold foil eggs. I have been longing for an excuse to play with gold leaf!
  • stained wood eggs. I have no idea why this had not occurred to me at ALL until I saw this tute, but I am seriously about to go drag out all the wood stain I own and try it. This would look really pretty on top of a wood burned egg. 

  • tissue paper-decoupaged Easter eggs. The kids and I didn't know what to expect when we first tried this project, but the result is surprisingly lovely! Tissue paper is so thin that you can actually blend the colors, and the ample application of Mod Podge makes the finished eggs super shiny with colors that have depth and seem slightly translucent.
  • stamped tissue paper-decoupaged eggs. You can get all kinds of cool details by stamping onto tissue paper. If you want to try this, don't use the dyed craft tissue paper that we use for the previous tutorial--that stuff bleeds like crazy!
  • mood eggs. Syd actually has some thermochromic powder leftover from her years-long passion for slime-making. I wonder if the paint would stay working well for multiple years in a row on our wood eggs?
  • painted ice cream egg. Here's another niche but weirdly adorable painted egg project.
  • masking fluid and watercolor eggs. I had never heard of masking fluid before, but Syd likes painting with watercolors, so it might be a useful purchase in general for her--and then I could play with it by making Easter eggs!

P.S. If you know of a good way to decorate a wood Easter egg, please tell me about it in the Comments. I can always use another happily-embellished Easter egg in our stash!

Saturday, March 13, 2021

Make a Wood Burned Stick Plant Marker

This tutorial was originally published on Crafting a Green World.

My favorite plant markers are the simplest ones you could make--they're just wood burned sticks! I've experimented with more decorative and elaborate plant markers over the years, and some of them ARE really fun to create and display, but I haven't found anything more eco-friendly, easier to make and use, or sturdier than wood with a wood burned label. 

 These wood burned stick plant markers have no paint to fade, no glue to lose its adhesion, no sketchy materials to worry about leaching into the ground, no artificial substances that will sit around forever if I neglect to collect them from the garden! A nice, thick stick will stay serviceable for several years, it will never lose its contrast with its wood burned label, and when I'm done with it, it'll happy decompose wherever I leave it, benefiting the soil as it does.

Supplies

To make your own wood burned stick plant marker, here's what you'll need:
  • Stick. Look for a stick that's around 1" diameter, and cut it to lengths approximately 8"-10". If you find the stick somewhere other than your own property, you might want to also bake it using the same method that you use with acorns. I might be the garden version of a helicopter mom, because I worry about introducing random fungi, parasites, or insects to my plants from outside sources, but baking will kill anything that grows.
  • Carving knife. You don't need a full-on set of wood carving knives (although my kids and I use ours all the time!), but you do want some sharp knife that you can do a little whittling with. Don't be scared, because it's easy and fun!
  • Wood burner. Wood burning kits are easily available and fairly inexpensive, but if you don't see yourself using one often, it's worth it to ask around among friends and family to find one to borrow.

Directions

1. Prepare Your Stick


 Cut it to size, if you haven't already, and peel the bark off if you prefer that look. 

  2. Carve The Stake 


 Choose one end of the stick to be the bottom, and use your carving knife to begin carving that end of the stick into a point. It's pretty messy, so do this outside, and it's somewhat slow going, so I highly suggest working your way through an audiobook or becoming obsessed with a podcast to help the time pass. 


 Eventually, though, you'll have shaved that end down to a nice point. You don't have to make the tip sharp, of course, unless you think it might be helpful to have some vampire-slaying stakes disguised as plant markers. I, personally, do find this helpful.

3. Flatten One Side For a Label

 
Use your carving knife to shave away one side of the top half of the stick, creating a flattened area for your plant marker's label. This is a little trickier than carving the stake, but the good news is that this flattened area does not have to be at all perfect for you to be able to wood burn the label. If you get really frustrated, you can cheat by using a palm sander and your most abrasive sandpaper to even out the surface. 


 I warned you that wood carving is messy!

4. Wood Burn the Label


 Follow the instructions on your wood burner to attach the appropriate tip and heat it up, then use it like you would an unwieldy sort of pen--it's really that easy! Going slowly helps, and don't be afraid to go over the same line a couple of times to make it deeper and darker. Try not to let the tip just sit in one spot, however, as that will add a large, burned blot to your work. 

 When your label is wood burned on, your plant marker is ready to go to work! Unlike most projects that you use outdoors, you don't need to seal these plant markers; wood ages well and each plant marker will easily last several years in its spot before it needs to be replaced. 

 I like to place these markers next to my perennial plants, especially the ones that I don't have confined to garden beds. My milkweed, for instance, tends to pop up late and likes to spread out, so a permanent marker to remind me where it keeps me from trying to put an annual on top of it. 


  In the photo above, my brand-new sunflower plant marker is going to help me remember that I transplanted some of my perennial sunflowers into that narrow bed this year. They LOVE it there, but until they get tall and start to bud they tend to look kind of weedy, the poor dears, so that nice sturdy plant marker will (hopefully) keep me from absentmindedly pulling them next spring. 

Saturday, February 27, 2021

How to Make a Chalkboard Easter Egg

This tutorial was originally published on Crafting a Green World back in 2017.

 This is one of the easiest Easter egg crafts that you can make, and one of the longest-lasting, too! You'll love the ability to decorate your chalkboard Easter eggs in a different way every year. 

Heck, if you have kids, they'll enjoy decorating these chalkboard Easter eggs in a different way every day! 

 To make the chalkboard Easter eggs, all you need are: 

  wooden or papier mache egg. These are commonly found at craft stores now. I like to avoid buying plastic eggs, but if you already have some on hand, you can use many kinds of chalkboard paint on plastic--check out the instructions on your paint for details. 

  chalkboard paint. Eco-friendly chalkboard paint does exist, but I haven't personally tried it, as I'm still working through the 32-ounce can of Disney chalkboard paint that I bought years ago--that stuff really lasts! I've also not tried tinted or homemade chalkboard paints, but again, they do exist.

 Chalkboard paint is super easy to apply. Yes, you can apply primer first, especially if you have primer tinted toward the color of chalkboard paint that you're using, but for the particular wooden eggs in this project, some were unfinished new wood and some were previously painted white, so I didn't bother with primer. 

 You're also meant to use a foam brush or foam roller to apply your chalkboard paint, but with these small surfaces, I used a regular bristle paintbrush that I had on hand. I might have had to apply an extra coat or two over what I would have had to do with a foam brush, especially on that white egg, where my brush strokes showed up exceptionally well, but after four coats, even the white egg was covered cleanly, and the paint on such small surfaces dried quickly enough that the two extra coats weren't a huge waste of time. 

 There are a lot of tutorials that tell you that you have to condition your chalkboard before you can really draw on it, but unless the instructions on the container of chalkboard paint call for this step, I don't do it, and personally, my projects have never suffered from "ghosting" or any other of the ills said to be caused by lack of seasoning. 

 I love these chalkboard Easter eggs because you can decorate them as elaborately as the Easter eggs that you see in children's picture books. And if you used white or light brown chalkboard paint, the effect would be even more realistic!

P.S. Need even more ways to get festive for Easter? Check out ALL my Easter crafts here!

Saturday, February 20, 2021

Woodburned Easter Eggs with Watercolor Stain

This tutorial was originally published on Crafting a Green World in 2017.

 A great way to avoid buying plastic Easter eggs is to make your own stash of eco-friendly Easter eggs that you can re-use year after year, or embellish store-bought Easter eggs made with natural materials, such as wood, ceramic, or papier mache. 

 We've done all of the above, including making DIY papier mache Easter eggs and wool felted Easter eggs, but I enjoy adding to our stash every year--for one thing, I've got two kids to whom I'm hoping to pass down our beautiful handmade eggs, so I need a good stash, and for another, I'm never quite sure that we get *every* single egg back from every single Easter egg hunt... 

 One of the easiest ways to have a beautiful stash of heirloom Easter eggs is to buy wooden eggs and then embellish them. To wood burn and stain them, you'll need just the following: 

  wooden Easter eggs. I'm a HUGE fan of Casey's Wood Products, and I've purchased a ridiculous number of wooden objects from them over the past several years, including pretty much every size of wooden egg. I look for the items made in Maine, and of second-quality. 

  wood burner. I own this one, and although I don't love it, the price was certainly right, and it's worked for me for probably six years by now, so I certainly don't have much to complain about. I really want these alphabet brands that you can use with a wood burner, and if they fit mine, then that would certainly raise my opinion of it! 

  watercolors. Use liquid watercolors if you're wanting to stain the wood, and any watercolors if you're wanting to paint on details. The method itself is super easy, and a great family activity. 

1. Draw your design in pencil. This is something the the whole family can do while sitting around the table together. Add in some music or an audiobook and you've got the perfect hour before bedtime in my family! 

My kids prefer to draw scenes onto their eggs (I have one kid who draws dragons on everything, including every holiday decoration for the past three years), but I think these eggs look really interesting with little designs and patterns,  zentangle-style, done all over them. I especially like it because it's something that you simply can't do with most eggs, so it adds to their interest and appeal.

 You might want to watch against penciling in too many tiny details, as you'll soon be wood burning them, but I've actually found that my wood burner can get quite a bit of detail if I use a light touch. 

 2. Wood burn your design into the egg. If you're wood burning noobs, you can designate a "practice egg" for yourself so that you can play around with the wood burner and get a feel for it. It doesn't really work to use any old scrap of wood for practice, because the wood burner will burn each type of wood differently. 

 My kids have been using the wood burner since they were both pretty small; they still don't totally have the hand for it--they tend to press too hard and have a lot of stop-and-starts--but they're quite capable of doing it, and they love it. 

  3. Embellish with watercolor. If you're looking to stain your egg all over, you can do it with any color of liquid watercolor--my tutorial for that is here

If you want to paint details onto your egg, you can do that with any watercolors and a small paintbrush. Manage your expectations by realizing that the watercolor will flow along the grain of the wood, often unexpectedly, so don't expect rigid lines demarcations except where you've wood burned. 

  Optional: Seal the completed Easter egg. Oh, my gosh, y'all, I get so many questions about this! People really, really, REALLY want a non-toxic, eco-friendly, food-grade wood sealant that will stand up to a kid putting a stained and sealed toy into her mouth. 

I am sitting right here and killing that dream for you. Your sealant can be non-toxic, eco-friendly, and food-grade, OR it can stand up to a kid putting it into her mouth. If your kid is still putting her toys in her mouth, just... don't stain it those beautiful watercolor colors until she's older. If a kid mouthing your Easter eggs is not a concern for you--and if you're head-scratching right now, I promise you that it's such a concern for SO many people that I had to write it first--then check out the following options for sealing your wooden Easter egg. 

  1. Don't seal it. It doesn't really need it if it's just coming out to play around Easter time. 

  2. Use this homemade beeswax wood polishTest it on your practice egg first. I, personally, don't love sealing stuff with beeswax polish, but a lot of people do, so there you go. 

  3. Use a polyurethane alternative. Here are a few to play with

  4. Use a non-eco-friendly product. I know, I know, but it's my personal philosophy that if we use eco-friendly products whenever possible, then we have the wiggle room to use something not eco-friendly whenever it's legitimately the best solution. Sealant and aerosol spray mount are two products that I do own and use, simply because I haven't yet found acceptable, eco-friendly alternatives. If YOU know of great, eco-friendly alternatives, let me know right this second! 

 I store our stash of Easter eggs year-round with our other holiday decorations, and bring them out sometime after St. Patrick's Day every year, when they once again strike us as new and colorful and festive and fun. Sometime after Easter, I might buy a few more plain wooden eggs to have on hand, because the next year, we're for sure going to want to decorate some more!

P.S. Need even more Easter crafts? Here are all my Easter tutorials right there in one place!