
I use the largest wooden eggs available from Casey's Wood Products (and I buy them in bulk, because the younger kid, especially, LOVES to decorate wooden eggs and wooden peg people), although I've seen larger plastic Easter eggs, and I'm sure you could upcycle those, or even use papier mache Easter eggs exactly ("egg-sactly"--UGH, I can't stand myself!) the way that you do these wooden ones.
To make the glittered and embossed Easter egg, first you draw a design directly onto the egg. With my wooden Easter eggs, I draw the design on in pencil--

--but if you were upcycling a plastic Easter egg, you should use a Sharpie.
Next, trace over your drawing with hot glue:
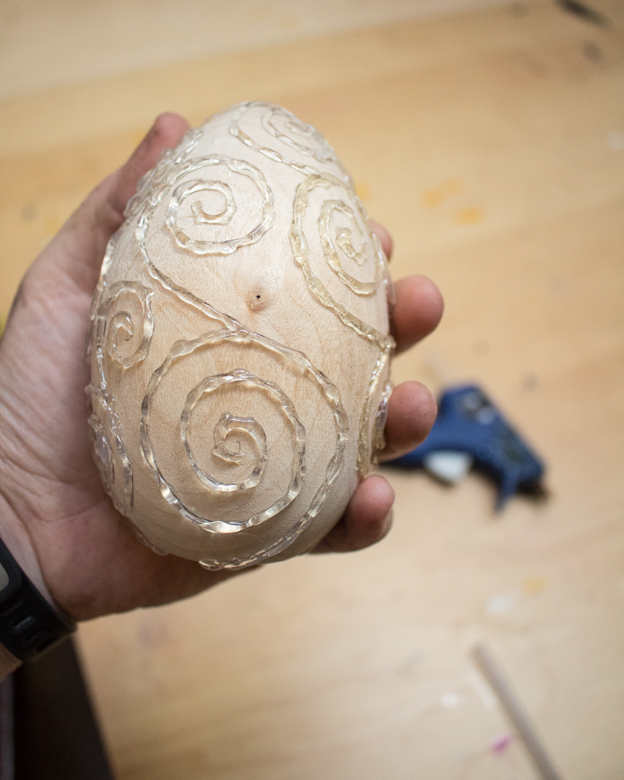
Try to do a better job than I did keeping your lines even by keeping the pressure on the glue gun's trigger nice and steady. You might want to practice on cardboard first.
I sure should have!
Pull off all the little hot glue strings, then use spray paint to prime and paint the egg a base color. This is basically the same thing that the big kid and I did when we made our spooky potion bottles, but then, because we were going to mess with the embossing a lot more, we painted on the base layer and THEN did the hot glue.


OMG I just realized that you could make these EXACTLY (egg-sactly!) the way you make the potion bottles! Hello, spooky embossed Easter eggs!
Okay, pace yourself, Julie. Finish this blog post, wash the dishes, edit your kid's English essay, answer a zillion emails, go to your Zoom meeting, and TOMORROW you can make spooky embossed Easter eggs.
ANYWAY, you want that base layer to be a color similar to the color of glitter spray paint that you're using. For one thing, it adds depth, and for another, it'll hide any thin spots if you don't do a perfect job with the glitter spray.
Spray this glitter spray OUTSIDE (I feel like you were already outside; I mean, you just spray painted your egg and I hope you were outside for that, but seriously, this glitter spray means business!), let it dry for the recommended time period, and then admire your beautiful Easter egg!

I hate that you can't see how awesomely sparkly this Easter egg is. Here, though--I'll zoom in, and you can see all the billion bits of glitter that make it so sparkly:

It's. So. SPARKLY!!!
I've mentioned before that we are fierce, ferocious, take-no-prisoners Easter egg hunters at our house, and so pretty, precious-looking eggs like these aren't for Easter egg hunts, because I would be absolutely beside myself to lose this, then hit it with the lawnmower five months later.
Honestly, the lawnmower wouldn't be that excited, either. This baby is BIG!
P.S. Want to follow along with my craft projects, books I'm reading, road trips to weird old cemeteries, looming mid-life crisis, and other various adventures on the daily? Find me on my Craft Knife Facebook page!
No comments:
Post a Comment