This tutorial was originally published on Crafting a Green World.
If you can get a clock with a dragon on it, always choose the dragon clock. Dragons are awesome.
But if you can't get a clock with a dragon on it--if ALL the clocks at the thrift store are boring and beige and dragon-free--then just choose one of the boring clocks, take it home, and put a dragon on it yourself.
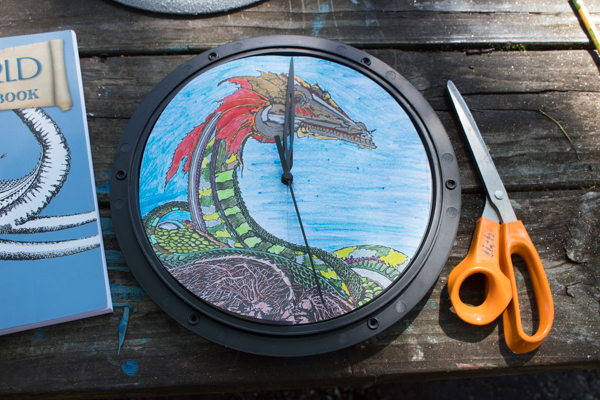
This particular clock cost me a whole dollar at Goodwill. It wasn't exactly beige, but it wasn't anything special, either. I refinished it with my special secret paint method (which I'll share with you in a minute!) and a completed coloring book page, and now it's my new favorite thing.
Want to make your new favorite thing, too? Just follow along!
You will need:
clock. It should be in working condition, with a flat face (ie. no sticky-uppy numbers) and an accessible one--flip it over and look for the screws attaching the front to the back. If you can reach them, you can probably dismantle your clock, refinish it, and reassemble it without too much fuss.
coloring page. You can also use scrapbook paper or wallpaper, of course--just make sure that your paper is acid-free, if you don't want to have to change it out every few years.
paint. As you'll see in a minute, I'm using three different paints on this clock: primer, a stone texture paint, and a silver glitter paint. It's what I needed for the exact effect that I wanted, but you can use whatever paint you prefer, as long as it will work on the surface of your clock. Plastic, for instance, will need a primer designed for plastic.
miscellaneous supplies. pencil, scissors, white glue and paintbrush, etc.
1. Disassemble the clock and refinish the frame. Do NOT lose those little screws! This clock was intended for my kids' bedroom makeover back in 2017, which they have requested have a Medieval fantasy castle sort of theme. We're not going too far overboard, but we are painting their walls grey, displaying my older daughter's sword and dragon collections, and adding some small touches, such as this clock whose frame I wanted to look like it came from a treasure trove.
To get the effect, I primed the plastic frame, then sprayed it with two coats of stone texture paint. When that was dry, I sprayed it with two coats of silver glitter paint, making the whole thing super sparkly and mysteriously like a vein of silver torn from the rock. I've since also done it to a picture frame and a light switch cover, both also intended for the kids' bedroom, and they've all come out looking amazing.
2. Prepare the new paper background. To fit with the fantasy castle theme, I used a completed coloring page from the Tolkien's world coloring book. You can use any paper you'd like. Use the frame to help you trace a template of the clock face onto the coloring page, then cut it out.
Gently set the page on top of clock and mark the center; cut from the edge up to the center, then cut a hole in the center to accommodate the clock's stem.
3. Glue the new clock face down. Gently peel up the paper in sections, and paint the back side with a thin layer of white glue; press it well so that it doesn't bubble.
My hands are filthy because I was also working on the second coat of those grey walls. The kids were off at sleepaway camp, and I wanted to surprise them with their new room when they got home!
4. Reassemble the clock. This will probably involve cleaning the glass front of the clock, and then putting it all back together.
You can do other cute things with the clock face, of course, such as adding number stickers or stencils or decoupaging several different papers onto it, but double-check the placement of the clock hands, first--the minute hand on this particular clock was sooo close to the clock face that there wouldn't be room for more layers of paper and Mod Podge.


No comments:
Post a Comment