Showing posts with label remaking clothes. Show all posts

Saturday, May 29, 2021

How to Refashion Pants into a Skirt

This tutorial was originally published on Crafting a Green World in 2017.

 There are several ways to refashion pants into a skirt, including this cute method for making a denim skirt out of a pair of old blue jeans. Even that method, though, can feel overwhelming to a newbie sewer, so here's an even easier method! 

 As you can see in the image above, all you need for this refashion are: 

  a pair of pants that fit well at the waist. They can be as ripped, stained, or ugly as they need to be in the legs, as long as they're well-fitting in the waist. This is a great way to refashion pants that are too short after your kid hits her latest growth spurt, or winter pants that you know will be too short next fall. It's also great for those carpenter/bootleg/skinny/whatever style of jeans you've got that used to be trendy but are now just laughable, the poor things. 

  an A-line skirt whose diameter at some point matches the hip measurement of your pants. The waist on this skirt doesn't matter at all, as long as at some point its flare has the same measurement as the hip measurement of your pants. That's because you're going to do this: 

1. Line up the pants and the skirt at their matching measurements. As you can see in the above image, I've drawn a chalk line exactly where I want to cut the pants--see how this allows me to keep the entire waist and pockets of the pants? You can sew a well-fitting skirt without knowing how to set pockets or sew a waistband or use a zipper foot or make a button hole! 

 Line up the skirt (or dress--in this tute, I'm using a very sketchy-looking thrifted dress whose fabric my kid loves), so that the point at which its flare matches the length of that chalk line are exactly lined up. Here is where you also make sure that the bottom hem of the skirt is exactly parallel to that chalk line--you don't want your skirt to hang weird! 

  2. Cut the two pieces of clothing along the marked line. Hold them down firmly to keep them from shifting, then cut them both at the same time. 

  3. Sew the skirt piece and pants piece together. Turn the skirt piece inside-out, then pin it, right sides together, to the pants piece so that the raw edges are lined up. Sew the two pieces together and then finish the seam. 

 My daughter and I used this skirt as part of her design for this year's Trashion/Refashion Show in our town, which is why it has Christmas lights safety pinned to it:  She paired it with a hooded shirt that I sewed from another pair of pants and a dressy blouse, and a cape that she cut out of an old fleece blanket, but I'll tell you about those another time!

Wednesday, February 24, 2021

It Only Took Me Two Years to Make This Diagonal Denim Strip Quilt

 Because I get distracted...

I get so habitually distracted that one of my New Year tasks is to look through last year's planner and transfer all of my WIPs from the previous year to a new list in the front of my new planner. This year's WIP list holds 21 items, which... that's a lot of projects to have started and not finished...

But but BUT that list actually used to have TWENTY-THREE items, but I did finally update the kids' Girl Scout vests with their new badges and patches AND I finally made the broken dish pendant I'd been wanting.

Of course, Will's Girl Scout vest already needs another new badge sewn onto it, but whatever. Instead, let's focus on THIS awesome project that I knocked off my list this month!

Not gonna lie: I started this quilt for Syd, and this quilt for Will, AND a still-unfinished quilt for my bed two years ago, thinking that I'd give myself just loads and loads and loads of time to piddle my way through them by Christmas. I like to give everyone a cozy present on Christmas Eve, and homemade denim quilts would fit the bill just fine!

Yeah... no. I gave everyone giant fuzzy slippers instead. And THIS Christmas Eve I gave them all STORE-BOUGHT fuzzy blankets, gasp! I even had Will's quilt already completed by that time, but Syd's was still a pile of denim and flannel. 

Finally I decided that the quilts would make a cozy Valentine's Day present for the kids, so I buckled down and spent most of a day basically making Syd's quilt from start to finish:


For Will's quilt, I'd done horizontal rows, and I'd tried for an ombre effect, but I don't really love it. For Syd's quilt, I tried diagonal rows, and I love it so much that I feel a little guilty that Will's quilt isn't so good, yikes:


In case you ever come over to my house and wonder why I have literal masking tape on my literal family room floor, it's so that I can lay out a quilt whenever I want. I am literally just that classy!

And as always, back-to-front binding is THE way to go:


I am so pleased with how this quilt came out!


It's super cozy and warm, it's comfortingly heavy, it was dead easy to make because it doesn't even require batting, and because the entire top is upcycled jeans, the only costs were for the flannel backing, the thread, and the approximately one zillion jeans needles I broke sewing over those one zillion seams:


I'd say that diagonal rows are now my go-to denim quilt design, but the quilt that I'm planning for my bed is going to be a square, and I'm currently obsessed with the idea of sewing it in a log cabin design.

Maybe I'll even have it finished in time to show it to you within the next couple of years!

Friday, April 12, 2019

Trashion/Refashion Show 2019: Gibbon Girl

It's fun to see how Syd has grown in the nine years that she's participated in our town's Trashion/Refashion Show:

2011: Fairy Princess

2012: Rainbow Fairy

2013: Rose Dress

2014: Upside-Down Orange

2015: The Awesomes (with WILL!!!)

2016: The Phoenix (which I sewed while sick with the flu)

2017: Supergirl of the Night (the last design that I helped Syd sew)

2018: Medieval Maiden (the first garment that Syd constructed completely independently)
And that brings us to 2019: The Year of the Gibbon!


These are Syd's application pictures, and every year they suck, because February is rarely well-lit. Oh, well. You can still see that Syd's vision is a caped black tunic and leggings (upcycled from a few black tops and sweaters that we thrifted). The highlight of the garment is a pair of sleeves that Syd can make look ruched, but can also make look like this:


She used a pair of pants for those sleeves, and later altered it so that she could have a secret pass-through for her hands when they're in their super-long formation.


Syd really, really liked the idea of sleeves that drape like a bridal train, but she also intended from the beginning that they could be fully weaponized, like so:


I love seeing her have so much fun with her design. From the very beginning, Syd's garments have always been playful, and most of them embrace big, powerful movement.


Her garments are never something that you simply wear; they're something that you DO:


 Our town's Trashion/Refashion Show is happily well-situated within our busy spring every year--it's generally about a month after cookie season, and about a month before Syd's birthday party. It's nice, because as soon as we finish planning for one thing, we can move right into the next!


The day of the fashion show is the hair/makeup call, then the stage rehearsal, then cooling our heels in the house while the other acts rehearse--


--then the pizza party--


--then the fun time of squeezing into a few square inches in the overcrowded dressing rooms backstage--


--and then I go sit in the audience with the rest of the extended family, and Syd?

She shines.

Here are some cheater pics that I took during the dress rehearsal:


And here's the real show:


This year's official show photographer has been taking photos for four years now, and he also created the slideshow that played between the acts. Check out this awesome tribute that he made for all of the Trashion Kids--he made a whole slide for each kid that he'd seen come back every year, and here's Syd's!


Look at how she's grown. Syd actually HATES it when people tell her how much she's grown (it's Nutcracker-related trauma on account of they cast by height and they're always looking for the shortest kids and it sucks), but look at the kid in those photos. She has grown! Syd has always been an artist, but she's become such an able DIYer, too, confidently constructing her vision garment from top to bottom, shoes to hairstyle. Those leggings? She sewed them from a stretchy black sweater, sure, but she also did it WITHOUT A PATTERN. No template. She didn't even trace another pair of leggings! She just... started cutting, sewed them up, and boom. Perfect leggings.

Perfect leggings. Smoky eye shadow that she applied herself. A garment with sleeves fit for royalty and suitable as long-range weapons.

I absolutely can't wait to see what this kids does next.

Monday, January 7, 2019

Pattern Review: T-Shirt Panties from the Kid's Scrundlewear Pattern

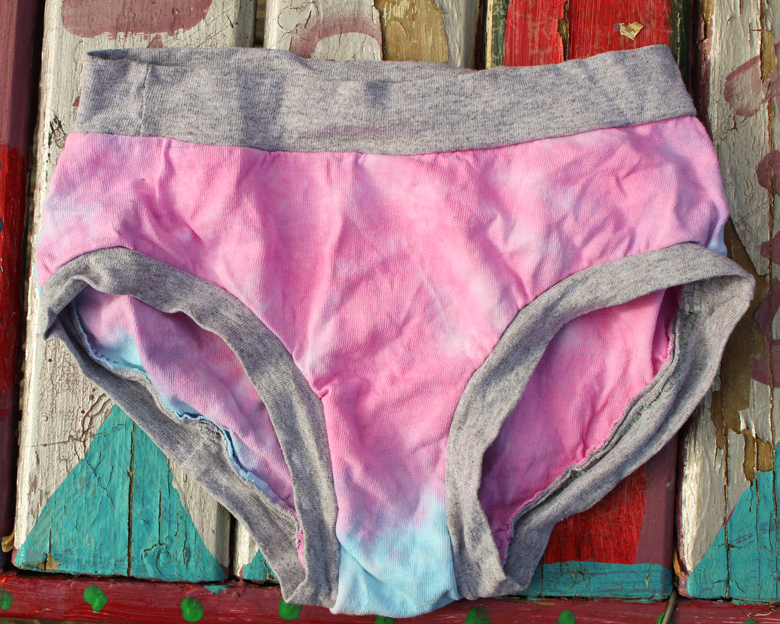
The kids tie-dye T-shirts at every single Girl Scout camp, and I (secretly) never think they come out cute, but it turns out that cutting it down into underwear actually makes the tie-dye look a lot nicer.

The younger kid needed more underwear, and why should I spend an hour going to the store and back to buy them when I could instead spend an hour researching underwear patterns, buy one for the approximate cost of a ten-pack, and then spend another five hours sewing seven pairs on my home sewing machine?

I don't know. Why do I do anything?

Well, the fit is better, for one. The prints are cuter, and just what the kid likes. I don't have to worry about some other little kid in a sweatshop laboring 14 hours a day making them; I'm in my 40s, and I only sew when I feel like it. I can use up my stash fabric sewing these, so that's pretty cool.

Also, I hate shopping, but I like to sew. Case closed!

For this project, I bought the Kids' Scrundlewear pattern from Stitch Upon a Time. It might not have been the best economical decision, because my kid is in the top size for this pattern, but I liked it the best of all of the digital patterns that I browsed and I think I'll get my eight dollars' worth from it.

Actually, I think I already did!

I have a ridiculous stash of T-shirts for crafting. Most are T-shirts that the kids have outgrown or that are damaged beyond repair, some are shirts that were given to me specifically for crafting with, and few are ones that I thrifted because they fit somebody's passionate obsession and surely will come in handy for something.

Such as this adult-sized My Little Pony T-shirt that I bought for a dollar several months ago:

Excuse the awful lighting in all of these photos. It is never not raining, and it is, to the children's great sadness, seemingly never going to snow.

Yep, all seven of the kid's new pairs of underwear are sewn from T-shirts. I mixed and matched the waist- and leg-bands from other shirts, and came up with some really cute combinations, I think:

Both kids love sharks, and the younger kid wore this shirt, a gift from her grandparents, until she could no longer squeeze into it. Now she can wear it again!

 One thing that I'm pretty proud of is my ability to sew with knits, no starch or stabilizer necessary. If a piece gets fiddly I will starch it, but all of these came together quite quickly and easily:


The Scrundlewear pattern also doesn't call for any elastic, which is nice because I then didn't have to buy a single other thing to make all this underwear. And I could have made the kid twenty pairs, what with all the T-shirts in my stash, but I started to get bored with sewing multiples of the same thing and decided that I'd see how she does with seven pairs for now:

I like the pairs with the T-shirt graphics the best, but the kid's favorites are these striped pairs.


The kid reports that they're super comfy, they wash well, and although I was worried that she'd think them too bulky, since T-shirt fabric is thicker than underwear fabric, she hasn't complained and so I'm certainly not going to bring it up!

Next up: I bought this adult underwear pattern, and so now it's time to attempt to sew something that will meet the approval of the REALLY picky kid...

P.S. I sew LOTS of things, usually pretty weird. Want to see it all? Follow along on my Craft Knife Facebook page!

Tuesday, April 17, 2018

Trashion/Refashion Show 2018: Medieval Maiden

This was the year that Syd not only designed but constructed her own complete garment for the Trashion/Refashion Show. I'd been threatening/promising her for years that the next year, she'd be on her own, but then the next year would roll around, she'd design some complicated garment, and before I knew it there I'd be, muscling together sequins and T-shirts and silk sheets at the sewing machine.

And then I formed a Girl Scout troop, and that troop decided to become, during the month of February, the Girl Scout Cookie War Machine, and I found myself instead spending eighty-hour weeks as the fixer for the world's largest girl-led business. I realized that I had to let go of also figuring out the construction of a child-designed outfit from unsuitable fabrics under the unflinching supervision of said child/tyrant.

So Syd did it alone this year. And it was amazing. For both of us, I think.

It was interesting to watch how Syd approached constructing her garment this year. Previously, she's only ever had to worry about the design itself--although she helped me sew and glue, she didn't have the responsibility of figuring out exactly HOW to make her design reality. This year, of course, she had ALL of that responsibility, and I noticed that she was instinctively more flexible and more adaptable, more experimental. She let the fabric guide her as much as she did her design, and I think that it shows in her final result. The completed Medieval Maiden garment certainly resembles her original design, but to me, having seen the skirt that she started with, it looks much more organic than our previous collaborations--it's not so much that she took this and that and the other thing and made something completely different with them, as we've done in previous years; more that she molded these things into something that works differently, but is still very much what it was in the beginning.

My favorite part of the entire process might be the photo shoot that I get to do for her application, especially if the weather is cooperating for a change. I have to include some required poses, but after that we just get to show off!

One of my favorite parts of Syd's garment is that when she's still, with her arms back, you can't see her wings.

Syd would tell you that the wings are made from the inner lining of the original skirt. I will tell you that they're actually made of pure drama.


The interesting thing about this skirt was that it had three layers, plus lots of embellishments to play with. Syd kept the outer layer as-is, although at the dress rehearsal she decided that it needed to be pinned up at the sides so that she wouldn't trip during spins. The inner layer of the skirt made the wings, and Syd used the waistband of the middle layer as her neckline, then cleverly split it down the back and tacked it in place where she wanted the stitching to stay. And that's how she made herself that open back!

In the detail images you can see all the pleating and embroidery leftover from the costuming.


It's important to me that a child's garment, even one meant to be seen on a fashion show runway, should welcome active movement--really, it should invite it. Syd, however, makes her design decisions without my input, so I was pleased to see that she incorporated so much of that ethic into her own garment. This dress is made to move!


And one last action shot that has the bonus of showing off our junky yard!

Syd also had the responsibility of caring for her garment until the show, which I guess explains this pic that I found on my phone of her cat sleeping on the dress, which is, of course, crumpled on the carpet. Sigh...

Eight years in, Syd and I are old pros at spending the day of the fashion show in the theater. We get to watch all of the other acts--


--eat some pizza (eight years in, Syd also has a LOT of opinions about how much pizza one should take from the craft services table in order to ensure that there's enough pizza for everyone, and we spent the rest of the afternoon after this discussing the specific ways in which she felt that some people were not observing this completely unwritten, made-up, and entirely in her head rule. Life with tweens!)--

--and touch up her hair and makeup. I still got to help with the hair, but my days of doing makeup are apparently over:


And then--it's showtime!


Here's the video, if you'd prefer the full audience experience:


This is the first year that I did not have to step on stage AT ALL. I was a little sad when I realized that this meant that I wouldn't have the same backstage time with Syd--we're quite fond of our silent backstage dance parties!--but otherwise, the stage is not somewhere that I currently feel called to be. I was happy to watch her shine from my seat safely in the audience:


And look at her shine. Always, afterwards, I ask her if she's glad that it's over. Always, she tells me that she wishes she was still onstage:

We'll be back again next year, I guess!

P.S. You can always find WIP pics and discussions from these and all my other weird projects on my Craft Knife Facebook page.