Showing posts with label recycled crafts. Show all posts

Sunday, September 12, 2021

How to Make a Teacup Candle

This tutorial was originally published on Crafting a Green World in 2016.

If made correctly, a teacup candle is beautiful, useful, and endlessly refillable. You'll love its warm light and gentle scent, and you'll enjoy your teacup candle far more than you would a boring old store-bought container candle. 

 You will need: 

  beeswax or soy wax. I use beeswax, but soy wax is an excellent substitute. Just don't use paraffin! 

  wax-only crock pot or double boiler and repurposed glass jar. I thrifted a small crock pot years ago to use just for my beeswax crafts, and it's still going strong! As an alternate, you can use a double boiler and melt your solid wax in any old glass jar inside of it. 

  vintage teacups. Use only teacups that have no visible cracks or hairline cracks in the body of the cup; chips at the rim and broken handles should be okay, but use your own judgment. 

  hot glue gun and glueYou could use epoxy glue if you don't have a hot glue gun, but hot glue really is the best choice here. 

  pencil, tape, and clothespins. You'll use these only to hold your wicking in place, so feel free to find substitutions. 

  wicking. You can buy wicking constructed specifically for container candles, or use your own stash wicking that's appropriate for the diameter of the candle that you're making, or for a smaller diameter candle (this is called underwicking). 

 1. Examine your teacup for flaws. Your teacup should be able to withstand the candle burning, but an older teacup that has flaws might not. Check your teacup carefully for any cracks or crazed glazing; a couple of chips on the rim or a broken handle shouldn't matter, but any flaws on the body of the cup might affect its structural integrity. 

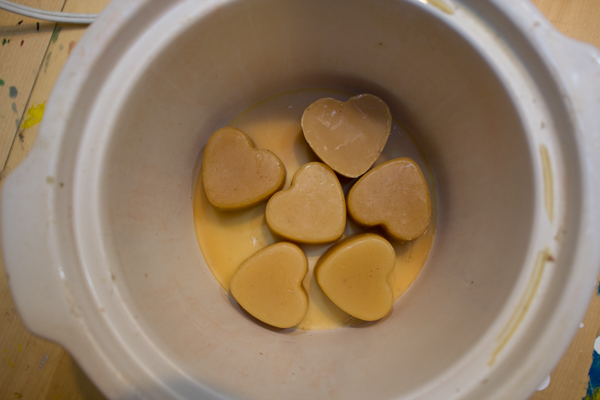
  2. Melt your wax. Using your crock pot or double boiler, melt enough solid wax to fill your teacup most of the way. I pour my leftover beeswax into novelty silicon trays and then store it in a glass jar, so that's why my wax is adorable. 

  3. Measure and glue down the wicking. Measure out a length of wicking about twice the depth of your teacup, then dispense a dollop of hot glue in the bottom center of the teacup and press one end of the wicking into it. 

 4. Brace the wicking. Tape the other end of the wicking to a pencil or chopstick, then wrap the wicking around it until it's nice and straight and taut. To keep it that way, I like to pin a clothespin to each end of the pencil, then brace them against something--here, I'm using my scissors--to keep the entire contraption from shifting.


5. Pour in the wax. Using a ladle, carefully pour melted wax into the teacup, trying your mightiest to keep it from sloshing against the sides of the cup.

To keep the wax from shrinking away from the sides of the cup as it hardens, pour about 1/3 of the wax into the teacup, let it set, then another 1/3, let it set, and then the last 1/3.

6. Trim the wick. Cut the wick just above the top of the wax, and reserve the excess wick for another project.


Teacup candles make excellent handmade gifts, especially for those people who you don't otherwise know what to give--teachers, hostesses, your great aunt, etc.

Or, you know, yourself. You get to have a teacup candle, too!

Saturday, August 28, 2021

How to Make a Brown Paper Bag Journal

This tutorial was originally published on Crafting a Green World in 2016.

A brown paper bag journal is quick, easy, and makes a great writing and drawing surface! Grab a bag from the recycling bin and follow the easy instructions. 

 If you need a quick and easy notebook, the answer is no farther than the local grocery store on the day that you forget your cloth bags--this brown paper bag journal project is quick, easy, and makes a great writing and drawing surface! 

 This brown paper bag journal is good and sturdy, so you can take it out on hikes or throw it in your backpack for when inspiration strikes. It's about as unpretentious as they come, though, so you don't have to worry about messing up your "nice" journals (which I hope you don't--that's what they're there for!). The brown paper takes a variety of media surprisingly well, and my family has found them to be especially great for themed notebooks and journals for specific projects--my kids made the ones in these photos to use as current event journals for the coming week. 

 Here's what you need to make a brown paper bag journal for yourself!

Brown Paper Bag Journal


two brown paper bags. This will make a medium-sized notebook of sixteen pages, although you can easily add a lot more pages if you use more bags. You may also have to use more bags if you don't want to include any of the store's graphics in your journal, but we just decoupage over it. 
  four clothespins. Or clamps, or paperclips. 
  embroidery thread and needle. This is about the perfect weight for the binding of these books--thread would be too thin, and twine too thick. 


 1. Cut and trim your brown paper bags. You'll be using the front and back of each brown paper bag for this project--recycle or upcycle the sides and bottom. Cut out the front and back of each bag, then stack the sheets--we use four--and trim them to a uniform size. 


  2. Punch holes down the center of the sheets. With the sheets still stacked, find the exact center, lengthwise, and mark the line with your metal ruler. You will now need to poke holes down the center of your pages, using even spacing. Use your needle or an awl to make the holes. VERY IMPORTANT: You MUST have an odd number of holes! Hint: If the width of the pages is an even number (ours are around 16"), you can poke holes every inch and have an odd number. 


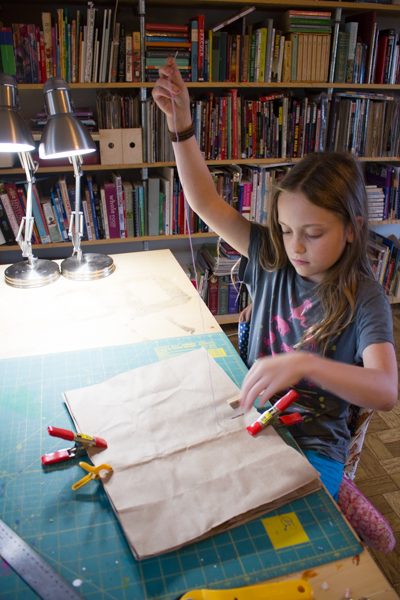
 3. Sew the spine. Use clothespins to clamp the pages together at top and bottom, just on each side of your column of holes. 


Thread a length of embroidery floss that's longer than double the width of your pages, and knot the end. Sew in one hole and out the next all the way up the pages,  and then all the way back down. 


 If you poked an odd number of holes like I told you to, you'll find that sewing back down will overlap the opposite sides of where you sewed up, making an unbroken line of stitching on both sides of the pages. 


 4. Knot the thread. When you get back to your starting point, knot the embroidery floss, then trim it and fold the book in half at the stitching. 

 This brown paper bag journal is a super simple DIY for the artist or writer in your family, especially if you embellish the front and back cover yourself. Kids can also make these in school or club meetings, and you can even ask parents to bring in the bags for the project--you know everyone forgets their cloth grocery bags every now and then!

Saturday, July 10, 2021

How to Upcycle a Coloring Book Page into a Bookmark

This tutorial was originally published on Crafting a Green World in 2017.

Need another idea for how to upcycle a coloring book page? Here's how to turn it into a sturdy bookmark, the easy way! 

 My kids and I love coloring books, as I'm sure you can tell from all of the tutorials that I post on ways to upcycle coloring book pages. Well, here's one more for you! 

 This coloring book page bookmark looks especially nice when made from one of those adult coloring book pages with lots of patterns, or when fussy cut to pick out an extra-cute detail from a larger coloring book page. It's also a good way to upcycle a coloring book page that the artist has abandoned partway through--you know they NEVER go back to finish those old pages. 

 If you use a page that's colored by a kid, these also make great little handmade gifts to family and friends. When going through the latest stack of finished coloring pages, for instance, I found a couple of springtime pages that will look great made into bookmarks and tucked into Easter cards for the grandparents. Want to try it out for yourself? Read on! 

 You will need: 

  coloring page. You can use anything that you want for this, although remember that coloring books made from cheap paper are NOT acid-free. They're fine for short-term use in a book, but you wouldn't want to put one of those bookmarks in a book and then forget about it for twenty years. 

Many adult coloring books advertise that they use acid-free paper, however, and because I have two kids, we have a family rule that if you want to color something from a "nice" coloring book, you have to photocopy it first. This increases the playability of the coloring book, makes for a more satisfying coloring experience, as the kids usually choose to copy their page onto cardstock so that they can use permanent markers or our artist-quality colored pencils, and generally means that the finished product will be acid-free. 

  backing material. Again, you've got a lot of choice in this. You want a sturdy back to your bookmark, because wishy-washy bendy bookmarks SUCK, and also because your coloring book page probably has another drawing on the back or bleed-through from the front. My favorite backing material is adhesive card stock, although you'll see that I use duct tape for a couple of the bookmarks below. Other options include any sort of card-weight paper and your own adhesive. 

  hole punch and embroidery floss or yarn. This adds the perfect last detail to your bookmark. Feel free to also add beads! 

 1. Back and fussy cut the bookmark. I like to apply my backing paper first, even though it does make the placement less accurate.

Applying the backing first, though, makes the bookmark easier to trim without getting adhesive onto your scissors. 

Cut the bookmark to shape and then add the backing and THEN trim, however, if fussy cutting the absolutely perfect bookmark is your highest priority. 

  2. Hole punch and add yarn or embroidery floss. I like to use double the length of my bookmark in embroidery floss. I knot it at the bookmark, then knot each of the threads near the end to prevent unraveling. You can use several pieces of embroidery floss at one time, if you want. It makes the bookmark look even nicer!

Saturday, July 3, 2021

Turn a Coloring Book Page into a Postcard

This tutorial was originally published on Crafting a Green World in 2017. 


 Drowning in cute, completed coloring book pages? Here's a fun way to give those pages another life while spreading some joy around. All you need to transform your coloring book pages into fun postcards are: 

  completed coloring book pages. As I've probably mentioned before, we photocopy all of our coloring book pages onto cardstock before we color them, but I've also made a postcard out of a vintage Archie comic book page, at the bottom of the pic, so that you can see how this method will work even with thin, cheap paper. 

  cardboard/thick card stock and adhesive. Adhesive-backed cardstock makes this job even quicker and easier, but almost all of it that you'll find has a texture that means you'll have to write your postcards using ballpoint pen. If you want to use your own cardstock or cardboard, choose a thin, even adhesive for this. I have an emergency can of spray mount (which is not eco-friendly) that I try to whip out only when it's absolutely necessary, but you can use regular glue, if you apply it lightly then press the postcard between pieces of waxed paper with a weight on top. 

 The only thing that you need to do to turn your coloring book pages into postcards is apply an adhesive backing (I do this first, making sure to cover a larger dimension than I'll want, so that I don't have to painstakingly match two perfectly-sized pieces afterwards), then fussy cut your postcard to the correct dimensions. There's even a little wiggle room in postcard dimensions, so you can be sure to capture the perfect part of your graphic. 

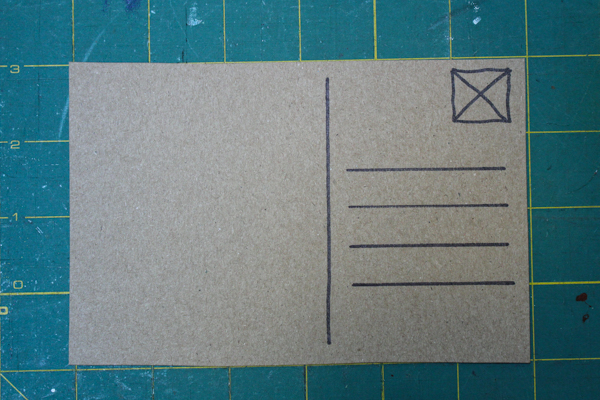
 If my kids are going to be using the postcard, I'll flip the finished postcard over and then, with a ruler and a pen, draw the line separating the address from the message, and the lines for the address. Sometimes I'll even ink in a little square for the stamp. If I don't do this, the kids will be sure to run over the space for the address, and it sucks. 

 These quick-and-easy little postcards are especially nice for sending to loved ones who will appreciate your beautiful artwork--I like to build up a stash,  then let my kids use them for thank-you notes and quick messages to grandparents.

Saturday, June 26, 2021

How to Make Postcards from Food Packaging

This tutorial was originally published on Crafting a Green World in 2017.

Save those empty cookie and cake mix boxes! Here's how to make postcards from your empty food boxes. Ones that you can really mail! 

 If you thought that my DIY coloring postcards were easy, then you're in for an even bigger treat, because postcards made from food packaging? Kind of the easiest thing EVER. Seriously, you don't even need a tutorial for this business. All you have to do is grab yourself some cardboard food packaging, the dorkier the better (check out my Funfetti, Friends! I can't tell my daughter no!).

How to Make Postcards from Food Packaging

Cut the postcard to any of the dimensions allowable in the USPS postcard regulations. These regulations call for a postcard height between 3.5" and 4.25", and a length between 5" and 6". Cardboard food packaging already meets the USPS regulations for postcard thickness. 

 As long as your postcard stays within these allowable dimensions, you can play a bit with the edges. I like to round the corners (although if you don't have a corner rounder, which is, I admit, a kind of ridiculous tool to own, it can be tricky to get these rounded corners to look completely even). You can also very lightly scallop the edges of your postcard (check out this postcard of the Grand Canyon to see what that looks like), although be sure that you stay within the allowable dimensions. 


I like to draw a line separating the message of the postcard from the space for the address, and sometimes I like to also draw guidelines for the address and a square for the stamp, just to make it look more balanced. If you have Sharpies or paint pens, you could also embellish the front of your postcard--doesn't Tony the Tiger want to wear a golden crown on his head? 

Saturday, June 19, 2021

How to Make a Broken Dish Pendant


This tutorial was originally posted on Crafting a Green World.

Pro tip: If you pretend that your dinnerware aesthetic is mismatched Fiestaware, then it doesn't matter how many dishes your kids break, because you can always just go buy another random plate and it'll fit right in. And bonus points for style, because broken Fiestaware is awesome for crafting!


Of course, you can use all kinds of broken dishes for crafting, but I am particularly fond of this colorful and cute broken dish pendant that I recently made from my dearly departed yellow Fiestaware plate. It's easier than you think to cut ceramics with a couple of standard tools, and there are loads of ways to finish off the pendant to your taste. This broken dish pendant is a fun upcycling project, and you get to use power tools--what could be better?

Tools & Supplies

To make your own broken dish pendant you will need:

Broken Dish

The local thrift store is my favorite place to buy crafting supplies, and I have no qualms about shattering even the cutest thrifted plate just to make mosaic tesserae or broken dish pendants. I'm equally fond of upcycling my own broken possessions, which is why I have that sad little stack of broken Fiestaware!

Dremel with Diamond Bit Cutting Wheel

 
Obviously, you can substitute whatever variable-speed rotary tool you prefer, but my good old Dremel 3000 has been doing right by me for at least a decade now, so I don't have experience with any other brands.

Grinder or Sandpaper (optional)

You do want to grind or sand away any sharp edges or snags, but you can leave the just plain irregular or uneven bits alone if you're not feeling picky.

Jewelry Findings

There's a lot of scope for imagination here! You'll see me finishing my pendant with soldered edges and a double barrel swivel, but you can use any findings and method you prefer, or even just use a tile bit to drill a hole right through your piece for hanging.

1. Cut the pendant shape from your dish


The secret to this project is just how stinking easy it is to cut ceramics with the correct tools. Here, I'm using an old-school Dremel 3000 and a diamond cutting wheel. That's really all you need!  Notice that I'm doing this cutting in my sink, shamefully getting water droplets all over my Dremel. That's because the most important piece to this puzzle is keeping your work surface wet: it reduces friction and lowers the temperature (caused by friction), so your piece is less likely to crack and your cutting wheel will last longer.

2. Sand or Grind the Edges of Your Pendant (optional)


I definitely could have cut this circle more neatly (if you're worried about making wonky cuts, choose a super simple shape, like a triangle, for your first few pendants. Save the wonky-looking circles for experts like me!), but the soldered edges that I'm planning on will cover a lot of flaws. All I did, then, was switch out my Dremel's cutting wheel for a grinding bit to grind down one jagged bit and round the pendant's edges. Rounding the edges ALWAYS makes a cut piece look more professional!

3. Rig the Pendant for Hanging

You have SO many options for actually turning your broken dish into a pendant!
  • Use epoxy glue to adhere a bail directly to the back of the pendant.
  • Use a diamond drill bit to drill a hole through the top of the pendant.
  • Wrap the pendant in wire, and twist to make a loop for hanging.
  • Solder around the pendant, then solder on a jump ring.

For a piece any bigger than this particular pendant, I like the look of drilling a hole directly through the dish, but this little Fiestaware logo pendant is only 1" in diameter! Did any of y'all also learn how to solder during the
soldered microscope slide jewelry craze? If so, you'll know that I burnished copper foil tape onto the pendant's edges, brushed them with flux, then soldered them with lead-free silver solder. A larger dollop of solder on top allows you to fix the hanger. 

 There are SO MANY fun things to do with broken dish pendants like these. You can turn them into necklaces or charm bracelets, add them to suncatchers or windchimes, or embellish pull chains or garlands. Supersize your broken dish pendants and use them as Christmas ornaments or gift tags, or decoupage or paint on top of them to make signage or wall art. Let me know what you're going to turn YOUR broken dish pendant into in the comments below!

Saturday, June 5, 2021

The Easiest DIY Newspaper Seed Starting Pots

This tutorial was originally published on Crafting a Green World in 2017.

Seriously, y'all, these are the easiest seed starting pots on the planet. There's no origami involved. No fancy tools. Heck, making these seed starting pots is even easier than opening the packaging on store-bought seed starting supplies! 

 I LOVE these DIY newspaper seed starting pots, because you can make them as-needed, and there's no waste-you plant your sprouted seedlings right in this pot, which decomposes to enrich the soil and allow your baby plant's roots to spread. No trauma to the babies, nothing to carry to the trash bin--it's a double win!

DIY Newspaper Seed Starting Pots


All you need are: 

  newspaper. If you don't take the newspaper yourself, just ask around. A single day's paper is enough to give you plenty of pots to start out with. 
  beer bottle. A hardship to obtain, I know. If you don't have one, I know for a fact that you have something similar on hand. Check your pantry. Check your fridge. I know you can do this! 
  plant markers (optional). You can write the name of the plant directly onto the newspaper pot with Sharpie, and the writing will last long enough for you to get the pot into the ground, but I paid my kid a penny a pop to write me a bunch of plant markers onto popsicle sticks, and you know what? Those work just as well as the cuter plant markers. 

 1. Rip your newspaper right down the middle. Don't use the ad flyers, and don't use the Sunday comics (because you're saving those for wrapping paper, right?). But all the other sections? Just go ahead and rip them all right down the middle. 


 2. Wrap a strip of newspaper around your beer bottle. You want about two inches of of the strip to hang off of the bottom of the bottle, so I find that lining the top of the strip up along the top edge of the beer bottle's label works well. Keep wrapping the strip around the bottle until it's all wrapped up--you'll overlap it on the bottle a few times, which will make your pot stronger. 

 3. Fold in the bottom of the newspaper cylinder. Neatly fold it up against the base of the bottle, all the way around. 


  4. Slide the newspaper seed starting pot off of the beer bottle. When it's free, give the bottom fold a good crease all the way around. Once you set it in a tray and fill it with damp soil, it will learn to keep that fold, and by the time you're ready to plant, you may have to rip it or snip it with scissors to open the bottom back up. 

 These newspaper seed starting pots don't last forever, obviously, what with staying damp and being filled with dirt, but they will last for more than long enough to grow your plants from seed to good, sturdy plant start. If you set them in a tray, you'll also be able to gently water them by putting water only in the tray and letting the newspaper wick the water up to the rest of the pot.

Tuesday, May 18, 2021

I Made a Sewing Machine Cover from an Old Blanket and a Vintage Quilt Top


As we all knew it would, last year's sewing machine saga ended with me buying another sewing machine.

I do NOT understand why sewing machines are impossible to repair!

I mean... obviously I DO know why sewing machines are impossible to repair. If the sewing machine company (*cough, cough, all of them, cough*) makes its sewing machine using plastic parts, then your sewing machine will inevitably break before too long, because plastic isn't a good material for a hard-wearing, hard-working sewing machine part. And when that two-dollar piece of plastic that makes up some crucial part of your machine's operation cracks and renders your sewing machine inoperable, you can't buy a new two-dollar piece of plastic to replace it, because the company doesn't sell its parts separately.

It is SUCH a racket. Even my old metal sewing machine is just about impossible to repair these days, as its replacement parts are now vintage and therefore also hard to find. 

I just really need somebody with a 3D printer and an entrepreneurial spirit to start a business copying and selling sewing machine parts. I'll buy the snot out of your products before you get shot down for patent infringement!

Speaking of stealing another entity's intellectual work... I 100% created my sewing machine cover by cutting the cheap-looking cover that my machine came with apart at the seams and tracing it.


Where did I get that cotton blanket that I found at the very bottom of my stash fabric bin? No clue, but I love it as the base fabric of my sewing machine cover.

Where did I get that vintage quilt top, also found at the bottom of my stash fabric bin? No clue, but it's perfect for embellishing that cotton blanket!


I used my wood star template to make a couple of stars to embellish the cover, and I love how they look patchwork without me putting in the effort!


I zig-zag stitched them to the cover, although I should have put some interfacing under them first:


Just don't look at how the applique is a little wavy. Instead, look at how nicely my sewing machine is protected from dust!


Let's hope this sewing machine lasts longer than the last four!

Saturday, April 24, 2021

Camping Hack: Make a Handwashing Station

 This tutorial was originally published on Crafting a Green World.

You don't get to have filthy hands even while you're camping, not unless you want to hike all day back to your car while suffering from the norovirus. 

 Pro tip: you don't want that. 

 Instead, make this DIY handwashing station that is so easy to assemble, a child can--and did!--do it. If you're not much of a camper, you can use this exact same handwashing station in the garden, or even by the back door, so that muddy hands NEVER make it into your house. 

 You will need: 

  empty plastic gallon jug. A gallon jug of water is the easiest to use, since you won't have to wash it.

  ripped tights. You'll need one intact leg, with no holes so large that a piece of soap could fall out.

  carabiner and rope (optional). You can get by without hanging your handwashing station, but it'll be a lot easier to operate when hung from a nearby tree limb. 

  twine. Yarn or other narrow cording are acceptable substitutes. 

  golf tee. Feel free to look for substitutes for this, because not everyone has a golf tee at hand. You're looking for a peg with a tapered end, sturdy enough not to snap and solid enough to serve as a drain stopper. 

  1. Poke a small hole in the bottom of the plastic jug. Poke it near the edge, on the side opposite the handle. Push the golf tee into the hole--it should fit snugly, ideally no more than halfway up the tee. Over time and many uses, the hole will naturally widen, but the golf tee should fit it for a very long time. When you're out camping and you finally see that you're pushing the golf tee all the way in to fit, make a mental note that upon your return, you need to make yourself a new handwashing station. 

  2. Tie a length of twine between the golf tee and the jug handle. This is so you don't lose the tee while you're washing your hands. You might want to secure the twine to the tee with glue. 

  3. Attach the soap. Cut off one leg of the tights. Push a bar of soap down to the foot, then tie the open end of the tights around the jug's handle. The soap should dangle down past the jug, giving you enough room to soap up your hands at the handwashing station. 

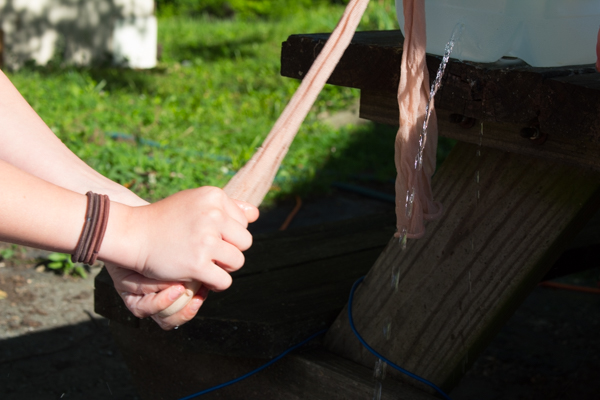
  4. Attach a carabiner or piece of rope. This handwashing station will work when sat at the edge of a table, but it's best used when tied by the handle to hang from a tree limb. Attach a carabiner to the handle, and loop on a long piece of rope that you can toss over a tree limb at your campsite. To use the handwashing station, fill it with water and either set it on the edge of a table, with the golf tee hanging over, or tie it by the handle to hang from a tree limb. Pull the tee to wet your hands: 

 Put the tee back in and soap your hands: 

 Pull the tee again to rinse. Rinsing your hands does take a little while, so if that bothers you feel free to experiment with a larger hole and stopper, although I personally would find refilling the handwashing station after every use far more annoying than I do rubbing my hands vigorously under a narrow stream of water. Either way, no norovirus for you!

Saturday, April 3, 2021

How to Refinish a Clock with a Coloring Page

 This tutorial was originally published on Crafting a Green World.

If you can get a clock with a dragon on it, always choose the dragon clock. Dragons are awesome. 

 But if you can't get a clock with a dragon on it--if ALL the clocks at the thrift store are boring and beige and dragon-free--then just choose one of the boring clocks, take it home, and put a dragon on it yourself. 

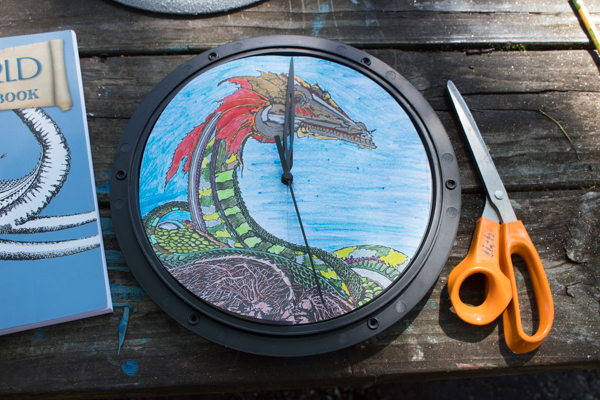
 This particular clock cost me a whole dollar at Goodwill. It wasn't exactly beige, but it wasn't anything special, either. I refinished it with my special secret paint method (which I'll share with you in a minute!) and a completed coloring book page, and now it's my new favorite thing. 

 Want to make your new favorite thing, too? Just follow along! 

 You will need: 

  clock. It should be in working condition, with a flat face (ie. no sticky-uppy numbers) and an accessible one--flip it over and look for the screws attaching the front to the back. If you can reach them, you can probably dismantle your clock, refinish it, and reassemble it without too much fuss.

  coloring page. You can also use scrapbook paper or wallpaper, of course--just make sure that your paper is acid-free, if you don't want to have to change it out every few years. 

  paint. As you'll see in a minute, I'm using three different paints on this clock: primer, a stone texture paint, and a silver glitter paint. It's what I needed for the exact effect that I wanted, but you can use whatever paint you prefer, as long as it will work on the surface of your clock. Plastic, for instance, will need a primer designed for plastic. 

  miscellaneous supplies. pencil, scissors, white glue and paintbrush, etc.  

1. Disassemble the clock and refinish the frame. Do NOT lose those little screws! This clock was intended for my kids' bedroom makeover back in 2017, which they have requested have a Medieval fantasy castle sort of theme. We're not going too far overboard, but we are painting their walls grey, displaying my older daughter's sword and dragon collections, and adding some small touches, such as this clock whose frame I wanted to look like it came from a treasure trove. 

 To get the effect, I primed the plastic frame, then sprayed it with two coats of stone texture paint. When that was dry, I sprayed it with two coats of silver glitter paint, making the whole thing super sparkly and mysteriously like a vein of silver torn from the rock. I've since also done it to a picture frame and a light switch cover, both also intended for the kids' bedroom, and they've all come out looking amazing. 

  2. Prepare the new paper background. To fit with the fantasy castle theme, I used a completed coloring page from the Tolkien's world coloring book. You can use any paper you'd like. Use the frame to help you trace a template of the clock face onto the coloring page, then cut it out. 

 Gently set the page on top of clock and mark the center; cut from the edge up to the center, then cut a hole in the center to accommodate the clock's stem. 

 3. Glue the new clock face down. Gently peel up the paper in sections, and paint the back side with a thin layer of white glue; press it well so that it doesn't bubble. 

 My hands are filthy because I was also working on the second coat of those grey walls. The kids were off at sleepaway camp, and I wanted to surprise them with their new room when they got home! 

  4. Reassemble the clock. This will probably involve cleaning the glass front of the clock, and then putting it all back together. 

 You can do other cute things with the clock face, of course, such as adding number stickers or stencils or decoupaging several different papers onto it, but double-check the placement of the clock hands, first--the minute hand on this particular clock was sooo close to the clock face that there wouldn't be room for more layers of paper and Mod Podge.

Saturday, March 27, 2021

How to Frost Glass

This tutorial was originally posted on Crafting a Green World.

Whether you want to upcycle a Mason jar to look like sea glass or alter a window so that it no longer offers a picture-perfect view directly into your bathtub, frosted glass is a beautiful way to make glass opaque while maintaining translucency. 

 Frosted glass is easy to DIY, and there are a ton of different methods to do it. The easiest method, and the one that I'm going to show you here, is as simple as adding a couple of coats of spray paint to a squeaky clean glass surface. Here are my two vintage Coca-Cola bottles before being frosted. One I've left clear, and the other I've already spray painted a color that turned out to be WAY brighter than I wanted. It would be nice if the flower vases didn't outshine the flowers! 

 This is for sure a project for making sure that your spray painting technique is on point--it's very important to hold the spray paint 10-12" from the object you're painting, and to coat it with light, overlapping sprays. Here's the clear glass bottle after one coat of frosted glass spray paint

 You don't have to wait any specific time before you can recoat the object, but it takes about ten minutes for the full frosted glass effect to show up, so don't get too impatient. Here's my bottle after two coats of frosted glass spray paint: 

 As you've gathered, you can use this frosted glass spray paint even on a surface that isn't already clear, but the result won't look like frosted glass. Here's my red bottle after two coats of frosted glass spray paint: 

 I do really like how the frosted glass paint mutes the shine and saturation of this painted surface--it's definitely not a look I'd want for everything, but it's a nice look for a vase for spring flowers.