Showing posts with label drawing and painting. Show all posts

Saturday, July 18, 2020

How to Refinish a Picnic Table with Paint

I originally published this tutorial on Crafting a Green World.

You've got to paint a few coats of sealant on your picnic table, anyway, if you want it to last outdoors--you might as well paint something interesting onto it first!

You can do this project on a picnic table of any age. If your picnic table is old and care-worn, replace any rotten wood and sand the other surfaces down to clean boards, first. If your picnic table is brand-new, you can paint right onto the unfinished wood.

Supplies & Tools

Either way, you'll need the following supplies:

  • Water-based outdoor primer. 
  • Water-based outdoor paint. Avoid oil-based paint, which generally has more VOCs than water-based paint, and requires paint thinner to clean up. You can use any water-based outdoor paint, and look for the smaller, approximately 200 mL "sample" containers to avoid waste. For this project, I bought 200 ml containers of Dutch Boy Maxbond Exterior in satin. There's just enough paint to refinish my two picnic tables, one old and one new, and freshen up the work on the deck chairs that I refinished here on CAGW four years ago.
  • Paintbrushes. I used large paintbrushes for the primer and the sealant, and a selection of small artist's brushes to paint the colorful details onto my picnic table.
  • Measuring and marking tools. These might include a pencil, meter sticks or rulers, and masking tape.
  • Polyurethane sealant. Buy water-based polyurethane sealant to make this project more eco-friendly. I used to be reluctant to use polyurethane sealant altogether because of its environmental footprint, but watching my deck furniture rot and need to be replaced after just a couple of seasons of Midwestern weather taught me that it's better to do what it takes to make things last. If you know of a better alternative, do me a favor and let me know in the Comments below!

Directions

1. Prime the picnic table.

You only need to prime the area that you'll be working on, as you can otherwise seal the bare wood of the underside of the picnic table and benches. I used white primer, but I'd actually recommend avoiding white unless you really want that specific color in the background of your design, or you plan to completely cover the white with another color. Even after several coats of sealant, white quickly looks dirty, and that happens all the more quickly outside. If I had this project to do again, I'd have instead started with a slate grey or blue for the picnic table's top.

2. Sketch out the design.

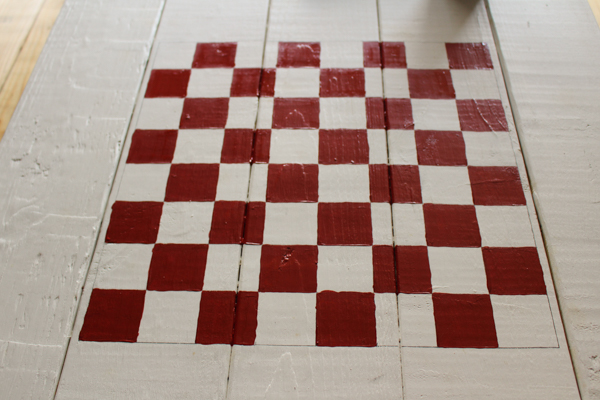
You can draw your design with a pencil directly onto the primed surface of the picnic table. I wanted this picnic table to have a chessboard, tic tac toe board, and colorful board game path painted onto it, so I first sketched them all in with pencil.

For the chessboard, I used two-meter sticks to measure out a 16x16" square, centered between the two picnic benches, and then I divided the square into an 8x8" array.

For the board game path, I used masking tape to lay a curving path around the perimeter of the picnic table. Masking tape can even be used to make smooth curves if you tear off and layer short pieces.

I traced the path in pencil, tore off all of the tape, and then divided the path into 2" steps.

I also used masking tape to lay out the tic tac toe board, then traced around it in pencil and tore off the tape.

3. Paint the picnic table.

This part of the process takes the longest, because you must wait for a color to dry before you can begin painting an adjacent color, and each color might require 2-3 coats before it looks saturated.

After the entire picnic table is painted, you can paint on the polyurethane sealant. This also takes a while, since there are several coats to add, and it can take up to a week for the last coat of sealant to fully cure for use.

But the time-intensive process is well worth it when you see the beautiful result!

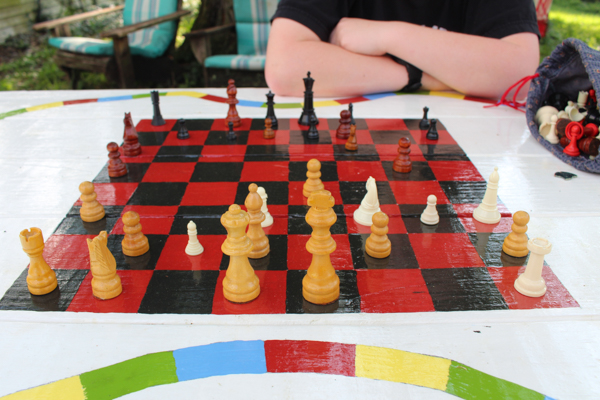
The well-sealed surface of our picnic table ensures that we can use it as-is for all of our other outdoor projects and fun, but there's nothing like sitting down to a quick game of tic tac toe using twigs and leaves while we're waiting for one last person to finish getting ready before we all hop in the car, or grabbing the bag of mismatched chess pieces for one game of chess that turns into eight games on a lovely spring evening.

That's a lot of multi-purpose fun from just a few colors of paint!

Thursday, May 28, 2020

Homeschool Science: Would a Blue Whale Fit in Your Driveway?


It would in ours!

Although, to be fair, we DO have a really long driveway...

Measuring whale lengths was the very last activity that I wanted the kids to complete to earn their Girl Scouts of Hawai'i Aloha fun patch, way back when it was actually a unit study based on our 2019 vacation to Kauai!

We just never got around to it last summer, though, and once autumn hit we had so many autumn things to look forward to that it was less tempting to dive back in. Now that we're spending so much more time on our property, however, and ESPECIALLY now that Will's AP exams are over (yay!), we actually do have the time to dive back into some of our unfinished business... and finish it up!

This activity was loosely based on the time that we drew life-sized dinosaurs all over a local park's basketball courts. My dream *had* been to go back to the basketball courts and draw life-sized whales, but we obeyed our governor's strictest stay-at-home order to the letter, and so to modify the activity to be able to be done on our own property, I wondered if we could measure life-size whale lengths on our driveway, and then just draw models of the whale next to its measurement.

Reader, we COULD!


I swear, these Smithsonian Handbooks are some of the best homeschooling resources that I own:


We have a whole stack of them. We used them constantly from the time the kids were toddlers... to today!


The kids each chose a couple of whales that interested them (fighting over who got to pick the narwhal, because OF COURSE), then I helped them measure that whale's length on our driveway.

Once they got the length measured, they focused on drawing a good model of their whale and learning its gross anatomy and some facts about it to share with everyone.

Here's Syd working on her blue whale, which does, indeed, just fit in our driveway!


I think everyone's favorite part of homeschooling is how we can interact with and love on our pets all day. They seem to know when the kids are doing something especially interesting or unusual, and they always want to join in!


Both kids really enjoyed this project!


Ah, here's one thing that I do NOT so much appreciate about homeschooling. Guess who's fighting again?


Someone threw a piece of chalk at her sister, and someone else kicked her sister. It's fine.


I also like homeschooling because generally, we're pretty chill about distractions here. Want to take a break from memorizing whale anatomy to chalk your father's freshly-washed hair?


It's art!


Spots also participated in Homeschool Art, which is what she gets for lying down on somebody's chalk rainbow:


Eventually, the kids remembered their whales, and finished their whales, and we all took a whale walk along the length of each whale, and then listened as each kid explained interesting facts about that whale's life and significant details of its anatomy:


And that's how we finally finished our unit study of Hawaii!

Eleven Years Ago: Wildflowers, Interpreted
Twelve Years Ago: At Last, a Tie-Dyed Quilt!

Sunday, April 5, 2020

All the Easter Crafts!

Easter is a good holiday for baking and crafting. Nobody but the Easter Bunny has to worry about presents, so there's no shopping or making, nobody is coming over, so there's no cleaning or decorating, and it's not one of our feast days, so there's no huge amount of cooking--give me white yeast rolls, a ham, and some chocolate bunny to gnaw, and I'm good for Easter!

So Easter, for us, is a super fun time of baking ridiculous treats and decorating endless eggs. I don't know what about that we all find so entertaining, but year after year, there it is--endless eggs! There's always something new to do with just one more dang egg!

Here, then, is the master list of my Easter tutorials. I loved compiling this list, because it took me back for years of Easters past, years of little faces focused in concentration as they do one more weird thing to one more endless egg, years of little feet stomping around and little hands picking Easter eggs out of their hiding places. Feel free to reminisce with me:


felted wool Easter eggs. We did these way back when I was into felting with the kids. It's been years since I've felted wool, but it's just now occurred to me that I bet Syd would LOVE needle felting...


chalkboard Easter eggs. This is our most recent Easter project, and Syd has been playing with it daily.


blown-out Easter eggs. The process is kind of gross, but I love that you can then keep the finished and decorated egg forever. They're delicate, but they won't rot.


woodburned and stained Easter eggs. As much as I cherish the memory of the cute little projects that my little babies got up to, I really enjoy making these more sophisticated crafts with them. Woodburned Easter eggs look really cool!


stained wooden Easter eggs. This is my go-to liquid watercolor staining method. It's brilliant, and looks awesome.


papier mache Easter eggs. If you're not into plastic Easter eggs, you have GOT to make these. You can hinge them so that they still open for treats!


tissue paper decoupaged Easter eggs. These can be kind of fiddly, but we use pre-cut squares of tissue paper, and that makes it a lot easier.


tie-dyed Easter eggs. This is a weird little activity for when you're tired of just dunking your eggs to dye them.


homemade natural Easter egg dye experiment. This was so fun, and a great excuse to drag everything out of the spice cabinet!


cascarones. We made these last year as Spawn Eggs for Syd's Minecraft-themed birthday party, but they're traditionally an Easter craft.


egg dye volcanoes. After you finish dyeing eggs, pour more vinegar into the dye bath, spread a layer of baking soda onto a cookie sheet, and let the kids go! I still remember how joyfully Syd played with this.


how to dye brown eggs. Because we've got LOTS of brown eggs!


Easter egg dye paint. Here's another fun thing thing that you can do with your leftover Easter egg dye.


miniature watermelon eggs. We actually made these for a dinosaur-themed birthday party, but they'd make super cute Easter eggs for an egg hunt.


Pysanky eggs. This is probably the most involved Easter project that we've done, but it was also the best-looking, and so fun!


embroidered felt Easter egg. These are a good replacement for plastic eggs, since they contain a secret pocket for treats!


glittered and embossed Easter egg. I LOVE how sparkly these eggs become!

I didn't realize how many projects I had until I was almost finished--apparently we really do try a couple of brand-new Easter crafts every year!

P.S. Want to follow along with my craft projects, books I'm reading, road trips to weird old cemeteries, looming mid-life crisis, and other various adventures on the daily? Find me on my Craft Knife Facebook page!