When you were a little kid, did your parents have a "special" cake, the one that got baked for all the special occasions, the one that you ALWAYS requested for your birthday or a celebration or any time that you got to be in charge of picking the cake?
When I was a little girl, Mammaw's chocolate chip bundt cake was THE cake.
For my little girls, I think that my rainbow cake is now the cake. We had rainbow cake last year for Sydney's birthday, and then for her birthday party--made sense, because her party theme was rainbows. This year, however, for Sydney's birthday, with a choice among all the cakes in the entire world--cookie cake, ice cream cake, chocolate cake, pink cake--her request was, again, for a rainbow cake.
Now, you can do a rainbow cake two ways: the easy way, or the hard way. I do the hard way for the birthday party, and the easy way for the birthday. The easy way still, obviously, takes more work than just buying a birthday cake from Sam's Club, but it's really not that hard, since you can even use a box of cake mix if you want, and the impact of the finished cake is giant.
Here's how to make rainbow cake the easy way, because you are definitely going to want to do this yourself. It's that fun:
Prepare a double batch of white cake using your preferred method. I have made white cake from scratch and have used white cake mix for this recipe--it works either way. If you're a total baking newb, however, double-check your cake mix box to make sure that you're buying white cake mix. When I was a total baking newb I brought both yellow cake mix AND white cake mix to my aunt, who was making a giant dinosaur cake for Will and needed two boxes of mix--she was not pleased.
I advise making a double batch of cake mix because you'll have more cake batter to dye, and so it'll be easier to work with as a whole. If you only need one cake or one batch of cupcakes, then just bake the rest and freeze it for later--rainbow cupcakes make a nommy breakfast treat!
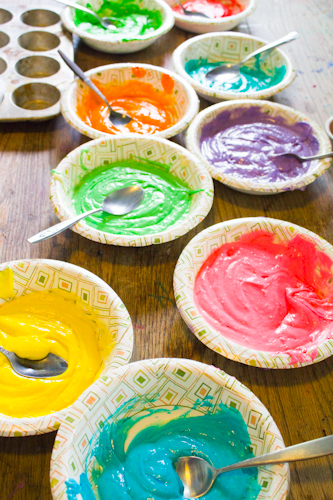
Separate the cake batter into as many separate bowls as you want colors in your cake, and dye each bowl of batter separately, using a clean spoon for each:

I highly recommend using better-quality gel or paste food coloring
If you're making this cake yourself, as the adult, you can work a little more systematically from this point, but, especially if you're baking cupcakes (as I am here), this project is a fabulous one to let little kids do themselves from here. Especially for cupcakes, which cook fairly quickly, this would also be a fun party activity to allow little party guests to design their own cupcake.
Arrange all the different bowls of colored mix so that they're accessible, each with its own spoon:
Using the dedicated spoons, drop spoonfuls of cake batter into the cake pan however you'd like:

You can use this same cake technique for a full-size cake pan, a smaller individual cake pan, as Sydney has above, or for cupcakes:


When you're finished, bake as usual.
I think that you'll be really pleased with what you end up with:


Stick around, because Syd has already requested a star-shaped layered rainbow cake for her star-themed birthday party this weekend, and so if I'm making a layered rainbow cake, anyway, well, then I might as well write a tutorial!
Here's the food coloring we used:

4 comments:
Yay! I was just this morning searching google for rainbow cake recipes!
Thanks so much for the tutorial!
Cool idea! I will definitely be giving my kids this option soon.
They're gorgeous!!
My daughter and I made these this morning for her 5 1/2 b-day party and they turned out awesome! Thank you so much for this really fun tutorial :) Going to see if I can figure out this link thing...
Post a Comment