Showing posts with label Crafting a Green World. Show all posts

Monday, April 25, 2022

Crafting with Kids: Make Your Own Plaster of Paris Figurines

I originally published this tutorial on Crafting a Green World way back in 2010!


Summer is for kitschy children's crafts. Popsicle sticks, pom poms, the ubiquitous lanyard, plus a few thousand mosquito bites are all that's necessary for the perfect summer. 

Kids' crafts, however, can compete with the eco-friendly lifestyle that we try to teach them. They want foam stickers and plastic beads, and we want them to craft with twigs and pine cones

One of the ways to teach children to craft positively is to teach them the DIY mindset. Plaster of Paris is a kid-friendly material, made from powdered gypsum (just like the dunes at White Sands, New Mexico!) that you rehydrate and then dehydrate again in a mold, and those little plaster of Paris figurines that craft stores sell are cute and fun to paint. But what sweatshop were they imported from? Who knows? 

Here's how give your kids the fun of making your own plaster of Paris figurines, all with stuff that you already have around the house. 

You will need:
  • Plaster of Paris. I bought mine half-used from a garage sale, but it's an inexpensive and easily found craft supply to find new or used.
  • Measuring cups and stirrers. You can either use cups and bowls and spoons that you can rinse off with the hose outside (NOT down your drain!), or you can do what we do and give one final use to stuff that we're just about to throw away, anyway- souvenir non-recyclable plastic cups or decorative tins or toothbrushes or used-but-dry popsicle sticks, or paint stirrers.
  • Kitchen or postal scale
  • Household objects for molds. Silicon muffin molds work well for this, as do conventional metal muffin tins, as well as any plastic or metal container. Be creative!
 1. Using the kitchen scale, measure out your plaster and water in a 2:1 ratio. This means that you need to have twice the weight of plaster that you do water. If you measure out 12 ounces of plaster, for instance, then you'll need to weigh out 6 ounces of water. 

2. Combine the plaster and water into one bowl and stir well until they're combined and there are no lumps. 


3. Pour the plaster of Paris mixture into your molds, smoothing out the tops with a popsicle stick or the flat end of a knife. 

4. After at least 30 minutes, the plaster of Paris will be firm to the touch and can be unmolded and painted with acrylic paints.  


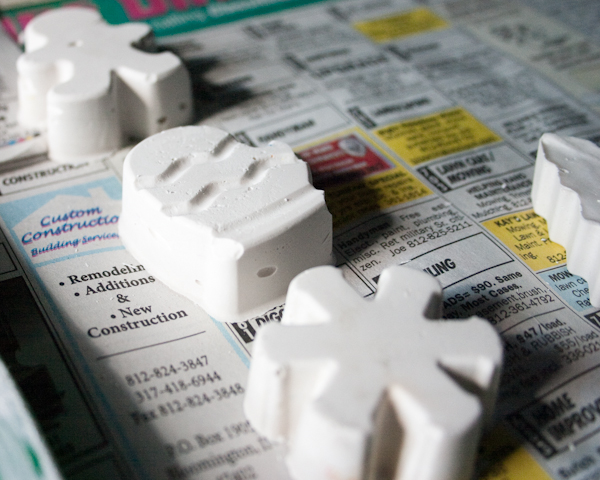
Plaster of Paris figurines make great paperweights, party crafts, and grandparent gifts. To make them extra crafty, you can embed found objects in the plaster before it's completely firm. May I suggest twigs and pine cones, perhaps?

Saturday, February 12, 2022

How-to: DIY Color Viewers


This tutorial was originally posted on Crafting a Green World in 2015.

Got a kid who's in love with color? These DIY color viewers will help her see the world in a whole new light! 

These color viewers are a project that is suitable for a wide range of ages. Toddlers and preschoolers will incorporate them into their sensory play, while older kids (who do still love their sensory play, of course!) will be able to use them for a variety of scientific observations and experiments--colored shadows, color mixing, the properties of light, the properties of the eye, etc. 

 Also? They're just plain fun! 

 Here's how to make your own set of color viewers: 

  1. Gather ample cardboard to upcycle. You'll need two pieces of cardboard for each color viewer. I have a horrifying collection of used shipping boxes that I was pretty thrilled to raid for this project, but cereal or cracker boxes, moving boxes, or my most common go-to, cardboard record album covers, will also work well. 

  2. Cut cardboard to size. This size will depend on the size of the cardboard pieces that you're using; to minimize waste, I cut my cardboard to the largest size that I could--about 5.25"x8.5". Cut two pieces for every color viewer that you want to make. 

  3. Cut a window into the cardboard. Measure 1" in on all sides, and cut out to make a frame. 

  4. Cut the cellophane to size. As with my DIY 3D glasses tutorial, it's the colored cellophane that really makes this project. Measure the window that you've cut into the cardboard, then cut each piece of cellophane, one per color viewer, 1" longer than that measurement by both length and width. 

  5. Glue the cellophane to one cardboard frame. Lay one cardboard frame wrong-side-up (for instance, I put the outsides of my scuffed and labeled shipping boxes to the inside of my viewers), then run a line of hot glue along the entire perimeter of the window. Carefully center and set the cellophane down over the window, and press in place. 

  6. Glue the second cardboard frame to the first. Run another line of hot glue around the frame, then center a second cardboard frame and set it down on top of the first, right-side-up. These color viewers are sturdy enough for even toddler play, but if you've got a smaller kid who still likes to gnaw, you'll probably want to cover the outside edges of the cardboard frame with clear packing tape so that the kid's saliva doesn't soften and wear away the cardboard. 

Older kids will mostly do this, though: 

 Then she looked at her sister through it, informed her that she was green and therefore made of puke, the sister screamed in outrage and began to chase her, and I might have possibly gone inside and locked the door.

Saturday, January 22, 2022

Tutorial: Stenciled Bean Bags

 This tutorial was originally published on Crafting a Green World way back in 2010!

I like to make educational toys for my girls--matching games from their artwork, file folder games, extension activities for the books they read, anything that will allow them to incorporate what I want them to learn into the pleasures of their lives. These particular bean bags were inspired by my three-year-old, who hasn't yet memorized her numbers. Sure, she can count on her fingers and plays a mean game of Uncle Wiggily, but sit down long enough to figure out the difference between a 5 and a 9? Eh. Why not just call everything an 8? 

 The beauty of the stenciling, however, is that you can put anything that you want on these bean bags--kids' names, states and capitals, letters (I really want to make this alphabet bean bag set), or instructions for the craziest Game Night game ever! Here's how to make them: You will need:
  • fabric scraps measuring at least 4.5" square. I used quilting cotton, but canvas, upholstery remnants, felt, and even vinyl would work, although you might need to modify your stenciling method with a different fabric
  • sewing machine with a medium-weight universal needle and matching thread. I top-stitched around these puppies twice to make them secure, so I'd advise a thread that will blend, not fetchingly contrast, with your fabric here.
  • dried beans. I used pinto beans, which were the cheapest, and used about three pounds of dried beans for 30 bean bags. Any dried legumes, rice, or even cherry pits would also work.
  • freezer paper, sponge brush, and professional-quality fabric paint for freezer paper stenciling
1. Cut out two squares of 4.5" fabric for each bean bag that you want to make. 


 2. It's easy to paint the stencils on your fabric before you sew it together. I used my Cricut to cut the stencils directly into my freezer paper, and I stenciled the positive image of each number on one side and the negative image on the other side. If you haven't tried freezer paper stenciling before, it's easy--check out my freezer paper stencil tutorial for more tips and tricks. 

 3. Making sure that the stenciled images on each fabric square are aligned in the same direction, face the two sides of each bean bag together and sew around 3 and one-half sides--you're going to leave yourself an opening half of one side long for stuffing your bean bag. 

 4. Clip the corners of each bean bag to reduce bulk, then turn them right side out, using a chopstick or dull pencil to push the corners out nice and sharp. 

 5. Top-stitch twice around three sides of each bean bag--don't top-stitch around the side that has the opening, because you'll do that one after the bean bag is stuffed. 

 6. Fill each bean bag with dried beans. I like mine nice and stuffed, but in order to top-stitch easily and neatly close your opening, leave a least an inch's room at the top. 


 7. Top-stitch the side with the opening twice. This will neatly close the opening and give that side the same sturdiness as the other sides, while allowing it to match, as well. 


 Now they're ready for tossing!

Sunday, January 16, 2022

How-to: Organic Terrycloth Hooded Towel with Applique


This tutorial was originally posted on Crafting a Green World back in 2013.

There's nothing like hopping out of the pool and into a comfy, soft, bounteous towel. But big beach towels are hard for little kids to manage, and that bleached, dyed terrycloth can be scratchy and harsh on damp, delicate skin. 

It's an organic terrycloth hooded towel to the rescue! This hooded towel isn't for babies--if you start with your own organic terrycloth fabric, you can sew this hooded towel with proportions perfect for big kids. Organic terrycloth won't add any extra chemicals to your kiddo's tender skin, and it's softer than those cheap-o novelty beach towels. 

And just in case there's any doubt who that awesome hooded towel belongs to, there's plenty of room on the back for a monogram, done superhero-style in the case of my superhero-loving kiddo, who's decided that her hooded towel does, indeed, look a LOT like a superhero's cape. 

 Need a superhero cape/hooded towel for your own kiddo? Read on for the tute: 

1. Take your kiddo's measurements, and figure out yardage. First, measure your kiddo's height--look how she's grown! 

Your hooded towel will be in the shape of a square turned diagonally, so this height measurement will be the diagonal length of the square. To calculate the length of each side of the square, use the Pythagorean theorem, in which c equals the diagonal and both a and b equal the lengths of the other two sides of the right triangles made from the square with that diagonal. No, you don't want to do that math? Fine, use this square calculator, but don't forget that your geometry teacher TOLD you you'd need the Pythagorean theorem one day! 

Using the Pythagorean theorem, and then rounding up to the next inch, I discovered that each side of my square needed to be 36" (do not include a seam allowance here or anywhere else on this project); this was a yay, because it meant that I could sew the entire hooded towel for my seven-year-old from one yard of organic natural terrycloth. 

Now, measure the top of your kid's head from front to back; this will be the altitude of the right isosceles triangle that makes up the hood. To cut a right isosceles triangle to this altitude, fold the remaining terrycloth to the bias, measure the altitude, and cut. 

Fold the terrycloth to the bias to measure the altitude of the triangle formed by the fold.

2. Make homemade bias tapeCut printed or undyed organic flannel on the bias at a width of 4", then make bias tape out of it. You will need enough bias tape to cover the perimeter of your square and the base of your triangle. 

3. Sew bias tape to the hood. Just sew the bias tape to the base of the triangle; the other two edges of the hood will be covered later. 

Sew bias tape to the base of the triangle forming the hood, then pin the raw edge of the triangle to one corner of the towel.

4. Attach the hood to the towel. Line up the two raw edges of the hood with the two raw edges of one corner of the towel. Pin well. 

Sew the bias tape around the perimeter of the towel.

5. Sew bias tape to the towel. Sew bias tape entirely around the perimeter of the towel, mitering the corners (here's how to miter corners with bias tape). When you come to the hood, you'll be encasing both the raw edges of the towel and the raw edges of the hood with that bias tape. 


I basted the applique to the towel’s back, then went back over it with a satin stitch.

6. Applique the hooded towel. Your hooded towel is perfectly serviceable at this point, but it might still need some personality. You can cut a monogram, or really anything that you wish, out of flannel, center it onto the back of the hooded towel, and applique it on using your machine's satin stitch. NOW it's got some personality! 

Saturday, June 19, 2021

How to Make a Broken Dish Pendant


This tutorial was originally posted on Crafting a Green World.

Pro tip: If you pretend that your dinnerware aesthetic is mismatched Fiestaware, then it doesn't matter how many dishes your kids break, because you can always just go buy another random plate and it'll fit right in. And bonus points for style, because broken Fiestaware is awesome for crafting!


Of course, you can use all kinds of broken dishes for crafting, but I am particularly fond of this colorful and cute broken dish pendant that I recently made from my dearly departed yellow Fiestaware plate. It's easier than you think to cut ceramics with a couple of standard tools, and there are loads of ways to finish off the pendant to your taste. This broken dish pendant is a fun upcycling project, and you get to use power tools--what could be better?

Tools & Supplies

To make your own broken dish pendant you will need:

Broken Dish

The local thrift store is my favorite place to buy crafting supplies, and I have no qualms about shattering even the cutest thrifted plate just to make mosaic tesserae or broken dish pendants. I'm equally fond of upcycling my own broken possessions, which is why I have that sad little stack of broken Fiestaware!

Dremel with Diamond Bit Cutting Wheel

 
Obviously, you can substitute whatever variable-speed rotary tool you prefer, but my good old Dremel 3000 has been doing right by me for at least a decade now, so I don't have experience with any other brands.

Grinder or Sandpaper (optional)

You do want to grind or sand away any sharp edges or snags, but you can leave the just plain irregular or uneven bits alone if you're not feeling picky.

Jewelry Findings

There's a lot of scope for imagination here! You'll see me finishing my pendant with soldered edges and a double barrel swivel, but you can use any findings and method you prefer, or even just use a tile bit to drill a hole right through your piece for hanging.

1. Cut the pendant shape from your dish


The secret to this project is just how stinking easy it is to cut ceramics with the correct tools. Here, I'm using an old-school Dremel 3000 and a diamond cutting wheel. That's really all you need!  Notice that I'm doing this cutting in my sink, shamefully getting water droplets all over my Dremel. That's because the most important piece to this puzzle is keeping your work surface wet: it reduces friction and lowers the temperature (caused by friction), so your piece is less likely to crack and your cutting wheel will last longer.

2. Sand or Grind the Edges of Your Pendant (optional)


I definitely could have cut this circle more neatly (if you're worried about making wonky cuts, choose a super simple shape, like a triangle, for your first few pendants. Save the wonky-looking circles for experts like me!), but the soldered edges that I'm planning on will cover a lot of flaws. All I did, then, was switch out my Dremel's cutting wheel for a grinding bit to grind down one jagged bit and round the pendant's edges. Rounding the edges ALWAYS makes a cut piece look more professional!

3. Rig the Pendant for Hanging

You have SO many options for actually turning your broken dish into a pendant!
  • Use epoxy glue to adhere a bail directly to the back of the pendant.
  • Use a diamond drill bit to drill a hole through the top of the pendant.
  • Wrap the pendant in wire, and twist to make a loop for hanging.
  • Solder around the pendant, then solder on a jump ring.

For a piece any bigger than this particular pendant, I like the look of drilling a hole directly through the dish, but this little Fiestaware logo pendant is only 1" in diameter! Did any of y'all also learn how to solder during the
soldered microscope slide jewelry craze? If so, you'll know that I burnished copper foil tape onto the pendant's edges, brushed them with flux, then soldered them with lead-free silver solder. A larger dollop of solder on top allows you to fix the hanger. 

 There are SO MANY fun things to do with broken dish pendants like these. You can turn them into necklaces or charm bracelets, add them to suncatchers or windchimes, or embellish pull chains or garlands. Supersize your broken dish pendants and use them as Christmas ornaments or gift tags, or decoupage or paint on top of them to make signage or wall art. Let me know what you're going to turn YOUR broken dish pendant into in the comments below!

Saturday, December 26, 2020

Two Ways to Make an Upcycled Journal

This set of tutorials was originally published on Crafting a Green World.

Is it your New Year's Resolution to write more? Draw more? Keep better track of what you need to do?

You can make an easy upcycled journal to meet all those needs, or to do whatever you want it to do. I'm going to show you three different methods to turn stash and found materials into journals that you can design exactly the way you've always dreamed of. Pick your favorite, or try them all!

Five-Hole Pamphlet

If you love those little Moleskine books, then you're going to love the five-hole pamphlet. I keep a couple of these kicking around in my backpack so that I have one whenever I need one, and I encourage my kids to make and use them for sketching and nature journals. Their lay-flat pages and small size make them a terrific on-the-go notebook.

To make a five-hole pamphlet, you will need:

paper As you can tell in the above image, you really can use anything. One of the journals pictured is made from brown paper bags, and another has pages made from old sheet music.

heavier-weight paper for the pamphlet's cover Think cardstock rather than cardboard for this. The cardstock should be .25" to .5" longer on both sides than the regular paper.

paper clips and paper cutter I use a guillotine paper cutter to keep all my cuts perfectly even.

awl, sewing needle, embroidery floss Waxed thread is the typical go-to for bookbinding, but you'll find embroidery floss much easier, and it's perfectly fine for these books. Upgrade to the good stuff if you want to make heirloom-quality journals.

1. Cut your paper to size Imagine the finished size of your journal--what are your ideal dimensions? 4"x 6"? 5"x 7"? The inside pages of your journal should be cut to twice that width by that exact height; the cover of your journal should measure an extra .5" on both the width and the height.

Also, imagine your journal's pages--how many would you like? The number of pages that will comfortably fit in a pamphlet depends on the thickness of paper that you're using. The brown paper bags, for instance, are pretty heavy-weight, so I've cut seven of them for my pamphlet. Play around with what feels comfortable to you, but 6-10 pieces of paper will give you plenty of pages in your upcycled journal.

After you've got your inside pages cut to size, align them perfectly and hold them together with paperclips on each side of the center line.

5. Make a stitching guide Another reason to limit the number of pages in your journal--you're going to use your awl to put five holes through the paper along the center line, where you'll be sewing the journal together. Use a ruler to evenly space the five points.

Once you have the five holes pierced, put the cover page centered behind the stack, hold it to the stack with more paper clips, and go through the holes once more with your awl. All of your stitching points should be nicely lined up now!

6. Sew the pamphlet. Start from the inside of your book, and sew first through the center hole, leaving a long tail in the middle. The sewing diagram looks like this:

Image Credit: Sewing Diagram for Pamphlet Stitch via The University of Iowa Libraries

 However, it's almost easier to remember that you start in the center, go in and out the holes all the way up and all the way down, skipping the center hole on your way back down. Go in and out the holes back up to the center, where you'll find yourself where you started. Both ends of the embroidery floss will be on the same side of the book, so tie them in a square knot and cut off the excess.

Fold your pamphlet in half and it's complete!

Accordion-Fold Book

This book is not sewn but instead made by gluing. It's another project suitable for all ages and makes excellent use of upcycled materials.

To make the accordion-fold book you'll need:

paper Your book will be one looooong piece of paper. You can glue pages together to make this piece--I'll show you how later!--but still, I like to start off with wide-format paper. Newsprint or pages from large sketch pads are both good choices.

cardboard Food packaging is my favorite material to upcycle for the covers of these books.

glue Use a good-quality white glue; a name-brand school glue is fine. To attach the covers to this book, I used double-sided tape to save time; this is not an archival choice, but it did get my book ready to use in record time!

cutting and measuring supplies

1. Cut and glue the pages of the book. Your book will consist of a front and back cover, with a long, accordion-folded piece of paper sandwiched between. Decide on the dimensions that you want for each page, and then cut several long pieces of your paper that are the correct height. Accordion fold the paper so that the width of each page is correct.

To attach two pieces of paper so that your book can be longer, simply cut the last page of one piece of paper off so that it's no longer the full width, but instead only 1" wide. Glue that tab to the first page of the next piece of paper, and continue to accordion fold for as long as you'd like!

2. Glue on the front and back covers. Cut two covers that are approximately 1/4" wider on each side than the pages, then center the first page on the back of the front cover and glue. Repeat for the back cover.

Pro tip: every time I glue paper, I put parchment paper over and under what I'm gluing, and then a heavy book on top. I let it sit until the glue has dried.

As a quick option, you can use double-sided tape here instead of glue. The tape will eventually erode the paper, but if you're making an everyday sketch or workbook, you'll appreciate the time-saver.

3. Glue on endpapers (optional). If you'd like decorative endpaper, you can glue pretty, handmade paper (our favorite is to marble paper with shaving cream!) on top of the page that you glued to the back of each cover. It's not necessary, but I think it makes the books more decorative.

These books make wonderful family timelines, travel journals, and doodle books. If you use a heavy-weight paper for the pages, you can also make your accordion book into an art journal or photo album.

Saturday, December 19, 2020

How to Sew a Reversible Skirt

I originally published this tutorial on Crafting a Green World.

It's business on one side, and a party on the other!

Or in this case--it's Girl Scout khaki on one side, and pretty pink on the other!

My kiddo wanted a dressier version of her Girl Scout uniform, but I also know good and well that she is simply not going to wear a khaki skirt for any reason other than a dressy Girl Scout occasion. I'm not one to enjoy sewing something that will get little use, so yes, I made her the khaki skirt that she wanted, but I made it reversible, with some pink prints from my stash that I know she'll enjoy wearing every other day.

Want to make your own reversible skirt? It's not hard, and it's a great stash buster!

You will need:

up to 2 yards of two different fabrics. I'm afraid that I went overboard and sewed this skirt too large, but to be fair, Girl Scouts wear those khaki uniforms from the 6th grade until they graduate high school and bridge to adults. It was boring enough to pick out khaki fabric the first time--I don't want to do it every year until my kid graduates! This particular skirt used two fabrics that were 22" x 72", but I could have halved both measurements and still had a fine skirt for an eleven-year-old.

1/2" elastic

measuring and sewing supplies.

1. Measure and cut two identical skirt pieces. Each should be the desired length of skirt + 1.5" and the desired width (two to three times the wearer's waist measurement) + 1.5". To make sure that the two pieces are absolutely identical, I like to lay one on top of the other and cut them simultaneously.

2. Measure and mark the hem/waistline. You will overlap these skirt panels when you sew them together, with one skirt panel folded over the other to make the skirt's hem, and the other skirt panel folded over to make the skirt's elastic waistband casing. You will see, then, a different-colored bias hem on one skirt and a different-colored waistband on the other.

Measure and mark 1.5" from the bottom edge of the skirt panel that you'd like to use for the bottom hem, and 1.5" from the top edge of the skirt panel that you'd like to use for the elastic waistband casing.

3. Sew both skirts. Sew each skirt panel into a tube by sewing the short sides together and finishing the seams.

4. Sew the hem and waistband. Place the two skirt pieces wrong sides together, and overlap them by 1.5" inches. The skirt that will be folded over and sewn to make the bottom hem should overlap the other skirt piece by 1.5" at the bottom, and the skirt that will be folded over and sewn to make the elastic waistband casing should overlap the other skirt piece by 1.5" at the top--the marks that you made in step 2 should help you with this.

Fold the bottom hem up, crease it, then fold it again to the inside and edge stitch it, encasing the raw edge of the other skirt panel.

Turn the skirt inside out, then fold the top waistband hem up and crease it, then fold it over again and edge stitch it down, leaving an opening to insert the elastic.

Attach a safety pin to the elastic, feed it through, sew the ends together, and sew the opening in the casing closed.

And now you have a reversible skirt! You can use this method to alter the matching skirts from this tutorial, and outfit a whole troop of Girl Scouts.

Saturday, December 12, 2020

4 Ways to Cut Glass Bottles (including the One Way that Actually Works!)

I originally published this tutorial on Crafting a Green World.

The ability to cut a glass bottle all by yourself is the Camelot of crafting. We've all heard of people doing it, we've seen the YouTube tutorials, we've for sure seen the awesome stuff you can make from a cut glass bottle, and yet... if you've ever tried it for yourself, you know that it's not that simple, is it?

If you haven't cut a glass bottle before and you think that it IS simple, go try it. I'll wait here until you come back pissed off and scratched, having cleaned up the mound of shattered glass that you were left with.

Done? Okay, great! Now hang out with me here while I run through the three most popular methods of cutting glass bottles that seem to show up most often online, and I'll tell you why they suck. Your reward is that when I'm done, I'm going to walk you through the one way of cutting glass bottles that actually works like a charm. It takes some special tools, but it's easy and it WORKS.

But first, the three methods that don't work:

Method #1: Score and Tap

It's a bummer that this method is so unreliable because it's the one that's the most commercially available. Most store-bought bottle cutting kits include a jig for the bottle, a wheel that etches the bottle, and a tool for tapping it:

 Here's the bottle cutting kit that I owned for a decade before it finally pissed me off enough that I gave it away.

The idea is that you place the bottle on the jig, turn it so that it's etched by the wheel, and then tap it to break the glass neatly at the etching. Here's an example of what a typical bottle cutter kit looks like:

It... kind of works? Ish? The method is sound, but the problems are that one, it's got a big learning curve, so your first 20-50 bottles aren't going to come out right. Two, it's unreliable, so even after you've finally got the hang of the method, you're still going to crack a bunch of bottles. There's just no getting around it. And that's a lot of waste for a process that's supposedly all about removing glass from the waste stream.

Method #2: Hot and Cold Water

This method is similar to the process above, except that instead of tapping the scoreline, you alternate pouring hot and cold water on it, using the physics of temperature to neatly break the bottle:

That's the idea, at least, but again, a method that involves breaking the bottle, however carefully engineered, is still going to subject you to a lot of trial and error. It's a more elegant solution in that you don't have to physically smack your bottle with a hammer, but you're still going to get so many bottles with wayward cracks, no matter how much you practice. It's not worth the waste.

Method #3: String and Fire

Oh my gosh, I so badly wish that this method worked better because you KNOW how much I love myself a good fire! For this method, you only slightly endanger your life by soaking a string in a flammable substance, wrapping it around a bottle, and then SETTING THAT STRING ON FIRE:

YAAAAAASSSSS!!!!! Who does not love setting stuff on fire?! Unfortunately, not only is this method exactly as unreliable as the first two but it also, you know, physically endangers you. Sigh...

Method #4: Just Cut It, Bro (the one that works!)

Okay, Sugar, you've been so patient with me first telling you all the ways that don't work for cutting a glass bottle that now I'm going to give you a present by telling you the way that DOES work.

You might have noticed that the three unreliable methods that I've shown you all have something in common: they break the bottle. Sure, you can get the hang of it and break the bottle just right more often than not, but there's still too much luck involved for my taste. In my opinion, the best method for cutting a glass bottle is to do just that: get yourself a rotary tool with a glass-cutting bit, and cut that bottle!

I use an older Dremel 4000 with a diamond cutting wheel attached. That, plus a trickle of water, plus some safety gear, plus a few grits of sandpaper, is all you need to cut a bottle accurately every time, no luck needed, with a very short learning curve.

Directions

1. Mark your cutting line.

Do this with a Sharpie, not masking tape or anything water soluble. You can mark curves, but keep in mind the turning radius of your cutting wheel--it's not a jigsaw.

2. Put on your safety gear.

You absolutely need a breathing mask to do this method. No excuses. I am not responsible for you filling your lungs with glass dust, so don't even think about not doing what I say. I use this type of mask, which is also good for soapmaking. The bottle will get slippery when it's wet, so a rubber glove on your bottle-holding hand won't steer you wrong, either.

 Me + weapon + victim: let the games begin!

3. Start the water flowing.

Run your faucet or hose so that lukewarm water will trickle over your bottle, right at the spot where you're cutting. Keep that water at your cutting location the whole time you're cutting. If your aim is off, you WILL crack that bottle, so don't let your mind wander.

4. Cut slowly, all the way around.

Hold the bottle steady in your non-dominant hand, and the Dremel steady in your dominant hand. Keep the Dremel itself out of the water, but make sure that water is flowing over your cutting location, and then just let the cutting wheel do all the work. Be especially careful when you're almost all the way around, as that last half-inch or so is the most likely to chip.

5. Sand the edges.

You can grind down sharp edges using a grinding bit on your Dremel, but I actually love the way that this guy sands down his glass by hand, and so I do mine the exact same way:

The only difference is I stop after the 320 grit because I just need to not cut my face off via my new drinking glass, not have the shiniest rims on the block:

My favorite thing about this method is how consistent it is. Whether you've got a bumpy, embossed glass, or a thin-walled beer bottle, or a wine bottle made of HUGELY thick glass, you'll cut it pretty much perfectly, pretty much your first time trying. It's way better than breaking your bottle and hoping for the best.

Saturday, December 5, 2020

Make a Steampunk Snowman from Upcycled Gears

This post was originally published on Crafting a Green World.

Way back in the day, my very first editor at Crafting a Green World wrote a post entitled "Steampunk is the New Green." Steampunk isn't so new now, but it's still a heck of a lot of fun to play with!

By this point in our collective steampunk obsession, we've definitely used up all of our old watch parts, and everyone's outgrown swim goggles have been painted black and had silver studs glued on, but there are still plenty of components to be found.

Here, I'm modding a steampunk snowman using the wooden gears from a child's old DIY marble coaster kit and some wire pulled out of an analog clock. Add in my special trick for making metal paint look grungy, and you've got yourself a brand-new-to-you made-entirely-from-old-stuff steampunk snowman.

Supplies & Tools

You will need:

  • The gears and a couple of other parts from one of those DIY wooden marble coaster kits. Wait a couple of months for the tween to make it, play with it, and get tired of it, and then rescue it from dusty oblivion.
  • White primer
  • Bronze or gold acrylic paint
  • Brown or black acrylic paint
  • Water-based polyurethane sealant
  • Hot glue
  • Other steampunk-themed ephemera

Directions

1. Figure Out Your Basic Snowman Layout

Obviously, you need a big gear for the snowman's butt, a medium gear for its torso, and a small gear for its head. I gave my kids my box of stash ephemera and they added a few more bits and bobs, like eyeballs and arms and wire to twist all around.

2. Paint All Of The Snowman Pieces

Start with white primer, and make it a no-sand primer if you're not sure what material your snowman pieces are made of. Follow that with a few coats of gold or bronze acrylic paint, so that all your snowman pieces look industrial and metallic.

3. Add A Grungy Patina

Making your snowman look like it's had a hard few centuries in the icicle mines is easy to do. First, coat all the pieces in a thin layer of water-based polyurethane sealant. Then, while that layer is still wet, pour out a little more sealant onto a palette.

Sidenote: my super sophisticated palette for this project is a piece of aluminum foil covering the folding plastic table that why, yes, I DID HAUL IN FROM MY GARAGE INTO MY FAMILY ROOM. One kid is hogging the actual family room table with her actual schoolwork, and the other kid is hogging the studio table sewing her entry into our town's annual Trashion/Refashion Show. They're only being charming and industrious in this way because I've banned them from screens until 5:30 pm, just so you know. Anyways, add a small dab of black or brown paint.

Stir the paint into the polyurethane sealant until it's a blotchy mess and you're a little worried about it, then use your paintbrush to daub it all over all of your snowman parts. It seems bonkers, but you really do want to take off most of the shine and put on lots of obviously grimy bits. After you've got some nicely grimy spots, you can even add another bit of black paint to your polyurethane sealant mess and daub on a few even dirtier spots.

If you really hate it, you can go back over the whole thing with more metallic paint and make it shiny again, but I think you'll like it!

4. Glue The Snowman Pieces Together

You could use an epoxy glue like E6000 here, but honestly, hot glue is a billion times quicker and does the job just as well. It's always a bit of a trick to keep the front of your project looking clean of glue, but you can add more glue to the back for reinforcement if you need to.

5. Embellish Your Snowman (Optional)

Depending on what you have on hand and how artsy you're feeling, there are lots of fun embellishments that you can add. For instance, one of my kiddos decided that she wanted to add even more detail to the distressing that I did with acrylic paint and polyurethane sealant, so she got out her set of chalk pastels and a paintbrush and did her thing, and then I hit the entire snowman with a quick spray of clear glaze.

After the glaze dried, I wrapped some of that thin copper wire I found in an old clock around the centers of the gears to make them look like these woven embroidery floss ornaments (which you also upcycle cardboard for, making it another great eco-friendly project!).

Depending on what you, yourself, have on hand, other awesome embellishments could come from jewelry charms, other small gears, and clock parts, cardstock cut into cool shapes and embellished (I think my own snowman could really use a pair of cardstock mechanical wings!), or anything else that you can think of!

6. Add An Ornament Hanger

Using that same thin copper wire, I tied a lark's head knot around the snowman's gear head and made a hanging loop. Leather or a necklace chain would also work well for this.

Our happy steampunk snowman is large enough that it could have been our tree topper, except my other kid had already made a giant 3D origami star for the tree topper this year. So instead we hung it on our Christmas tree, where it shares real estate with a scrapbook paper chain, a felt Darth Vader, and a couple of old lightbulbs filled with colored sand and glitter.

Perhaps steampunk snowman will top our tree next year!