Tuesday, July 28, 2020

How to Homeschool Math: Our Curricula, Resources, and Activities for Elementary


Yes, you CAN homeschool math.

Do not give me that sulky face, and don't you dare tell me that you clearly cannot homeschool your child because you obviously don't remember how to divide fractions.

Of course you don't remember some math stuff! You learned all that a zillion years ago! But you know what?

You are a grown-up adult. You can pick it back up. It's really not that big of a deal.

Also, remember that time that you tried to learn some math thing back in school and it was too hard and you got mad at yourself and said that you hated math and you're not good at it?

You were NOT a grown-up adult back then. You were a child.

How fun, then, not to pass that same negative mentality on to your own kids?

Elementary math can be so much fun for kids! Elementary math is fun manipulatives. It's fun games. It's jumping and screaming and singing. It's drawing and painting. It's measuring and pouring. It's reading books together, and doing puzzles, and figuring out interesting problems. It's some of my happiest memories with my kids.

ELEMENTARY MATH

Both my kiddos studied math informally until second grade, then began in Math Mammoth's Light Blue Series at either Level 2 or Level 4, depending on the kid. Math Mammoth took them both all the way through elementary and middle school math.

For part of elementary and middle school, we also used this text as a combined math/science/history study:


Here are some other textbook, reading, and viewing resources that we used:


Almost all of these came from the library, and most consist of fun picture books that I found for us to read together--even older elementary kids (and even high schoolers!) love great picture books!

And here are our most important manipulatives:


There are tons more manipulatives that I created myself or Googled, downloaded, and printed. I'm a BIG proponent of DIYing as much as possible!

Below, I've listed tons of the enrichment activities, extra reading/viewing resources, and fun stuff, that I did when my kiddos were elementary ages. They're not listed in any particular order, because they don't have to be done in any particular order! I liked to have the kids doing some kind of hands-on math activity every day, and if it wasn't inspired by them wanting to bake or build or draw or read together, then I invented a fun invitation or set up a game or suggested a project or offered up a puzzle.

I also set up enrichment and hands-on activities to support skills that the kids were struggling with, or to expand on skills that they were blazing through. Seriously, ask me how many hands-on activities I know for teaching rounding!

So scroll through my list of fun enrichment activities, and definitely set them up to support something specific, but also feel free to engage in them at random. I mean, most of what we did in elementary was totally random, and those were some of the best years of my life!


  • Building Big Numbers with Base Ten Blocks. This is the BEST math activity that my younger elementary kids ever did. It's endlessly repeatable when they're little, and builds that crucial number sense that they need to make everything else make sense!
  • Clock Cake. Clock reading is a skill taught in elementary math, but it's ever more abstract these days, as every device has a digital clock and analogue clocks are becoming more of a rarity. The solution? Bake and decorate your own clock!
  • Roll the Time. To get even more clock-reading practice, write minutes onto a blank die, combine it with a twelve-sided die, and have a kid roll the time. She can tell you the answer and draw it onto a blank clock face.
  • Roll to a Hundred. I'd completely forgotten how many of those printable hundred charts we used in the early elementary years! There are endless amounts of games you can make using them, all of which reinforce numeracy and computational skills.


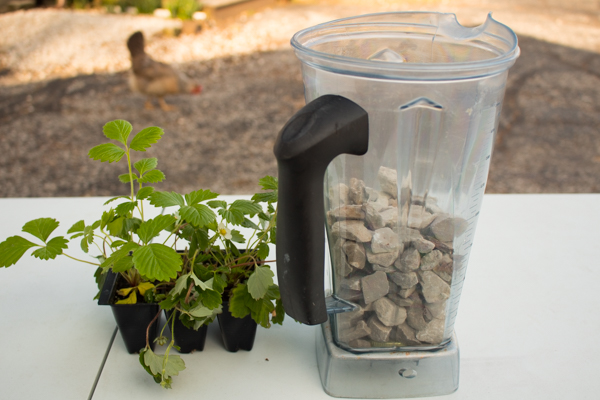
  • Metric Conversions in Grams using Rice Models. If you have a balance scale and some rice, kids can make their own metric conversion models, using a LOT of problem-solving and practical life skills in the process. And even in high school, we STILL pull out those rice models whenever a kid needs a metric conversion refresher!


  • Hands-on Rounding. For some reason, Syd really struggled to master this concept, and so now I have a zillion concrete, physical, hands-on ways to teach rounding.
  • Decanomial Square. You're going to see me refer to this a lot, as it's one of our most-used math manipulatives. It's well worth DIYing or buying one, because your kids will still be using it in high school!
  • Skip Count with Coins on the Hundred Grid. It's good to practice skip counting a lot, and in a lot of different formats. This version also reinforces coin values.
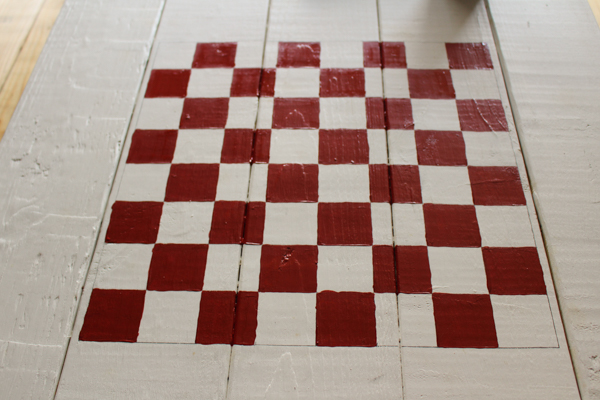
  • Multiplication Touch. It's quite the project to build the roll-up hundred mat and the number tiles from scratch, but Multiplication Touch is well worth it! It's surprisingly fun to play, so works great not just for memorizing the facts, but also for reviewing them for years.

  • Model Long Division with Base Ten Blocks and Cuisenaire Rods. You can cover a LOT of mathematical ground with just those two types of math manipulatives! By the time a kid hits long division, she's already starting to get math instruction that's more focused on teaching her how to plug numbers into an algorithm than it is on understanding what she's doing, and that's not cool with me. When I teach long division, I like to drag out all the blocks and show a kid exactly--and I mean EXACTLY!--what is physically happening to the literal numbers that she's dividing.
  • Literally Walk through Long Division. The beauty of homeschooling is that nobody--not you, and definitely not the kids!--are trapped at a desk. Get the wiggles out and bring whole body learning into your math study by drawing a GIANT long-division problem on your driveway and then having your kids solve it. Who knew there was so much walking, crawling, and skipping in math?


    • Level these fraction models up to middle school and high school by bringing them out whenever kids need a review. They WILL randomly forget how to convert between mixed and improper fractions, but going back to the manipulatives will quickly remind them, and every time they re-learn it, they'll cement it into their brains even better!

  • Montessori Pink Tower. Playing with the Pink Tower can be soooooo satisfying for the pattern-loving child, and it's great for their hand-eye coordination and number sense.
  • Montessori Pink Tower and Cuisenaire Rod Patterns. If you're loving the idea of open-ended exploration of math manipulatives for young learners, then you should really check out Montessori math! These kid-built, elaborate patterns are satisfying to create and look at, and since they're built on a Base Ten system at a centimeter scale, they're terrific for building a kid's number sense. Here's the Montessori Pink Tower:
    • Level pattern-building using the Montessori Pink Tower and Cuisenaire rods to middle school by having kids create their own diagrams or pattern cards from their creations. Perhaps they want to share them with a younger learner, or even publish them!
  • Make Mandalas with a Compass and Protractor. Here's a fun art activity that happens to teach compass and protractor use while also offering a lot of scope for creativity and process-oriented art. 
    • Level this activity up for middle and high school by encouraging even more elaborate, thoughtful creations.
  • Origami. This is one of the best geometry activities that your kids won't even recognize as math work! Start with SUPER simple builds so that they don't get frustrated with the fine motor requirements, but no matter what they make, they're building an intrinsic knowledge of angles and shapes and how they work together in two- and three-dimensional spaces.
    • Level this up to middle school and high school by working through ever-more-challenging how-to books.

  • Pentominoes. Allowing kids free exploration of mathematical models and manipulatives and interesting shape puzzles is one of the best things that you can do with them in elementary, whether or not you're officially homeschooling. Pentominoes are especially fun for older elementary kids who enjoy stretching themselves with challenging puzzles.
    • Level pentominoes up to middle school and high school by working through ever-more-challenging puzzles, and calculating the number of possible solutions to puzzles.
  • Ink Blot Prints that Show Bilateral Symmetry. Get really messy in order to get really symmetrical!

  • Symmetry and Similar Figures with Pattern Blocks. This is a more challenging activity for older elementary, but you get to drag out ALL the pattern blocks and it makes the kinda abstract concept of similar figures crystal clear!
  • TangramsThis is another math manipulative that's endlessly entertaining, even onto middle school and high school. Heck, *I* still love to play with tangrams!

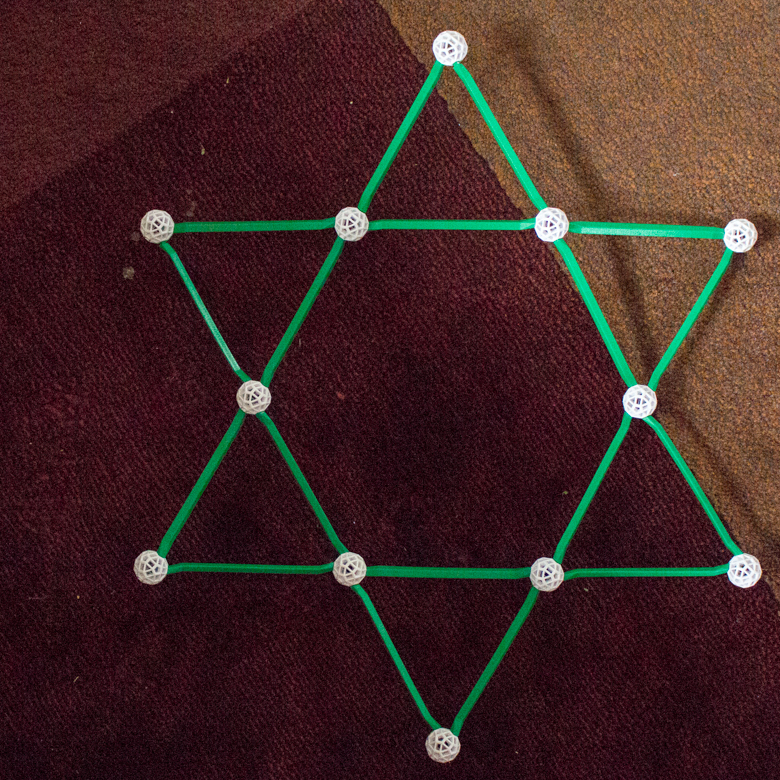
  • Zometool Stellations. To stellate a polygon is to extend its line segments. It always makes something beautiful, and it encourages kids to stretch their imaginations and become more mathematically creative thinkers.
    • To level this to middle school, have the kids measure the angles both inside and outside their polygons.
I don't blog about every single thing that I do with the kids, so here are some of the Pinboards where I collect even more elementary-level math resources. Some I've done, some I haven't, but I think they all look pretty cool!
I LOVED doing math with the kids in elementary. I loved exploring open-ended activities with them--activities that I, too, thought were fun! I loved reading math poems and picture book biographies of mathematicians together. I loved every single time a kid was happy while doing math, every single time she felt confident, every single time she took a risk, every single time she struggled and struggled and finally understood. 

It's exactly what learning should be, and it was my privilege to give that to my kids.

Saturday, July 25, 2020

Turn an Old Blender into a Planter

I originally published this tutorial on Crafting a Green World.

Yes, that's a super-expensive Vitamix blender pitcher that finally cracked (it's too embarrassing to tell you why, but I assure you it was because of Reasons).

No, I could not stand to simply toss it away, even after it spit something like a half-gallon of hot tomato soup onto the counter before I figured out it was broken.

Instead, I did what I do with every single even vaguely container-shaped piece of junk that needs a second life around here--I turned it into a planter!

The process is so easy that yes, you, too, should be turning every single even vaguely container-shaped piece of junk into a planter. Think about how much sturdier your piece of junk is than a chippy terra cotta pot, and how much more eco-friendly than a brand-new plastic pot.

And think about how roomy that beautiful broken blender pitcher is. So much space for strawberries!

Tools and Supplies

Here's what you need to plant strawberries or anything else that delights you, in your own broken blender pitcher:

  • old jar lid (optional: see Step #1 to see if you'll need one)
  • gravel
  • potting mix
  • plant

Directions

1. Prepare the blender to be water-tight.

Blender pitchers have their blade attachment at the bottom. Generally, this won't be a problem, and in fact, it's even easier to turn your blender pitcher into a planter if you keep the blades installed.

However, this is my super-expensive Vitamix blender pitcher that we're talking about here. I saved up a LONG time to buy that baby, and I sure ain't dropping a ton more money for another entire brand-new pitcher! Instead, my partner removed the blade attachment from this broken pitcher and installed it in the new pitcher that I bought to replace it. It was still pricey as heck, but way less expensive than buying the complete replacement pitcher with the blades included.

So if you, too, have removed the blade attachment from your blender pitcher, making the pitcher water-tight again is as easy as scavenging an old jar lid that is larger than the hole but smaller than the bottom of your blender. Set the lid over the hole and you're done. If you want to be perfectly safe, use epoxy glue to adhere the lid in place, but since the next step is going to be filling something like half this pitcher with rocks, all that weight will also keep the lid in place.

2. Add a layer of rocks.

This depends on the plant, of course, but it's likely that your blender pitcher is far deeper than necessary. Instead of wasting a LOT of potting soil in that space, fill up what you don't need with rocks.

Some really cute options would be river rocks, broken pottery pieces, shells, even aquarium gravel if you've got it, but I am flat out of cute rocks and such and so honestly, I just scooped up some of the gravel off of my driveway.

Whatever. Pretend like it was a thoughtful aesthetic choice.

3. And then you plant!

I'm so in love with the transparency of this planter. Look at what pretty layers the rocks and potting soil make--even prettier if you add that aquarium gravel or shells or pottery shards! I'm also loving the fact that it's got a handle, making it easy for me to move around; add just the right bracket, and you could also hang it or mount it somewhere fun.

And that's how you might find me deliberately thrifting old blender pitchers this year--because now I'm all about the idea of a planter with a handle!

Thursday, July 23, 2020

Homeschool Biology: Let's Learn Neuroanatomy!


Neuroanatomy hit the requirements for a goodly portion of the kids' studies this past year.

Will needed it for AP Psychology. Syd needed it for Honors Biology. And just for funsies, I found a Healthy Brain Initiative Girl Scout fun patch that also included it!

Obviously, you can learn neuroanatomy simply by memorizing diagrams of the brain, spinal cord, and a neuron, but that's not super fun, now is it?!?

You know what IS super fun?

Making this wearable brain diagram, that's what!


The kids made both English and French-language versions--


--and tried to make one for Luna, as well, but alas, her brain is a different size...


To memorize the parts of the neuron, I had the kids create their own models using their own ideas, although they were allowed to do some research for inspiration. Even teenagers are obsessed with Pinterest! You can see Syd's Model Magic neuron above. Will's beaded neuron was equally impressive, but she built it on a table top and didn't realize that it didn't have any structural integrity until she picked it up and it collapsed into one long, beaded string.

It's a beautiful necklace, though!

So that the kids would have a diagram that they could study, I photocopied some of the pages from this awesome book--


--and had the kids color them and use them as their reference for memorization.

I also like to have the kids get their hands on real artifacts whenever I can, not just models, so although Syd objected and spirited herself away to a friend's house during this activity, Will was happily on board with learning how to dissect a sheep's brain with me.

It's a VERY good lesson in how complicated things are in real life, even when they look pretty simple in a color-by-number diagram!

That was enough neuroanatomy for all of our purposes at the time, but since this topic is one that we do spiral back around to regularly, I've got quite a big list of other games, activities, and other enrichment projects to enhance this study. Here's some of them!

  • Crochet Pattern. Learning to crochet is absolutely on my to-do list, primarily so I can make lots of nerdy little projects like this one!
  • DIY Model. This assignment is similar to the one that I assigned the kids for their neuron model--you just have to tell them the parts that must be illustrated and labeled, and let them go off to be as creative as they like!
  • Ectomy. For those who love the brain hat as much as we do, The Basement Workshop also has a game to reinforce memorization of the lobes of the human brain.
  • Fondant Brain. You know how much we love to turn everything into a cake or a giant cookie! One day, we'll bake ourselves one of those and decorate it with a fondant human brain
  • Functional Neuroanatomy. This interactive site from the University of British Columbia is as detailed as you could ever possibly need. You can watch videos, look at models, and teach yourself a LOT of brain anatomy!
  • Mold. We've got a plastic brain mold very similar to this one, which we use for Halloween baking--because of course! However, it's on my to-do list to one day use plaster of Paris, or perhaps my dream material--concrete!
  • Quilled Neuron. Syd and I have done quilling before, and we thought it was really fun. I'm feeling like a quilled neuron is not beyond our skill set!
By the time you finish all of those projects, you're going to know your neuroanatomy really, really, REALLY well!

P.S. Want to follow along with our handmade homeschool and afterschool adventures? I post lots of resources, projects, and photos of our adventures over on my Craft Knife Facebook page!

Tuesday, July 21, 2020

She Sewed Herself a Wrap Skirt


Does everyone, at some early-ish point in their sewing journey, sew themselves a wrap skirt?

Apparently, I sewed one for myself almost exactly eleven years ago today, at approximately five years into my own sewing journey.

If I had to guess, I'd say that Syd, as well, is approximately five years into her sewing journey, and therefore it was obviously time for her to decide to sew herself a wrap skirt.

This wrap skirt was actually a terrific early pandemic sewing project! For one, my sewing machine was still functioning well (currently, my back-up sewing machine is in the shop, after it was determined that my go-to sewing machine was beyond repair. Fingers crossed that I'll be sewing again someday soon, because I'm really missing it!). 

For another, Syd choose this Lila+June pattern that's not only free, but also a downloadable pdf that was easy to print at home:


It was even early enough in the pandemic that although our local fabric stores were closed, our favorite online fabric store hadn't even worked up enough business to cause shipping delays and/or stock sell-outs yet! At the moment, this jet black Premium Kona cotton fabric is sold out, which makes sense because before my sewing machine(s) broke, I was happily sewing mask after mask out of Syd's leftovers.

Here's Syd adding the waistband to her skirt, just about the time that I started eyeing that fabric and mentally configuring how I could DIY face masks for the family from it:


And here's Syd trying to decide if she likes the length. She was originally imagining something shorter, but eventually decided that she liked the length as it was:


Time to hem it, then!

Farewell, sweet Singer! I'm not going to buy your brand again, at least not in the same price point! Your insides are made of cheap plastic that doesn't last, and replacement parts aren't sold for you!

You'll be happy to know that Syd's skirt fits perfectly, is a pleasing length, and, most importantly...


It's twirly!!! 

Alas, there's been no place to actually wear it, since we're still mostly pajama-clad these days (it's 10:30 am right now, and the seamstress in question is wearing her bee onesie. I'm MUCH more professionally dressed in a super-old T-shirt and Matt's Hufflepuff jammy pants). But one day--hopefully within the next two months!--Syd will once again walk into an in-person ballet class, and won't that wrap skirt be quite the most efficiently lovely thing to wear over her leotard?

Eleven Years Ago: Make My Felt Menagerie
Twelve Years Ago: Grandpa Bangle's Toolbox

Saturday, July 18, 2020

How to Refinish a Picnic Table with Paint

I originally published this tutorial on Crafting a Green World.

You've got to paint a few coats of sealant on your picnic table, anyway, if you want it to last outdoors--you might as well paint something interesting onto it first!

You can do this project on a picnic table of any age. If your picnic table is old and care-worn, replace any rotten wood and sand the other surfaces down to clean boards, first. If your picnic table is brand-new, you can paint right onto the unfinished wood.

Supplies & Tools

Either way, you'll need the following supplies:

  • Water-based outdoor primer. 
  • Water-based outdoor paint. Avoid oil-based paint, which generally has more VOCs than water-based paint, and requires paint thinner to clean up. You can use any water-based outdoor paint, and look for the smaller, approximately 200 mL "sample" containers to avoid waste. For this project, I bought 200 ml containers of Dutch Boy Maxbond Exterior in satin. There's just enough paint to refinish my two picnic tables, one old and one new, and freshen up the work on the deck chairs that I refinished here on CAGW four years ago.
  • Paintbrushes. I used large paintbrushes for the primer and the sealant, and a selection of small artist's brushes to paint the colorful details onto my picnic table.
  • Measuring and marking tools. These might include a pencil, meter sticks or rulers, and masking tape.
  • Polyurethane sealant. Buy water-based polyurethane sealant to make this project more eco-friendly. I used to be reluctant to use polyurethane sealant altogether because of its environmental footprint, but watching my deck furniture rot and need to be replaced after just a couple of seasons of Midwestern weather taught me that it's better to do what it takes to make things last. If you know of a better alternative, do me a favor and let me know in the Comments below!

Directions

1. Prime the picnic table.

You only need to prime the area that you'll be working on, as you can otherwise seal the bare wood of the underside of the picnic table and benches. I used white primer, but I'd actually recommend avoiding white unless you really want that specific color in the background of your design, or you plan to completely cover the white with another color. Even after several coats of sealant, white quickly looks dirty, and that happens all the more quickly outside. If I had this project to do again, I'd have instead started with a slate grey or blue for the picnic table's top.

2. Sketch out the design.

You can draw your design with a pencil directly onto the primed surface of the picnic table. I wanted this picnic table to have a chessboard, tic tac toe board, and colorful board game path painted onto it, so I first sketched them all in with pencil.

For the chessboard, I used two-meter sticks to measure out a 16x16" square, centered between the two picnic benches, and then I divided the square into an 8x8" array.

For the board game path, I used masking tape to lay a curving path around the perimeter of the picnic table. Masking tape can even be used to make smooth curves if you tear off and layer short pieces.

I traced the path in pencil, tore off all of the tape, and then divided the path into 2" steps.

I also used masking tape to lay out the tic tac toe board, then traced around it in pencil and tore off the tape.

3. Paint the picnic table.

This part of the process takes the longest, because you must wait for a color to dry before you can begin painting an adjacent color, and each color might require 2-3 coats before it looks saturated.

After the entire picnic table is painted, you can paint on the polyurethane sealant. This also takes a while, since there are several coats to add, and it can take up to a week for the last coat of sealant to fully cure for use.

But the time-intensive process is well worth it when you see the beautiful result!

The well-sealed surface of our picnic table ensures that we can use it as-is for all of our other outdoor projects and fun, but there's nothing like sitting down to a quick game of tic tac toe using twigs and leaves while we're waiting for one last person to finish getting ready before we all hop in the car, or grabbing the bag of mismatched chess pieces for one game of chess that turns into eight games on a lovely spring evening.

That's a lot of multi-purpose fun from just a few colors of paint!

Thursday, July 16, 2020

Paint Stirrer Crossbows and Popsicle Stick Catapults: Homeschool STEM with Rubber Band Engineer


We're not exactly lacking STEM studies here in our homeschool, but I thought that the kids might like a change from robotics, so I offered them the opportunity to create something from this fun little book:


Because what could possibly be more charming than a book with a real, actual rubber band on it?!? Or more tempting than a cover that boasts the instructions for a "slingshot rifle" inside?!?

Here is Will's ballpoint pen crossbow, made from paint stirrers, bamboo skewers, a lot of hot glue, and some twine:


I don't have any photos of it in action because I didn't realize that its first shot would be its last! Will suspects that the twine she used was too stiff; she thinks she needs something with the slightest bit of stretch so it can hold a little more potential energy without putting so much pressure on the paint stirrer. 

Stay tuned for Version 2!

Syd's wooden pencil catapult was more successful overall--


--but then, she did have an assistant for its construction:


It turns out that a catapult made from duct tape, wooden pencils, and a plastic lid, shooting a cork tied to yarn, is quite the thing to keep a young cat entertained:


An automatic winder would improve the catapult's playability here, I'm told, as much of the fun for the cat involves chasing the yarn as it's being wound up again for another go:


This was definitely a good book for encouraging the tinkering aspect of STEM: the contraptions all worked fairly well, with build instructions clear enough that a kid could follow them independently, and yet they always had the potential to work better, or in a different way, with some overall easy-to-implement ideas that kids can dream up. 

In this way, rather than each contraption being the end goal, it's more the starting point (it reminded me quite a lot of the time the kids made paper roller coasters, actually!). A kid uses her fine-motor skills and ability to follow directions to create an instrument upon which her own research, ideas, refinements, and tinkering do the work to teach her the physics, math, and engineering concepts hidden within each contraption.

And if you end up with a ballpoint pen that's turned into a projectile, all the better!

P.S. Want to hear more about paper roller coasters and paint stirrer crossbows? Follow my Craft Knife Facebook page for more projectile adventures as they happen!