Saturday, August 15, 2020

How to Remove Wax from a Jar Candle

I originally published this tutorial on Crafting a Green World.

Here's a shout-out to my fellow VERY thrifty crafters!

I like to do a lot of wax crafts, but beeswax is expensive, and lacking my own set of beehives, my budget can't quite keep up with my habit.

Fortunately, I also have a lot of jar candles around the house, some homemade (with more lovely beeswax!) and some gifted or store-bought (with various qualities of wax, but often most likely the cheapest). When these candles burn down there's always still some wax left at the bottom and around the sides of the container. Reclaiming that wax is a simple process, and when I'm done, I have all-new wax to craft with!

It's worth it even to reclaim that cheap wax of unknown (but probably petroleum-based) provenance. You can use it to make fire starters, or dye it and use it to make wax seals. Perhaps you have an origami boat that you'd like to waterproof?

The possibilities for reclaimed beeswax or soy wax are endless, of course, including remaking your own jarred or poured or dipped candles.

And don't forget that you can also reuse the jar that the candle came in! I'll show you how to get it squeaky clean near the bottom of my post.

Supplies

Here's what you need to reclaim the wax from your jar candles:

*Save yourself some trouble and hit up your nearest thrift shop for the cheapest crock pot on the shelf, and then use it only for crafting. I bought this crock pot from Goodwill for $1.50 probably a decade ago, and it works perfectly for me and then lives out in the garage when I don't need it.

Directions

1. Cover your work surface with newspaper, then ready your crock pot.

Because I promise you that you do NOT want to spill melted wax all over your kitchen. Just... you really don't.

2. Add the jar candle containers and water to the crock pot.

Oh, if only it were so easy! So here's the thing: those nearly empty jar candle containers are going to want to FLOAT, dagnabit. It's super annoying, and also, you really don't want to get water in the containers with the beeswax.

What you have to do, then, is wedge the containers in so that they can't float away. Setting a ceramic plate on top of them works well, as does filling Mason jars with water and setting them in the crockpot to take up all the rest of the available space.

3. Melt and pour.

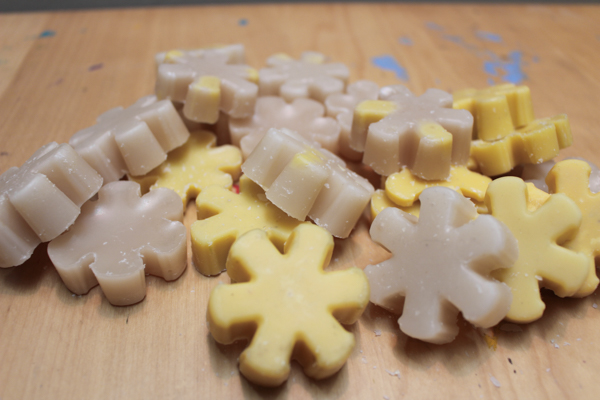
After everything is wedged tightly into place, all you have to do is turn your crock pot on and wait for the wax to melt. I like to pour the melted wax into silicone molds, not only because the wax slips out so easily when it's cooled, but also because afterward, you have lots of manageable little blocks of wax that it's then easy to melt again and use for all your projects.

Often, your melted candle wax will have soot or wick fragments in it. If so, pour it through a layer of cheesecloth to catch the impurities.

4. Store reclaimed wax separately.

It's worth it to always store this reclaimed wax separately from your other wax stash. If you have no idea what type of wax you've reclaimed, you obviously don't want to mix it in with your lovely soy and beeswax, but even if it's soy or beeswax that you've reclaimed, you still don't want to simply add it back to your stash. Reclaimed candle wax is fine for making more candles, but I certainly wouldn't want to use it for the skin care products that I also make using beeswax.

Now, what about those reclaimed jar candle containers? Even with the wax melted and poured out of them, you'll notice that they're still waxy. The trick to getting them squeaky clean is to completely immerse them, right side up, in a large pot of water. Make sure there's plenty of water covering the top of the containers. Heat the pot of water on the stove, and when the water temperature reaches the melting point of the wax that the candle containers once held, the remaining wax will melt and float to the top of the water.

You have to play around with this method a bit and keep a good eye on the pot, because your wax of unknown provenance is going to melt at an unknown temperature, and if you have several candle containers in the pot, you're probably going to be dealing with a different melting point for each of them. But when all the wax has finally melted and floated up to the top of the water, you can take the pot off the burner and let the water cool.

Skim the solidified wax off of the cooled water and toss it, and then you're free to check out your former candle containers. They'll likely still be sooty and need a good scrub-up, but after that, they're ready to reuse or upcycle.

Might I suggest that you use them to make another jar candle?

Friday, August 14, 2020

Crafts for the Apocalypse: Syd's Girl Scout Silver TAP


My kid wrote a book!

For Syd's Girl Scout Silver Award, she wanted to focus on the problem of tweens and teens spending too much time on screens. Syd really enjoys crafts and recipes and likes to follow tutorials to make new creations, so she decided that making a set of craft and recipe tutorials for other kids to follow would be a fun way to encourage them to put down their phones and pick up the cardboard and scissors.

Thus began one of the LONGEST Silver Award TAPs in history. OMG, I had NO IDEA what an involved process this would be, particularly when accomplished by the world's pickiest perfectionist.

First, Syd had to brainstorm and then settle on possible crafts and recipes. Then she had to test each one, discard the ones that she wasn't happy with, and decide on a final line-up. Then she made them all again, sometimes a few times, until she had the perfect process for each one. Then she wrote each tutorial, and went through a few revisions on some of them, because it's tricky to write a tutorial!

Fortunately, tutorial writing is exactly within my very specific skill set. 

Syd sent a draft of her tutorials to our Girl Scout troop to be beta tested, and revised some of the tutorials again based on her feedback. As all this was happening, and for the next several months after the tutorials were finished and polished, she was also creating all the art. She went through several drafts to create an original character to model the finished projects, and then a zillion drafts as she drew each of the illustrations. 

And, of course, the book needed an overarching theme, both for the illustrations and the cover art and title.

Thanks to the pandemic, the entire book became... apocalypse-themed. 

When Syd was FINALLY happy with her illustrations and art, she imported it all into Adobe InDesign and Matt showed her how to do even more edits and make the layout:


When Syd was happy with the layouts, she sent a pdf back out to the Girl Scout troop to proofread, made more corrections based on their feedback, and then made even more corrections after feedback from the MEAN GRAMMAR AND PUNCTUATION MOMSTER. 

Originally, Syd had the idea that she could present physical copies of her activity book to kids, perhaps at day camps or after school programs, possibly with a kit included or possibly in concert with some in-person programming. Obviously that was out, thanks to the apocalypse, so instead Syd created a blog to host free downloadable pdfs of her book, and then promoted it.

Syd still wanted to give out *some* copies, though, so she decided to have a few copies printed and drop them off in Little Free Libraries around town. She wrote a budget proposal and presented it to our Girl Scout troop for the funds, then emailed back and forth with a local printing company to get her order made.

And at long last, Syd had real copies of Crafts for the Apocalypse in her hands!


But only briefly, as off they went into all the Little Free Libraries in town:


I had hoped (and advocated for, and nagged about) the project would be completed and the paperwork submitted before Syd began her public school adventure this week. The paperwork isn't submitted, because apparently none of the brilliant minds in this family are brilliant enough to figure out how to create a multi-page pdf (SIGH!), but the rest of the work is done and the forms are filled out and the essays are written, so perhaps today will be the magical day when the pdf fairy comes down from on high to compile the essays and time logs and forms into one clean and efficient multi-page pdf.

This was the perfect project for Syd, even though it turned out to be way bigger than it needed to be for the Silver Award (the suggested time commitment for a Silver Award TAP is 50 hours; Syd put in over 90, and even then didn't log everything). She got to exercise her creativity, express her love of art and making things, and work through the big challenges of maintaining a giant project independently. 

And of course, the fact that her project concluded with a connection to Will's Silver Award TAP is especially sweet to me.

Now... on to Gold!

Twelve Years Ago: I'm a Wench

Monday, August 10, 2020

July Favorites: The Latest Book in the Series

Hey, who's got two thumbs and is tired of living through a pandemic?

*points to self with thumbs*

I am 99% sure that I am doing this pandemic thing incorrectly. I'm supposed to be cherishing the privilege of my time at home, right? Making magical memories with my children? Spending quality time with my partner, who's also privileged to be working from home? Devoting myself to hobbies, gardening, cooking, and interior design? Deep cleaning my house and meeting all of my exercise goals?

Yeah, today I ate a stale roll for breakfast, because it was there. I finally dragged Will into the lesson planning conference I've been asking her for all week, only for her to insist repeatedly, with emphasis, that she DOES NOT CARE what she studies for eleventh grade and HAS NO OPINIONS about what would be fun to study and can't I just think of stuff for her? So I shouted at her, which was pretty cool of me, and then for good measure just went ahead and shouted at both kids for treating me like a servant they're not particularly satisfied with, and then drove myself to the park and sulked in the sunshine for a while. I got bored with walking after a while, because I am NOT meeting my exercise goals, and came home to more evidence that, indeed, I AM the only person living here who knows how to clean a house.

I am so bored of this, you guys. But we're all healthy, so yay for that!

At least boredom and ennui and existential despair led me to get a lot of books read in July! 

My library hold request for the latest Hunger Games novel finally came in:


To tell the truth, I originally wasn't that excited about it--I wasn't terribly passionate about President Snow's character in the original trilogy, and if asked, his wasn't the origin story I would have most wanted to know--but I knew that there were lots and lots of people in the hold queue behind me, so I dove right in as soon as I got it. 

Um, you guys? This book is SO GOOD! As much as I didn't think I'd care to hear Snow's origin story, I did find it compelling to read about this dystopian world from the point of view of the Capital. And I love the storytelling that almost convinces us, at times, that Snow might not be a soul-less sociopath. You know what a soft spot I have for protagonists that are messed up emotionally! 

July was apparently my month for getting my mitts on the latest book in every series. I finally also got to pick up these two from the library:


The Eye of Zoltar wasn't quite as good as the previous two (not enough Quarkbeast, for one thing), but Random Shit Flying through the Air was so, so, so much better! And the first book of that series is really good, too! Speaking of my love for protagonists who are messed up emotionally, I love what a mess Teagan is, and how she never says the right thing, and how her previous experiences make her wary and constantly worried. 

And yes, afterwards I DID spend a full evening on YouTube watching documentaries about subduction zones, fault lines, and super earthquakes that are for sure going to destroy the west coast. 

Here's what else I read in July!


Poor Will is still struggling with the feast or famine nature of the pandemic public library system. I make an appointment every week for a no-contact holds pick-up, and Will has all of the hold queues on all of our family accounts full to the brim with requests, but library returns are also being quarantined, so turn-around time is slooooooow, which means that she never gets all the books she wants to read.

Nevertheless, thankfully a wee bounty of Tamora Pierce did finally make it into her hands!


What would this kid even do without Tamora Pierce?!?

Here are Will's non-Tamora Pierce favorites from July:


And here's what else she read!


I'm pretty sure all the horse books stem from a book trade she did with a friend who's a horse girl. I recognize a couple of the YA novels as Little Free Library donations (our Little Free Library is basically the greatest idea ever: people put books into it, Will reads them, puts them back, people take them away and exchange them for more books for her to read!). And all the rest that are sci-fi and fantasy?

Well, maybe I'm not the only one dreaming of escaping our interminable pandemic staycation...

As further proof that I am failing the pandemic, while everyone else on my Facebook feed has resorted to pressure washing all their outdoor stuff and planting those mystery seeds from China because they're otherwise so caught up on all their housecleaning and yardwork, I watched this entire hour-plus video essay on Bronies while I washed dishes... AND I STILL DIDN'T GET ALL THE DISHES WASHED!


All the sexualized aspects of My Little Pony fan culture thankfully were not on our radars when Syd was super obsessed with the show. We even went to several pop cons together and I never saw a single body pillow! One piece of  sweet MLP fan art that I bought for Syd at a convention still hangs in her room. If she ever wants to get rid of it I'll just hang it in the family room, instead, next to my print of a cat dressed as Wonder Woman and another print of my favorite Harry Potter fan comic.

I did not do anything productive while randomly watching this documentary on Liberty Bell 7 with Syd (I mean, other than gossiping to her about various Gus Grissom stuff...)--


--but nevertheless, it was the WORST IDEA to watch it the day before we all sat down to watch our current favorite space heroes, Astronauts Bob and Doug, return home from the ISS... I'd forgotten that they had a splashdown planned.

I don't have anymore good podcast recommendations this month. I mainly binge podcasts while I walk or craft, and in July BOTH my sewing machines broke (and the woodworking I've been doing instead is too noisy for also listening to podcasts), and an aggressive dog began barking and nipping at my feet as I walked alone in my neighborhood every morning, so now I'm too afraid to do my morning two miles and it's just occurred to me that both of these things have probably had a big impact on my boredom, ennui, and existential despair.

Cool, cool...

What I DID do, however, is binge the entire last season of Grey's Anatomy, and while I wait for Season 17 to start someday I've also been binging the Grey's Anatomy playlist. All the songs have so much of the same vibe that it's kind of ridiculous after a while, but I don't care because I LOVE it.


August had always represented a big change in our collective schedules, as that's when Syd's public school debut will occur. Of course, now it's an online public school debut, with independent study times/pre-recorded lessons interspersed with live classes whose times are different, I kid you not, EVERY SINGLE DAY. I can't imagine the teachers' workloads as they try to handle this.

Thankfully, my skill-set of homeschool educator is going to transition well, I think, to my new purpose of helping Syd mediate her online learning (and supplementing where I find it lacking, mwa-ha-ha!). Now, I just have to figure out if I should 1) try to meet again with Will to come to a consensus about her eleventh grade studies, 2) go ahead and plan out studies that I think she'll enjoy, like astronomy and cybersecurity, or 3) assign her the most obnoxious studies that I can possibly muster because, as she DID firmly state to me, she DOES NOT CARE what she studies for eleventh grade.

Ugh, it's so hard to live on the right side of the maturity/pettiness divide!

P.S. I've got even more books, resources, and fun times over on my Craft Knife Facebook page, where I fight the good fight between maturity and pettiness every dang day.

Saturday, August 8, 2020

How to Make a Shadow Box from Corrugated Cardboard

I originally published this tutorial on Crafting a Green World.

ALL MY THINGS bring me joy. I am not giving up a single one of my priceless possessions, whether that possession is a dragon egg-themed Easter egg, a tiny skull-shaped bottle, a handmade polymer clay narwhal, or the name of my home state cut out of a license plate.

Why do I have the name of my home state cut out of a license plate? Don't remember. Don't care. But I am KEEPING IT.

As I've discovered, one's priceless possessions look less like you're a hoarder when they're displayed nicely so that you can enjoy them, not piled up on top of your dresser gathering dust. Storing your little treasures nicely is as easy as arranging them in a shadow box, and making that shadow box is as easy as cutting and pasting.

You learned how to do that stuff in kindergarten. You can totally do this.

Why make a shadow box instead of buying one? Well, it's cheaper, for one thing. And it's better for the environment because these shadow boxes are made from corrugated cardboard and old papers, not particle board and plastic. And you will absolutely LOVE the way that you can customize each shadow box to have exactly the shape and the shelves that you want.

Seriously, hot glue is a miracle of science.

I think that these DIY shadow boxes look nice, and most importantly, they keep your stuff stored and on display so that you can enjoy it. Check out how to make your own, and then get your own stuff off your dresser and displayed like you love it!

Supplies & Tools

You will need:

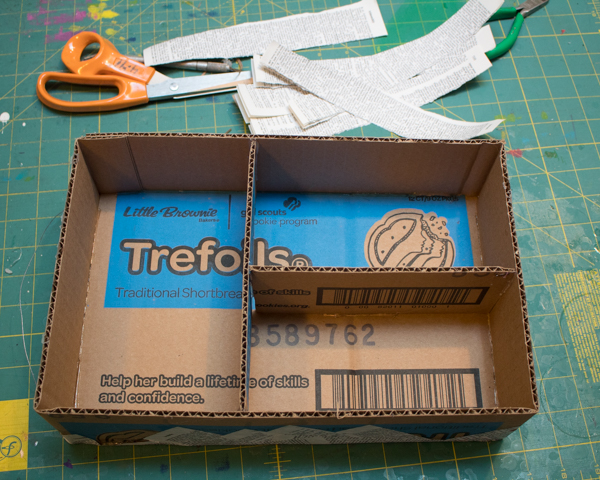
  • Corrugated cardboard. All of the cardboard that I'm using in this project comes from cases of Girl Scout cookies. Ask a Girl Scout of your own, and I'm sure she'll be thrilled to offload some to you, too.
  • Xacto knife
  • Metal Ruler
  • Self-healing cutting mat.
  • Hot glue gun and hot glue.
  • Stash wire, sturdy enough to hold your shadow box full of treasures
  • White glue, water, and a container to mix it in
  • Paper. I've used old book pages, sheet music, comic books, and even plain newspaper for these shadow boxes.
  • Optional materials: paint and polyurethane sealant. Paint can cover ugly papers, such as newspaper, and polyurethane sealant will make your shadow box sturdier and easier to wipe off, and will keep the surface from getting sticky over time (that can sometimes be a problem with glue-based decoupage, so definitely consider it if you plan to put something legitimately precious in your shadow box)

Directions

1. Make the outside frame of the shadow box.

Find a box whose area you like for your shadow box, and break it down and lay it flat on top of your self-healing cutting mat. You'll be cutting the top and bottom off of the box, and then cutting it into a strip that will equal the depth of your shadow box. I really like three inches for this, although I used four inches for the shadow box that holds my friendship rocks and that depth works well, too.

Open up the strip that you cut and stand it up on your cutting mat; this is the outside frame of your shadow box!

2. Add a back to the shadow box.

Set your shadow box frame on top of another piece of corrugated cardboard with at least the same area as the frame; if you're using Girl Scout cookie cases, one of the larger sides of a second case is perfect for this.

Hot glue the back to the frame all the way around, and then cut away any excess cardboard.

3. Add shelves.

Cut more corrugated cardboard strips the same width as the shadow box frame, and then use those strips to add shelves to the shadowbox. Use hot glue to tack the shelves down, but you'll be securing them much better a little later.

4. Add a hanging wire to the shadow box.

Hot glue a length of wire or cording to the sides of the shadow box, making a loop that goes over the top of the shadow box for hanging. Don't secure the hanging wire to the back of the shadow box (as I did on my very first attempt at making this project), because if you do, the shadow box will tend to tip forward when it's filled and hung. Securing the wire to the sides of the shadow box will even out its balance a little better.

5. Decoupage the shadow box.

If you liked the look of the raw cardboard, you could be just about done with your project there. I think these shadow boxes look nicer and are sturdier when decoupaged, however. To do this, choose a fun paper and tear it into strips. Pour a 1:1 mixture of white glue and water into a jar and stir it up. Piece by piece, dip a strip of paper into the mixture, strip off excess glue with your fingers, and smooth it onto the shadow box.

Overlap as necessary to cover the entire surface area of the shadow box. I like to cover the back first, let it dry, and then cover the front.

Covering the front will take a lot more time, as you use lots of paper to cover all those fiddly corners and seams.

Let the glue dry well, and then you can paint or seal your shadow box if you wish. After that, it's ready to be enjoyed!

Friday, August 7, 2020

I Organized our Embroidery Floss into a Card Catalog

I don't think I've ever shown you much of the vintage card catalog that lives in our study. That's mostly because instead of being cute and interior-designy, it's got drawers full of photos and messily, haphazardly organized craft supplies, and on top is where I keep all my messy, haphazardly organized WIPs. 

We're not really Architectural Digest over here. I know, because Will's obsessed with their videos!

To be honest, I only really care about organizing something when it effects the children's functionality. I don't mind opening every single drawer and poking into every single cupboard to look for the one thing that I want (well, I *mind*, but not enough to change my behavior...), but I VERY much mind the kids having to do the same thing when all they really want is to use the tool they're looking for to create something cool. It doesn't take much frustration like that before the kid just gives up and does something else.

They always know where their video games are!

So when Will got onto a friendship bracelet kick, and then Syd got interested in embroidery, I wrote on my to-do list the task of organizing our embroidery floss stash. It was a giant tangle of embroidery floss, because of COURSE it was, and stored in 1) a vintage sewing box of my grandma's (honestly, the tangled embroidery floss in that box probably WAS my grandma's!), 2) a cardboard box, and 3) a plastic shopping bag, because I am literally that classy.

Here's my inspiration for my beautiful card catalog organization! Using my card catalog to organize the embroidery floss hadn't occurred to me before I saw this post, but as soon as I saw that top picture, I was all, "YES!!! I CAN DO THAT!"

And bonus points: the poster board that I wanted to use to create the little in-drawer organizers was still laying chaotically on the floor of the homeschool closet, after the kids and I had used some of it for a project... a while ago.

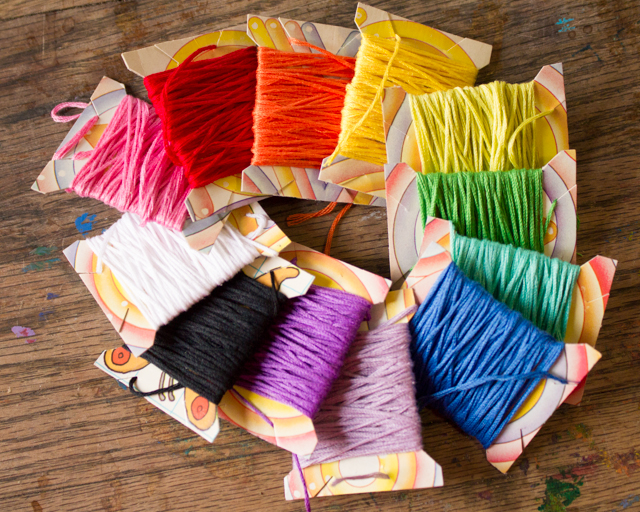
I used my good old cardboard embroidery floss spool tutorial--

--to make sixty more spools from old record album covers--at this point, I've only got a vintage Nutcracker record album cover left in my stash, so yay for upcycling! I'm going to have to start collecting empty macaroni and cheese boxes, though, to fulfill my constant need for cardboard for crafting.

I managed to, at some point, snooker each person in the family into helping me wind some embroidery floss onto spools by the simple expedient of doing this activity on my bed, next to the only television in the house, mwa-ha-ha! Syd helped while we watched a TERRIBLE monster movie on Amazon Prime, Matt helped while we watched a documentary on competitive synchronized swimming, and Will helped me while we watched one of my current favorite films, The Aeronauts:
I apparently didn't even bother to make my bed on this particular day, so you get to see what color my sheets are, you lucky duck!

r/HobbyDrama taught me that DMC floss has perfect consistency between dye lots, so I did label all of our DMC flosses, just in case that knowledge comes in handy one day. Otherwise, Syd organized the flosses for me so that they look pretty, and now all of our embroidery floss is neatly wrapped around spools tidily arranged in posterboard organizers that are stored out of sight in a single labelled card catalog drawer.

Hell, I'm going to have to organize all the other card catalog drawers now, aren't I? At least I have plenty of poster board left!

Tuesday, August 4, 2020

How to Homeschool in Indiana


Fun facts about homeschooling in Indiana: there are very few regulations, and no top-down guidance.

If you're a confident and conscientious homeschooler, this is great news. You can follow your kids' interests, let them learn at their own pace, explore whatever inspires them without having to worry about state standards. You can study Ancient History instead of State History in fourth grade, let your kid learn everything possible about astronomy instead of following along with the second grade science standards, mind your own business while they drop every other academic goal and simply read for most of their waking hours. Essentially, your kids can study what they want,when they want, and how they want, and the state of Indiana does not care.

If you don't know where to begin, though, don't know what to encourage your kids to study, or when to encourage them to study,  or how to encourage them to study, this can be terrifying. The state of Indiana won't give you curriculum advice. It doesn't employ consultants for you. It won't offer you any kind of testing, portfolio review, or any other way of making sure your kids are on track, at-level, and learning well. You are responsible for ALL of that.

That means, of course, that if you're lazy or don't prioritize, you might not do any of that. Yes, I DO know parents who shouldn't be homeschooling their kids. I know parents who do a much better job educating their kids than could be done in any local school, and I know schoolkids who'd be much better served by homeschooling instead, but I also know kids who are homeschooling but would have a better academic and social experience in school. 

Don't be those parents.

ANYWAY... I'm mostly here to talk to you uncertain Indiana parents today. I know that generally, when a blogger says something like, "Everyone is asking me about blah blah blah," nobody is actually asking them anything; they just want to talk about blah blah blah. But when I tell you that EVERYBODY is asking me how to homeschool in Indiana these days, I promise you that this is metaphorically true. I've been spending some time every single day lately talking someone or other through Indiana's very few homeschool regulations. So here, and mostly so I can copy-and-paste my own words more easily into various Facebook Message and Comment boxes and text conversations, is what I've been saying.

HOMESCHOOLING IS ALLOWED IN INDIANA

This state code tells you that homeschooling in Indiana is allowed:

IC 22-4.1-25-1.5"School"

     Sec. 1.5. As used in this chapter, "school" includes a public school, a charter school, a state accredited nonpublic school (as defined in IC 20-18-2-18.7), and a nonaccredited nonpublic school.


A homeschool is a nonaccredited, nonpublic school. Just flows melodically off the tongue, yes?

BEGIN HOMESCHOOLING BY THE AGE OF SEVEN; PROVIDE AN EDUCATION EQUIVALENT TO THAT GIVEN IN PUBLIC SCHOOLS

This state code tells you the age at which you must begin homeschooling your child:

IC 20-33-2-8Students not bound by requirements

     Sec. 8. A student is not bound by the requirements of this chapter until the student becomes seven (7) years of age, if, upon request of the superintendent of the school corporation, the parent of a student who would otherwise be subject to compulsory school attendance under section 6 of this chapter certifies to the superintendent that the parent intends to:

(1) enroll the student in a nonaccredited, nonpublic school; or

(2) begin providing the student with instruction equivalent to that given in the public schools as permitted under section 28 of this chapter;

not later than the date on which the student becomes seven (7) years of age.


The magic age is seven! If you've kept your kid home from first grade, though, you've likely begun to homeschool them before their seventh birthday, but before the age of seven, you don't have to even call it homeschooling; school in Indiana is not mandatory until the age of seven.

This code is a little strange in that it seems to imply that you can EITHER enroll your kid in a "nonaccredited, nonpublic school," OR begin providing them with instruction equivalent to that given in the public schools. But both of those things are homeschooling! The key phrase in there, though, is "instruction equivalent to that given in the public schools." Although there are no curriculum requirements (as you'll see below), your kid's education must be "equivalent." There is no definition of this term, either! Here in Indiana, homeschooling parents take this to mean that we should be able to show our local school corporation's superintendent, if so requested, that we are educating our children. This means that you should be keeping some records and a portfolio of work, even if you unschool.

HOMESCHOOL FOR AT LEAST 180 DAYS PER YEAR

When your homeschooling kid is seven, this compulsory attendance code comes into play:

IC 20-33-2-5Days of attendance

     Sec. 5. A student for whom education is compulsory under this chapter shall attend school each year for the number of days public schools are in session:

(1) in the school corporation in which the student is enrolled in Indiana; or

(2) where the student is enrolled if the student is enrolled outside Indiana.


Right now, Indiana public schools are in session for 180 days each school year. You should have some kind of method for proving that your child homeschools that number of days yearly, as well (although at least in our family, we homeschool FAR more than that...). Your method can be as simple as a calendar on which you've written "absences will be marked with a red x." If your calendar is blank, there have been no absences!

HIGH SCHOOL STUDENTS TRANSFERRING TO HOMESCHOOL MUST SIGN A FORM OF ACKNOWLEDGEMENT

If your student is in a public high school, however, and wants to transfer to homeschooling, there is another regulation that applies to you:

IC 20-33-2-28.6Transfer to nonaccredited nonpublic school; acknowledgment of legal requirements; notification to bureau of motor vehicles

     Sec. 28.6. (a) This section applies to a high school student who is transferring to a nonaccredited nonpublic school.

     (b) Before a student withdraws from a public school, the principal of the student's school shall provide to the student and to the student's parent information on a form developed by the department and approved by the state board that explains the legal requirements of attending a nonaccredited nonpublic school located in Indiana. The principal and a parent of the student shall both sign the form to acknowledge that the parent understands the content of the form.

     (c) If the parent of the student refuses to sign the form provided by the principal under subsection (b), the student is considered a dropout and the principal may report the student to the bureau of motor vehicles for action under section 28.5(g) of this chapter. The student is considered a dropout for purposes of calculating a high school's graduation rate under IC 20-26-13-10.


The reasoning behind this is that apparently, some schools that wanted to get rid of students would convince their parents to withdraw them to homeschooling, instead, so that the school didn't have to count those students as drop-outs. The kids generally essentially were drop-outs, however. So now if you withdraw a high school student to homeschooling, you have to sign a form saying that you understand what you're doing. You still may NOT understand what you're doing, but at least the school's butt is covered!

Here's the problem with homeschooling a high school student in Indiana: you can transfer from public high school to homeschooling, easy-peasy, but you do not want to transfer from homeschooling to high school mid-way through. That's because the state calls courses that are standardized to meet their minimum requirements "accredited," and ONLY the public schools, private schools that have jumped through the hoops, and a couple of online providers count as "accredited." So if your kid homeschools through ninth grade, then wants to transfer to the public high school in tenth grade, they'll take her, but they won't count her as a tenth-grader, because they won't accept anything she studied at home as "accredited." My kid has a rocking PSAT score and three stellar AP exam scores under her belt, not to even mention her super challenging math classes and all the other kick-ass stuff she's studied in the past two years, but if I tried to put her in our local high school, she'd have absolutely nothing they would accept as a credit towards graduation.

So in Indiana, if your kid thinks that they might want to go to public high school AT ALL, they need to try it in fall of their freshman year. They can always transfer back to homeschooling if they don't like it, but if there's even a chance they'll want to graduate from a public high school with that accredited diploma, they need to start in ninth grade.

INDIANA HOMESCHOOLERS HAVE NO PRESCRIBED CURRICULA; INDIANA HOMESCHOOLERS "MAY" PARTICIPATE IN PUBLIC SCHOOL ACTIVITIES WITH PERMISSION

Here are two state regulations wrapped into one:

IC 20-33-2-12Nonpublic, nonaccredited, and nonapproved schools; curriculum or content requirements; student enrollment or participation

     Sec. 12. (a) A school that is:

(1) nonpublic;

(2) nonaccredited; and

(3) not otherwise approved by the state board;

is not bound by any requirements set forth in IC 20 or IC 21 with regard to curriculum or the content of educational programs offered by the school.

     (b) This section may not be construed to prohibit a student who attends a school described in subsection (a) from enrolling in a particular educational program or participating in a particular educational initiative offered by an accredited public, nonpublic, or state board approved nonpublic school if:

(1) the governing body or superintendent, in the case of the accredited public school; or

(2) the administrative authority, in the case of the accredited or state board approved nonpublic school;

approves the enrollment or participation by the student.

     (c) A student who attends a school described in subsection (a) who also enrolls in a particular educational program or initiative as permitted under subsection (b) may be offered the opportunity to participate in state standardized assessments, but such participation is not required.


Here's where Indiana tells you that there is no prescribed curriculum or content for homeschooling. You're a "nonpublic, nonaccredited" school, and they wash their hands of you!

Here's also where they tell you that your homeschooling kid CAN participate in a public school--a class or a club or, as Will does, a standardized exam--IF the superintendent or school board (or often just the principal) say they can. What they don't tell you is that depending on the district, more often than not the school will say a flat-out no. The school district we live in, for example, is extremely unwilling to let homeschooling students participate in anything, including College Board exams that are ONLY hosted at schools. Will has had to go out of district to take both the PSAT and AP exams, because the school that our property taxes go to refuses to host her.

Pro tip: if you want your kid to do something that only happens at school, like the PSAT or AP exams, start asking far and wide several months in advanced, and be prepared to travel when your local schools refuse.

And that's all the Indiana-specific regulations for homeschooling! You can see that other than some rules about compulsory education, you're quite free to plan your child's educational experience with them. It can be intimidating, at first, not to have any guidelines about curricula, but you can always peek at the state/national standards if you're curious to know what's being studied at every grade, and the freedom to let your kid study at their own pace, within their own passions, and as adventurously as they desire is so worth it!

P.S. If you want to see more about the day-to-day of our homeschooling, check out my Craft Knife Facebook page for pics, works in progress, resources, and all the weirdness that encompasses my kiddos' education!
Saturday, August 1, 2020

How to Sew a Nine-Patch Quilt for an American Girl Doll

I originally published this tutorial on Crafting a Green World.

A nine-patch quilt is the easiest type of quilt to sew, although I might be biased since as a child I first learned how to sew by back-stitching, under my grandmother's supervision, nine-patch quilt blocks of my very own.

A nine-patch quilt block is made from nine pieces in two different fabrics. The pieces are all square and are sewn together in alternating fabrics in three rows of three. This pattern works well with both a dedicated color scheme and layout or a seemingly random mishmash of color and contrast, which is another reason why it's such a favorite with sewers of all ages and levels--and their recipients!

Just as the nine-patch quilt is the easiest type of quilt to sew, I find a doll quilt to be the easiest size of quilt to make. There's nothing like a tiny quilt to give one instant gratification! An American Girl doll quilt, in particular, is a great size to start with--at just 12" x 18", you can make the whole thing in a single afternoon.

Here's what you'll need!

Supplies

  • Fabric and cutting supplies
  • Sewing machine and matching thread
  • Double-fold bias tape
  • 12" x 18" fleece piece


Directions

1. Measure and cut the fabric pieces

The most important thing that you can do to make a beautiful quilt is to cut the pieces completely accurately. Each piece in this quilt is a perfect square, 2.5" x 2.5". Each nine-patch quilt block uses two different fabrics and a total of nine pieces--four of one fabric and five of the other. You will need six total nine-patch quilt blocks for this quilt.

The nine-patch quilt lends itself to an easy hack if you'd like to make two at a time--for two children, say, or two dolls. All you have to do is cut nine of each fabric piece, and then you'll easily have two complementary, but NOT identical, nine-patch quilt blocks in the making:

2. Piece each nine-patch quilt block

Have your iron at hand, because you always want to iron every seam flat. To sew a complete nine-patch quilt block, first sew the three separate rows of three pieces--

--ironing each seam flat as you go, and then sew the three rows together to complete the block:

Repeat for each additional nine-patch quilt block until you have six completed blocks.

3. Piece the quilt

Arrange and rearrange all of the nine-patch quilt blocks until you're happy with the look of the quilt as a whole.

Use exactly the same method to piece the full quilt as you did to piece the individual blocks. First piece the quilt blocks together into rows, then piece the rows together until the quilt is complete.

4. Back the quilt with fleece

Because this is a doll quilt you get to skip some of the more fiddly steps involved in making a full-sized quilt. You don't have to sandwich batting between the front and back of your quilt, unless you really, really, really want to, and you won't actually have to quilt or tie this quilt--unless you really, really, really want to!

A neat trick to give a doll quilt a thicker, fluffier feel without bothering with batting is to back it with fleece, instead. If you simply must have three layers to your quilt, you can always use a double layer of fleece, but I promise that the quilt top plus one layer of fleece gives this doll quilt an authentic heft and feel.

5. Bind the quilt

Binding a full-sized quilt can also be time-consuming, so you're lucking out again with this doll-sized quilt. I use a lot of different methods to bind quilts (one of my all-time favorites is back-to-front blanket binding), but my go-to method for a quick-and-easy doll quilt is to use double-fold bias tape. Bias tape can be store-bought (although you should look for bias tape made from natural fabrics, not polyester--blech!) or handmade nearly as easily, and 10mm double-fold bias tape is absolutely perfect for this project.

Your completed nine-patch quilt is the perfect size and scale for an American Girl doll to snuggle up under. Size up the quilt blocks to 4.5" to make a matching quilt for that doll's favorite person, or size the blocks down to 1.5" to make a Barbie doll-sized quilt.