Unless we're just absolutely out of time the girls make handmade gifts for all of their gift-giving occasions, and the particular occasion that inspired these delicate little polymer clay flowers was the birthday party of a friend from Syd's ballet classes. It's an interesting (and useful!) challenge to craft the perfect gift for a friend that one doesn't already know very well, and I was more than a little surprised, honestly, that Syd didn't automatically choose to make the child something ballet-themed.
But if there's one thing that you must know about Syd, it's that she always has A Vision. She envisioned embellishing a headband with a bouquet of polymer clay flowers, and that's just what she did!
Even if it meant crafting over a dozen tiny, delicate, detailed polymer clay flowers by hand:
I love this one the best. See how she used her own fingerprints as embellishments?
Syd took the following photos of her completed headband (and unfortunately she is not yet as interested in photography as she is the other arts, and it shows...), so you can see that the details did not stop with the bouquet. She added a braided length of waxed cord, embellished with beads, that dangles from the bouquet--
--and on the opposite end, a nice, big bumblebee!
Here the headband is in all its glory (and with all the hot glue strings tidied out of the way):
Business cards are the bane of my... business, I guess. I bought a set of business cards the first time I needed them--Moo cards, back when they were brand-new!--and I did love them, but they just seemed like such an easy thing to DIY that I couldn't bring myself to buy them again. My tiny business is profitable enough for my purposes, but only if I don't add a bunch of extra little expenses, you know?
So for over a decade now I've made all of my business cards, and it is a tedious, boring activity. To keep myself entertained sometimes I'll purposefully try to thing of something new to do to make them--check out all these tutorials that I've written on this very topic:
--bus mostly I make them out of old cardboard or record album covers or other recycled cardboard. They turn out cute, but, again. Boring to make. Tedious.
In related news, the kids were recently cleaning the walk-in closet where we store our homeschool supplies, open-ended materials, and random bits and bobs for projects (this sounds amazing of them, but they were only doing it because in the week prior they'd made such a ridiculous mess of it that I couldn't even walk on the floor in there), and they discovered a packet of photographs that I'd surely taken a decade ago, at least, back when I was still doing craft fairs. I think that I was considering making postcards or greeting cards, but when I saw the printed photos I didn't really think they'd suit, and so I put them back with my other stash supplies, and then, goodness gracious, I must have MOVED them at some point instead of simply tossing them in the recycling like a normal person, and then just shoved them into this closet with all my other junk.
Is it worth it to store something for a decade instead of tossing it into the waste stream if you eventually find a use for it?
Apparently you know how *I* would answer!
It turns out that these photographs are super easy to make into large-format business cards. Another option, of course, would be to simply fussy cut them to make them the standard size, but I'm using these solely to go out with Pumpkin+Bear orders, so I have the space to add this larger card.
All you have to do is find some stash scrapbooking or colored paper--anything that has a plain, solid-colored back--and trim it so that it's about 2" wider than the photograph for both length and width. If you're using printer paper and 4" x 6" photographs, you can get two of these from every page:
Next, center the photograph on the paper backing, and adhere with acid-free double-sided tape:
I have a customizable self-inking stamp that has been working perfectly for me as long as I've been making my own business cards, so it's easy to stamp my business card info on the back of each card. There's plenty of room to write your information by hand, however, or at least to add embellishments with paint pens, washi tape, or stickers. That's a good way, by the way, for an artsy kid to fill her time if she's stuck with you at a meeting or an office.
And now I have a good two dozen more business cards made from stash! I also have some motivation to go through more of my old photos, too, in case I find more fodder for making these quick and easy business cards.
In case you're looking for even more DIY business card inspiration, here are some examples that I've collected over the years to inspire ME!
Syd is generally to be relied upon as my crafting buddy. Along with watching cooking videos on YouTube, it's about our favorite way to spend time together. Whenever a publicist sends me a crafting book, she's right in there with me, checking it out and then trying it out and seeing what we can make of it.
Our most recent score is The Art of Modern Quilling. This is the first time that Syd or I have ever tried anything to do with quilling, and it turns out that we're both super into it!
The book has instructions for making all the different quilling shapes, and they're all fairly easy to do, and much, much, MUCH easier after I figured out how to DIY a quilling tool from a coffee stirrer:
After that, making all the shapes was a piece of cake for both of us!
Can you find Syd's original quilling shape invention in here?
Syd most enjoyed the process-oriented activity of making all the quilling shapes, and we ended up with quite a collection that we can use for future projects:
I have some old Mason jar lid rings hanging around, left over from Syd's Christmas ornament project last December. I realized that if I cut the quilling strips to be 1/2" wide instead of 1/4", they would perfectly match the width of a Mason jar lid ring, so I used the lid ring as a form to make a project:
I filled the space with the main design that I wanted (I experimented with quilling old sheet music, and it looks okay as the background, but you can't, of course, see the notes. I'm very curious to try quilling color-saturated magazine pages next!), and then pressed in other quilled shapes until tension held the entire thing in the Mason jar lid ring.
To actually secure it, I brushed glue under the edge of the Mason jar lid ring as I was coating the entire piece with several coats of Mod Podge to seal it:
I really wanted to use polyurethane, but I can't find it in the house, and at -14 degrees outside, it would take a far more important reason than simply desiring my preferred sealant to make me go outside and dig around for it in the garage.
Not to mention that I suspect I'll be pissed when I find it, because I store my paints in the closet inside so that they WON'T get frozen, and if the polyurethane is in the garage then not only did someone borrow it without asking and not put it away properly, but also it's probably ruined. Because it's -14 degrees outside. And that stuff is expensive.
So Mod Podge and a peaceable mood it is!
It's awesome to have another crafting skill in the toolbox, and I'm looking forward to seeing what future projects quilling lends itself to. I mean, cardmaking is a given, but I have a couple of flat picture frames that I thrifted but haven't refinished yet, and I'm toying with the idea that quilling on top of the frame would look really cool. Syd embellished a couple of very elaborate headbands recently using polymer clay; wouldn't quilled pieces, sealed very well (I sure wish that polyurethane was on my closet shelf where it's supposed to be right now!), be just as pretty?
Stay tuned!
P.S. Syd and I are always making something weird. Want to follow along and see what else we're working on? Check out my Craft Knife Facebook page!
I think that we're all liking this Topics in STEM unit even more than we did the last one!
This semester, we're studying Robotics and Programming. The spine for this unit is the Girl Scout Robotics badges for Cadettes and Seniors, and the Cadette/Senior/Ambassador Think Like a Programmer Journey. Our main manipulatives are LittleBits, Ozobot BIT, and Sphero, although we're bringing lots of other tech into the unit, as well.
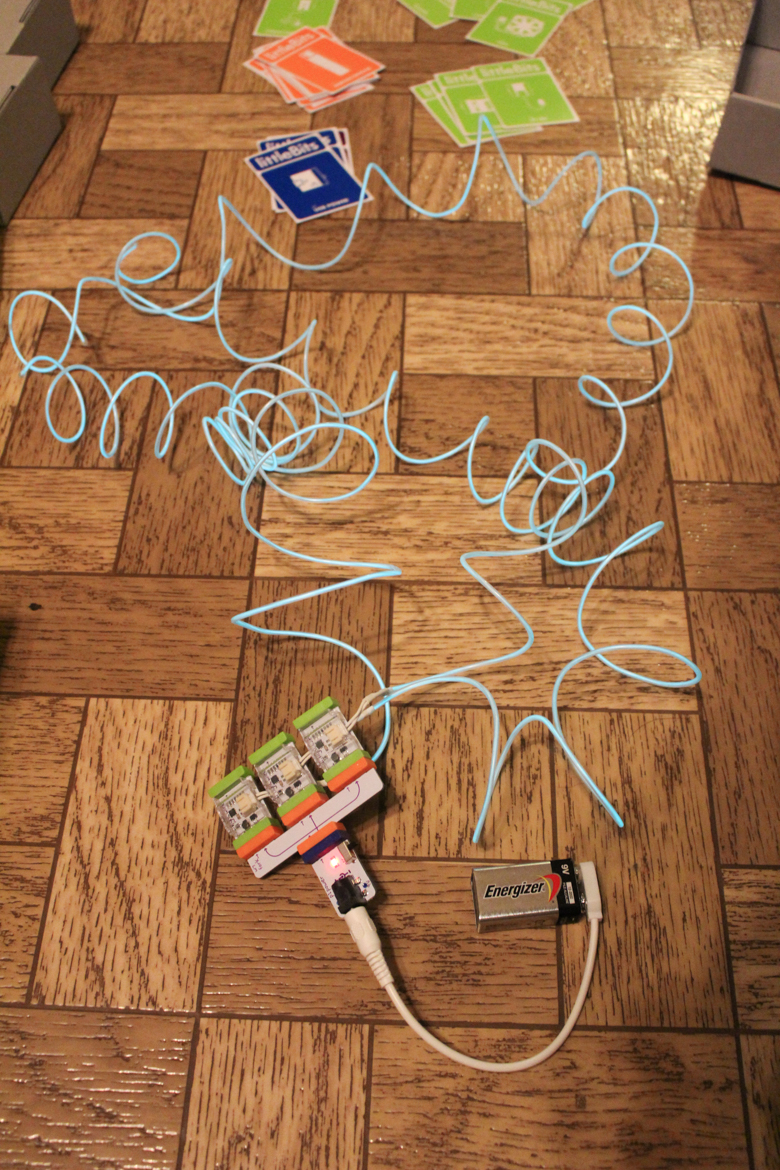
Our adventures with LittleBits began with Step 2 of the Girl Scout Cadette Programming Robots badge. We needed to learn about sensors and circuits, and LittleBits has a lot of both!
Y'all are going to be so jealous, but our local university's library has a HUUUUUUUUGE set of LittleBits, which we checked out for free. This is the girls organizing the collection so we can see what we've got to work with:
Basically, LittleBits has everything you could ever dream of wanting, all nice and organized by color. Blue is a power source, pink is a sensor or other type of input, orange is a wire or a logic gate, and green is an output. Here's just a partial list of what we've got to play with from each category:
BLUE
AC adaptor
battery pack
micro sd adaptor
midi adaptor
stereo cables
USB adaptor
PINK
bend sensor
button
dimmer
keyboard
light sensor
microphone
motion trigger
mp3 player
oscillator
pressure sensor
remote trigger
sequencer
slide switch
temperature sensor
toggle
ORANGE
Arduino
cloudBit
double AND gate
double OR gate
invertor
Makey Makey
MIDI
NAND gate
NOR gate
wireless receiver
wireless transmitter
XOR gate
GREEN
buzzer
DC motor
fan
infrared LED
LED
number display
RGB LED
rope light
servo motor
synth speaker
UV LED
vibration motor
And that's, like, not even all the set includes, just all I felt like writing down. Imagine everything that you can do with that set-up!
After we organized the LittleBits, our next activity was simply learning how to assemble a circuit. And assembling a circuit couldn't be easier. At the most basic, you need a blue bit for power and a green bit for output. Get a little more complicated, and it's blue + a pink bit for input + green. More complicated yet is blue + pink + an orange bit for logic or wiring + green.
I set the girls to play, with the proviso that they had to write down all of their successful circuits, because writing something down is what makes it science!
If we didn't know what something was, there's a set of Module Cards, as well, with a ton of info about each bit. Otherwise, it was really fun to experiment:
I cannot overestimate the benefit of open-ended exploration in learning how something works. Tinkering is essential to the human brain. Sure, I could have lectured the kids about circuits (which I did, a little), shown them a Powerpoint of examples of circuits, maybe had them build a single model circuit by following my step-by-step directions, and that would have been fun and educational, but this?
This is so much more. This is figuring stuff out, and troubleshooting, and building on what you already know, and wondering why something doesn't work and adding more details to what does work and then taking it all apart and trying something new:
And apparently the goal of both children was to build the most obnoxious circuit possible:
I also really enjoyed watching each child's own method of troubleshooting. Syd gives it a funny look, thumps on it a little, tries different outlets, then reads the Module Card to see what she might have missed:
Will thumps quite a bit more aggressively...
I think what she was trying to do was connect a sound sensor input to a buzzer output, so that the buzzer would then provide the necessary input to keep itself running. It doesn't exactly POWER itself, but it's definitely not a bad start!
Here's some more fun troubleshooting, this time with Makey Makey!
I love to watch them so focused and content:
They figured out how to get the number display output to work, but they're still puzzling over how the input affects which number is displayed.
On another series of days, we learned about logic gates by modeling them with the LittleBits. Can the kids build a working AND gate?
They can!
I can't totally tell from the video, but I think this might be an XOR gate that Syd is testing:
You guys, this was SUCH a fun project. You can do SO MUCH with these things! We're moving on to cobbling together some DIY circuits (because even though LittleBits are awesome, they're also awfully... clean. I need my kids to know how to muscle together a circuit made out of nothing but a coin battery, a twinkle light, and some aluminum foil) and then some working models of various systems (Matt is already on tap to help the kids build a functioning hydraulic arm and hand out of corrugated cardboard, syringes, colored water, and plastic tubing), but later the kids will be building actual, working robots and/or programmed circuits to accomplish amazing things, and my hope is that they'll have the knowledge and confidence, now, to make them more sophisticated with our library-issue tech toys!
The constant watching of the radar and the wishing for snow starts in mid-November, but it's rare that we get a good snowfall until January. Occasionally, we've had a good December snow, but mostly, we don't see the season's first big snow until the next year.
Sometimes it doesn't even show up until February, which is... oh, my gosh.
Fortunately, we didn't have to wait quite that long this year:
None of us can get over this doggy's inexplicable love of the snow. In this video we're all marveling, because we've never seen her play with a toy before--she's THAT excited!
That first snow was the best we've ever had for snowballs and snow people, but it went straight from rain to snowstorm to rain again. Thankfully we had another snowstorm that later led into a beautiful, sunny day!
In case you hadn't heard the news that kids love sensory materials, here is one kid army crawling through the snow, the other kid tossing it and pouring it and throwing it into her mouth, and the army crawling kid got caught lapping snow up from the ground like an animal...
And Matt even got pictures of ME. I'm wearing his novelty twinkle light print onesie under my snow gear, by the way. MY onesie has a life-sized skeleton on it:
If you look carefully, you can see that Will is in this photo, too!
The one tragedy is that with all of this snow, we never did actually get any good sledding done. So we still have plenty of big wishing to do, and fortunately it's not even February yet. One year, we didn't even get our first big snow until the middle of February!