Wednesday, December 13, 2017

My Kid Made Soap All By Herself

I mean I was there, obviously, talking her through it, but from start to finish, my kid's hands were the only ones to touch this entire batch of cold-process soap.

Imagine. Eleven years old, and she can already make her own soap from scratch! Can you think of a more authentic homeschool credential?

To be fair, there was an actual academic reason to set the child up to make cold-process soap. Syd and I are studying the history of fashion together this year, and it's mentioned (although I'd loooove to see the primary source...) in our textbook that the Celts introduced the Romans in Britain to both soap and pants.

I'll be teaching Syd how to sew leggings after Christmas, but way back in September I taught her how to make soap. It's what a good little Celt knows how to do, you see.

We used an easy beginner's recipe, mostly coconut oil and olive oil in simple ratios, something that you'd have to work hard at to screw up.

When you're just pouring distilled water and measuring oils, you don't have to wear any protective garb:

But when you're ready to get the lye out, on go the goggles, the breathing mask,  AND the rubber gloves!

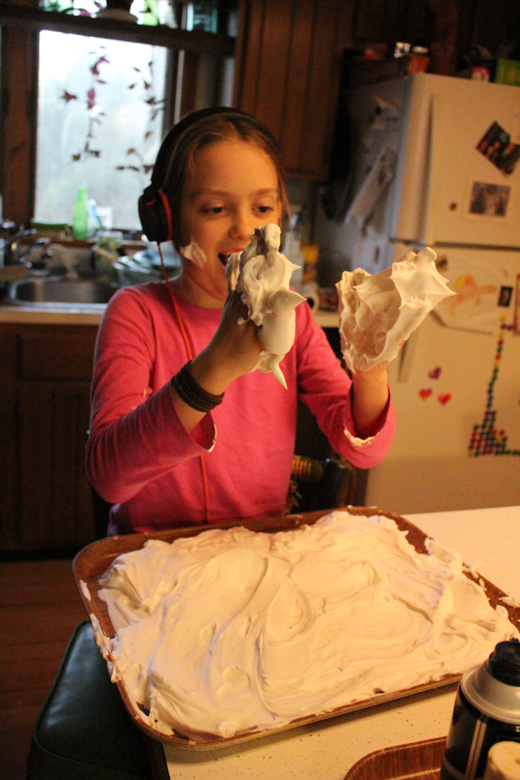
You can see that she's wearing long sleeves, as well, in this photo--

--although she's not in this one:

Her gloves went almost up to her elbows, so when she got overheated in our early-autumn kitchen and wanted to change, I let her. Probably a mistake, but she didn't receive any chemical burns, so there you go.  I wish I could find kid-sized lab coats for a reasonable price somewhere!

She stirred the lye to dissolve it into the distilled water (you always pour LYE into WATER, never water into lye!)--

--then took its temperature. It is hot, because yay for exothermic reactions!

I didn't photograph the oils for some reason, but imagine them warming on the stovetop, and Syd moving from checking the temperature of the lye water to checking the temperature of the oils, waiting for them to approximately match.

When they do, the fun begins! She poured the oil mixture into the lye water, then blended and blended and blended:

I had previously dug up some of last season's Girl Scout cookie boxes (I keep the empties as much as I can for projects, because it's important to Use Resources Wisely!), reassembled them, and taped them back up, so here Syd is pouring her soap into the Girl Scout cookie boxes,  standing up inside a larger box, to serve as her soap molds:

When the soap has cured enough that it's solid and able to be cut, Syd extracted them from their molds--


--and cut them to size!


I had a half-batch of soap to cut and trim, too:


That wavy knife makes everything cuter! The soap should cure for a few more weeks after it's cut, and even then, the longer it cures, the harder and longer-lasting it will be.

Soapmaking with children is an enrichment activity that can serve all kinds of studies. When the kids were little, they made simple glycerin soaps, and even laundry soaps, as a practical life activity, and an exercise in measurement and a practice in philanthropy:
That latter tute actually reminds me that we haven't made homemade laundry soap since moving into our new house! As you can tell in that post, my process was quite organized, and without that same scaffold in the new house to remind me, it just slipped my mind. 

Mental note to make time this winter break to make laundry soap!

If you're studying history, then hopefully you'll run into the Celts, because they're a fascinating people. We studied the Celts back in April of last year--most notably, by painting ourselves in wool and then having a giant battle with the Romans over the sheep that we'd been stealing--but here are a couple of other resources on my radar for studying the Celts:
  • Celtic knot templates. These could be coloring pages, but you could also use them as templates for shrinky dinks or clay.
  • BBC Celts. The BBC Schools website is great for any topic that affects Great Britain. They have plenty of information about the Celts, as well as several hands-on activities for enrichment.
And, of course, if you're making soap with kids, you'll surely want some more interesting soapmaking resources!
  • Explode Ivory soap. This is a fun rainy day activity, and perhaps an interesting tie-in to a consumer science study.
  • Felted wool soap. The kids and I have felted wool around rocks and wooden Easter eggs before, so I know that it's a great kid-friendly activity!
  • Paint with bubbles. This is a way to get younger kids involved, but even my 11- and 13-year-old still love sensory activities like these.
Here are the books that Syd and I explored as part of our soapmaking study. Some are more on my level and some more on hers, and I have some bookmarked recipes still to try out in several of these!

  • Homestead Blessings. This DVD is kind of amateurish and they don't use safety equipment (gasp!), but it's still helpful to see the process of soapmaking from start to finish. Just wear goggles, though.
  • Dirt: The Filthy Reality of Everyday Life. I like to learn more about whatever the kids are studying, so this history of our conception of "dirt" in our cultures was super interesting.
  • The Natural Soap Chef. Here's one of the books that Syd looked through to find the recipe that she wanted to use. I still have a couple of recipes bookmarked in here!
  • Handmade Soap Book. Here's another good one for recipes.
  • You Wouldn't Want to Live Without Soap! The kids both love this series, and I'm often surprised about how frequently they have a title suited to something that we're studying.

Monday, December 11, 2017

How to Make a No-Sew Tied Fleece Blanket

This tutorial is so easy that apparently I decided that you don't even need nice photos for it, and I just shot what the kids were doing as they made a few more of these no-sew tied fleece blankets for our local animal shelter.

These blankets make great animal shelter donations, because you can make them to fit specific kennel sizes (we were asked to make one size for the cat kennels, and another, larger size for the dog ones), and the fleece is easy for the staff to wash. The fact that the blankets can go home with the doggies and kitties when they're adopted is a big bonus!

These no-sew tied fleece blankets are actually good gifts for people people, too, though, not just for fur people. It's a bigger project to tie a lap blanket, or even a full-sized blanket, for a person, sure, but it's also a project that can be easily done while one watches Netflix.

Season 2 of The Crown just came out, so I am a BIG fan of projects that can be completed while one watches Netflix! I'm sewing SIX variations of mermaid/shark/mermaid skeleton lap blankets, and let me tell you that I am binge-watching SO much dishy Queen Elizabeth II drama! And Philip! I can't even!

Anyway...

To make this project all you need are two pieces of fleece, cut to identical dimensions. Make a cardboard template that is 1"x2", and use that to fringe all the way around each piece of fleece. You need the template so that your fringes are identical, as well:

To make those larger cuts out of the corners, just completely cut away two of the cardboard template dimensions, to make a 2"x2" square cut from each corner.

Now all you have to do is put the fleece wrong sides together, then tie them together by matching the fringes and tying them together with a square knot:

A square knot is just the simplest knot you know, but you do it twice, once with your right hand dominant, then again with your left hand dominant. So if you tied the first knot going left over right, do it again right over left:


My Girl Scout troop taught the square knot to several Brownies early this semester (as well as teaching them how to braid to make these dog toys, and how to make these pumpkin and oat dog treats!), but on another day the kids and I were teaching an activity at the Children's Museum that required tying ribbon to chopsticks, and I was surprised at how many older kids, even teenagers, couldn't tie a knot, or didn't want to try.

I always make them try twice before I help them, just in case you previously thought that I'm nice.

Of course, even knot-tying goes faster when you have a sister to help you!


Even better when you turn it into a sing-along!


When you've tied all the knots all the way around, your blanket will likely look horrifyingly wonky, because you've just naturally tied your knots with varying degrees of tension. It's an easy fix, though--just stretch it by hand all the way around, and it'll straighten itself out. You'll probably need a buddy if you're making a larger blanket, but regardless, when you're done, it will look nice and perfect just like this:

This particular blanket went to a cat at the animal shelter. I'm hoping that it's long found its forever home along with her!

Want to do a little more with your no-sew fleece blanket? Here are some other ideas on my radar:

  • I like the look of this different method that doesn't use knots, but it does require cutting a slit into each fringe, so that feels like the same amount of work, and also less kid-friendly.
  • I've seen weighted blankets talked about around the internet, and it's always been kind of casually on my to-do list for the kids (and maybe for me!). This tutorial for a no-sew weighted blanket, using bean bags stuffed with poly beads, looks like the easiest tute, and a great one for a kid, as you can add more beans as she grows.
  • This braided-edge fleece blanket is even more work, but again, the edging looks quite lovely, and looks harder to make than it is.
  • You can use this same knot-tying method to make all kinds of fleece projects. I like the look of this patchwork blanket made by knotting all of the pieces together--it has so much dimension, and looks so snuggly!
If I have any fleece left over after sewing two mermaid tail blankets, two mermaid skeleton blankets, and two eaten-by-a-shark blankets this week, I might try one of these and let you know how it went!

And after I sew all of those, I'll also be able to catch you completely up on The Crown!

Thursday, December 7, 2017

Our Favorite Christmas Traditions: The Children's Museum of Indianapolis

The Children's Museum of Indianapolis is one of my most special Christmas traditions, because it's something that just the kids and I do together. As with everything, as the kids have changed so has this tradition--what used to be a day spent at the museum with a baby and a toddler is now a day with a tween and teen, and if nothing else, tweendom definitely has the potential to butt into our fun.

But this year, we hit another sweet spot, and once again it was a magical Christmas tradition.

When the kids were small we splurged on a membership to the Children's Museum (every other year, alternated with a membership to the Indianapolis Zoo), but now that they're big, we go as volunteers, and so on this morning we spent two hours teaching kindergartners about the Mexican Christmas tradition of Las Posadas:


We had a couple of kids who weren't bored out of their minds to listen to us, but mostly we got to experience for the first time the misery of being the lame table, as kids drifted away from my enthusiastic raptures of "It's like a PARADE, Children!", and Syd temptingly shaking the tin maraca for them, in order to go spend all of their time playing the dreidel game two tables over. 

The worst, though, was when I would tell the children about the pinata and Will would hold it up, and the kids would be all, "OOH, a PINATA! Can we play it?!?", and I'd be all, "No, sigh, but you can hold it. No, not like a gun, Sweetie, okay, no stomping on the pinata, there's no candy in there, please don't rip it apart with your hands, okay that's enough with the pinata, who wants to touch the tin Nativity with one finger," etc. BO-RING!!!

Anyway, some kids, I hope, came away with an understanding of Las Posadas, but most of them probably wondered for about two seconds about how Mexico gets a Christmas parade but you can't play with the pinata, and then turned their minds to dreidels.

Oh, well. Can't win them all.

Afterwards, I appear to have packed the most hipster lunch possible for us--
Yes, those ARE salads in jars, with ranch dressing taken from the condiments dispenser in the cafe, and yes, even the of COURSE they're kettle chips are in a Mason jar, too. Because if I put them in a Ziplock, they'll get crushed before lunch! So instead I spent the afternoon with my backpack full of clinking Mason jars. Next time, I'll put my felted wool cozies on all of them first...
And then, Christmas miracle of all Christmas miracles, Will says that yes, fine, she'll go see Santa and yes, fine, I can take her picture, and I book the children to his side so fast that she doesn't have a chance to change her mind.

And so this, thank goodness, happens again, for the first time in three years:
  

It was just yesterday, and also four years ago, that they sat there just like this:


 There's no doubting Santa's real when you can see for yourself that he hasn't changed a bit!

Once again this year, magically, both kids did all the work to earn their elf ears:


And magically, they both consented to wear them!

Who knows how long this particular Christmas magic will last? Next year may well find both kids too cool for Santa, or we may find a new, more "grown-up" Christmas tradition. But I've had this year, and I have the experience to know to treasure it, and with these big kids, I'll be equally treasuring every one of the traditions we've still got coming. 

Because those traditions, when the kids are tiny you think they're forever, but to my sorrow, they are not.

Tuesday, November 28, 2017

You Really Can Marble Paper with Shaving Cream!

I was verra much doubtful about the feasibility of actually marbling paper with shaving cream, despite all of the Pinterest pins that I'd seen about it--you know how Pinterest is, right?

But it was by far the easiest-looking method, AND we already had all of the supplies that we needed to do it (because don't YOU have spare cans of shaving cream in your homeschool closet, because you saw them on clearance one time and figured you could use them for something or other? You can!!!), so I decided to roll the dice and give it a try.

I used this tutorial for marbling paper with shaving cream from The Artful Parent, because I follow her blog and I've used a few of her tutes before--she's what you might call a Trusted Source!

We used these supplies:
  • school cafeteria trays, one for each kid (I bought them from our local university's Surplus Store, which is where half the stuff in our house comes from)
  • cheapest shaving cream you can find (The Artful Parent's tute calls specifically for shaving FOAM, but we used cans labeled "Shaving Cream" with no problems)
  • liquid watercolors--half my stash is Colorations, and the other half is the Dick Blick store brand. I wish there was a local place to restock, because I really need more orange, but I don't want to pay for shipping at either site!
  • paper. We used this cardstock from Paper Source (I received free samples for review purposes), because I was hoping the kids would produce some designs that they could use as covers or endpapers for the books that they'll be making for the Girl Scout Cadette Book Artist badge, so I wanted them to use high-quality paper.
For the step-by-step process, click over to that tutorial from The Artful Parent, but here are some photos of how it went for us. Please excuse the dim lighting--this was on the kids' work plans for the day, but we didn't get to it until very late afternoon:


The kids are meant to be spreading the shaving cream into one even layer, but in the process they rediscovered something that they seem to have forgotten since their preschool years--SHAVING CREAM IS FUUUUUUUUUNNNNNNNN!!!!!!!

I am highly in favor of sensory activities even for big kids, primarily because it's so clear how those big kids, themselves, take to the opportunities to immerse themselves in sensory experience:

Even the kid whom you'd least suspect of such a thing... did this:


That's one way to make sure one washes one's face, I guess!


Even though it does require some assistance from one's sister...


Eventually, these two goofballs DID get down to business:


Here's some not really better light to show you how pretty their paper turned out:


I could have gotten a better shot of that where the color scheme wasn't so off--in particular, I don't know why the blue didn't come out at all--but I'm having a really busy week, so please use your imaginations. We don't own grey liquid watercolors, so imagine all of that as blue, and the red is really red, not magenta. The green looks weird, too, but the purple looks about right.

It was challenging to keep the paper flat while also allowing it to dry, so I'll likely show the kids how to go over it quickly with a warm iron before they use it in their paper products.

I also have plans to use more of this Paper Source paper to make marbled business cards, so stay tuned!

If you're in the mood, here are some other really amazing-looking marbled paper projects that I've got pinned:
  • marbled paper with alum. You can buy alum at the grocery store, so this would also be an easy method to try.
  • marbled paper with milk. This is an extension of an art/science activity that uses the milk, so useful in getting some more use out of your supplies, but I wouldn't try to keep the paper afterwards---unless you like things that smell like sour milk?
  • marbled paper with oil paints and methyl cellulose. This is the most professional method, which is why it requires supplies that I didn't want to buy. I'd be curious to see first-hand how the results differ from these other methods that use grocery store supplies.
  • marble paper with spray paint. I always keep a full rainbow of spray paint, as well as black and white and a clear coat, on hand as one of our permanent art supplies, so this is one project that we actually might do someday soon.
  • marbled rocks with nail polish. I'm wary of using up Syd's beloved nail polish, but if you want to marble something more permanent, like the rocks made in this tute, nail polish is a paint that would stick.

Although this shaving cream marbling worked out so well, right now I can't ever see myself trying another way! 

Unless it's messing around with spray paint, of course. There's always more space in my day for messing around with spray paint.

P.S. Check out this comic that Syd made of Peter the Great trying to cut his nobles' hair against their will. There's never a dull moment in AP European History!

Thursday, November 23, 2017

Homeschool Science: How to Make a Molecular Model of Photosynthesis

The kids and I are using CK-12's 9th/10th grade Biology textbook as the spine for this year's biology curriculum--for Will, who is in the eighth grade but who is taking high school-level coursework, this will be recorded as Honors Biology on her transcript.

In addition to that textbook, we're using The Illustrated Guide to Home Biology Experiments as our lab manual, and of course we've got a plethora of other reading/viewing/listening resources and hands-on activities to enrich our study.

We're progressing through the book a LOT more slowly than I thought we would, but that's okay, as biology is in both of the kids' areas of interest, so we might as well be thorough and enjoy ourselves, and unlike AP European History, which Will and I are also enjoying, there's no deadline for finishing, so I'll be happy simply to have us finish by next September, when Will will begin 9th grade coursework.

All that is to explain why after almost two months of study we're only in chapter 4, lol! And we've taken nearly a month to get through chapter 4, as some of the labs that I wanted the kids to do called for special supplies that I had to order. But finally we've got our elodea cuttings, our bromothymol blue, our hydrochloric acid, our test tube stoppers, and our heat lamp bulb, and so so our study of photosynthesis and cellular respiration is finally almost complete.

This molecular modeling of the process of photosynthesis is a hands-on enrichment activity that I had the kids complete after reading the chapter, but before we did our first experiment on actual plants. Modeling the process helps your kid see that it really is just a math formula, not magic: carbon dioxide plus water plus light energy equals glucose and oxygen.

Oh, who am I kidding? Science IS just another name for magic!

Got some molecular modeling tools? You can make the magic happen yourself!

To model photosynthesis, you'll need your favorite molecular modeling kit, or a DIY version. We have Zometools, and last year I bought the Molecular Mania set when we were doing a brief chemistry study. I like the Zometools set because it includes color-coded buckyballs and molecule building cards, but since we have the larger set, too, when I needed more of a particular element all I had to do was lightly spray paint one of our regular white buckyballs and there you go! Paint a ball red and it still works with the regular kit, but now it also represents oxygen!

Here is the chemical formula of photosynthesis:

6CO+ 6H2O + sunlight ------> C6H12O+ 6O2


To model photosynthesis, then, each kid needs to build six carbon dioxide molecules and six water molecules:


In Zometools, carbon is black, oxygen is red, and hydrogen is white. I told the kids not to worry about single or double bonds, since I just wanted them to witness the conservation of matter throughout the process itself.

We used our imagination to add sunlight, and then the kids then had to figure out how to use what they already had to build glucose: C6H12O6:


This is Syd's version of glucose:

I didn't ask them to put it together the "right" way, because I didn't want them to have to research an answer. Just getting all of the correct elements collected into a glucose molecule was enough for me.

Nevertheless, look what Will came up with, all on her own!


Well, the dog may have been giving her tips...


But check out the symmetry of her glucose molecule!


It's really not that far off!

As you could see in the lower half of Will's photo above, when you've finished reassembling the water and carbon dioxide molecules into glucose, you'll have some oxygen atoms left over. This is the waste product, but oxygen doesn't like to be a single atom--it likes to have an oxygen buddy, so give all of your oxygen atoms an oxygen buddy:

And you'll have a perfectly even number!

It's ready to be exhaled, so that humans can inhale it and exhale carbon dioxide, which is what plants inhale so that they can exhale 02, so that humans can inhale it.

P.S. If you don't want to buy a molecular modeling kit, that's cool. I've actually collected links for some nice-looking DIY molecular modeling sets, so here they are: