Saturday, November 7, 2020

How to Sew a Pompadour

I originally published this tutorial on Crafting a Green World.

It's not just a fancy hairstyle!

Madame de Pompadour lent her name not just to the bouffant hairstyle, but also to the practical yet lovely little drawstring wrist bags that allowed one to both wear a fancy ballgown (with no room for pockets!) and carry a lipstick and some cash for gambling with.

Pompadours are still lovely and practical to sew and to carry, although it's probably less advisable to take them gambling with you. But they still go well with an outfit that doesn't have pockets! A pompadour is also a handy change purse or bobby pin carrier to live inside your backpack, and if you think very large-scale, you could turn one into a handy travel play mat and storage bag for a child's toys.

Even better, a pompadour is also dead simple and super quick to sew! If you're making a smaller version, it's easy to use stash fabric to sew one. To make one for yourself, you will need:

CompassThis is the circle drawing tool, not the finding your way in the wilderness tool.

Two Complementary Fabrics. The original pompadours were fancy, made of fabrics like velvet and silk. Those are still appropriate, especially if you're sewing a pompadour to match a formal gown, but you can also use more utilitarian fabrics. The two pompadours in this tutorial are both sewn from quilting cottons.

Buttonhole Foot. Or the endless patience to sew a buttonhole by hand!

Grosgrain Or Other Ribbon. Choose something sturdy rather than delicate here. Silk or cotton ribbon can be dyed to match your fabric.

1. Measure and cut two circles. The pompadour is simply two circles of fabric sewn together and cinched with a drawstring. It can, when completely loosened, flatten completely, and so its maximum dimensions are the dimensions of the circle that you choose.

Use your compass to make a circle template (mine is approximately 12" diameter), then measure and cut two circles of fabric:

 This is not me, but my 11-year-old. The pompadour is her hands-on project for the Rococo period in our History of Fashion study.


2. Sew a buttonhole at each end of the "outside" fabric. Mark and sew the buttonhole about 1" from the edge at each end of the fabric:

Later, you'll be sewing a channel for the ribbon on either side of these buttonholes.

3. Put the two fabric circles right sides together, and sew all the way around, leaving an opening for turning. Use whatever seam allowance you prefer for this.

Use the opening to turn the pompadour right side out, and a blunt pencil to help you push out the seams so that you have a smooth circle. Iron the pompadour flat, tucking in the raw edges of the opening as you do so, then edgestitch all the way around, closing the opening and giving a neat, finished edge to the pompadour.

4. Sew a channel for the drawstring.  Sew two complete circles around the circumference of the pompadour, one above the buttonholes and one below:

5. Insert the drawstring. Measure two lengths of ribbon that are the circumference of the circle (here's a calculator to help you!) plus 2-4". Use a safety pin as a bodkin to draw the ribbons through the channel that you sewed for them.

Each ribbon will go in and out of the SAME BUTTONHOLE, and then will be knotted to itself:

When you're finished, you will have a ribbon loop at each end of the pompadour; pull them both, and the pompadour will draw tightly closed. Loosen them, and it will open up!

Thursday, November 5, 2020

My Rainbow Sierpinski Triangle Quilt Top is Complete!

 Check out the third coolest thing that I've ever made!

I was inspired to make this quilt when I was looking for ideas for baby gifts, of all things, and found a picture of this quilt. It's perfect for a baby, right? It's colorful. It's a great size for tummy time. It's got a clever and sophisticated mathematical pattern on it to build little baby brains!

And most important... I'm obsessed with rainbows. And math. And I like to sew.

I built myself a Sierpinski triangle template by printing this triangle graph paper and drawing in only the triangles that I knew would be black. I photocopied it, the better to make numerous attempts at a roughly symmetrical rainbow and then get mad at each one for a different reason and recycle it. Finally, I settled on this one--


--which I kind of don't love in some ways, because I wish it also had rotational symmetry, but it more or less works, and it looks pretty.

On to cutting out a zillion triangles with my brand-new 60-degree triangle ruler--


--and then laying them all out on the floor while binge-watching House until I got an arrangement that I liked:


Then I stacked them all up by rows--


--and pieced them together a little at a time, whenever I had some free time and felt like binge-listening to This American Life podcasts.

The media which will be binged is just as important as the activity conducted while binging, don't you think?

For pictures that show how to piece these triangles into rows, check out my quilted rainbow mug rug tutorial, where I give a step-by-step walk-through and have a bunch of pictures that I took while it was stormy outside and so the pictures are dark and gloomy and gross, too, and I don't want to republish them here.

But be assured that I pieced the entire triangle quilt just like I did in that tutorial: three triangles pieced together with corners matching, then that three-triangle piece pieced onto the larger strip:


My mini iron earned its keep here, which is awesome, because I'm pretty sure that I impulse-purchased it at least a decade ago and I'd be surprised if I really used it since.

I used the snot out of it ironing little triangle seams open, though!

Done by threes, each row comes together pretty quickly:


Sewing the rows together is a little trickier, and I ripped out my first row several times before I figured out a couple of different tricks to get my triangle points lined up at each row.

So, looking at the wrong side of the row, you can see the point at each seam where three different fabrics meet. If you put a pin through exactly at that point--


--and then poke it through the exact top point of the triangle facing it, you will have pinned them exactly to match:


If you're not feeling quite as picky, you can eyeball it:


But you probably know that I'm always feeling picky.

You should be good if you're sewing everything with a precise .25" seam allowance (don't be afraid to be picky!), but to make 100% sure that you're not sewing over any triangle tips, you can look for that same point where three fabrics meet while you're sewing the rows together. Put your stitching directly on top of that point, and your triangle tips will look perfect!


I'm not gonna lie--all these triangles did make for a LONG project, but it was surprisingly not tedious, because the whole time, it was really pretty! In every state of WIP, the quilt top was mesmerizing, with interesting patterns constantly being revealed with every new triangle sewn to it:


I think it's the prettiest now that it's finished, though, and you can see the complete pattern, both mathematical and rainbow:


The quilt, itself, isn't complete, but finishing that quilt top is most of the battle! I know exactly how I'm going to back it and bind it, and who I'm going to give it to for Christmas, and then, you guys...

I think I'm going to make another one for ME!

Wednesday, November 4, 2020

Homeschool High School Art Class: How to Earn the Girl Scout Senior Collage Artist Badge


My obsession with using Girl Scout badges as homeschool units of study continues, as Will and I turned earning the Girl Scout Senior Collage Artist badge into an excellent and super fun study that I'll incorporate into part of a high school fine arts credit for her. 

Step 1: Explore collage. Normally, I wouldn't have thought twice about taking a field trip to an art museum to look at collages, but... you know, there's a pandemic going on. Now that our local university's art museum has re-opened, I do think we'll chance a visit, but until then, I satisfied this step by requesting a ton of collage books from our public library and employing contact-free pick-up. 

I actually ended up really liking what these books brought to our study, as we were able to look through not just fine art collage books but also casual how-to and craft books, which I think gave us more ideas about what we, ourselves, could do with collage. 

Here are some of the collage books that we explored:

Our public library has a stellar collection of zines, so if we'd had more access to the library, or if I'd also been leading Syd through this badge, I was toying with the idea of centering all the activities on zine creation.

Next time!

Step 2: Focus on composition. For this step, Will did do one of the suggested activities, just because it looked like fun!

Since this was a for-fun activity, not really one that I had planned as part of her fine arts unit, I didn't make any criteria for neatness, precision, or craftsmanship. If I had, I might have showed Will how to use our paper cutter to make precise squares, or how to grid the paper lightly to ensure accurate placement, etc. But since this was our very first actual collage activity, and since Will isn't the most confident artist on the planet, "cubomania" turned out to be the perfect low-impact, high-interest collage to get her interested in digging deeper.

3. Create with color. Here's another suggested activity that worked perfectly as written and was also very fun! It tied well into a review of the color wheel, although, as you can see, Will chose to work entirely in greyscale:


Here are some of our color wheel resources:
  • 3D color wheels. My Scouts have a varying level of patience with step-by-step directed activities such as this one, but this DOES make a beautiful hanging piece!
  • color wheels composed with strange paintbrushes. Sometimes it's not what you make, but how you make it that's the point of the activity. This project ties into the Outdoor Art badges by challenging kids to make the standard color wheel, but to paint it with something unusual. In this particular activity, I had my kids use tree branches, but it would be fun to have kids first collect a variety of nature finds to use--perhaps even without telling them what they'll have to use them for! I think older kids especially enjoy these kinds of physical challenges that are both unusual and maybe just a tad bit babyish. Who wouldn't want to play a little bit longer?
  • giant collaborative color wheel. Yes, this is written as a preschool art activity, but not all process-oriented art is solely for preschoolers! This would be a fun group activity to begin a color study, especially if you encourage kids to collect ephemera between meetings. 
  • interactive color wheel. This is such a good idea! Instead of using a pre-printed template, though, I think it would be fun to have kids make their own card stock template, and then let them choose their own colors and color wheel combination. Think how much fun they'd have playing with their favorite colors in this wheel, instead of the standard assortment.
  • mandala color wheel. Here's a much more sophisticated color wheel that will make an appropriate challenge for an older kid.
  • spinning color wheel. This is a quick and easy activity that gets kids up and moving a bit.
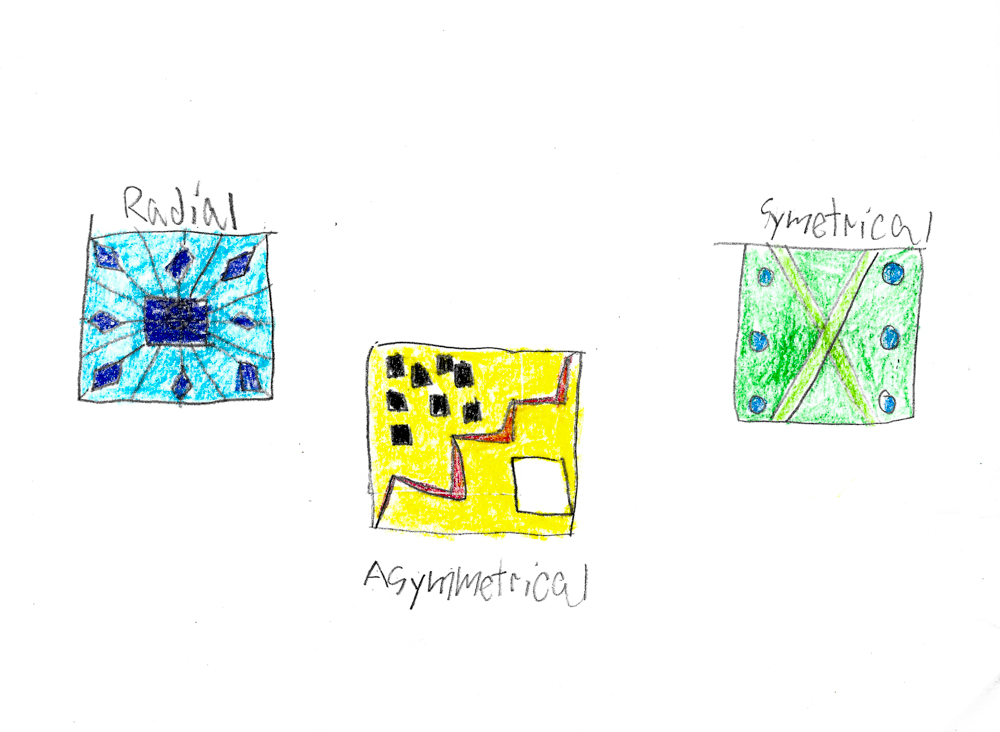
Step 4: Use found objects. Will and I went off the rails for the last two steps of this badge, and so instead of creating a found object collage, for this step we reviewed symmetry and how it effects artistic composition. 

Afterwards, Will created a larger piece that incorporated three different types of symmetry into a single composition. 

Step 5: Share a message. Until this step, each of Will's collages had been completed in a single sitting. Even if it took her a couple of hours and/or several episodes of Welcome to Night Vale, each time, when she got up from the art table, she had a finished product to show.

I wanted Will to have the experience of creating a multi-step, multi-day, more involved project, so instead of any of the "share a message" activities, we created that elaborate piece.

I used this large-format collage animal tutorial, and I LOVED it! The only step that we did not attempt was the free-form, process-oriented art while listening to music, and that's only because I have SO much large-format paper ephemera, some of which includes old kid art. So that's what we tore into strips--


--and used as the base for our collage animals:


Matt made us the tracers, and I was surprised when Will wanted to create not the dog that I'd just assumed she would, but an owl:


Black screenprinting ink worked great as a substitute for india ink, but polyurethane did not work as well as the resin called for in the tutorial would have. Definitely use the resin for realistically shiny eyes!

Imperfectly shiny eyes aside, Will and I are both very pleased with her large-format, multi-step, carefully-crafted owl collage:


It's now mounted high in our family room, so it can watch over our bookshelves and keep our books safe from mice.

Even though Will was my only Girl Scout who earned this badge with me, I think this is a badge that would work particularly well for Girl Scout troop meetings. It's set up so that completing one collage per meeting is very manageable, other than that last collage, but the tutorial for that one is written by an art teacher who lays out how to space it out over a period of days. Add in a socially-distanced field trip to an art museum, followed by a picnic and some free time outdoors, and you have a picture-perfect Girl Scout badge!

Want to do more with collage? Here are some of my favorite collage resources and projects, and even more collage projects and resources that are on my to-do list:
  • Jack-o-lantern. This is a little cheezy, yes, but so fun and festive to do on a holiday week!
  • reflection board. I think this would be such a cool starting activity for every Girl Scout meeting while you're working through the Collage Artist badge, or for the beginning of every school day if you're incorporating it into your homeschool. There's a lot to be said about the experience of getting into the practice of something, even if only temporarily, and I love this as an extension or alternative to journaling. 
  • window cards. Here's a way to multi-task collage activities with a service project! You could use this activity to make Christmas or Valentine cards, in particular, because they both have iconographic silhouettes that come to mind. Kids could make them for their families or for nursing home residents. 
  • tags and bookmarks. This could be another good pre-holiday activity, or you could forget the gift tags and just focus on bookmarks. The extra artistry and detailing that's called for with these types of projects can be extra-appealing to older kids, I've found, and sourcing materials should be easy, because you can simply ask kids to bring in some of their recycling!
  • magnets. These are similar to the tags and bookmarks, above. This project would work well with the Senior Room Makeover badge, since kids could also make an upcycled magnet board to go with it (pro tip: thrift old cookie sheets!).
  • postcards. You have to be a little more careful with postcards, but it's fun to see how things end up when they go through the mail! I recently did a similar project with my Girl Scout troop as an at-home activity, and the kids are all waiting with bated breath to receive them as I type this!

Saturday, October 31, 2020

How to Make Clear Slime

I originally published this tutorial on Crafting a Green World.

Slime is a wonderful sensory experience, and I'm thrilled that so many young people are embracing the joy of exploring interesting textures (there are no interesting textures on their phones!). Making slime is also a terrifically educational activity, with problem-solving and reading and following instructions combined with quite a lot of chemistry and not a little bit of physics, as well.

To make clear slime, I consulted my own resident slime-making expert. She's put in hundreds of hours making slime, and is here with us today to teach you how to make clear slime, the Holy Grail of slimes. Syd's clear slime isn't your ordinary, everyday "clear" slime that's actually milky or white, she tells me. When she says that her slime is clear, she means it is CLEAR.

As in crystal!

So read along as the world's slimiest kid takes the task of making clear slime and breaks it down so simply that even the average non-slimer adult can follow it.

To make clear slime, you will need:

  • Clear Elmer's glue. I used to be able to buy this by the gallon, but lately, I've only found smaller containers for sale. I sure hope the gallon size comes back soon!
  • Hot water. The water should be hot, but still, a comfortable temperature for a kid to touch. For mobile slime-making (yes, this is something that she does...), Syd boils a kettle of water, then pours it into a thermos for transport.
  • Contact lens solution. Buy the cheapest on the market for this project, making sure that it contains boric acid.
  • Baking soda.
  • Two mixing bowls, a spoon, and a resealable container for storage.

1. Pour 1/2 cup of clear glue into a bowl. Remember that kids do this, so don't worry about trying to make your measurements too fussy. The important thing is that you're using CLEAR glue, not white. You can use white glue for other slimes, but then your slime won't be clear!

2. Mix in 1 tbsp of saline solution. This is also known as contact lens solution.

So here's a thing that I want to tell you about: we're going to talk about borax. When slime-making first got big, there was an actual backlash as people started FREAKING OUT that their kids were touching borax. As alternatives, people started posting slime recipes that don't use borax. Some of those recipes are great, some are not, and lots of them use contact lens solution as their substitute for borax.

Y'all, contact lens solution and borax both come from boron! They're pretty much the same, just that one is in powder form and the other is dissolved into a solution.

Not that I think that you should even force your kids to avoid borax, because I don't think that at all. Heck, my kids were making laundry soap from borax with their bare hands at the age of eight (they probably should have been wearing gloves, but still). Borax is FINE, Friends. Sure, if they bathe in it every day for a month it'll irritate their skin, but so will pool water.

3. In a separate container, dissolve 1/2 tsp of baking soda into 1/2 cup of hot water. Stir it well and make sure that it dissolves completely.

4. Once the baking soda is completely dissolved, pour it into the glue mixture. Try to pour it over the entire surface of the glue mixture.

5. Wait approximately a minute, then stir. Knead if necessary. 

At first, the mixture will be a goopy mess but continue stirring and you'll be able to see when the slime activates because it will start to ball up. It will still be sticky when you start to knead it but keep working it and it will become ever more elastic and non-Newtonian until it's the perfect slime.

You will have some of your baking soda and water solution left in the bowl, and that's perfectly fine and normal.

One thing that your slime will not start out as is perfectly clear, for the simple fact that you just kneaded a ton of bubbles into it.

If you really want perfectly clear slime, then pop it into an airtight container and let it sit for a day. The next day, it will be clear!

Note that as soon as you start playing with it, though, you'll start kneading bubbles back into it. This picture is of the clear slime that Syd has played with for a while, and you can see the bubbles:

Pro Tip: Syd stores her slime in small plastic deli containers to keep it fresh--and off of my carpet! She tells me that this particular slime will lose its bounce after several days, but it's easy to reactivate it. To reactive this clear slime, dissolve 1/2 tsp baking soda in 1/2 cup hot water. Pour the older slime mixture into this solution, stir, and then knead it when it becomes firmer. Keep the reactivated slime and discard the excess water.

Thursday, October 29, 2020

How to Sew a Quilted Rainbow Mug Rug

I have been obsessed with sewing triangles lately, mainly because this WIP rainbow Sierpinski's Triangle quilt has taken over my thoughts and dreams:


The sewing on it has to be really precise so that all the nice points are nice and pointy and match all the other nice points, so first I practiced by sewing lots of other triangle projects.

And in the process, I came up with this quilted rainbow mug rug that I'm super into!


It's VERY good practice for the precise cutting and sewing required with triangle pieces, but at the same time it's a reasonably quick project to get through. It's apparently a fun project, as well, because as soon as I made one mug rug, I immediately pieced a second one.. and then a third... and then a fourth... and now I have a full rainbow set of six happily at my disposal.

Here's how YOU can sew a fun rainbow of your own!

You will need:
  •  60-degree triangle ruler
  • six different fabric prints in rainbow colors
  • cotton batting
  • cotton broadcloth in a single rainbow color
  • thread that matches the broadcloth
  • universal sewing needle. This one is a good size to handle the 2-5 layers of cotton that it will be sewing.
  • small iron (optional). A regular iron can handle this project, but I LOVE this particular iron for ironing seams flat as I sew.
1. Measure and cut the triangles. For this mug rug, I think that 2.5" triangles result in the perfect finished size. Your 60-degree triangle ruler has printed lines that guide you to making the correct cuts, essentially having you cut a 3" triangle that you'll sew with a .25" seam allowance. For triangle sewing, your seam allowances have to be really, really precise (the fact that I keep emphasizing this means, I fear, that my sewing is not normally so precise...), so this is also a good time to get out your ruler and make sure you know what an exact .25" seam allowance looks like on your sewing machine.

All my photos are terrible because it's raining and it's going to rain forever and if I wait until I've got natural light to photograph things so they don't look terrible I, too, will wait forever.

After my triangles are cut out, I like to play with arranging them to make sure I like the aesthetic:


2. Piece the triangles into two rows of three. Piecing together three triangles, top points aligned, will give you a perfect 180-degree straight line. Your triangle ruler will have already had you cut each triangle with one notched point, and that notched point is the easiest place to align the triangles. Carefully align two triangles, right sides together, and sew them with a .25" seam allowance. Iron that seam open.


I had to practice and practice and practice before I could consistently sew this third triangle just right. I ripped out SO MANY seams, and walked away from my sewing machine to go do something else SO MANY times. 

So that you don't have to suffer the way that I did, here's how I double- and triple-check that I've got this last triangle lined up correctly:


See the triangle points that stick out because you ironed the seam open? Those points help you match the pieces! If you've matched the notched piece at the top and you match this triangle point at the bottom, your piece is perfectly aligned and you can sew it with a perfect .25" seam allowance.

Iron the seam open, and here's what your three triangles should look like on the back:


Here's what they look like from the front:


I took the photo at a weird angle, because taking it from directly above would have entirely blocked the small amount of light present in my study on this gloomy day, but if you look carefully, you should see that the middle triangle's bottom point does not extend all the way to the bottom of the piece. There should be .25" between the bottom point and the bottom raw edge.

If there's not, rip it out and try again. Lord knows I've done that many a hundred times in the past few weeks!

3. Piece the two rows together. Lining up the points when you piece the two rows together is also a little tricky, and also had me ripping out seams multiple times before I finally figured out a couple of tricks. First, check out the picture below:


In this picture (which is actually of my Sierpinski's triangle quilt in progress, mwa-ha-ha!), see how the back of the black triangle has a top point that meets the two blue pieces? Ignore the seam that goes off to the right to make a point, and just look at where the three quilt pieces meet at one point.

That point is also the triangle's point on the front side! If you can pin that point straight through to the point on the other piece of fabric, your points will match.

It also gives you a visual guide when you're sewing. Make sure you stitch directly over that point, and your triangle will look nice and pointy from the front:


Look at how tidy and pointy and almost exactly perfect the finished hexagon is!


4. Quilt the hexagon to the batting. For these mug rugs, I've decided that I prefer quilting the hexagon to the batting only, and adding the backing fabric later. So cut out a piece of batting that's a little bigger than your hexagon--


And then quilt the hexagon to it by stitching in the ditch with white thread.

5. NOW you can sew the backing fabric to your quilt! The backing is going to serve not just as a backing, but also as the back-to-front quilt binding for your mug rug. To that end, pin your quilt to the backing fabric, then enlarge the hexagon an extra .75" on all sides. A clear ruler makes this super easy:


Cut out the backing fabric.


Crease and pin the binding. Here's where that mini iron really comes in handy! For each side, fold the extra fabric in half and iron to crease, then fold it over again and pin it to the quilt. Here's a really great tutorial with clear illustrations for exactly how to do this back-to-front blanket binding.

And here's what it looks like in progress!


Now all you have to do is sew the binding to the quilt, using matching thread. It doesn't really matter if you use a straight or zigzag stitch, and I experimented with both, but eventually decided that I prefer the look of zigzag for my mug rugs:


And so that's what I did!


I like how clean the back looks, since it doesn't have any of the quilting:


And as you can see, it's the perfect size for a coffee mug!


I enjoy making these so much that I made a listing in my Pumpkin+Bear etsy shop so that I can keep on making them. 


You can order your own quilted mug rug in sets from one to six, with the backing fabric color of your choosing. I choose your print fabrics, but they'll always be a six-color rainbow:

Trust me when I tell you that a rainbow on your coffee table is a very cheery thing to have!

Six Months Ago: A DIY Binomial Cube/Trinomial Cube Manipulative

One Year Ago: 20+ Things to Do with Apples

Two Years Ago: Movement and Grace: Scenes from the Ballet Classroom

Three Years Ago: Montessori Pink Tower Extensions for a Sixth Grader

Four Years Ago: American Revolution Road Trip: Bay Front Park, Maryland

Five Years Ago: Hawaii with Kids: Luaus and Leis on the Big Island

Six Years Ago: La Maestra

Seven Years Ago: Trick-or-Treating with IU Basketball: Haunted Hoops!

Eight Years Ago: To Build a Fire: Junior Version

Nine Years Ago: Halloweening

Ten Years Ago: Willow Bakes Amelia Bedelia's Cake

Eleven Years Ago: One Deer Down, One Clown to Go

Twelve Years Ago: Illness and Ornaments and Perhaps a Psychotic Break