That led me to my current research question: what are ALL the Council's Own fun patches that a Girl Scout could earn outside of the council of origin?
Fun question, right? Knowing that would make it a lot easier to find one that my troop would want to earn, or perhaps even one that would would tempt them into learning or exploring something new, always a Girl Scout gold standard!
I started my research figuring that I'd knock it out in an afternoon and get the blog post with my whole list published the next morning.
Yeah... the next morning I was still researching. And the next morning. AND the next morning...
Nine days later, I'm finally finished up (Girl Scouts of Wisconsin East was last on my list). The master list is RIDICULOUSLY long, so I'm going to break it down and post by category before I overwhelm you with the many-thousand-worded complete experience.
First category, Art and Crafts! This includes all the fine arts, in ways both experiential and informative, and hands-on crafts. There aren't a ton of Council's Own fun patches in this category, which is kind of a bummer because crafts, especially, are something that my Girl Scout troop tends to enjoy.
Ah, well. Wait until we get to the STEM categories, which have many, many, MANY fun patch options!
For these lists, I only included fun patch programs that fit the following criteria:
Girl Scouts can earn this fun patch wherever they are. I did not include any fun patch programs that have site-specific criteria, unless I felt that those criteria would be easy to substitute and still maintain the point of the fun patch program. I also didn't include fun patch programs that require time-specific criteria that have already passed, such as patches programs designed for the 2020 COVID lockdowns. I noted in the description of each patch when substitutions would be required.
Girl Scouts can obtain the council's requirements to earn this fun patch. I found several instances in which the council still sells a specific fun patch, but has deleted all the requirements from its website. If I couldn't find an easy link to those requirements from another site, I did not include the patch.
Girl Scouts can obtain the physical fun patch. There were also several instances in which councils still host the requirements for a fun patch program, but no longer sell the patch (or, as in the case of a few GSAK patches, they have fewer than ten remaining). If it is unlikely for a Girl Scout to be able to obtain the fun patch, I did not include it. The link to purchase each fun patch is in the caption for its graphic.
Y'all might remember that Juliette Gordon Low is my biggest hero. I love so much about her--her passion for travel, her commitment to bettering the lives of girls, the fact that all of her major achievements happened past the age of 50, the way that she normalized living and working and doing so many amazing things with a physical disability. I even kind of love that she was known for being pushy, stubborn, and light on the details of her big plans, because that is just about the opposite of how history normally loves to portray its heroines.
Juliette Gordon Low is a wonderful role model for all kids, but in the Girl Scouting movement it's pretty common to just have the little ones celebrate and learn about her life. The little kids make Flat Juliettes and send them on adventures, learn some facts from her biography, throw her a birthday party around Halloween, and then it's off to learn about insects or social dance or balloon-powered cars.
The occasional lucky troop may make their own pilgrimage to Juliette Gordon Low's home, but most Girl Scouts don't think a lot about Juliette Gordon Low after their first year or two learning about her. And that's such a shame, because as great a role model as she is for any kid, I think she's an especially great role model for the older Girl Scout. The teenaged years are when girls really need all the role models they can get of brave, wild women who travel and do good works and are pushy and stubborn. And Low, herself, had a special affinity for older girls, and would have loved these modern teenagers if she'd ever had the pleasure to meet them.
So here are some of the ways that I like to connect my Girl Scouts with the founder of our movement.
Celebrate Founder's Day and/or National Girl Scout Day
Founder's Day, or Juliette Low's birthday, is on Halloween, and National Girl Scout Day, the officially recognized date of the founding of Girl Scouts, is March 12. I like that they're roughly half a year apart, because if your troop tends to be busy during one holiday, you've got a good shot at them not being super busy on the other!
Juliette Gordon Low was a high society lady, and she loved herself a good tea party. Afternoon tea is actually one of the older Girl Scout experiences that you can book at her birthplace! A DIY version of a tea party is a fun way for Girl Scout to earn the Cadette New Cuisines badge and the Ambassador Dinner Party badge--the Senior Locavore badge doesn't work quite as well for this, but there are some retired Interest Patches that would certainly apply.
Low also loved art, and up to the end of her life was constantly trying to improve her various artistic skills and learning new ones. She particularly loved drawing and sculpture, and learned how to weld as an older adult. Every now and then my Girl Scout troop toys with the idea of attending at Cookies and Canvas-type event, and I've always thought that this would be a fun activity to incorporate into a larger celebration of Low's life.
Both Founder's Day and Juliette Gordon Low's birthday make good occasions for a troop service project. I LOVE service projects that come around yearly, like donating cookies to a local youth shelter right after cookie season and Christmas shopping for economically disenfranchised kids, because it's less for me to have to think about planning for the year and more that the kids can look forward to every year--having activities that kids look forward to is crucial to older Girl Scout retention!
My troop already has yearly service projects planned around cookie season and Christmas, so we've never done anything particular for Founder's Day or Low's birthday, but I've heard of troops that assemble DIY birthday kits containing an aluminum baking pan, boxed cake mix and oil and frosting, a pack of birthday candles, and a Happy Birthday banner to donate to a local food pantry for Founder's Day. I've also heard of troops that create a little green-themed gift set, with onesies, a Juliette Low picture book, a couple of soft toys, and a gift certificate for a year's membership to Girl Scouts when she's old enough, and donate it to local hospitals to pass on to the first girl born on March 12. It's a super cute idea, but you'd definitely have to run it by council first, because I won't be surprised if the cost of membership goes up within the next five years!
Ceremonies
special bags ready to hold the candles for our Eternal Flame ceremony
I'm not personally big on ceremonies, but this was a specific request of one of my older Girl Scouts, so I've been making more of an effort the past couple of years. And since Juliette Low, herself, LOVED a good Girl Scout ceremony, it's definitely something worth incorporating into older Girl Scout meetings.
The Eternal Flame ceremony is a particularly good one for older Girl Scouts, because it's meant to be conducted when there are Girl Scouts who are transitioning away from the troop. My Girl Scout troop conducts this ceremony during our yearly Bridging/Graduation celebration now that we've got a high school graduate or two every year.
We put our own spin on the ceremony in that, after a leader tells the story of Juliette Low and her first troop of Girl Scouts who'd grown up and were ready to fly away and share their spark with the rest of the world, we light our candles in honor of our own Girl Scouts who are about to fly away. As each person's candle is lit, that person shares something about the Girl Scouts we're honoring--a favorite memory, their hopes for her, or just their best wishes. It's a lovely ceremony, and a great end-of-Girl Scouts memory for our graduates.
Other especially good ceremonies for older Girl Scouts include any Scouts' Own, flag ceremonies (you can be proactive and volunteer your troop's services to any civic organizations for their upcoming events), kid-organized Journey ceremonies, and Court of Awards whenever a kid earns the Silver or Gold award.
Badges and Fun Patch Programs
There's never been an official badge related to Juliette Gordon Low, which is a bummer, but the Girl Scout Way badge at any level can easily be themed to her. What there are, though, are thoughtfully created council-based fun patch programs, with plenty of activity suggestions (that you can take or leave, of course--my Girl Scout troop tends to rewrite EVERYTHING!) and beautifully designed patches. Here are three current ones:
Juliette Lowfrom Girl Scouts of North-Central Alabama
Kids don't get enough experience working with primary sources in school, which is a shame, because historical primary sources can be so entertaining! Historical Girl Scout manuals and badge books and leader guides are easy to interest today's Girl Scouts in, and they're wonderful for building historical context and helping a kid feel connected to her Girl Scout history.
My favorite historical primary source to show Girl Scouts is the 1918 silent film, "The Golden Eaglet":
Not only is it absolutely adorable, but it centers the experience of the older Girl Scout!
AND it features a cameo by Juliette Low, herself!
I particularly love how this look at 1918 Girl Scouting shows so much in common with today's Girl Scouts. We still learn first aid, camp and learn how to cook outdoors,. The Child Nurse badge became the Babysitter badge, but what kids lost in not learning how to bathe a baby they've gained in learning Child/Infant First Aid and CPR. And we don't commonly teach the Scout Pace anymore, but after laughing their butts off at it my kids tried it... and it's a BRILLIANT way to cover ground quickly!
At the same time, the kids are always thrilled to bits at the parts that are VERY different from today. Girl Scouts does ZERO marching in formation these days, lol, and there's no semaphore or Morse code (if you want to sneak in some extra history education, you can talk about why Girl Scouts was more militarized in 1918). The kids also marvel at how they'd never walk into the home of someone who was sick and completely take over all the housework, yardwork, and childcare... and then, of course, you can talk about what your troop could do in service instead. Meal Trains and yardwork are services that are still VERY welcome!
It's a little harder to find a connection to Juliette Gordon Low by earning retired Girl Scout badges, even though my troop LOVES to earn retired badges, simply because the physical badges that were available during Low's lifetime are, of course, precious antiques now, and you'd never sew them onto a kid's current Girl Scout vest. But the retired badges that ARE available for love or money on ebay and Facebook groups are still terrifically fun to earn, and get kids involved in activities that are less common today.
Kids generally enjoy just looking through and discussing whatever you can find for them to peruse, whether it's the old Girl Guides or catalogues or issues of American Girl magazine (which used to be run by Girl Scouts before it was run by Pleasant Company) or the 1920s girls' novels written about the adventures of a Girl Scout troop at a female boarding school--think Tom Brown's School Days but even more wholesome! Honestly, the kids love it as a stand-alone activity, but if you wanted to bake in more leadership skills and problem-solving practice and service hours, kids could prepare a presentation for a younger troop or Service Unit meeting.
Travel was one of Juliette Low's enduring passions, so every time we give the gift of travel to our Girl Scouts, we're connecting them to the history of our founder. Low was known to be an exceptionally adventurous traveler for her time, and thought nothing of traveling for months with only very basic necessities at hand, in accommodations and using transportation that was atypical for most tourists coming from Western Europe or North America.
Older Girl Scouts connect with Juliette Low's legacy by learning the skills to become confident trip planners and travelers, from budgeting to figuring out transportation and accommodations to practicing resilience to venturing out of their comfort zones and having big adventures. It's nice that this is still such a key part of the Girl Scout movement, and it's something that my troop absolutely adores.
But of course, Girl Scouts can also pilgrimage to some of the actual places important to Juliette Low! Savannah, Georgia, is a terrific destination for national travel, and taking my own two kids to Juliette Low's home, the home of Girl Scouting, is one of my favorite Girl Scout memories. But anything historically associated with Girl Scouts can forge those same connections, like the national headquarters in New York City, Low's plaque in Washington, DC, or any of the WAGGGS centers--I'm planning for my family to pop by Pax Lodge when we're visiting London this summer so we can participate in the flag ceremony, collect our pins, and hopefully earn one of their fun patches. My excitement is palpable!
Further Reading
These older kids are capable of reading adult biographies of Juliette Gordon Low, but I can't imagine even the most enthusiastic Cadette being interested in the 300-page biography that I recently plowed through, complete with an extensive index and list of primary sources for my further reference pleasure. I like to read non-fiction books about Low and early Girl Scouting/Girl Guiding, however, and I enjoy sharing the best of what I've learned both with my Girl Scout troop and in adult training workshops at the council level.
Children's and picture books, although they're below the reading level of older Girl Scouts, are still enjoyable for them to skim through and talk about during a meeting. You can turn it into a project by handing them a pile of these books and suggesting that they rank them or write book reviews. You can turn it into a service project by suggesting that the troop could buy copies of their favorites to donate to a local public or school library that doesn't already own them.
Here Come the Girl Scouts, by Shana Corey. This is my favorite of the children's books about Low. I think it really captures how exciting it must have been to be an early Girl Scout, and how involved and caring Juliette Low was in working with the children. I always tell fellow Girl Scout volunteers that our professional staff are hired for their passion for providing service to children, NOT for their administrative skills (and it shows, ahem!), and to be honest, that's simply a tradition passed down from our founder, herself.
Helping Hands: A Paper Doll History of the Girl Scout Uniform, by Kathryn McMurtry Hunt. Hint: You can scan these and print them on transparencies or shrink plastic, or change the sizing and make them into charms. You can also color copy them onto super thick cardstock so that each kid can have her own set.
Juliette Gordon Low: The Remarkable Founder of the Girl Scouts, by Stacy A. Cordery. I'd been meaning to read this particular biography for years, so I took COVID as my excuse to finally work through it. The most notable takeaway, to me, is that Low was firmly in favor of making it possible for cognitively-impaired Girl Scouts to earn the Golden Eaglet, and after she retired she even published an opinion piece in their leader magazine encouraging it and opposing an opinion piece written by the current president of Girl Scouts who was against it. My hero!
How the Girl Guides Won the War, by Janie Hampton. This isn't about Low or Girl Scouts, but specifically about the UK Girl Guides during World War 2. Kids were doing the same types of activities on both sides of the ocean, but the Girl Guides had the added terror of the London Blitz to contend with, and it's fascinating to read about ALL of the considerate, caring, brave, helpful, thrifty activities that these children, especially the older ones, participated in.
I've been going hard in cookie mode for the past couple of months, so this is my own personal reminder to incorporate some early Girl Scout history into my next troop meeting. We'll be celebrating finishing up cookie sales, taste-testing ABC Baker cookies and the new Raspberry Rally, writing thank-you notes to businesses that hosted our cookie booths, and updating some of our marketing materials while it's all fresh in our minds--perhaps we can bake the original Girl Scout cookie recipe, too!
P.S. Want to follow along with my craft projects, books I'm reading, dog-walking mishaps, encounters with Chainsaw Helicopters, and other various adventures on the daily? Find me on my Craft Knife Facebook page!
Now that the holiday celebrations have passed, do not look at your beautiful but wax-stained table linens and despair!
It's possible to remove most candle wax from most fabric, even if your candle wax is highly pigmented, and even if your fabric is precious and delicate.
Below, I'll run you through a couple of different techniques to try, one a little gentler and the other a little more aggressive. As you will likely have expected, the gentler technique has the least cleaning impact but puts the least stress on your fabric, and the more aggressive technique has the most cleaning power but is quite hard on your fabric.
That's why I'm telling you right off that it might not be possible to remove YOUR candle wax from YOUR fabric. If it's a choice between a squeaky clean vintage table runner that's now faded, with splotchy dye runs, and falling apart at the seams vs. a vintage table runner in good condition with a couple of wax stains, I always choose the method that preserves the item and keeps the patina of a useful life.
But for now, let's stay optimistic, shall we?
CAUTION: All of these methods involve the application of heat to your fabric. If your wax is highly pigmented, you run the risk of heat-setting that pigment into your fabric, even if you're able to lift the wax. At the end of my post, I'll also give you a step-by-step method that offers the best chance at removing pigment stains, but messing with vintage fabrics always entails risk of damage.
Here's the main culprit. It's definitely wax, but I don't know what kind. It's melted completely through the batting of this table runner and is also visible on the back. By the feel of it, there also seems to be quite a bit of it in the batting inside the table runner. I know the front and back of this piece are cotton, but I don't know the fabric makeup of the batting.
Method 1 (The Gentler Method): Blotting Paper and an Iron
Because we don't actually live in the Victorian times, alas, substitute white tissue paper, an unbleached paper towel, or even a clean piece of typing paper for the blotting paper.
Fold one of these items a few times until it's fairly thick, then place it directly under the stained part of the fabric. Put another piece of paper directly on top of the stain, and hold a warm iron to it for a couple of seconds. Lift up the iron and give a little peep at the paper.
The idea here is that you'll melt the wax using the least possible amount of heat. As the wax melts, it will be absorbed by the paper, allowing you to eventually lift the entire stain out of your fabric.
You'll have an easier time with this method if you know the type of fabric and the type of wax you're working with. Different waxes have different melting temperatures, and so do different fabrics! Cotton, for instance, can easily stand up to an iron temperature hot enough to melt pure beeswax, but I'm not so certain about polyester. If you're lucky, perhaps you've only stained your vintage polyester table runner with soy wax, which has a much lower melting point.
I'm pretty certain that my own vintage table runner is cotton (although, to be fair, I'm less certain about the batting...). My guess that the wax was plain old paraffin, however, is definitely incorrect. The melting point of paraffin is barely higher than that of soy, but even taking a gamble and turning the iron up to high, I lifted practically nothing of this wax. It even still felt hard to the touch!
Method 2 (The More Aggressive Method): Boiling Water
The problem is that while a glass container can definitely hang out in a pot of boiling water without damage, your fabric might not be so sturdy. Hot water can cause vintage dyes, in particular, to bleed, a situation that might result in a fabric that, while wax-free, looks a LOT worse than it did with the wax on it!
Proceeding with great caution, then, boil a kettle of water. Set up a portable drying rack to suspend the fabric over a surface you're not afraid to get melted wax or boiling water on (I vote for your driveway or the sidewalk!), then pour a stream of boiling water directly onto the stain.
Your goal here is both to melt the wax with the boiling water and use the momentum of that stream of water to carry the melted wax through your fabric and out the bottom. This is a good method for my vintage table runner, in particular, because I can feel that there's even more wax clumped in the batting between its two cotton layers.
And this is the method that worked for me! I still don't know what type of wax was on the table runner, but the boiling water carried it completely away.
But remember when I cautioned you about pigments possibly being heat-set into your fabric using either of these methods? Yeah, the boiling water carried away all the wax, but it left a yellow stain. I'd be happy, regardless, because the stain is much less conspicuous than the wax, but I have a couple more stain-fighting tricks in my arsenal.
Bonus Method for Removing Wax Pigment
If your fabric survived a hot iron or boiling water, it's probably going to be fine with this method, but proceed cautiously and use your more conservative judgment, regardless.
Wet your fabric, then use your finger to rub this a really high quality stain remover into the stain. Do a quick wash on warm as soon as you've rubbed the stain solution in, then pull your wet fabric out of the washing machine and give it a look over. If it's still stained, rub in a little more stain solution, and then use your finger (you can use a glove if your fingers are tender, but I hand-wash dishes in practically boiling water daily without gloves, so...) to massage in a tiny bit of sodium percarbonate. Sodium percarbonate is an oxygen bleach that's generally color-safe, but still, this is a more aggressive technique, so be careful.
Again, do a quick warm wash as soon as you've applied the stain solution and sodium percarbonate. And again, pull the wet fabric out of the washing machine as soon as the cycle's complete and give it a look over.
If it's still stained, get your portable drying rack back out and set your fabric somewhere sunny for the afternoon. Be careful if there are other, vivid colors on the fabric that you don't want to fade, but otherwise, sun bleaching is extremely gentle on all types of fabric.
And, as I can attest, since it was approximately 20 degrees out when I sun bleached my table runner, you can sun bleach stains away even when it's below freezing outside! Your fabric will end up iced over... and stain-free!
I hope this assortment of methods inspires you to use all of your beautiful linens and quilts and table runners and napkins and doilies and such the way they were meant to be used, instead of hiding them away to save for a day that may never come. When I die, I don't know if my kids will even want these precious vintage fabrics that I treasure so much, but I do know that they're more likely to want them and treasure them if I actually use them, sewing them into the memories of their happy childhoods.
The balancing act is worth being able to paint all sides at once!
I discovered how cutely people were styling their loft beds while researching all the crap we needed to buy for our first-time college student. I am also going full-on dorm-style in her tiny bedroom at home, because it turns out that these dorm room kids have the best ideas for making the most of tiny spaces.
And her sister, who we're simultaneously moving into her own HUGE bedroom, also wanted the same kind of dorm loft bed, because she has all the hobbies and all the crap to go with those hobbies, so wants as much floor space as possible.
By dorm loft bed, I LITERALLY mean a literal dorm loft bed. I looked everywhere online and all the commercially-available loft beds either looked flimsy or were ridiculously expensive. But then Matt went to our local university's surplus store, spent two hundred dollars on four loftable beds that used to be in a dorm, paid another twenty bucks to a local machine shop to cut the steel pins you need to loft them, then a little more on a couple of 2"x4"s to make the braces for the lower half of the beds, and just like that we've got two loft beds and two metal mattress frames that I'm seriously considering using as garden trellises.
The teenager who is VERY picky about her room insisted that she wanted her bed painted black. I was extremely hesitant about this, but once Matt and I had finished the project, I had to admit that it looked good. Like, REALLY good.
So then I dragged the college kid's loft bed pieces out into the garage and painted those, too! And they also look good! Will I never cease learning about the wonders of a fresh coat of paint?!?
The next day, the teenager and I spent the afternoon listening to an audiobook of The Iliad (those gods cannot let the mortals alone to live their own lives for a single freaking second!) and touching up all the paint in her bedroom:
--and then while she was at ballet that night, Matt and I got her bed installed.
It holds a human!
It was also terrifyingly tall, though, so the teenager had to wait for me to order and receive a guardrail before she could actually sleep in it.
The college student's bed got assembled next, and now we're ready to style them!
Here's my dorm loft bed inspiration:
The benefit of buying dorm surplus is that these pics are all of the exact same basic bed that we now own. I love seeing what other teenagers have done with these beds!
Both of my own teenagers want their desks under their loft bed. I personally think it's too dim there even with supplemental lighting, but I guess if you've got the sharp eyesight of youth, you might as well take advantage of it! My older teenager has consented to shop our home and let me move the well-loved IKEA table that used to be in their playroom into her room, but the picky younger teenager remains picky, and even with the promise of a miraculous fresh coat of paint, none of the tables we already own suited her.
So we're still working on that, I guess.
Here are some other things that I think would be SUPER cute to style under their loft beds:
I haven't been to a garage sale since COVID, but I guess now I've got an excuse to get up early on Saturday, withdraw some cash from the ATM, and take a little tour around town... or at least I will when the weather finally stops being ridiculous. I'm ready to move Proper Spring, but the weather here keeps insisting on continuing to swing wildly between Second Winter and Swamp Spring. If this keeps up, I won't be able to get any decent yardwork done before Here There Be Tornadoes Month!
This post was originally published on Crafting a Green World way back in 2016.
Back in 2012, I showed off my Star Wars T-shirt quilt top to you. I told you all about how I'd constructed it over the past six months from thrifted Star Wars T-shirts that it had taken me years to collect. I shared details of the log cabin style that I'd used to piece it, and the color scheme that I'd selected that would enable me to best utilize my stash fabric.
I told you that for my husband's birthday, I planned to back the finished top simply with flannel, then quilt it.
When I said "birthday," I meant "anniversary," and when I said "planned," I meant that I would do it four years later.
Four entire years later, here is the finished quilt!
This quilt top has sat in my WIP pile for four years. We moved in that time, and I took it with me. We got a bigger bed, and I put off finishing it, dreading having to enlarge the quilt from a queen to a king. Several birthdays and anniversaries and Christmases passed, and I always found something else to give my husband.
And then the new Star Wars movie came out (and if you haven't seen it, it's WONDERFUL!), and suddenly, there was all this Star Wars fabric in the fabric stores!
Want to know a sure-fire way to get someone to finish a years-old WIP? Tell them that they get to buy themselves some new fabric to do it!
Although the rest of the quilt is sewn entirely from thrifted and stash fabrics, it turned out that some new fabric was just the inspiration that I needed to finish this project up. I toyed with the idea of using my new Star Wars prints in flannel and cotton to add a border around the quilt, thereby resizing it to fit our king-sized bed, but everything that I tried looked janky. Finally, I decided that I'd rather have a quilt that I like the look of, even if it's too narrow to fit our bed, than a quilt that fits well but gets on my nerves every time I see it, and I used that new fabric, along with some stash, to piece the quilt back.
Because I want to use the quilt in the summer, I didn't use any batting between the layers. I put the front and back right sides together, sewed almost all the way around, then turned it and edge stitched the entire perimeter.
The quilt isn't even technically a quilt, because instead of quilting it, I tied it at all four corners of every T-shirt piece.
Four years, my Friends, and in the end, this Star Wars T-shirt quilt took one day to finish.
I can't wait to see what I'm going to accomplish in another four years!
I'd been promising my teenager that after her big sister left for college, she and I could transform the kids' old playroom into a bedroom just for her, leaving her sister their shared bedroom to have during college breaks.
You will be unsurprised to learn that this project has spun wildly out of control.
I don't think that when I was a kid, kids generally had much input in the basic infrastructure of their bedrooms. I didn't choose the floor or walls or furnishings of my childhood bedroom, at least, and Matt says that he never did, either. So I'm quite enjoying the novel process of giving my teenager total control over how her bedroom looks. Forest green walls? Sure! Paint the built-in bookshelves black? Absolutely! You want a full-sized punching bag taking up a ton of floor space? Merry Christmas!
My older kid is generally uninterested in paint and floors and furnishings, as am I, so it's been fun to see how thoughtful this teenager is, how she has a very specific vision, and how she's mostly uncompromising about bringing that vision to life.
The project has also been a great excuse to get some long-needed repairs and renovations completed. Like, I literally learned IN LATE DECEMBER that one ought to deep clean one's carpets regularly:
Those exact same terrible carpets were also in the kid's bedroom and playroom, had been there probably since the early 1980s, and were equally as disgusting as the disgusting carpet in our bedroom.
Fun fact: that disgusting carpet is STILL in our bedroom, and still not professionally deep-cleaned, but redoing the kids' bedroom and playroom was a great excuse to hire a company to come remove that disgusting carpet, at least, and replace it with nice new bamboo flooring picked out by the teenager to match her forest green walls.
Well, guess which rooms had apparently had quite the termite infestation some years ago!
Just as our original home inspection hadn't uncovered the slow leak into the subfloor, it also hadn't uncovered the fact that several joists below the kids' bedroom simply didn't exist, there was so much termite damage. To be fair, the crawlspace below that room is only a few inches high...
Next time, we may need to request a home inspector who utilizes an RC car with a GoPro duct taped to it.
And the saga still isn't complete, because there were even more rotten joists next to the wall that faces our concrete porch, leading to the current theory that the concrete porch is funneling rainwater into the house's foundation. We're on the list to get that fixed later this Spring, fucking sigh.
But at least our brand-new floors look amazing!
The lavender bedroom walls requested by my college kid have to wait, seeing as we may have to have one of those walls rebuilt (fucking sigh!), but the forest green walls and black built-in bookshelves in my other teenager's room can start magically appearing right away:
I don't know why these SureSwatch stickers aren't available next to the paint cans in every hardware store, because they are WONDERFUL! I've been cutting each sticker in half and I think that still leaves plenty of room to stick them up and see if you like the paint color. As you can see above, my teenager went through a few rounds of paint samples before she found the one that worked best with the lighting and the floor.
And then all we had to do was make it happen!
A couple of takeaways:
1) I never want to paint built-in bookshelves again. It was miserable. They never ended. They're so tall, and also so short. And I nearly asphyxiated myself crawling into them to paint the insides because they're also so deep. Hate. Hate. HATE!!!
2) Even though this house was in rough shape when we bought it, we nevertheless pretended like it was move-in ready and did not change a thing. Kept the yellowed paint in all the rooms, kept the peeling vinyl floor, kept the thirty-year-old carpet, kept the toilet in our bathroom that was on its own homemade pedestal to give it that DIY ADA compliance vibe.
And then, of course, I just spent the next seven years complaining. The floors are terrible. The carpet is terrible. Why is the toilet so tall? Whenever we leave the house closed up for a few days, why does it always smell so musty when we come home?
Y'all, I think that musty smell was the WALLS! After painting this stain-blocking, mold-resistant primer (recommended by our construction guys!) over that yellowed playroom paint, the house has not had that musty smell since. So next time I move houses, no matter how lazy I am, I WILL repaint!
As of now, the college kid and the teenager both have new flooring. The teenager has fresh paint, and this beautiful view from her bedroom into our newly-fenced front yard:
Beds are the current saga. Matt bought four super cheap dorm beds from our local university's surplus store, then hired a local machine shop to cut the required steel pins to the correct size to enable us to loft them, then cut a 2"x4" down to make a brace like the one in this picture:
And then we hauled them outside to lean them most elegantly against the basketball goal so we can paint them to the teenager's specifications, too:
The painted beds are actually looking amazing, so I'm glad that we put forth the effort.
The teenager didn't help, though. She conveniently had to study for her Intro to Baking final exam, humph.
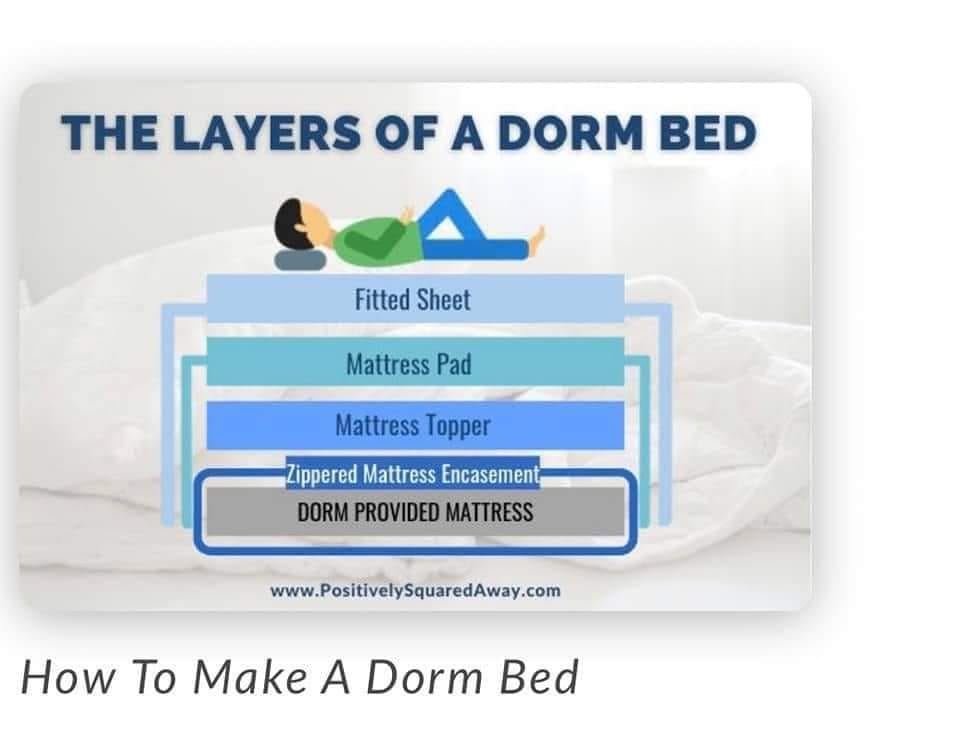
The Dorm Chatter folks also recommend shelf liner between the mattress and topper to keep everything from slipping. I did that with my college student's dorm bed, and everything has stayed put perfectly and she reports that her bed is super comfy!
Since the kids' new loft beds are just surplus dorm beds, I'm doing the same thing. Here are my Amazon purchases, scheduled to arrive hopefully in the nick of time before my college kid gets home for Spring Break, so she doesn't have to sleep on the couch:
Mattress Topper. Goes on top of the standard mattress to make it either softer or firmer, depending on what you prefer. My college kid really likes the one I put on her dorm mattress, so I went ahead and bought two more for the kids' new mattresses, since Matt bought the cheapest mattresses he could find and gave me no input to make sure they were the comfiest possible for my precious babies (ahem).
Mattress Pad. This goes on top of the mattress topper to protect that non-washable surface from whatever you might get on it, whether it's soda or sweat or menstrual effluvia. I actually didn't know that these existed until Dorm Chatter opened my eyes, and then I bought one for my bed, too!
Fitted Sheet. My little Gen Z-ers are typical for their generation in disdaining flat sheets, so I don't even argue anymore and just buy them fitted sheets. It's weirdly hard to find all-cotton fitted sheets here in the Year of Our Lord Microfiber, and I've actually already had to return a whole order of sheets that I thought were going to be cotton but weren't, grr.
My picky teenager is certainly going to want to pick out new blankets and pillowcases in her preferred colors, too, but fortunately my easygoing college kid will be satisfied with the approximately one thousand blankets, quilts, and afghans that we already own.
And shit, I just realized I forgot to buy the bed rails for these five-foot-tall loft beds! Okay, back to Amazon I go...
.jpg)


%20(1).jpg)


.jpg)
.jpg)
.jpg)


.jpg)
.jpg)
.jpg)
.jpg)
.jpg)
.jpg)
.jpg)