Saturday, December 19, 2020

How to Sew a Reversible Skirt

I originally published this tutorial on Crafting a Green World.

It's business on one side, and a party on the other!

Or in this case--it's Girl Scout khaki on one side, and pretty pink on the other!

My kiddo wanted a dressier version of her Girl Scout uniform, but I also know good and well that she is simply not going to wear a khaki skirt for any reason other than a dressy Girl Scout occasion. I'm not one to enjoy sewing something that will get little use, so yes, I made her the khaki skirt that she wanted, but I made it reversible, with some pink prints from my stash that I know she'll enjoy wearing every other day.

Want to make your own reversible skirt? It's not hard, and it's a great stash buster!

You will need:

up to 2 yards of two different fabrics. I'm afraid that I went overboard and sewed this skirt too large, but to be fair, Girl Scouts wear those khaki uniforms from the 6th grade until they graduate high school and bridge to adults. It was boring enough to pick out khaki fabric the first time--I don't want to do it every year until my kid graduates! This particular skirt used two fabrics that were 22" x 72", but I could have halved both measurements and still had a fine skirt for an eleven-year-old.

1/2" elastic

measuring and sewing supplies.

1. Measure and cut two identical skirt pieces. Each should be the desired length of skirt + 1.5" and the desired width (two to three times the wearer's waist measurement) + 1.5". To make sure that the two pieces are absolutely identical, I like to lay one on top of the other and cut them simultaneously.

2. Measure and mark the hem/waistline. You will overlap these skirt panels when you sew them together, with one skirt panel folded over the other to make the skirt's hem, and the other skirt panel folded over to make the skirt's elastic waistband casing. You will see, then, a different-colored bias hem on one skirt and a different-colored waistband on the other.

Measure and mark 1.5" from the bottom edge of the skirt panel that you'd like to use for the bottom hem, and 1.5" from the top edge of the skirt panel that you'd like to use for the elastic waistband casing.

3. Sew both skirts. Sew each skirt panel into a tube by sewing the short sides together and finishing the seams.

4. Sew the hem and waistband. Place the two skirt pieces wrong sides together, and overlap them by 1.5" inches. The skirt that will be folded over and sewn to make the bottom hem should overlap the other skirt piece by 1.5" at the bottom, and the skirt that will be folded over and sewn to make the elastic waistband casing should overlap the other skirt piece by 1.5" at the top--the marks that you made in step 2 should help you with this.

Fold the bottom hem up, crease it, then fold it again to the inside and edge stitch it, encasing the raw edge of the other skirt panel.

Turn the skirt inside out, then fold the top waistband hem up and crease it, then fold it over again and edge stitch it down, leaving an opening to insert the elastic.

Attach a safety pin to the elastic, feed it through, sew the ends together, and sew the opening in the casing closed.

And now you have a reversible skirt! You can use this method to alter the matching skirts from this tutorial, and outfit a whole troop of Girl Scouts.

Friday, December 18, 2020

My DIY Rainbow Sierpinski Triangle Quilt


I'm probably supposed to tell you that the best thing I've ever made is my children. 

And don't get me wrong, because they're super great, but 1) I'm pretty sure that they actually made themselves out of nonsense, candy, and pig-headedness; and 2) they are NOT a completed rainbow Sierpinski triangle patchwork quilt!

I LOVE this thing. It's, like, the perfect distillation of most of my favorite things: colors lined up nice and orderly, sewing, math, and picky little details that it's almost but not quite possible to get absolutely perfect.

If only I could somehow combine it with reading, cats, and hot chocolate spiked with matcha and Bailey's, I'd be gone right now because I'd have reached Nirvana. Oh, and literal Nirvana would be there playing for me, too.

When you last left me thisclose to Nirvana, I had completed the beautiful rainbow quilt top. I was pretty pleased with myself for being so far ahead in my homemade Christmas gift game that I then complacently did other things for a month, then was all, "Crap! Christmas is this month and the Incompetent Narcissist in Chief has made a shambles of the post office! I should probably get my gifts in the mail so that I can start fretting about them being lost in the mail!"


To finish my rainbow Sierpinski triangle quilt, I sewed a .5" sash to the perimeter, added a cotton batting layer, and then backed it with one piece of black Kona cotton (I LOVE extra-wide fabric!). I added an extra 2" to the backing fabric on all sides so that I could make a back-to-front binding on the quilt. 

I really, really, REALLY struggled with what thread color to use for quilting--first-world problems, amiright? I consulted my teenagers, who were sarcastic and unhelpful--thanks a LOT, Kids!--and with Matt, who was probably helpful but I didn't like anything that he said. I finally decided to stitch-in-the-ditch around every triangle with white thread on the top and black thread on the bobbin...


...and now what I wish I'd ACTUALLY done was use black thread on the top and bottom and only stitch-in-the-ditch around the black triangles. The problem is that I don't super love the look of quilting--gasp, I know!--and I always want the lowest-profile, least-distracting-to-the-patchwork method. 

It might have worked if I wasn't shitty loose with my stitching in the ditch, but I don't like seeing the white thread breaking up my rainbow triangles:


Oh, well. It's done now. And I'd probably be a little sad if I didn't have an excuse to make another entire quilt just to have another go at one small and fiddly detail.

Anyway, what I actually feel is total love for the pretty quilt that I have accomplished! Here, have some more photos of it!


I am 100% going to make myself one of these now, both as an excuse to make it even more perfect this time, and because *I* want one! And then I'm probably going to list one in my Pumpkin+Bear etsy shop, because I quite enjoyed the challenge of sewing this and wouldn't mind making some more.

I think I want to play with different rainbow patterning to see if I can achieve true rotational symmetry, and I might see if I can come up with a more creative rainbow pattern than just rotational symmetry, as well. I also sort of want to buy this coloring book and try to recreate some of the mathematical patterns in it, because if Sierpinski triangles make an awesome quilt, then what else might?!?

And I am for SURE going to try quilting my next one with black thread on the top and bottom. My new rule of thumb is that whenever I'm debating between black thread or not-black thread, I should choose black thread.

Thursday, December 17, 2020

DIY Hot Chocolate Bombs, Because Bonding with Teenagers. And Also Chocolate.


"I just don't know why my body is falling apart this year," I say to no one as I sip my pre-dinner hot chocolate...

Or, you know, eat my after-breakfast cookie...

Seriously, I don't even know if what I'm consuming at any given moment is a depression snack, pandemic snack, or holiday treat. Some ever-evolving combination of all-three, I'd guess.

I blame it entirely on my children. If it was just Matt and I, our kitchen would contain nothing but lunch meat, sliced bread, apples, peanut butter, and store-brand Pizza Rolls. Well, and alcohol, because we have nobody but ourselves to blame for 5:00 Cocktails and Crossword Puzzles. But with one kid who's an adventurous eater, one kid who seems to cruise Instagram Reels looking for the latest on-trend cooking project, and my parental obligation to feed them vegetables and protein and, like, calcium and whatever,  and make a pandemic suck as little as I'm able to while everything is sucking SO MUCH...

Let's just not think about it right now. Instead, let's make hot chocolate bombs with Syd!

These turned out so perfect and so cute, and were super easy, too! I highly recommend them as a fun project to bond with your kid, and they would definitely make good handmade holiday gifts.

You will need:

  • chocolate or candy for melting. I used straight chocolate chips, because apparently I'm basic, but Syd, who's weird in that she loves hot chocolate but hates "food" chocolate, used candy melts and they worked just as well. As a bonus, she used Funfetti candy melts, and the resulting hot chocolate bomb is ADORABLE.
  • basting brush. We have a silicone one that we got god knows where, considering how anti-silicone I used to be when it came to food-related items, but dang, is it easy to clean after getting melted chocolate ALL over it!
  • hot chocolate mix. Use some kind of powdered mix. Most years, I make my own from cocoa powder, sugar, and powdered milk, but not gonna lie--this year, we're drinking a store-brand mix and honestly, the kids probably like it better.
  • marshmallows. You've gotta have some mini marshmallows or it ain't a real hot chocolate bomb!
  • silicone or other flexible mold. This item seems to be the sticking point for most people to be able to make hot chocolate bombs. Silicone sphere molds are hot sellers right now! You don't have to have that exact item, however. Here's a short round-up of stuff that you might have that would work equally well:

The only two qualities that your mold requires are that it 1) is flexible, so you can peel it away from the chocolate shell without cracking it, and 2) is large enough that it can hold the hot chocolate mix and a few marshmallows.

1. Make your candy shells. Melt your chocolate chips or candy melts in the microwave, because you're still being just that basic. Stop to stir them every 20 seconds or so until they're nice and liquid.

Using a basting brush, coat two identical molds with the melted chocolate. Syd got hers right the first time, but I had to put a second coat on my shells because I made them too thin the first time. To be honest, I got overexcited and probably made them too thick that second time, but they still dissolved in the hot milk.

After you've coated the molds, put them in the refrigerator for about five minutes, until they've solidified and feel cool to the touch. At that point, you should be able to carefully peel the mold away from the chocolate. It's a little fiddly, so if it cracks just try again until you've got the hang of it. 


2. Fill one half of the mold with hot chocolate mix and marshmallows. Pile it in and mound it up, if you need to, because when you fuse the two parts of your hot chocolate bomb together it will have twice the space inside.


3. Fuse the two halves of the hot chocolate bomb. You can do this a couple of different ways. On TikTok, everyone seems to like to hold one half of the hot chocolate bomb edge-down on a hot surface, then stick it to the other half, but Syd and I both first used a knife to trim away any jagged bits from the edges of both mold halves, then we simply stuck them together and painted more melted candy across the seams until they were fused together and all sealed up. Since you only have to put the molds in the freezer for a few minutes before you can fill and seal them, the candy we'd originally melted to make the shells was still liquid enough that we could also use it to paint the seam closed, and it was super easy.


And look how cute they look! At this point, you could drizzle the finished hot chocolate bomb with more melted chocolate, then add sprinkles, more mini marshmallows, or crushed peppermint, but Syd and I both decided that our hot chocolate bombs were pretty enough as-is (and anyway, we were ready to drink them!).


To use the hot chocolate bomb, you just literally pour hot milk over it. But make the milk really, really, REALLY hot! The hotter it is, the easier the hot chocolate bomb's shell will melt, and anyway, you're going to sit there and admire the whole thing for a few minutes before you even think about drinking it, and nobody likes lukewarm hot chocolate.


Check out how delightful it is!

If you've got teenagers AND the opportunity to make them squeal with happiness, take that opportunity!

Sunday, December 13, 2020

All The Christmas Crafts

This is a repost of a round-up that I wrote in 2014. I recently decided to make it the home base for all of our Christmas craft tutorials, so I added all the ones that I've written since 2014. Because whether you're big or small, Christmas is a great time to drag out the craft supplies and bond with your family over popsicle sticks and hot glue guns!

One of the reasons why I enjoy blogging is the feeling of re-discovering an old post, especially when it's something that I've otherwise forgotten completely about. That time when Syd painted the wall with peanut butter. The day that Will threw a fit in a modern art museum. A glimpse of her protectiveness toward her sister.

This particularly applies to Christmas crafts, since they're often done and displayed within the day, and I don't tend to keep them for the next year (gasp, I know!). So, in honor of Christmas Recipe Day and Christmas Craft Day and Christmas Ornament Day on our Advent calendar, and my deep desire to save some time and avoid reinventing the wheel, here's my definitive round-up of all of my Christmas crafts that I can unearth:


Big stars are tree toppers, and little stars are ornaments!


In my opinion, those clear glass baubles exist solely to be filled with cuteness.


There's scope for making any kind of art that you want to illustrate these ornaments.


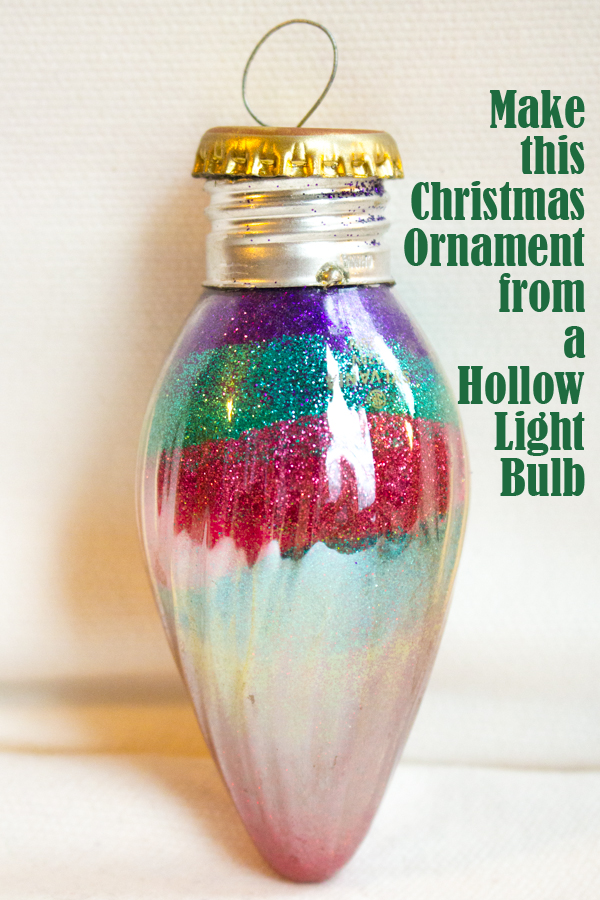
This one uses a hollowed out light bulb as a base for a regular filled ornament.


This is a fun process-oriented craft... and it's good for using up the last bits of various paint pots!


I was surprised at how much effort Syd put into this project. It turned out stinkin' adorable, too!


Do you love a puzzle that has some missing pieces? Turn your favorite perfect sections into ornaments!

cinnamon dough ornaments

This might be my favorite Christmas craft. We make them every year.


This is a super fun, super messy, VERY hands-on craft.

Icelandic laufabraud

The kids made this for their Geography Fair project in May, but it's actually a Christmas recipe!


When teenagers choose the Christmas craft...

dipped pinecone ornaments

These are crazy pretty, and they last for freaking ever. I'm partial to the crayon-dipped ones.

popsicle stick ornaments

The more glitter, the better!

waffle cone Christmas trees

These are quicker and easier to make than gingerbread houses.

sticker Christmas cards

These were dead easy for me to organize and for the kids to make, and I think that they turned out really cute.

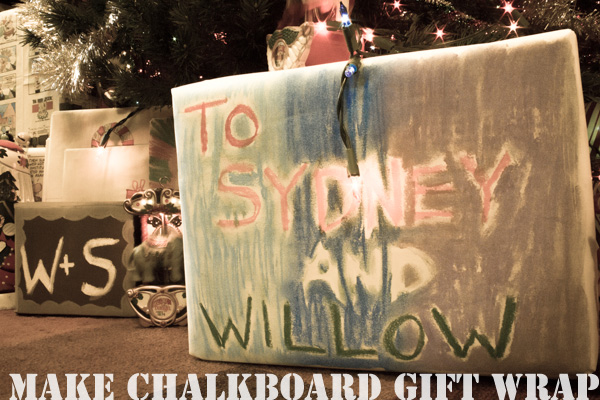
chalkboard gift wrap

This is especially fun, because you can do it right on brown paper (I do a lot of wrapping in brown paper bags).

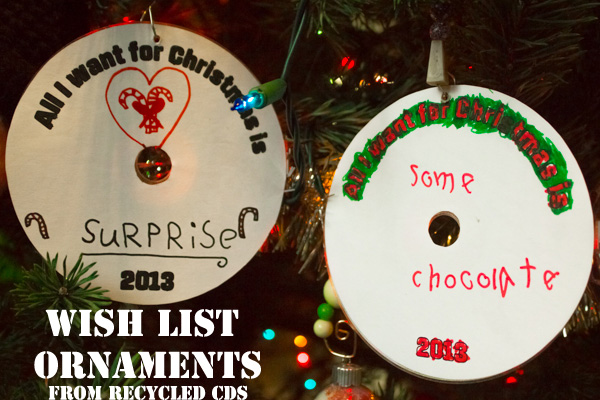
upcycled CD wish list ornament

Some parents don't like it when I bring this project to our ornament crafting party, but I think it's cool to remember what the kids wanted most each year.

painted popcorn garland

The look cute even when they're plain, but if you've got some teeny spritz bottles, you can make them really special.

beeswax ornaments

I think that these would look even cuter poured more thinly, so I'm going to have the kids try that this year.

gingerbread houses, steps one and two

I don't go through all this trouble every single year, but when I do, this makes the most EPIC gingerbread houses of all time. I'm going to do it this year.


Starting with a coloring book of ornaments made this a super-easy toddler/preschooler craft.

overhead projector Christmas tree

It's been a while since we've whipped out the overhead projector--we pretty much only use it now for tracing images that we want to be large--but there was a time that this puppy could save any dreary day for me!

collage window card

This required parental wielding of the x-acto knife when the kids were littler, but their random selection of collage papers, and their distribution, looked quite artistic.

coloring page Christmas ornaments

If you've got a scanner, so that you can shrink down regular coloring pages either before or after the kids have colored them, then you can use pretty much any image here.

painted wooden Christmas ornament

This is another easy one for littles. You start with those wooden die cuts that you can get most places, and they don't even have to be holiday-themed--we've got some pretty sweet dinosaur ornaments on the tree, thanks to this craft!

used sandwich bag ornaments

The first time that we did this, the kids weren't old enough to iron. They like this project even more now that they can!

record album cover ornaments

These are so fun for the kids, now that they have the hand strength to cut through cardboard.

felted sweater stockings

I made these, but the kids definitely have the sewing skills to do this now.

Whew! Honestly, I don't even think that these are the entirety of all the Christmas tutorials that the kids and I have done over the years, but I've got to go take a shower, then put Syd's hair up in her flat performance bun, then get the kids to gather up all the stuff that they'll need for the rest of the day and evening (ballet uniform, quiet  activity, school work, water bottle, and packed dinner for Syd, and aerial silks uniform, fat check for her recital costume, library books to return, water bottle, and packed dinner for Will), then drive them to Girl Scouts Co-op, then come back home and work out real quick, then drive back and pick them up, then drive Syd over to Matt's office and drop her off, then take Will to aerial silks, then take her to the library for LEGO Club, then go home and make and mail an etsy order. 

And oh, hell, I just this second got an email from the ballet department saying that the kid's got to bring foundation to her dress rehearsal tonight. Whatever kind of make-up foundation is, that's what I'm going to be buying instead of working out this afternoon.