Saturday, April 10, 2021

Make a Pegboard Cookie Cutter Holder

 This tutorial was originally published on Crafting a Green World.

Trying to store a bunch of cookie cutters is the pits. For several years, I'd been using a drawer underneath our kitchen table to hold our cookie cutters, because that's where they all seemed to fit on the day that I first unpacked them. Of course, we've acquired more cookie cutters since then, dragons and castles and Girl Scout trefoils, and not only did they no longer really fit, but the kids were unconcernedly smashing them in their overarching goal of simply getting that drawer closed again whenever they dared to open it

 Also, we had to dig through the whole thing just to find, say, the big snowflake, or to see if we had a star that would make a good size for a cookie wand topper. 

 Fortunately, our kitchen also has a large, accessible, and out of the way space above the kitchen cabinets. My husband and I turned the whole area into an easy open storage system just for cookie cutters, and I couldn't be happier with it. 

 Here's what you need to make your own! 

  pegboard. Pegboard, otherwise known as perforated hardboard, is a decently eco-friendly choice of material. It's generally made of sawmill waste or other residual wood fibers, is adhered with resin, and doesn't tend to contain formaldehyde. That being said, it's a good rule of thumb to always know the provenance of your materials, so that you can double-check that you approve of the manufacturer of the specific pegboard that you're looking at. 

  pegboard pegsYou can buy all kinds of cute varieties of peg; just make sure that you're buying the correct size for your pegboard. 

  wood glue (optional). I had this at hand,  but my dowel pins fit so snugly that I didn't need them. In fact, I had to use a rubber mallet to tap the dowel pins into the pegboard, they fit so well. 

  paint. Spray paint is not great for the environment, but I'm selective in my use of non-eco-friendly materials, and painting all of those little dowel pins and all of that square footage with all of those little holes? Yeah, I used spray paint. To make the project more eco-friendly, choose a brush-on zero VOC paint, perhaps with a paint sprayer

  wall hanging supplies. We tapped in nails at the corners of each pegboard, but you use the method that you prefer. 

 1. Cut the pegboard to size. Adjust your sizing a little so that you cut between the rows and columns of perforations. We had to piece together three sections of pegboard to cover the entire space that I wanted, so we had the additional annoying job of trying to cut the pieces so that the holes would line up perfectly across them. If you can accurately bisect the rows and columns, it works, but ours were a little uneven, so I just hung them to be even, and I didn't care if their tops didn't perfectly line up. 

  2. Add the pegs. Take your time so that you can figure out a pattern for the pegs, then push them in so that the back of each peg is flush with the back of the pegboard. I actually brought some cookie cutters out to the driveway so that I could test how they'd look with various spacing. 

 3. Paint the pegboard. I did my painting out on the driveway while my kid was running a bake stand out by the road and the drive-in next door had just opened for the evening--it was an absolute circus. Pro tip: if you want everyone in the universe to look at you, paint something weird in your driveway and then get people to drive by. Bonus points if you're also taking pictures as you work, because that's apparently also REALLY interesting to look at. 

 4. Mount the finished cookie cutter holder. This was too high for me, so my husband did the mounting while I stood below and assured him that he was NOT lining the perforations up correctly. I'm the only person who can tell, though, so whatever. 

 I LOVE our cookie cutter holder! 

The cookie cutters would look tidier if I'd hung them all myself, but the kids actually really wanted to do it, and who am I to stand in the way of a child wanting to do a chore? It reassured me, as well, that both kids can reach even the tallest cookie cutters with our step stool, so they can still bake independently. And we're all baking more, for the time being, while the ability to see what cookie cutters we have is still a novel thing, and the kids have rediscovered cute shapes that they'd forgotten we had. 

 It may not be great for our ideally anti-consumerist stance, however, as the kids have also figured out what cookie cutters we DON'T have and apparently desperately need. We don't have a dog cookie cutter, for instance, nor a cat one. The horror! It's possibly time to try out that DIY cookie cutter tutorial that I've been eyeing for a while now...

Thursday, April 8, 2021

On the Sculpture Trails

A few weeks ago, I had the idea to compile all of my random and many must-dos of Indiana into a single Google Map. Not that we're actually visiting any of those scattered museums and doughnut shops and used bookstores and historic homes right now, sigh. But soon, hopefully!

And if nothing else, also putting all the state parks and locations of interesting waterfalls and public caves and land preserves on the map has helped me be more creative when figuring out spots for family hikes. 

That's how we ended up at Sculpture Trails on the most beautiful day of last week. It's absolutely absurd that this was the first time I'd ever been there, as not only is it nonsensically close to where I live, but the kids and I used to carve scratch blocks for their aluminum pours back when they'd hold them at our local hands-on science museum almost a decade ago. So the fact that it took 13 months of a global pandemic to get me there is a little bit bonkers. Thank goodness for my hand-keyed Google map, I guess!

I was too excited at being out and about with family and friends to think any interesting thoughts while I was there, so instead here are all the photos I was delighted to take out there in the sunshine:


Because ultimately, everything is really all about me, I'm now feeling like my property needs more lawn art! Like, maybe not cast iron sculptures, but I could totally DIY something like this out of plywood and spray paint, right? Wouldn't it look lovely in my woods, perhaps just barely visible from the drive-in but only if the light is right and you happen to be standing in just the perfect spot?

Is there a line between "outdoor art installation" and "Dang, that lady's yard is tacky!", and if so, how does one come down on the correct side of that line...

...or even decide WHICH side is the correct one, lol?

Monday, April 5, 2021

Easter 2021: The Lowest of Keys

I experimented with staining an egg, and I LOVE it, and painting one galaxy-themed, which... well, I can say now that I've done it!

Over the weekend, I spent some time looking through old blog posts, reminiscing about Easters past, and whoa. Last Easter was the most high-key celebration we have EVER had for that holiday! Like, we did more for Easter last year than we did when the kids were toddlers! We dyed eggs and painted eggs and sewed eggs out of felt, I modeled an egg out of plaster of Paris, my partner built an entire MACHINE for egg decorating, I... BAKED AN ENTIRE LITERAL CAKE.
I get it, man. This time last year, I was absolutely beside myself with anxiety, and Easter was a darn good distraction. The kids were reeling from the cancellation of all their fun extracurriculars and every last out-of-the-house activity on their schedules, and, again, Easter was a darn good distraction.

This year, I'm still absolutely beside myself with anxiety, but that's old news by now. The kids, even though all their fun extracurriculars and most of their out-of-the-house activities are still cancelled, have a new normal. The younger kid's life is full of public school busywork, and the older kid's got plenty of her own, more meaningful (ahem) academic deadlines. 

So what did we need in this little break before nine pages of biology worksheets that won't be on the test, AP exam prep, and assisting with nonsense biology worksheets and exam prep and my own work?

We needed nothing, mostly, other than to hang out on the couch together. Or the back deck, in the shade. Or the driveway, in the sunshine.

To be honest, I might have gone overboard a bit on the traditional Easter Basket Clue Hunt. It took the kids upwards of 40 minutes to solve all the clues, oops, and one of them, I'm pretty sure, was long ready to say the hell with it and let the baskets be uncovered in their own time. But how can one prove one's worth for an entire basket of candy and small presents if one doesn't decipher and then follow clues that lead one from the refrigerator to the trampoline to your own bed to the bird feeder to the aerial silks rig to the car to the tree house to the bookshelves? What is Easter without computer research to find a specific Dewey Decimal number, or half an hour rifling through the car to find an Easter egg hidden in a secret compartment that you 100% did not know even existed in that car?

Sunglasses compartment? How is that even a real thing?

In my family, gummy bunnies and chocolate eggs and fuzzy socks and ponytail holders and geography coloring books are only for the wisest, the bravest, and the most daring.

Also, Peeps bunnies that I hand-sewed from felt. I had to put in just a little bit of high-key effort, lol!

I was not able to talk everyone in the family into coming together to make an Easter-themed meal. I had big dreams of everyone choosing some tacky, Easter-themed menu item--bread shaped like a bunny with a hole cut out of its tummy for dip, perhaps, or Jello poured into plastic Easter eggs to set--but nobody else had the same enthusiasm, so we got by with our old standards of canned cinnamon rolls shaped to have bunny ears, and, for the adults, morning mimosas and evening Baileys drunk out of hollow chocolate rabbits.

I also wasn't able to martial the kids to dye Easter eggs with me, even though they had expressed enthusiasm for the project long enough for my partner to get the eggs hard-boiled. Come to think of it, I'm actually pretty sure that was just a ruse to get enough hard-boiled eggs into the house that I feel like I have to make egg salad, a favorite of the kids that I rarely make because I detest peeling the eggs.

I was able to get everybody onto the back deck to paint wooden eggs, however! One must take one's successes wherever one can get them!


It is VERY important that I watch Jesus Christ Superstar on Easter, and usually I can wheedle another person or two into watching it with me. I tested everyone's patience even more this year by insisting on watching this Swedish arena production that I'd heard had some interesting acting choices for Jesus and Judas:


It DID have some interesting acting choices! Of course, it was also in Swedish... When the younger kid complained, I was all, "Well, I could always sing the lyrics along with them in English," and she was all, "Oh, yeah? Why don't you, then!"

Joke's on her, because I did! 

It's REALLY fun to hang out with me.

The fun thing about having emphasized the creation of handmade eggs for the kids' entire lives is that by now, we have a LOT of eggs. 

A LOT. OF EGGS.

My partner had the genius idea to actually, you know, *count* the eggs as he hid them this year, and... yeah, he hid 120 of them.

Unfortunately, after a full ten minutes of hunting--


--we only got back 109. Oops!

I guess we'll have a fun side quest while we mow the lawn this summer!

Some Easters, it's pouring. Some, it's freezing. Some, there's a global pandemic going on but at least the weather is gorgeous, sunny and warm, and when one finishes one's quest for Easter eggs (or, rather, gives up on one's quest for Easter eggs, as there are still 11 unfound eggs out there!), it's especially nice to just lie down on the warm driveway, a cat or two under your arm, and savor a day with nothing important to do other than eat candy, paint wooden eggs, and watch TV with your mom:


And if your Mom sneaks the opportunity to get the first family portrait she's managed since October--


--Well, every holiday has its own magic.

P.S. Want to follow along with my craft projects, books I'm reading, road trips to weird old cemeteries, looming mid-life crisis, and other various adventures on the daily? Find me on my Craft Knife Facebook page!

Saturday, April 3, 2021

How to Refinish a Clock with a Coloring Page

 This tutorial was originally published on Crafting a Green World.

If you can get a clock with a dragon on it, always choose the dragon clock. Dragons are awesome. 

 But if you can't get a clock with a dragon on it--if ALL the clocks at the thrift store are boring and beige and dragon-free--then just choose one of the boring clocks, take it home, and put a dragon on it yourself. 

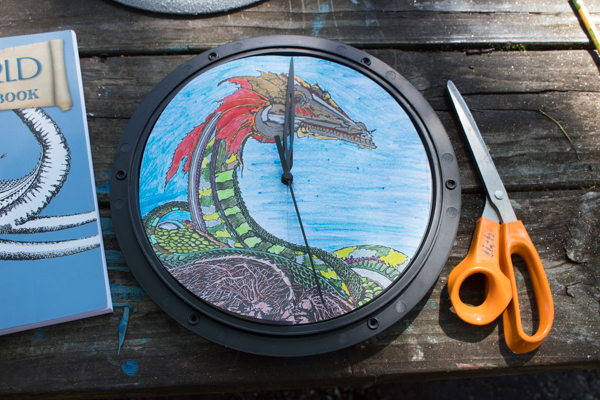
 This particular clock cost me a whole dollar at Goodwill. It wasn't exactly beige, but it wasn't anything special, either. I refinished it with my special secret paint method (which I'll share with you in a minute!) and a completed coloring book page, and now it's my new favorite thing. 

 Want to make your new favorite thing, too? Just follow along! 

 You will need: 

  clock. It should be in working condition, with a flat face (ie. no sticky-uppy numbers) and an accessible one--flip it over and look for the screws attaching the front to the back. If you can reach them, you can probably dismantle your clock, refinish it, and reassemble it without too much fuss.

  coloring page. You can also use scrapbook paper or wallpaper, of course--just make sure that your paper is acid-free, if you don't want to have to change it out every few years. 

  paint. As you'll see in a minute, I'm using three different paints on this clock: primer, a stone texture paint, and a silver glitter paint. It's what I needed for the exact effect that I wanted, but you can use whatever paint you prefer, as long as it will work on the surface of your clock. Plastic, for instance, will need a primer designed for plastic. 

  miscellaneous supplies. pencil, scissors, white glue and paintbrush, etc.  

1. Disassemble the clock and refinish the frame. Do NOT lose those little screws! This clock was intended for my kids' bedroom makeover back in 2017, which they have requested have a Medieval fantasy castle sort of theme. We're not going too far overboard, but we are painting their walls grey, displaying my older daughter's sword and dragon collections, and adding some small touches, such as this clock whose frame I wanted to look like it came from a treasure trove. 

 To get the effect, I primed the plastic frame, then sprayed it with two coats of stone texture paint. When that was dry, I sprayed it with two coats of silver glitter paint, making the whole thing super sparkly and mysteriously like a vein of silver torn from the rock. I've since also done it to a picture frame and a light switch cover, both also intended for the kids' bedroom, and they've all come out looking amazing. 

  2. Prepare the new paper background. To fit with the fantasy castle theme, I used a completed coloring page from the Tolkien's world coloring book. You can use any paper you'd like. Use the frame to help you trace a template of the clock face onto the coloring page, then cut it out. 

 Gently set the page on top of clock and mark the center; cut from the edge up to the center, then cut a hole in the center to accommodate the clock's stem. 

 3. Glue the new clock face down. Gently peel up the paper in sections, and paint the back side with a thin layer of white glue; press it well so that it doesn't bubble. 

 My hands are filthy because I was also working on the second coat of those grey walls. The kids were off at sleepaway camp, and I wanted to surprise them with their new room when they got home! 

  4. Reassemble the clock. This will probably involve cleaning the glass front of the clock, and then putting it all back together. 

 You can do other cute things with the clock face, of course, such as adding number stickers or stencils or decoupaging several different papers onto it, but double-check the placement of the clock hands, first--the minute hand on this particular clock was sooo close to the clock face that there wouldn't be room for more layers of paper and Mod Podge.

Thursday, April 1, 2021

How to Make a Glittered and Embossed Easter Egg


This is a fun Easter craft to do with giant Easter eggs! I created this last year when I was on a Zentangles kick, but I think it would work well with any kind of design, abstract or realistic.

I use the largest wooden eggs available from Casey's Wood Products (and I buy them in bulk, because the younger kid, especially, LOVES to decorate wooden eggs and wooden peg people), although I've seen larger plastic Easter eggs, and I'm sure you could upcycle those, or even use papier mache Easter eggs exactly ("egg-sactly"--UGH, I can't stand myself!) the way that you do these wooden ones.

To make the glittered and embossed Easter egg, first you draw a design directly onto the egg. With my wooden Easter eggs, I draw the design on in pencil--


--but if you were upcycling a plastic Easter egg, you should use a Sharpie.

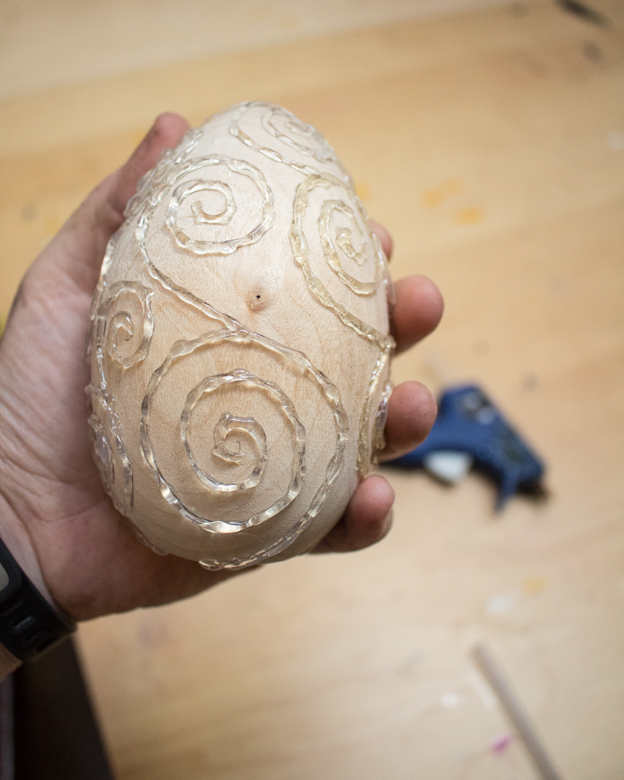
Next, trace over your drawing with hot glue:

Try to do a better job than I did keeping your lines even by keeping the pressure on the glue gun's trigger nice and steady. You might want to practice on cardboard first.

I sure should have!

Pull off all the little hot glue strings, then use spray paint to prime and paint the egg a base color. This is basically the same thing that the big kid and I did when we made our spooky potion bottles, but then, because we were going to mess with the embossing a lot more, we painted on the base layer and THEN did the hot glue. 

OMG I just realized that you could make these EXACTLY (egg-sactly!) the way you make the potion bottles! Hello, spooky embossed Easter eggs!

Okay, pace yourself, Julie. Finish this blog post, wash the dishes, edit your kid's English essay, answer a zillion emails, go to your Zoom meeting, and TOMORROW you can make spooky embossed Easter eggs.

ANYWAY, you want that base layer to be a color similar to the color of glitter spray paint that you're using. For one thing, it adds depth, and for another, it'll hide any thin spots if you don't do a perfect job with the glitter spray.

Spray this glitter spray OUTSIDE (I feel like you were already outside; I mean, you just spray painted your egg and I hope you were outside for that, but seriously, this glitter spray means business!), let it dry for the recommended time period, and then admire your beautiful Easter egg!


I hate that you can't see how awesomely sparkly this Easter egg is. Here, though--I'll zoom in, and you can see all the billion bits of glitter that make it so sparkly:


It's. So. SPARKLY!!!

I've mentioned before that we are fierce, ferocious, take-no-prisoners Easter egg hunters at our house, and so pretty, precious-looking eggs like these aren't for Easter egg hunts, because I would be absolutely beside myself to lose this, then hit it with the lawnmower five months later. 

Honestly, the lawnmower wouldn't be that excited, either. This baby is BIG!

P.S. Want to follow along with my craft projects, books I'm reading, road trips to weird old cemeteries, looming mid-life crisis, and other various adventures on the daily? Find me on my Craft Knife Facebook page!

Monday, March 29, 2021

Cooking with Teenagers: Fancy Coffee Drinks

 Sometime during the pandemic, one of my kids became a coffee drinker.

She's a teenager, so it's not, like, "real" coffee, or rather, not anything like the black coffee that I drink out of my French press every morning. Instead, her mid-morning coffee break consists of a carefully crafted beverage that does contain a goodly amount of either instant coffee or cold-brew, but also has so much sugar and milk in it that when she sometimes makes me a cup, too, because she's a generous kid, it tastes exactly like coffee candy in liquid form.

I don't know, you guys. Was I supposed to forbid her coffee until she's all grown up? I feel like maybe I was, but ugh. There is just so much to remember about being a parent! 

Anyway, it's more fun to find fancy coffee drinks on social media and make them with her.

You guys! I know this half-drunk mess in a Mason jar does not look appetizing, but it is that whipped coffee all the...

Posted by Craft Knife on Friday, April 24, 2020

Whipped coffee was definitely our gateway drink.

As much as I have the sinking sensation that I ought to be discouraging my growing child from polluting herself with caffeine, it IS pretty fun to have the love of fancy coffee drinks in common with her, and I do keep an eye out for delicious-looking recipes to try with her.

I mean, I would NEVER go to all the trouble to make myself, alone, a fancy coffee drink, not when black coffee is so quick and easy and gives me that same knot of anxious energy in the pit of my stomach. But when I make a fancy coffee drink with my teenager? Well, that's just us bonding!

Here's the latest recipe that we tried:

@cowlover3000

this is how i make the starbucks brown sugar shaken espresso yes i use a pasta jar for my coffees ##starbucksdrinks ##starbucksrecipes

♬ original sound - robyn

We made it a little too sweet--


--but look how deliciously frothy it got! Definitely going to try the shaken coffee method again:


And look how it encourages the teenager to drink her (free public school) milk! Yay, calcium!


Ooh, this was another really good recipe:

@littlebeancoffee

Reply to @ashleypummel I added peppermint because I’m still in a holiday mood 😍🎄##coffee ##frappuccino ##mocha ##starbucks ##christmas ##fyp

♬ The Girl - City and Colour
I even bought peppermint syrup for this! Syd doesn't always love chocolate, so for hers we used this salted caramel sauce instead of chocolate (and skipped the peppermint, I think? Peppermint and salted caramel don't seem like they'd be friends), although now that I'm thinking of it I bet we could substitute homemade dulce de leche. 

And because I was IN A MOOD, I found a totally different recipe that told me how I could make homemade whipped cream in my cocktail shaker, and then I did it, and then our gorgeous chocolate peppermint/salted caramel coffees were both beautiful AND delicious!


The mess that they made in the kitchen was less so...

But whatever. One thing that I now know about pandemics is that they leave plenty of time for housecleaning!

P.S. If you're doing a better job of keeping your teenagers away from caffeine than I am, I highly recommend DIY hot chocolate bombs as another great cooking with teenagers project!

Saturday, March 27, 2021

How to Frost Glass

This tutorial was originally posted on Crafting a Green World.

Whether you want to upcycle a Mason jar to look like sea glass or alter a window so that it no longer offers a picture-perfect view directly into your bathtub, frosted glass is a beautiful way to make glass opaque while maintaining translucency. 

 Frosted glass is easy to DIY, and there are a ton of different methods to do it. The easiest method, and the one that I'm going to show you here, is as simple as adding a couple of coats of spray paint to a squeaky clean glass surface. Here are my two vintage Coca-Cola bottles before being frosted. One I've left clear, and the other I've already spray painted a color that turned out to be WAY brighter than I wanted. It would be nice if the flower vases didn't outshine the flowers! 

 This is for sure a project for making sure that your spray painting technique is on point--it's very important to hold the spray paint 10-12" from the object you're painting, and to coat it with light, overlapping sprays. Here's the clear glass bottle after one coat of frosted glass spray paint

 You don't have to wait any specific time before you can recoat the object, but it takes about ten minutes for the full frosted glass effect to show up, so don't get too impatient. Here's my bottle after two coats of frosted glass spray paint: 

 As you've gathered, you can use this frosted glass spray paint even on a surface that isn't already clear, but the result won't look like frosted glass. Here's my red bottle after two coats of frosted glass spray paint: 

 I do really like how the frosted glass paint mutes the shine and saturation of this painted surface--it's definitely not a look I'd want for everything, but it's a nice look for a vase for spring flowers.