Saturday, July 25, 2020

Turn an Old Blender into a Planter

I originally published this tutorial on Crafting a Green World.

Yes, that's a super-expensive Vitamix blender pitcher that finally cracked (it's too embarrassing to tell you why, but I assure you it was because of Reasons).

No, I could not stand to simply toss it away, even after it spit something like a half-gallon of hot tomato soup onto the counter before I figured out it was broken.

Instead, I did what I do with every single even vaguely container-shaped piece of junk that needs a second life around here--I turned it into a planter!

The process is so easy that yes, you, too, should be turning every single even vaguely container-shaped piece of junk into a planter. Think about how much sturdier your piece of junk is than a chippy terra cotta pot, and how much more eco-friendly than a brand-new plastic pot.

And think about how roomy that beautiful broken blender pitcher is. So much space for strawberries!

Tools and Supplies

Here's what you need to plant strawberries or anything else that delights you, in your own broken blender pitcher:

  • old jar lid (optional: see Step #1 to see if you'll need one)
  • gravel
  • potting mix
  • plant

Directions

1. Prepare the blender to be water-tight.

Blender pitchers have their blade attachment at the bottom. Generally, this won't be a problem, and in fact, it's even easier to turn your blender pitcher into a planter if you keep the blades installed.

However, this is my super-expensive Vitamix blender pitcher that we're talking about here. I saved up a LONG time to buy that baby, and I sure ain't dropping a ton more money for another entire brand-new pitcher! Instead, my partner removed the blade attachment from this broken pitcher and installed it in the new pitcher that I bought to replace it. It was still pricey as heck, but way less expensive than buying the complete replacement pitcher with the blades included.

So if you, too, have removed the blade attachment from your blender pitcher, making the pitcher water-tight again is as easy as scavenging an old jar lid that is larger than the hole but smaller than the bottom of your blender. Set the lid over the hole and you're done. If you want to be perfectly safe, use epoxy glue to adhere the lid in place, but since the next step is going to be filling something like half this pitcher with rocks, all that weight will also keep the lid in place.

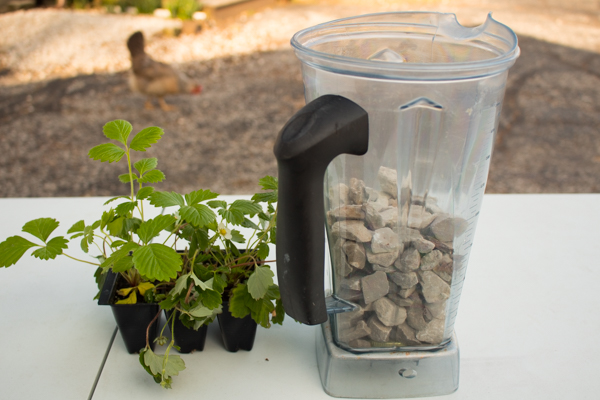
2. Add a layer of rocks.

This depends on the plant, of course, but it's likely that your blender pitcher is far deeper than necessary. Instead of wasting a LOT of potting soil in that space, fill up what you don't need with rocks.

Some really cute options would be river rocks, broken pottery pieces, shells, even aquarium gravel if you've got it, but I am flat out of cute rocks and such and so honestly, I just scooped up some of the gravel off of my driveway.

Whatever. Pretend like it was a thoughtful aesthetic choice.

3. And then you plant!

I'm so in love with the transparency of this planter. Look at what pretty layers the rocks and potting soil make--even prettier if you add that aquarium gravel or shells or pottery shards! I'm also loving the fact that it's got a handle, making it easy for me to move around; add just the right bracket, and you could also hang it or mount it somewhere fun.

And that's how you might find me deliberately thrifting old blender pitchers this year--because now I'm all about the idea of a planter with a handle!

Thursday, July 23, 2020

Homeschool Biology: Let's Learn Neuroanatomy!


Neuroanatomy hit the requirements for a goodly portion of the kids' studies this past year.

Will needed it for AP Psychology. Syd needed it for Honors Biology. And just for funsies, I found a Healthy Brain Initiative Girl Scout fun patch that also included it!

Obviously, you can learn neuroanatomy simply by memorizing diagrams of the brain, spinal cord, and a neuron, but that's not super fun, now is it?!?

You know what IS super fun?

Making this wearable brain diagram, that's what!


The kids made both English and French-language versions--


--and tried to make one for Luna, as well, but alas, her brain is a different size...


To memorize the parts of the neuron, I had the kids create their own models using their own ideas, although they were allowed to do some research for inspiration. Even teenagers are obsessed with Pinterest! You can see Syd's Model Magic neuron above. Will's beaded neuron was equally impressive, but she built it on a table top and didn't realize that it didn't have any structural integrity until she picked it up and it collapsed into one long, beaded string.

It's a beautiful necklace, though!

So that the kids would have a diagram that they could study, I photocopied some of the pages from this awesome book--


--and had the kids color them and use them as their reference for memorization.

I also like to have the kids get their hands on real artifacts whenever I can, not just models, so although Syd objected and spirited herself away to a friend's house during this activity, Will was happily on board with learning how to dissect a sheep's brain with me.

It's a VERY good lesson in how complicated things are in real life, even when they look pretty simple in a color-by-number diagram!

That was enough neuroanatomy for all of our purposes at the time, but since this topic is one that we do spiral back around to regularly, I've got quite a big list of other games, activities, and other enrichment projects to enhance this study. Here's some of them!

  • Crochet Pattern. Learning to crochet is absolutely on my to-do list, primarily so I can make lots of nerdy little projects like this one!
  • DIY Model. This assignment is similar to the one that I assigned the kids for their neuron model--you just have to tell them the parts that must be illustrated and labeled, and let them go off to be as creative as they like!
  • Ectomy. For those who love the brain hat as much as we do, The Basement Workshop also has a game to reinforce memorization of the lobes of the human brain.
  • Fondant Brain. You know how much we love to turn everything into a cake or a giant cookie! One day, we'll bake ourselves one of those and decorate it with a fondant human brain
  • Functional Neuroanatomy. This interactive site from the University of British Columbia is as detailed as you could ever possibly need. You can watch videos, look at models, and teach yourself a LOT of brain anatomy!
  • Mold. We've got a plastic brain mold very similar to this one, which we use for Halloween baking--because of course! However, it's on my to-do list to one day use plaster of Paris, or perhaps my dream material--concrete!
  • Quilled Neuron. Syd and I have done quilling before, and we thought it was really fun. I'm feeling like a quilled neuron is not beyond our skill set!
By the time you finish all of those projects, you're going to know your neuroanatomy really, really, REALLY well!

P.S. Want to follow along with our handmade homeschool and afterschool adventures? I post lots of resources, projects, and photos of our adventures over on my Craft Knife Facebook page!

Tuesday, July 21, 2020

She Sewed Herself a Wrap Skirt


Does everyone, at some early-ish point in their sewing journey, sew themselves a wrap skirt?

Apparently, I sewed one for myself almost exactly eleven years ago today, at approximately five years into my own sewing journey.

If I had to guess, I'd say that Syd, as well, is approximately five years into her sewing journey, and therefore it was obviously time for her to decide to sew herself a wrap skirt.

This wrap skirt was actually a terrific early pandemic sewing project! For one, my sewing machine was still functioning well (currently, my back-up sewing machine is in the shop, after it was determined that my go-to sewing machine was beyond repair. Fingers crossed that I'll be sewing again someday soon, because I'm really missing it!). 

For another, Syd choose this Lila+June pattern that's not only free, but also a downloadable pdf that was easy to print at home:


It was even early enough in the pandemic that although our local fabric stores were closed, our favorite online fabric store hadn't even worked up enough business to cause shipping delays and/or stock sell-outs yet! At the moment, this jet black Premium Kona cotton fabric is sold out, which makes sense because before my sewing machine(s) broke, I was happily sewing mask after mask out of Syd's leftovers.

Here's Syd adding the waistband to her skirt, just about the time that I started eyeing that fabric and mentally configuring how I could DIY face masks for the family from it:


And here's Syd trying to decide if she likes the length. She was originally imagining something shorter, but eventually decided that she liked the length as it was:


Time to hem it, then!

Farewell, sweet Singer! I'm not going to buy your brand again, at least not in the same price point! Your insides are made of cheap plastic that doesn't last, and replacement parts aren't sold for you!

You'll be happy to know that Syd's skirt fits perfectly, is a pleasing length, and, most importantly...


It's twirly!!! 

Alas, there's been no place to actually wear it, since we're still mostly pajama-clad these days (it's 10:30 am right now, and the seamstress in question is wearing her bee onesie. I'm MUCH more professionally dressed in a super-old T-shirt and Matt's Hufflepuff jammy pants). But one day--hopefully within the next two months!--Syd will once again walk into an in-person ballet class, and won't that wrap skirt be quite the most efficiently lovely thing to wear over her leotard?

Eleven Years Ago: Make My Felt Menagerie
Twelve Years Ago: Grandpa Bangle's Toolbox

Saturday, July 18, 2020

How to Refinish a Picnic Table with Paint

I originally published this tutorial on Crafting a Green World.

You've got to paint a few coats of sealant on your picnic table, anyway, if you want it to last outdoors--you might as well paint something interesting onto it first!

You can do this project on a picnic table of any age. If your picnic table is old and care-worn, replace any rotten wood and sand the other surfaces down to clean boards, first. If your picnic table is brand-new, you can paint right onto the unfinished wood.

Supplies & Tools

Either way, you'll need the following supplies:

  • Water-based outdoor primer. 
  • Water-based outdoor paint. Avoid oil-based paint, which generally has more VOCs than water-based paint, and requires paint thinner to clean up. You can use any water-based outdoor paint, and look for the smaller, approximately 200 mL "sample" containers to avoid waste. For this project, I bought 200 ml containers of Dutch Boy Maxbond Exterior in satin. There's just enough paint to refinish my two picnic tables, one old and one new, and freshen up the work on the deck chairs that I refinished here on CAGW four years ago.
  • Paintbrushes. I used large paintbrushes for the primer and the sealant, and a selection of small artist's brushes to paint the colorful details onto my picnic table.
  • Measuring and marking tools. These might include a pencil, meter sticks or rulers, and masking tape.
  • Polyurethane sealant. Buy water-based polyurethane sealant to make this project more eco-friendly. I used to be reluctant to use polyurethane sealant altogether because of its environmental footprint, but watching my deck furniture rot and need to be replaced after just a couple of seasons of Midwestern weather taught me that it's better to do what it takes to make things last. If you know of a better alternative, do me a favor and let me know in the Comments below!

Directions

1. Prime the picnic table.

You only need to prime the area that you'll be working on, as you can otherwise seal the bare wood of the underside of the picnic table and benches. I used white primer, but I'd actually recommend avoiding white unless you really want that specific color in the background of your design, or you plan to completely cover the white with another color. Even after several coats of sealant, white quickly looks dirty, and that happens all the more quickly outside. If I had this project to do again, I'd have instead started with a slate grey or blue for the picnic table's top.

2. Sketch out the design.

You can draw your design with a pencil directly onto the primed surface of the picnic table. I wanted this picnic table to have a chessboard, tic tac toe board, and colorful board game path painted onto it, so I first sketched them all in with pencil.

For the chessboard, I used two-meter sticks to measure out a 16x16" square, centered between the two picnic benches, and then I divided the square into an 8x8" array.

For the board game path, I used masking tape to lay a curving path around the perimeter of the picnic table. Masking tape can even be used to make smooth curves if you tear off and layer short pieces.

I traced the path in pencil, tore off all of the tape, and then divided the path into 2" steps.

I also used masking tape to lay out the tic tac toe board, then traced around it in pencil and tore off the tape.

3. Paint the picnic table.

This part of the process takes the longest, because you must wait for a color to dry before you can begin painting an adjacent color, and each color might require 2-3 coats before it looks saturated.

After the entire picnic table is painted, you can paint on the polyurethane sealant. This also takes a while, since there are several coats to add, and it can take up to a week for the last coat of sealant to fully cure for use.

But the time-intensive process is well worth it when you see the beautiful result!

The well-sealed surface of our picnic table ensures that we can use it as-is for all of our other outdoor projects and fun, but there's nothing like sitting down to a quick game of tic tac toe using twigs and leaves while we're waiting for one last person to finish getting ready before we all hop in the car, or grabbing the bag of mismatched chess pieces for one game of chess that turns into eight games on a lovely spring evening.

That's a lot of multi-purpose fun from just a few colors of paint!

Thursday, July 16, 2020

Paint Stirrer Crossbows and Popsicle Stick Catapults: Homeschool STEM with Rubber Band Engineer


We're not exactly lacking STEM studies here in our homeschool, but I thought that the kids might like a change from robotics, so I offered them the opportunity to create something from this fun little book:


Because what could possibly be more charming than a book with a real, actual rubber band on it?!? Or more tempting than a cover that boasts the instructions for a "slingshot rifle" inside?!?

Here is Will's ballpoint pen crossbow, made from paint stirrers, bamboo skewers, a lot of hot glue, and some twine:


I don't have any photos of it in action because I didn't realize that its first shot would be its last! Will suspects that the twine she used was too stiff; she thinks she needs something with the slightest bit of stretch so it can hold a little more potential energy without putting so much pressure on the paint stirrer. 

Stay tuned for Version 2!

Syd's wooden pencil catapult was more successful overall--


--but then, she did have an assistant for its construction:


It turns out that a catapult made from duct tape, wooden pencils, and a plastic lid, shooting a cork tied to yarn, is quite the thing to keep a young cat entertained:


An automatic winder would improve the catapult's playability here, I'm told, as much of the fun for the cat involves chasing the yarn as it's being wound up again for another go:


This was definitely a good book for encouraging the tinkering aspect of STEM: the contraptions all worked fairly well, with build instructions clear enough that a kid could follow them independently, and yet they always had the potential to work better, or in a different way, with some overall easy-to-implement ideas that kids can dream up. 

In this way, rather than each contraption being the end goal, it's more the starting point (it reminded me quite a lot of the time the kids made paper roller coasters, actually!). A kid uses her fine-motor skills and ability to follow directions to create an instrument upon which her own research, ideas, refinements, and tinkering do the work to teach her the physics, math, and engineering concepts hidden within each contraption.

And if you end up with a ballpoint pen that's turned into a projectile, all the better!

P.S. Want to hear more about paper roller coasters and paint stirrer crossbows? Follow my Craft Knife Facebook page for more projectile adventures as they happen!

Tuesday, July 14, 2020

Upon the Occasion of the Murderbrat's First Birthday


And just like that, our wee Ginger Prince--


--is one year old! 

Obviously, this calls for a party. Alas for the pandemic the guest list was quite limited, but nevertheless Syd baked the birthday boy a birthday cake--


--and we served it on doll dishes with one handmade candle and a sprig of catnip:


Syd even made enough for him to share with his frenemies!


We love our glorious murderbrat, while fully admitting that he's also kind of awful. He never fails to speak his mind, and isn't afraid to holler at us when we're not doing his bidding quickly enough. He chases Gracie, who puts up with his garbage, and takes running leaps directly over Spots, the better to piss her off. He spends much of his time lying on my desk next to me, on a cushion that Syd made for him so that he can look out the window or nap in equal comfort. He loves and comforts and entertains our Syd, and is probably her greatest source of joy in this challenging year. 

It's never made me happier to fail at something than it has to be this cat's foster failure.

It would be awesome if he would stop sharpening his claws on my chair, though!

the day they met
on the occasion of his first birthday

Saturday, July 11, 2020

How to Make a DIY Weighted Blanket

I originally published this tutorial on Crafting a Green World.

Weighted blankets are a high-ticket item, and that's for good reason: they're touted as somewhat of a miracle cure for problems like sleeplessness and anxiety, and you know that if you suffer from sleeplessness and/or anxiety, you're willing to do a lot to find some relief!

Unfortunately, as pricey as weighted blankets are, they're still not always made with great ingredients. Polyester fabrics and plastic pellets are crummy for the environment--seriously, we do not need more plastic (especially plastic pellets!) in our waste stream--and I'm not gonna blame you if you don't feel like sleeping every night with that nonsense draped all over your skin, either.

Supplies & Tools

It takes some fiddly work and some sewing prowess, but it's completely possible to DIY your own weighted blanket, and to do so using natural and/or sustainably-sourced materials. Here's how:

  • Instead of buying new fabric, upcycle flat sheets. For my weighted blanket, I'm using two cotton twin-sized flat sheets. Nope, they're not even the same color, and I don't care! If you care, you can buy organic cotton flat sheets or upcycle something cuter to DIY a duvet cover.
  • Instead of buying plastic pellets, use glass pellets. They're hypoallergenic and don't contain anything harmful that can leach out over time, although I do recommend sewing yourself a duvet cover, as I would with any filled bedding to give yourself an extra layer in case of rips.

In addition, you're going to need some good measuring tools and sewing tools. Spring for an excellent-quality universal sewing needle for this project, because it's shocking the amount of straight-line sewing you're going to be doing. I switched out needles midway through sewing the first series of channels for the filling and then spent longer than I care to admit trying to troubleshoot why the thread tension was suddenly shot before finally realizing that the problem was, of COURSE, the needle.

Fun fact: when in doubt, change the needle. It's nearly always the problem.

So now that you have a brand-new, excellent-quality needle installed the correct way in your sewing machine, a couple of sheets, and several pounds of glass pellets, here's how to turn all of that into a future of sound sleep!

Directions

1. Wash, Dry, And Iron Your Fabric

It's crucial for both brand-new and upcycled fabrics alike! Pro tip: sheets can come out of the dryer ridiculously wrinkly, no matter how much care you take. Instead of tumble drying them, use a clothesline. Smooth them absolutely flat, pin them well, and when they're dry you'll have an easier time ironing out the remaining wrinkles!

2. Measure Out A Grid


You can tell I worked so hard at getting out all those wrinkles, lol! Eh, whatever.

First, re-measure your flat sheets. Even though they're supposed to be a standard size, I learned the hard way (via a bunch of unhappy comments!) that most/many/all flat sheets, perhaps particularly after washing and drying, do not match these measurements.

Divide each measurement into a reasonable number of divisions to make a grid. You'll be sewing long columns of stitching parallel to the short sides of your blanket, filling a row with filling, then sewing parallels to the long sides of your blanket to close each row until your entire blanket is a grid with each module containing an equal amount of filling. It takes a little bit of math and a little bit of eyeballing to figure out what will be practical for your blanket.

My twin flat sheets measure approximately 66" x 96", so I decided on a grid of 16 columns by 8 rows, for 128 total modules.

Use a marking pen or masking tape to mark out the columns on one of the flat sheets. I like to do this even before I sew the two sheets together, although you can certainly complete the next step and then come back to this.

3. Sew The Flat Sheets Together

Pin the flat sheets right sides together, then hem together around three sides, leaving one long side open. You'll be using this open side to fill the columns, and will close it in the last step.

If you preferred to sew the sheets together before measuring and marking the columns, then measure and mark them now.

4. Sew The Channels


 If you look closely, you can see that I've got all of the columns sewn to make channels for the filling, and I've taped out the rows. I'll stitch down each row after I fill it.

Using a very short stitch length, stitch all of the column divisions, using your markings as the guide. You can stitch each of these twice if you want to make sure that the sewing line is very, very sturdy.

5. Measure And Mark The Row Guidelines

Lay your blanket flat again, and mark all the row gridlines the same way that you marked the column lines. Do this before you start to fill your blanket because you'll be sewing each row gridline down after you fill the modules below it.

6. Calculate The Amount Of Filling For Each Module

Remember that the total weight of your blanket should be about 10% of your body weight and that the total number of modules that you have to fill is represented by the number of columns multiplied by the number of rows.

For instance, I have a 16x8 grid making up my blanket, so I have 128 modules to fill. I'd like my blanket to weigh approximately 18 pounds, which is 288 ounces (fun fact: there are 16 ounces in a pound!). Dividing 288 by 128, I find that I should fill each module with 2.25 ounces of glass pellets.

That's too fiddly for me, so I estimated and let myself fill each module with between 2 and 2.5 ounces of glass pellets. Feel free to fudge your own numbers a bit, too!

7. Fill The Blanket

Tare a kitchen scale to a small cup, and weigh out the appropriate amount of filling for one module. Pour that filling into the first channel, shake it down, then repeat until you've done all of the channels. Lift the blanket up by the open end, shake all the filling down again, and sew along the first row marker so that you lock the filling into the modules along the bottom row of the blanket.

Repeat for each of the remaining rows. It helps to push your sewing machine back towards the middle of the table so that you've got room for the entire weighted blanket up there.

When you've reached the last row, you can double-fold and sew the blanket's opening closed, sealing that row and hemming that edge.

As you might be able to tell from the iamge below, my entire family loves my weighted blanket! On the day I completed it, in fact, I showed it off to my partner as soon as he came home from work, he lay down on the bed to test it out, and within a couple of minutes was sound asleep in his work clothes, out like a light for an unexpected 7pm nap. My teen likes to veg out under it while listening to music, and I really only get it back at night, where it's added to my arsenal of anti-insomnia remedies.

Full disclosure: I don't know if it's super helped my insomnia, but I already suspected that I was a hard case, and it IS very, very, very comfy. Totally worth the time and effort!