Ideally, Sydney will be modeling her Rainbow Fairy Dress in this year's Trashion/Refashion Show in our community. Otherwise/in addition, I'm sensing a spring and summer full of lots of rainbow fairy magic coming our way.
Monday, March 5, 2012
Rainbow Fairy Dress Revealed
This dress was completely Sydney's vision, with my construction to order. If you're curious, I go into much more detail about the pattern-drafting and my sewing methods in my project show-and-tell over at Crafting a Green World, but here I just want to show off the outfit that both Sydney and I worked very hard on, and that we're both pretty thrilled with in its outcome:
Ideally, Sydney will be modeling her Rainbow Fairy Dress in this year's Trashion/Refashion Show in our community. Otherwise/in addition, I'm sensing a spring and summer full of lots of rainbow fairy magic coming our way.
Sunday, March 4, 2012
Willow's New and Improved Handwriting
Handwriting practice has been added so seamlessly to the Daily Schoolwork List (which does not get completed anywhere close to "daily," but more on that another time), that it's really a pleasure to watch the girls consistently working on it. I like to think that the kiddos take pleasure, too, in handwriting that has so steadily and vastly improved that it has to be as obvious to them as it is to me.
A dear friend, whose homeschooled son has beautiful handwriting, suggested that I show Willow examples of all the different styles of handwriting and ask her to select which she'd like to learn--it gives her ownership over the process, and allows her to learn a style that she'll find lovely. Willow's choice: the Palmer Method. It makes me crack up, because I feel like a 1950s kindergarten teacher, but Palmer handwriting really is nice.
I purchased, using my monthly homeschool budget that I fund through my paid writing and my etsy sales, Startwrite 6.0 so that I could create handwriting copywork that was consistent in method and relevant to the girls' other studies. Although the user interface is a little wonky and non-intuitive, it does have everything that you'd ever need to customize a handwriting sheet. Because Willow has formerly shown no attention to the details of letter formation or placement, and doesn't always form each letter the most efficient way, we go whole hog on her sheets--lined pages, an outline of each letter to help her stay within normal parameters, dots along each letter's path that she can aim for, arrows and numbers to remind her where and when her pencil needs to go, and a free space after each word so that she can practice:
Syd's handwriting is pretty great, although she still likes to play fast and loose with placement on the line, and she prefers her handwriting pages with just the outline:
And here she's writing the ingredients list for the rainbow play dough that we sell in our pumpkinbear etsy shop, to include with the order that we ship to the customer:
Along with coloring pages and drawing lessons to practice fine motor skills in general (not to mention lots of play with power tools and taking stuff apart with screwdrivers, etc.), regular copywork practice is really, obviously working.
Yay!
A dear friend, whose homeschooled son has beautiful handwriting, suggested that I show Willow examples of all the different styles of handwriting and ask her to select which she'd like to learn--it gives her ownership over the process, and allows her to learn a style that she'll find lovely. Willow's choice: the Palmer Method. It makes me crack up, because I feel like a 1950s kindergarten teacher, but Palmer handwriting really is nice.
I purchased, using my monthly homeschool budget that I fund through my paid writing and my etsy sales, Startwrite 6.0 so that I could create handwriting copywork that was consistent in method and relevant to the girls' other studies. Although the user interface is a little wonky and non-intuitive, it does have everything that you'd ever need to customize a handwriting sheet. Because Willow has formerly shown no attention to the details of letter formation or placement, and doesn't always form each letter the most efficient way, we go whole hog on her sheets--lined pages, an outline of each letter to help her stay within normal parameters, dots along each letter's path that she can aim for, arrows and numbers to remind her where and when her pencil needs to go, and a free space after each word so that she can practice:
Syd's handwriting is pretty great, although she still likes to play fast and loose with placement on the line, and she prefers her handwriting pages with just the outline:
Even beyond the ability to customize the same page for each child, I'm loving the ability to write handwriting sheets that are relevant to what the kiddos are actually doing each day. Here, Will is writing the definition of Anastasia's Mate, a good endgame trap that she learned in chess:
And here she's writing the ingredients list for the rainbow play dough that we sell in our pumpkinbear etsy shop, to include with the order that we ship to the customer:
We've also done the names of the presidents in order (which Will is in the process of memorizing), geography labels that get cut out and pasted onto big maps that they're making (Africa, currently), short letters to the grandmas, and reading/spelling words. I like stuff that can work double-duty!
With the model, and the lines, and the arrows, and the dots, Will has a better method for completing her handwriting systematically, and although Syd finds all that information overwhelming (which is why she does without it), I think it all helps to remind Willow to slow down and write methodically. I never thought to videotape the slapdash method that she used to use to crank out her former illegible handwriting, but it's vastly different from how she works now:
Along with coloring pages and drawing lessons to practice fine motor skills in general (not to mention lots of play with power tools and taking stuff apart with screwdrivers, etc.), regular copywork practice is really, obviously working.
Yay!
Saturday, March 3, 2012
Homeschool Chemistry: Acid Plus Base
As the first two demonstrations in the girls' fabulous chemistry set
, acid plus base experiments are so easy, so fun, and so wildly rewarding that still, my girls do these two demonstrations over and over again, each time absorbing more information about the science behind the reaction and learning more about the tenets of chemistry.
Of course, we've long used up the chemistry set's supplies of baking soda and citric acid--fortunately, since we often bake and preserve, we've got both of those materials in our kitchen stores, and I tend to buy vinegar six gallons at a time when it's on sale, since it's about all I use for cleaning. Nevertheless, whether or not you own a chemistry set, I still highly recommend a good stock of nice glass test tubes and cheap plastic eyedroppers; the eyedroppers allow children to have more control over the amount of water or vinegar that they add to their mixtures, and the test tubes are really ideal for observing the chemical reaction.
Experiment #1: Small Scoop of Baking Soda, Eyedropper of Vinegar
It's nice to keep the amounts very small so that the chemical reaction between the sodium bicarbonate and the ascetic acid is easy to observe. Notice the bubbling, notice the fizzing, notice the foam!
Experiment #2: Small Scoop of Baking Soda, Small Scoop of Citric Acid, Eyedropper of Water
I think that this version is even more fun, because the two powders, one an acid and one a base, nevertheless do not react--
--until you add water as a catalyst!
Extensions:
- Look up the chemical formula for each ingredient, then explore the elements that make up the formulas.
- Write an illustrated tutorial for each experiment.
- Use the chemical formulas and the scientific notation of the chemical reaction as copywork or memory work.
- Compare other liquids to water when conducting Experiment #2. Does rubbing alcohol affect the reaction? Does orange juice?
- Play with the reaction as a sensory experience, as long as you don't have any cuts on your hands. Neither vinegar nor citric acid are strong enough to hurt healthy skin, so get out a big baking pan (or go outside--I wish!) and make big piles of baking soda, on which you drop vinegar rain.
- Add powdered tempera to either the baking soda or vinegar to make fizzy paint.
- Make and erupt the traditional baking soda and vinegar volcano.
- When the kiddos were finally finished with their play (nearly an hour later!), they asked me what they could do with all their test tubes and mason jars of vinegar. I suggested that they use it to scrub the kitchen floor--and they did!
Friday, March 2, 2012
I Love My New Ruffler Foot
We have one sewing machine and supplies store here in town, independently operated. I go there pretty frequently for sewing machine repair and servicing, and when I want to buy a new specialty presser foot.
Also, I hate them.
It's the kind of place where you can go in knowing exactly what you want--a buttonhole foot for your old-school Brother, say--and the employee will still make you feel like an idiot. You can't answer some specific question about the exact type of shank on your machine, perhaps, which lack of knowledge is somehow the catalyst for her making you feel like you barely have any business getting yourself dressed in the morning, much less operating a sewing machine. And the other employee, the one who would know off the top of his head what your shank type is, is out for the morning and won't be in for three more hours. And that book that you can see right there, the one that would say exactly the type of shank on your machine, looking things up in that book isn't the job of the particular employee in front of you, nor are you permitted to use it. Oh, and they don't stock buttonhole feet, anyway, so they'd have to special-order it, which is the responsibility, perhaps, of some third employee, who's also not in the store at the moment.
Because I'm a big chicken, I've taken to forcing Matt to patronize this store for me. He says that they're really rude to him, too, but I don't care.
The absolute only redeeming quality to this store is the fact that, since I do have an older machine, all this rigamarole notwithstanding, I do invariably end up with the correct foot, including the correct shank type, for my Brother. If you've got an older machine, you'll know that can be tricky.
And that's how I came to own this fancy contraption, otherwise known as a ruffler foot:
It's wonderful. You set the gauges for how many ruffles you want per how many stitches, and how wide you want your ruffles, then you feed the fabric into the middle, and off you sew, ruffling happily away:
I bought it because I knew that I would be sewing mad ruffles for Sydney's rainbow fairy dress, and I did NOT want to gather every single huge layer by hand (nor could I, really, with a couple of the wonky fabrics that I chose). And while I still need to do a lot of playing around with my ruffler foot before I can do a really precise job using it, with muscle, and a lot of jiggering, and some blatant cussedness, those ruffles, they did get ruffled.
Thursday, March 1, 2012
While I Sew, the KittyCat Suffers
I've spent the week so far sewing Sydney's entry for this year's Trashion/Refashion Show (more on that later!), and while I've been busy, the girls have been busy, too, playing outside in the unseasonably mild weather with their stuffed animals, including all their thousand toy horses into three-hour baths with them, completely immersed in their game entitled Animal Rescue Obstacle Course.
From what I can tell--
--it seems to involve doing mean things to their toy animals and then rescuing them.
Yay, Animal Rescuers!!!
Friday, February 24, 2012
Math Play
The girls haven't been interested in computation, math drills, or any sort of problem-solving work in a while. Instead, I see their little brains resting from all that heavy concentrated thinking and instead focusing on internalizing visual, spatial, and relational mathematical concepts.
That looks like this:
That plus a lot of painting, project-building, chess games, taking stuff apart with screwdrivers, testing physical limits on the playground, picture drawing, and constructing elaborate costumes out of play silks is what math looks like around here these days.
Thursday, February 23, 2012
Tutorial: DIY Deep Conditioner
Back in December, the girlies got head lice. I don't have any leads on the origin of the infestation, although I am pretty suspicious of these riding helmets.
Treating for head lice, while not super-fun, was actually not even remotely as bad as I'd feared it would be. We didn't even nit pick, and although I know that you're going to tell me that we did it all wrong if we didn't nit pick, we didn't.
We did use two doses of a CDC-recommended pesticide shampoo (because yes, I use poison on my babies), spaced nine days apart, to bomb the little bastards into the next century, and although that, combined with a dedicated focus on avoiding cross- or re-contamination, worked for us, man, did it do a number on my poor little kids' hair! Their hair was so dry afterwards, and Syd had the addition of an itchy, flaky scalp. I'd use it again if I had to, because it worked, but after a few weeks' time and the conclusive evidence that the head lice were all gone, the kiddos' hair definitely needed some rehabilitation.
Have you ever put olive oil on your hair? I still won't do it on my own kind-of dry hair, because I find the flashbacks to my junior high years, when my hair seemed to be greasy again a half-hour after I washed it (and I refuse to even recall the condition of my face), too painful, but I happily had Willow mix up the following recipe of one part olive oil, one part apple cider vinegar, and one part honey:
I was tempted to add a couple drops of a nice essential oil, lavender or tea tree or peppermint, but I'm too leery of putting essential oils directly on my children to actually do it, so instead I worked it through the kids' dry hair (it was REALLY messy, like crazy messy, and you know that I am not afraid of mess), let them read for a half-hour so that it could soak in--
--and then shampooed their hair.
Results: The treatment did work, although it wasn't ideal at the time. It took three separate shampoos to wash all of the oil out of their hair, and since I didn't want to wash their hair three times in a row, figuring that wouldn't be helpful to their dry skin and hair, I spaced the shampoos out over six days, just braiding their hair in between times and ignoring the fact that it was oily.
Now, however, their hair is perfectly glossy and smooth, doesn't feel dry to the touch, and Syd no longer has an itchy, flaky scalp. I'm trying to be more vigilant about putting leave-in conditioner into their hair after every bath to combat any more dryness before it begins.
I've heard that leave-in conditioner also has some prophylactic properties regarding head lice--the reasoning being that it's harder to get a grip on a hair strand with conditioner on it, I suppose? I'm also trying to insist that the girls shampoo their hair more frequently than they'd prefer, and to better supervise their hair brushing, because I think that I could have caught that head lice infestation earlier if I'd been more vigilant. I'm stopping short of treating their hair with essential oils, because those same oils are in all our cleaning supplies and our soap--they're getting a pretty good dose of tea tree oil every day even without me spraying it on their hair, I'm thinking, and I'm reluctant to add more directly onto their bodies. I'm insisting that each girl use her own hair brush, and not her sister's, but they still share towels--and a bed!--and half their clothes and all their playtime.
Eh, at least it's not pinworms again. Now THAT was gross!
Wednesday, February 22, 2012
Matt's Anniversary Present: A Smash Book
It's been fifteen years since I, a sophisticated junior at TCU, looked at that cute but goofy freshman at Mike McCaffrey's Anti-Valentine's Day party and thought, "Hmmm...I think I'm going to trick that boy into thinking that it's his idea to go out with me."
And the rest is history, the history of kids and cats and cross-country moves and used cars and visits to the beach and drinking margaritas and watching way too much sci-fi together.
To celebrate fifteen years together, I defaced a vintage children's book, because nothing says "Happy Anniversary!" quite like graffiti and hot glue:
a Before picture: I found a coloring page from "The Last Unicorn" for Syd to color. It's an inside joke that all I did as a child was watch a bunch of weird, dark cartoons, and inappropriate 80s-era comedies that were on HBO, and it's my mission to introduce Matt to all of them
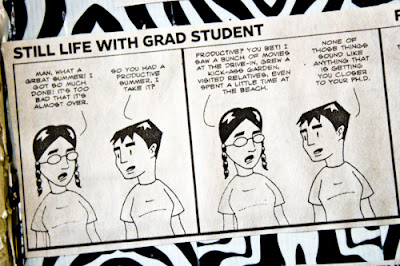
for a while at IU, until they changed their budgetary policies to both boot me out of my associate instructor position (and thus, indirectly, out of grad school) and forbid Matt to work any additional jobs in the university at all other than his current one, he and I did a comic together for the student newspaper. Our friends all appeared, and our parents, and our cats. It's one of my all-time favorite things that I've ever done
The year before we got pregnant with Willow, Matt and went on this CRAZY road trip across three-quarters of the United States. Seriously, we were gone practically a month! We almost got arrested on a beach literally five minutes after getting there, and we kept having to sleep in the car, and we'd eat in these freaky buffets all the time because then we could be full enough to not have to have another meal that day, and I brought along all these travel memoirs of couples that we could read to each other as we drove, but in every single memoir the experience of travel basically destroyed each couple's marriage, and we saw everything in the entire world, it felt like
Matt's introduced me to every awesome graphic novel ever written, except I stopped reading this particular one below when it got really rapey
Fifteen years is kind of hilarious, because when I look back at those photos from when we were dating, we look like babies
Like this photo of us with our friends. We're babies! We're in my first apartment, which I first shared with this guy friend of mine who later went kind of schizo, accused me of slamming my car door into his every time we were parked next to each other (which I didn't do) AND of replacing his gigantic bottle of Pert Plus with a giant bottle of hand lotion (which I also didn't do) AND sent this threatening letter to my parents telling them that he was going to sue me if I didn't pay him back $250 for all the D&D books that he'd left in the apartment when he finally moved out AND he put a password on our telephone account in secret before he moved so that he could switch the account for free and I had to pay to set up a new account AND he stole that old gold velvet and horsehair couch that we bought together without even asking for it. I loved that couch!!!
I asked the girls to draw pictures of all of us, and to write down some reasons why they love their Daddy. The reasons for both girls generally revolved around activities such as wrestling and treat-buying
I had to look the word "occasion" up in the dictionary, because all of a sudden I couldn't remember how to spell it
paint, glue colored with acrylics, text printed onto photo paper, a fussy-cut piece of vintage wallpaper, and LOTS of glitter
more text on photo paper, and vintage sheet music with a few applicable phrases circled in Prismacolor marker
and the cover, which is just a glory of random stuff--paint, stencils, paper doilies, die-cuts, twine, Sharpie, and a few images from the ill-fated original book left uncovered
It was so pleasant to put this book together that I finally understand why some crafters spend so much time scrapbooking rather than performing more reasonable activities like, you know, making skirts out of pillowcases or finding weird ways to dye play dough. The physical present was for Matt, sure, but the real treat was for me, spending weeks reliving all the happy memories of our fifteen years together, suddenly making realizations along the lines of "Hey, Matt has NEVER done his share of the dishes!"
He's always been good at presents, though (except for that fake opal ring in San Antonio business--who the hell gives his girlfriend of three years a fake opal ring on the trip that they're taking to San Antonio to celebrate being together for three years? Don't you think that when you've been dating for three years, and you're on a special anniversary trip, on VALENTINE'S DAY for Pete's sake, and you hand a girl a ring box, and inside it is a fake opal ring, and it's not even a fake opal engagement ring, just a generic fake opal ring, that she might not react with pleasure and gratitude?!?). This year for our anniversary Matt bought ME a panini press, because he knows I'm a big nerd who wants to make paninis all the time.
Seriously, don't you want to come over for breakfast today? I'm making cream cheese, chocolate chip, and banana paninis, and if you stay for lunch I'll even make you a turkey bologna and mozzarella panini. For dinner it's pulled pork and avocado paninis, with strawberry, cream cheese, and powdered sugar paninis for dessert.
Monday, February 20, 2012
Fire and Wax and Inspiration
I know, I know...I post about kids and candles and crayons ALL the time.
But seriously, if you knew how much time my kids really spent goofing around with candles, melting crayons, then you would be shocked that I'm this restrained with my posting.
One Saturday morning, while Syd and Matt were at ballet (and picking up holds at the public library, and interlibrary loans at the university library, and dropping off summer camp forms at the Humane Association, etc.--you know the drill!), Will asked to play with the candles and the matches again, the candles and the matches that she and her sister and their friend had just played with last night after their candlelit dinner (turkey bologna and cheese sandwiches with apples and carrots, if you must know how poorly I feed my children's company).
I set her up with the glass plate that we use as a candleholder, but when I saw that she was really more interested in holding crayons to the candle to watch them melt--another common pursuit over here--I moved her to a big mat board left over from Matt's art school days:
Here's the thing, though--as Willow is working, intently and with full concentration, I'm sitting next to her at the table, making sure she doesn't catch her hair on fire and working on a smash book that I'm making Matt for our anniversary (more on that later). So I'm working on my stuff and watching her do her stuff, and suddenly I'm noticing all those nice puddles and pools of crayon wax, and I'm thinking that they look like those old-timey beeswax seals that you see people put on their envelopes to seal them in the movies, and I'm thinking that I'd love to have some sealing wax and those special stamps to play with, and then I'm thinking that, you know, I've actually got some clay stamps that I bet would work pretty much the same as that...
A few minutes later, and now Will and I are BOTH goofing around with candles and wax. At first, my experiments don't go so well--
And that's what I mean when I'm always telling you that my children inspire my craft.
P.S. I've got that crayon sealing wax tutorial up over at Crafting a Green World.
But seriously, if you knew how much time my kids really spent goofing around with candles, melting crayons, then you would be shocked that I'm this restrained with my posting.
One Saturday morning, while Syd and Matt were at ballet (and picking up holds at the public library, and interlibrary loans at the university library, and dropping off summer camp forms at the Humane Association, etc.--you know the drill!), Will asked to play with the candles and the matches again, the candles and the matches that she and her sister and their friend had just played with last night after their candlelit dinner (turkey bologna and cheese sandwiches with apples and carrots, if you must know how poorly I feed my children's company).
I set her up with the glass plate that we use as a candleholder, but when I saw that she was really more interested in holding crayons to the candle to watch them melt--another common pursuit over here--I moved her to a big mat board left over from Matt's art school days:
.jpg)
.jpg)
Here's the thing, though--as Willow is working, intently and with full concentration, I'm sitting next to her at the table, making sure she doesn't catch her hair on fire and working on a smash book that I'm making Matt for our anniversary (more on that later). So I'm working on my stuff and watching her do her stuff, and suddenly I'm noticing all those nice puddles and pools of crayon wax, and I'm thinking that they look like those old-timey beeswax seals that you see people put on their envelopes to seal them in the movies, and I'm thinking that I'd love to have some sealing wax and those special stamps to play with, and then I'm thinking that, you know, I've actually got some clay stamps that I bet would work pretty much the same as that...
A few minutes later, and now Will and I are BOTH goofing around with candles and wax. At first, my experiments don't go so well--
But after a while, I do believe that I've got that perfect method figured out:
And that's what I mean when I'm always telling you that my children inspire my craft.
P.S. I've got that crayon sealing wax tutorial up over at Crafting a Green World.
Saturday, February 18, 2012
Power Drill versus Crayons: DIY Valentines
I'm the mean momma who still makes my kids do homemade valentines, pretty much just to save a couple of bucks.
Also, of course, because we're DIYers to the bone, we don't buy what we can make, putting a little effort into a handmade gift makes our celebrations more thoughtful and meaningful, and frugality is a habit that must be constantly cultivated or it slips away.
In other words, I like to save a couple of bucks.
That's not to say that the kids' valentines take hours and hours of painstaking work for them to craft, however. Instead, the valentine work exists on a sort of spectrum. At the smack beginning of February, I tend to set out the materials to make big, splashy, complicated valentines, because the kiddos are super-excited and want to make big, splashy, complicated valentines.
A few days later, and they're perhaps cutting hearts out of paper and writing HAPPY VALENTINE'S DAY on them, along with a hand-drawn picture and some stickers or stamps.
The day before the big party, I count out how many more valentines they each need to make, hand them some heart die-cuts, and say, "Here, write your name on these." Done and done!
The following project comes from the BEGINNING of the month of February, when hearts and valentines and complicated holiday crafts are pretty exciting to be starting off with. It also utilizes power tools, which everyone knows by now is something that my Will and I are both big suckers for.
You start by making yourself some recycled crayons. Will made hearts both big and small to use for valentines, as well as big LEGOs and small skulls for an upcoming friend's birthday.
Next, you set yourself up with a power drill, a good work surface, and a big old book or something else underneath your drilling area.
You probably want to put your kid in safety goggles. I evaluated the project, and decided not to require them for this one--with the power drill, it depends on the material for me regarding whether or not I make the kid wear the safety goggles. Wood and masonry and even plaster=goggles. Crayon and beeswax and just messing around in the dirt=no goggles.
Notice Will's good posture here:
She's on her knees on the chair so that her head is elevated above the work surface and the drill, and so that she can hold the drill vertical to the work surface without having to keep her arm at an awkward angle.
She's got a firm grip on the crayon on the far side away from the drill, and she's pressing with just the right amount of force to keep her grip on drill and crayon without losing control:
And then you drill!
I had a better video, but then at the end of it Will suddenly swung the drill up and pointed it at her face so that she could "watch it spin," and in my chastising I may have called her a little redneck and told her that if she put her eye out with a power drill she'd have to be a shop teacher instead of a humane society worker when she grows up, so with that fabulous combo of dangerous tool use and impeccable parenting, I'll just save it to show at her rehearsal dinner or something.
After you drill a hole in the crayons, you'll have a stack that looks like this:
Also, of course, because we're DIYers to the bone, we don't buy what we can make, putting a little effort into a handmade gift makes our celebrations more thoughtful and meaningful, and frugality is a habit that must be constantly cultivated or it slips away.
In other words, I like to save a couple of bucks.
That's not to say that the kids' valentines take hours and hours of painstaking work for them to craft, however. Instead, the valentine work exists on a sort of spectrum. At the smack beginning of February, I tend to set out the materials to make big, splashy, complicated valentines, because the kiddos are super-excited and want to make big, splashy, complicated valentines.
A few days later, and they're perhaps cutting hearts out of paper and writing HAPPY VALENTINE'S DAY on them, along with a hand-drawn picture and some stickers or stamps.
The day before the big party, I count out how many more valentines they each need to make, hand them some heart die-cuts, and say, "Here, write your name on these." Done and done!
The following project comes from the BEGINNING of the month of February, when hearts and valentines and complicated holiday crafts are pretty exciting to be starting off with. It also utilizes power tools, which everyone knows by now is something that my Will and I are both big suckers for.
You start by making yourself some recycled crayons. Will made hearts both big and small to use for valentines, as well as big LEGOs and small skulls for an upcoming friend's birthday.
Next, you set yourself up with a power drill, a good work surface, and a big old book or something else underneath your drilling area.
You probably want to put your kid in safety goggles. I evaluated the project, and decided not to require them for this one--with the power drill, it depends on the material for me regarding whether or not I make the kid wear the safety goggles. Wood and masonry and even plaster=goggles. Crayon and beeswax and just messing around in the dirt=no goggles.
Notice Will's good posture here:
She's on her knees on the chair so that her head is elevated above the work surface and the drill, and so that she can hold the drill vertical to the work surface without having to keep her arm at an awkward angle.
She's got a firm grip on the crayon on the far side away from the drill, and she's pressing with just the right amount of force to keep her grip on drill and crayon without losing control:
And then you drill!
.jpg)
.jpg)
I had a better video, but then at the end of it Will suddenly swung the drill up and pointed it at her face so that she could "watch it spin," and in my chastising I may have called her a little redneck and told her that if she put her eye out with a power drill she'd have to be a shop teacher instead of a humane society worker when she grows up, so with that fabulous combo of dangerous tool use and impeccable parenting, I'll just save it to show at her rehearsal dinner or something.
After you drill a hole in the crayons, you'll have a stack that looks like this:
To make these into valentines, Will typed "from Willow" onto cardstock, cut it out and hole punched it, and tied it to each crayon with yarn.
Not that you need a reason to drill through big crayons or anything, though, because frankly it's just fun.
Even if you're NOT a redneck like us.
Wednesday, February 15, 2012
Tiny Dancer
Syd doesn't watch a lot of Disney movies, but she does listen to a lot of Disney music. You'll know if a certain musical piece of the Disney war machine is an especial favorite of hers, because she'll choreograph a dance number to it:
I really like to watch these, not only because my kid is awesome and brilliant and dances like an angel, but also because I can see how she's begun recently to incorporate some of the specific moves that she's learning in her ballet program. Syd's been in our local university's VERY expensive pre-college ballet program since the age of three, and it's by far the biggest item in our kid budget. Every now and then Matt questions the expense, but it's my belief that when a kid is legitimately serious about something, she deserves our best provisions for her passion. I'm also the one who enrolled her in and took her to pretty much every OTHER (cheaper) dance studio in town for classes first, including the class in which they danced to Barney songs, the one in which the other kids all sassed and disobeyed the teacher while my big-eyed babe looked at them and absorbed it all, and the one in which five minutes of every class was devoted to, I kid you not, cheerleading practice, so Syd's Pre-College Ballet program, with its dress code and its dedicated pianist and its student roles in the university's Nutcracker performances every year, thrills me, whether or not it's the reason why we eat beans and rice just that many more days each month.
Of course, then I go and let my classical dance-trained kid spin around in circles to Disney songs all day, every day, so what do I know?
Tuesday, February 14, 2012
Melted Crayon Afternoon
I am actually loving the fact that I don't do craft fairs anymore. Instead of spending an afternoon constructing elaborately-layered crayons mostly by myself, with the girls helping me or playing with each other, now a crayon craft afternoon looks like us all together on the floor, surrounded by the craft crayon bin, the entire silicone mold collection, and an ever-growing pile of crayon wrappers, the stereo playing Sydney's latest Disney Song and Story CD
obsession (we get them from our public library or from Spotify, and Syd LOVES them). There's no pressure of perfection, it's much more child-led, and since I don't have a quota to fill, we can stop whenever we feel like it.
Well, unless it's this week, when the girls have got some Valentines to make, and a couple of birthday presents for an upcoming party to craft for--THEY have a quota! And while we're at it, I might as well try out that giant peace sign silicone mold that a friend gave me for Christmas.
Handy Tip: I grab crayons from our big bin, slice each one up the side with an X-acto knife, and put them in a separate pile for the girls to dig through and unwrap:
We've got little hearts, and big hearts, and little LEGOs, and big LEGOs, and little skulls (but not the big skull, on account of it's not a silicone mold, and therefore not oven-safe), and this humongous peace sign, so large that I can throw entire crayons unbroken into the mold:
Two hundred degrees!
You'll notice this change from my previous melted crayons tutorial: I only had to spill an entire mold's worth of molten crayons into the bottom of the oven to learn to put a baking sheet under the molds. You can't fool me more than three or four times!
The skulls and LEGOS came out perfect for delighting a certain little boy at his birthday party this weekend, and the peace sign?
I LOVE it! I need to figure out some way to make it mountable on my wall, and then I'm totally making another one for my pumpkinbear etsy shop. Another one, however, because this one is all mine:
But those melted crayon hearts? Well, they're not quite ready to be Valentines yet. After all, we haven't yet taken a single power tool to them! Stay tuned...
Subscribe to:
Posts (Atom)