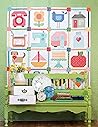
Showing posts with label quilting. Show all posts

Friday, June 14, 2024

June WIPs: Books, Bookmarks, and a Bookshelf Quilt

Little Free Library Bookmarks

Making these quilt-as-you-go scrappy bookmarks is my favorite thing these days! You can tell from the variety of ribbon that I'm even using up all of those little scraps that I've been hoarding saving, too. That rickrack?

It's VINTAGE! New in the package, too! I held onto it for another probably 15 years or so after getting my hands on it, but I think it'll be much happier as a dozen bookmarks than it was moldering away in the back of my closet.

I think the bookmarks in general look cuter with smaller scraps all pieced together, but I had some novelty fabric scraps that I feel like I've been holding onto forever, trying not to waste them but not knowing what to do with them. I'm especially in love with those vintage dinos!

Even though these bookmarks look finished, they're technically still WIPs while I wait on my partner to design some fabric for me, because my dream is to use Spoonflower to print custom messaging onto fabric, complete with the bookmark template as a cutting guide. Then I just need to cut it out and edge-stitch it to the backs of my bookmarks and yay! I'll have cute bookmarks with literary quotes on the backs to give out inside my Little Free Library!

My Too-Long TBR-ish Pile of Books


I normally read a couple of books a week, so I don't know why I'm dragging through those top four books so slowly. I even like them, so that's not the reason!

Oh, lord, I've just noticed that my Complete Letters of Vincent Van Gogh isn't even on this list, and I've been puttering through that one since last winter...

In other news, though, thanks to all the sewing and gardening I'm almost finished listening to A Court of Mist and Fury. I'm really liking it, and my review of it is going to be VERY different than the one that I wrote for A Court of Thorn and Roses, ahem. My favorite part of the book so far is when, near the end, Rhys sits down and literally rewrites the canon of the first book to fix all the problematic stuff. It's not a bad authorial choice, actually! The author also did a lot of work throughout this book to change the perspective of the first book and justify those changes through plot and characterization, etc., but sometimes you just gotta have a good, old-fashioned lore drop.

Bookshelf Quilt

It consists so far entirely of aspirational Pinterest pins:

But one day, ideally before September, it will be a real quilt on the dorm room bed of my younger kid!

Just have to teach myself Foundation Paper Piecing first...

In other news, look who loves the newly power-washed back deck!


Does anyone else's co-parent buy himself everything he's ever wanted right before every gift-giving occasion? Did it occur to him that maybe I knew he wanted his own power-washer instead of renting the one at Menards, and maybe I might want to buy it for him for Father's Day? SIGH! The kids have at various times been reporting to me about actively heading him off from impulse-purchasing other long planned-for Father's Day gifts, but all I can say is that he better not buy himself a single other thing before Sunday!

P.S. Want to follow along with my craft projects, books I'm reading, road trips to weird old cemeteries, looming mid-life crisis, and other various adventures on the daily? Find me on my Craft Knife Facebook page!

Wednesday, June 5, 2024

How to Sew a Mini Quilt Block Coaster

A mini quilt block coaster is a useful–and beautiful!–way to destash some of your prettiest quilting cottons.


I do not know what happens to all of my coasters! Over the years I’ve made tile coasters, chalkboard coasters, and endless quilt block coasters, and nearly all of those are simply… gone! To be honest, I probably don’t want to know why they go missing so regularly in the house I share with my partner and two teenagers, but just between us, I suspect foul play.

It’s fine, though. I do LOVE the hexagonal rainbow quilt block coasters that I sewed four years ago–rather, I love the single one of those that still exists in my family room!–but change is fun. Anyway, a new set of coasters is a great way to destash a bit of my quilting cotton!

For this project, I was specifically excited about destashing the last bit of a super cute honeybee print that I’ve had for quite a while and was down to its very last 1/16 or so of a yard. There wasn’t a panel of it wide enough to do much of anything with, but there were just enough bees left on it, at just the right size, for me to fussy cut the center piece of a set of bright, summery quilt block coasters.

So that’s what I did!

Turning a mini quilt block into a coaster is an easy project–all the hard work is in sewing that quilt block, after all! Here’s how to do it!

Materials


You will need:

  • mini quilt block. Any quilt block that’s approximately coaster-sized, say between 4 and 6 inches wide, will work for this project. If you want something bigger, just call it a mug rug! For mini quilt block ideas, check out my mini log cabin quilt block tutorial.
  • cotton batting or equivalent. Coasters are actually a great way to use up the last scraps of cotton batting leftover from a quilt project. I also like to use recycled polyester felt; if the felt is on the thin side, like craft felt often is, you can double it up for this project.
  • backing fabric. This back-to-front binding piece should be 1″ larger than the quilt block on all sides.
  • measuring, cutting, and sewing supplies.

Step 1: Cut the batting.


Iron and square the mini quilt block, then set it directly on the felt or batting and use it as a template to cut the piece to size.


One of the nice things about both felt and batting is that they’re a bit grippy, so if you’re moving straight to the next step you don’t even really need to pin this. But a few clips around the edges are also fine!

Step 2: Measure and cut the backing fabric to size.


Prep your backing fabric by washing, ironing, etc., then lay it right side down onto your work surface. I like to set my quilt block + batting stack right side up directly on top of the backing fabric, then use a clear, gridded quilting ruler to cut the backing fabric 1″ wider than the quilt block on all sides.


You’ll need to trim the corners of the backing fabric to reduce bulk in the binding. I always just eyeball this by first ironing the corners down, as in the above photo, then hand-cutting them off about halfway between that fold and the corner of the quilt block.

Step 3: Sew the binding.


Fold each side in to touch the edge of the quilt block, then iron to crease. Then, fold each side in again at the edge of the quilt block, bringing that first folded edge over the quilt block to create the binding. Adjust the corners by hand until they look tidy; you can make them look mitered or leave them as-is, as long as there are no raw fabric edges showing.


Stitch the edge of the binding down to the coaster. On my sewing machine, a basic Singer Heavy Duty, I use a zigzag stitch with a width of 3 and a length of 2.


That’s the entire process to make a coaster! I made six coasters, some with hearts and some with bees, and I’ve already thrown a couple in the wash because apparently we’re all messy coffee drinkers in this family. I LOVE that these coasters are as easily washable as our quilts and clothes!

Because these coasters are so summery, AND because I’ve got so much fabric, ahem, I’m already thinking about the idea of using these seasonally and sewing some different coasters that we can use in the autumn and winter. Little skull centers with orange, black, and purple frames would be perfect for October, don’t you think? And perhaps little hearts with pink, purple, and white frames for Valentine’s Day?

P.S. Want to know more about our adventures in learning, and the resources that we use to accomplish them? Check out my Craft Knife Facebook page!

Monday, June 3, 2024

I Love My New Mini Quilt Block Coasters

Also, look what I learned how to do!

It's nifty, but a little of that gif goes a loooooong way--please feel free to scroll down until you can't see it! I'll wait!


That's more soothing, right? Now, let's begin.

As of today, I think I've finally broken out of my months-long obsession with mini quilt blocks--nothing like a seven-hour session sewing mini quilt blocks to finish up gifts for my two favorite members of the Class of 2024 to break me... I mean, break me OUT. Ahem.

I also might have damaged my mind by listening to A Court of Mist and Fury pretty much that entire time. At one point I walked through the family room, where both kids have so far spent their summer doing their darndest to keep the couch from flying away (and it makes my heart sing with joy to see it!), and I was all, "Kids! I am so worried about Feyre's plan to steal the Book of Breathings! I know she's the only person who can stop the King of Hyburn from using the magic cauldron, but you can't winnow into the building where it's hidden! It's too dangerous!"

The kids gave each other that look that I don't understand since I'm an only child, but I think it means something along the lines of "What are we going to do about Mom?", and then one of them carefully said, "Um, are you still reading that fairy smut?"

Y'all. This one is barely smutty at all! And it turns out that it's very good! It even provides some fixes for stuff from the first book that makes it less stupid!

Anyway... the grad gifts I sewed are sooooo darling, and as a bonus I was able to use up several practice mini quilt blocks I'd made without knowing what I wanted to do with them. Y'all KNOW how much I love using up stuff!

Before that, though, I made these!

Oh, and this guy, too:

I used the mini log cabin quilt blocks that I have the tutorial for here. I couldn't get the binding quite as tidy as I'd wanted--I'm a sucker for mitered corners without any real ability to attain them--but the stitching and piecing is just about as neat as I've ever done. I have FINALLY learned the lesson of picking a seam allowance and sticking to it!

Or not, because for this project I cut a ton of fabric 1.5" wide, and whenever I wanted to vary the finished width of a piece I played with varying my seam allowance. It only kind of worked, because for some reason I couldn't figure out how to make the log cabin pieces around the bee .5" wide after sewing a .25" seam on the other side to preserve my fussy cut bee--


But whatever. It still keeps my coffee from dripping onto the table:


My newest innovation comes from splurging on some gridded mylar stencil sheets, because I cut a template for the 1.5" square that let me fussy cut my pieces, perfectly centering the element I wanted to feature. That and these plastic sewing clips that I'm still delighted by have transformed my sewing for the better!


I've got a proper tutorial for sewing these coasters scheduled for Wednesday, and then I'll show off the patchwork quilted grad gifts that I'm SUUUUPER excited about. 

And then I should probably get started learning how to Foundation Paper Piece, because I can't send my baby off to college without a bookshelf quilt!

P.S. Want to know more about my adventures in life, and my looming mid-life crisis? Check out my Craft Knife Facebook page!

Friday, May 31, 2024

Sew a Mini Square in a Square Log Cabin Quilt Block

My log cabin quilt block obsession has grown both larger… and smaller!


The log cabin was the second quilt block that I ever learned to sew (everyone’s first quilt block should be the Nine-Patch!), and it’s remained my absolute favorite. It’s the kind of block whose versatility works for both newer sewists–wonky pieces are absolutely acceptable here!–and advanced sewists who want to experiment with color, value, and dimension.

My current obsession is mini quilt blocks, and I’m loving one specific type of log cabin quilt block, the square in a square subset, for highlighting a fussy cut center piece. The pieces around it, while constructed in the traditional log cabin way, make a series of frames that further highlight that piece, similar to the concept of highlighting the red “hearth” piece in the center of a traditional log cabin quilt block.

Even with this very simple block pattern, there’s a lot of scope for the imagination. I wanted something summery, so I’m playing with yellows and oranges, but there’s an infinite amount of variety of color and width to be played about with here.

Here’s how to make these mini square in a square log cabin quilt blocks:

Materials


You will need:

  • fabric. Even though it’s a bit of a waste of fabric, depending on what width I choose for my log pieces, I’m cutting all my fabric 1.5″ wide and then simply adjusting my seam allowance to get the finished width that I want. My narrowest log pieces will be .5″ wide, so for those I’ll also be sewing with a .5″ seam allowance. The pieces that I want to end up 1″ wide will get a more traditional .25″ seam allowance.
  • measuring, cutting, and sewing supplies. I LOVE a clear, gridded quilting ruler for precise measuring and cutting. I cut the strips with a self-healing cutting mat and rotary cutter, and I fussy cut the center square using a pair of sharp sewing scissors. To make the fussy cutting even easier, I recently splurged on a piece of gridded plastic that I could use to make my own cutting templates. It’s NOT eco-friendly, but I love it and I’ll use it forever! For machine sewing, I like a narrow, sharp needle and matching thread. And like it or not, you have to have an iron!

Step 1: Cut the pieces.


Above, you can see that I’ve got my colorway figured out and my pieces chosen. All the strips are 1.5″ wide, and the center block is 1.5″ square. The little heart in the middle is just .25″ square, so I’m going to aim for all my finished logs to be .5″ wide. That means that all my seam allowances will be .5″. It’s overkill and don’t tell the quilting police, but just between us, I kind of love piecing with a wider seam allowance. It always feels so much easier for my fumbly fingers to handle!

Step 2: Frame the center piece.


Line up the seams of the first log piece and one side of the center block, wrong sides together. This first log piece will be the shortest, and although you won’t be able to tell by more than the lines of stitching, since all the pieces of this frame will be the same color, I nevertheless like to place it at the bottom.

I don’t like to start my stitching at the very edge of the fabric, because I can’t figure out how to keep the fabric from bunching at that edge when I do (let me know if you have tips!), so I like to offset the log pieces and then trim the extra away after sewing each seam.

Sew the seam, then use your sharp sewing scissors to trim each side of the log piece to match the edge of the center piece. Unfold and finger press the seam to whichever side you prefer–for this project, I’m pressing the seams open, but again, I think that’s something that I don’t want you to tell the quilting police that I do…


Above is the block that I sewed from the right side. You can tell that the top left is a little uneven, and if you want you can trim it down so it’s perfect again before you continue sewing.

Do I want to, though? Nope!

Here’s the block from the back side:


One piece of advice that I did receive once upon a time, and that I DO follow, is to iron quilt blocks from the right side, not the wrong side like in the photo above. I don’t know why that is but I do it anyway.

Sew the next three log pieces just the way you sewed the first one, continuing to border that center piece.


Each time, you’ll trim the log piece to match the two sides of the block, then iron the seam open (or to the side you prefer!) from the right side:


Remember that you can always trim the block to the correct size, so I don’t think you should get too fussy if one of your seams is a little imprecise. These blocks are tiny!


Your complete frame will look like the photo below:


Notice that you can see the lines of stitching for each piece in the frame, but that won’t really be visible if you’re not looking at it with your nose two inches from it like we are right now.

Step 3: Continue piecing additional frames.


Add as many additional frames as you want to this log cabin quilt block. I kept up with the .5″ seams for this quilt block, and you can see in the photo above that it’s definitely added “dimension” to the quilt block, but I don’t think it made it too bulky. I think I’m going to use these quilt blocks for coasters, anyway, so a little more thickness will just make them more absorbent.


I think that it looks the nicest to continue rotating the blocks and adding pieces in the order that you started with the first frame. So if you went clockwise like I did in the above photo, keep going clockwise! And even though we’re still looking at it with our noses two inches from the block, I think the stitching in the frames already looks less obvious, and it will continue to fade into the background the more frames you add.

Here’s my finished quilt block, below:


Instead of adding another frame with that 1.5″ strip I have there, I’m going to use a different piece of that fabric to sew a back-to-front binding when I turn this, and several of its identical friends, into coasters.

But the world is your oyster when you’re choosing what YOU want to do with your square in a square mini log cabin quilt block! You could make a zippered pouch, or a needle book, or a quilted postcard, or gather it together with 359 more mini quilt blocks and make a whole quilt top.

Let me know what you end up making--you know I'm nosy like that!

P.S. Want to know more about our adventures in learning, and the resources that we use to accomplish them? Check out my Craft Knife Facebook page!

Friday, May 24, 2024

Log Cabin Quilt from Upcycled Denim.... And It's King-Sized!

I originally posted this tutorial over at Crafting a Green World back in 2023.


What better summer project could there be than sewing a king-sized upcycled denim log cabin quilt?


I roasted while I sewed all that denim and flannel in the smack middle of the summer, but I’ll be so comfy this winter!

I’ve had this log cabin quilt sewn from upcycled denim in my mind’s eye for a few years, but it’s the embarrassing state of my fabric stash that finally prodded me into action. I may not have projects in mind for all that quilting cotton and canvas and jersey knit fabric, but sewing the giant plastic bin full of old jeans and that three yards of extra-wide flannel into the quilt of my dreams has certainly made a big dent in my hoard!

Here’s what I used for my quilt:

  • soooo much denim. I’ll never lack for fabric to sew with if I can just keep outgrowing my jeans every few years! I’d like to thank Covid and perimenopause for sourcing much of this latest quilt for me.
  • extra-wide flannel. I prefer to use thrifted sheets to back quilts, but in this case my thrifting luck deserted me, so I bought three years of extra-wide flannel. At about 108″ x 108″, it was nearly the perfect size to back my king-sized quilt. Just a little bit made it back into the fabric bin for later! The big box fabric store near me has a decent selection of extra-wide fabrics–I can at least get the color I’m aiming for, if not an exciting print.
  • measuring, cutting, and sewing supplies. You need a sturdy machine to sew over all those denim seams, and a sharp sewing needle.

Step 1: Measure and Cut Log Cabin Pieces


The beauty of sewing a king-sized quilt is that it can be a giant square–anywhere between 90″ and 110″ looks good and fits the space well.

For a log cabin quilt, this means that you can sew the entire quilt as if it’s one giant log cabin quilt block!

Because I’m the laziest, I wanted to make my strips as wide as I could get away with. For the jeans I’ve got in my stash, 6″ wide was a good choice, resulting in the least waste and looking proportionate in the oversized quilt. But of course the beauty of a log cabin quilt is that you can be really creative with it, so feel free to have fun with your sizing.

When I had a huge stack of strips, I sewed them all into a single strip, short sides together. Because the denim was all different weights, I finger-pressed each seam to the side that felt thinner or lighter… or, tbh, just in the direction that it seemed to want to go. No reason to stop being lazy now!

I can’t even tell you how many pairs of jeans I used in this quilt, but I got through a lot of podcast episodes just cutting log cabin pieces!

Step 2: Sew a Center Panel (Optional)


You don’t have to have a special center panel for a log cabin quilt, and when I first sewed this half-square triangle from upcycled denim, I thought that it would be a pillow front. But sometimes items change their purpose when they’re on my sewing table, and this one became the center panel for my quilt!

Step 3: Piece the Oversized Log Cabin Quilt Block


I sewed my pieced strip around and around my center panel, cutting the strip even at the end of each seam and beginning it again on the adjacent side.

Cut this piece even with the quilt, turn the quilt 90 degrees, and keep sewing!

This quilt would have had more of a log cabin look–and a really stunning one, too!–if I’d used a single color per strip, but that would have taken a lot of effort to sort my denim by color, and as I’ve mentioned, I’m the laziest!

At the end of every podcast episode, my favorite thing was to lay the quilt out to see how it was growing.

Can you see where I spilled my ice water on the quilt top? This thing was so bulky and heavy to haul around, and it knocked everything off of every surface I passed when I carried it around.

When it got to the point of having to move furniture to make it fit, I knew that I was almost done!

Step 4: Add the back and binding.


Finally bought myself these sewing clips after eyeing them for years. They’re not quite as life-changing as I’d hoped, but they DO make quick work of pinning bulky seams like these!

I am in the process of working through my sadness that I didn’t actually quilt this, so don’t make me feel worse about it. I even had a cute design in mind, but my at-home sewing machine can only do so much! By the time I finished this, I wasn’t sure if I could even fit the entire thing under my sewing machine anymore. Next time, I’ll think through some kind of quilt-as-you-go method, perhaps.

As it was, my family had to help me move half the furniture in the family room to make space for me to lay down the flannel fabric, tape it taut, lay the quilt top over it, trim the backing to 2″ past the quilt on all sides, then double-fold it around the quilt and pin it.

Four more straight seams later, and the king-sized upcycled denim log cabin quilt of my dreams was done!

I should probably be more careful of it considering how much time I put into it, but I believe that quilts are meant to be used, and this giant quilt DOES make an excellent summer picnic blanket! It’s super heavy and warm, too, so I’m excited about using it this winter.

My new goal is to think up some throw pillow covers that I can also sew from upcycled denim, but that won’t be so matchy that it looks too country… Pixelated skulls, perhaps? Or maybe monograms?

P.S. Want to follow along with my craft projects, books I'm reading, road trips to weird old cemeteries, looming mid-life crisis, and other various adventures on the daily? Find me on my Craft Knife Facebook page!