Showing posts with label felt. Show all posts

Thursday, February 27, 2020

How to Make a Tote Bag from Scratch


I never did find a pattern for the perfect zip-top tote bag.

So I made one up from scratch!

Fortunately, a tote bag pattern is dead simple to construct. Here's what both sides will look like--minus the Girl Scout marketing (and the cat hair, sigh...)!

We're currently in the middle of our third day of straight rain, with another full day of rain forecast tomorrow. Sucks, because I do not have the skills to make gloomy indoor spaces look lovely!
 Start with the desired finished dimensions of your tote bag. To each side and the bottom, add 1/2 the desired finished depth of the tote bag, plus 1/2" seam allowance.

Notice the square that you'll be cutting out of the bottom left and right pieces. This is a nice place to self-correct, because if it's not square, you need to go back a couple of steps and re-measure!

Because you're going to fully line this tote bag, you can use any non-stretch fabric that you like. I am pretty excited about making a fleet of appliqued felt-on-felt tote bags to replace the paper bags that we usually get at the grocery store (yikes, I know), because probably an entire decade ago Matt and I had a failure of communication during a Black Friday sale at Joann's that resulted in our ownership of an absolutely ungodly yardage of Eco-fi felt in every single existing color.

That absurd amount of felt has been a weight on my mind ever since, and I'm always on the lookout for felt projects. I think these tote bags are finally going to bring my felt stash down to the amount that a sane person could possibly be expected to own!

So, yes, feel free to satin stitch embellishments to your tote bag, if for no other reason than it uses up even more felt!

Next, cut out two more identical pieces:


I wanted these tote bags to be reversible, with one plain option and one embellished option.  Other than that, I don't really care about making the felt colors too mitchy-matchy--I mostly just want to use up all that felt!

For each front-and-back pair, put right sides together and sew up both sides and the bottom. Do NOT sew that square shut!


Instead, for each square match the two seams and make those your middle point--


--then sew the square shut, creating a box corner:


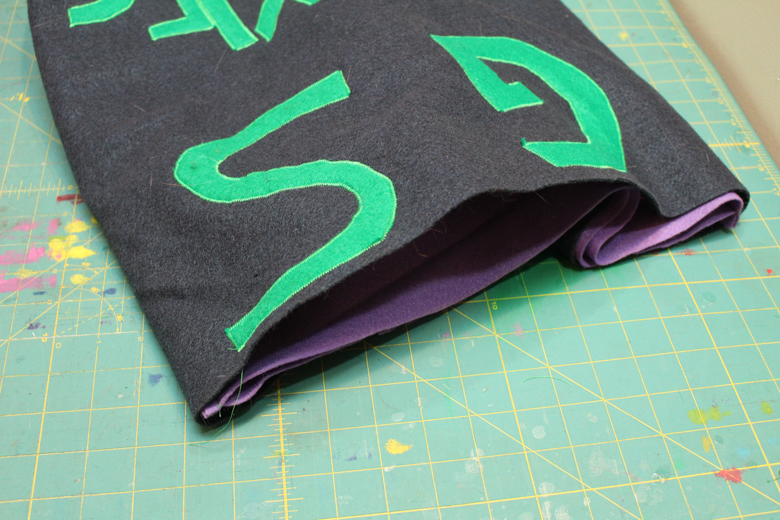
Put the two tote bag pairs together wrong sides together, one inside the other:


It should look something like this!


Cut a length of webbing for your strap, then insert it between the tote bag pairs and pin it well:


Edge stitch around the top of the tote bag. If you're using a fabric that will fray, you can fold the raw edges under and pin them first, but with felt or fleece you can just stitch away.

Stitch to reinforce the webbing straps by sewing down the length, then sewing an x:


Admire how many boxes of Girl Scout cookies your new tote bag can hold!


When it's not Girl Scout cookie season--because I have faith that one day it will not be Girl Scout cookie season--we'll turn the tote bag so that the purple faces out.

And when it's Girl Scout cookie season again--because it somehow seems to be always Girl Scout cookie season!--there's one more marketing tool all ready to use!

Tuesday, December 19, 2017

Mommy and Me Book Review: Disney Princess Felt

Syd is my right-hand girl when it comes to craft book reviews, because she's as likely as I am to spend the day in a pile of craft supplies, making all the stuff. Yesterday, for instance, she completed most of her schoolwork (she's a sneaky-sneak who avoids her French homework whenever possible), and spent some time lounging over the floor heating vent with a book and a blanket, but she spent most of the day drawing comics on the computer and baking and decorating a Grinch-themed cake.

I meant to throw her outside for an hour, but it was rainy and gross and I forgot. Guess we'll try for that Vitamin D today...

To aid in the crafting, this month I actually have our big table in the playroom set up with all kinds of supplies to make ornaments. I've got rocks and paint pens, ribbon and hot glue, scrapbook paper and kite paper, glue sticks, dried leaves--all the most important ornament-making supplies.

Will has been a paper chain making machine, I've done some mini window stars, and Syd and I have painted a few rocks (because who doesn't want rocks hanging from their Christmas tree?), but the hit of the table happened when I received this Disney Princess Felt kit free from a publicist for review and surprised the kids with it.

We've done several projects from the Star Wars Felt kit over the past year (I'm actually mid-Boba Fett right now...), so both kids were able to jump right into this one with little instruction from me. They already knew how to find the labeled templates for the character they wanted to make, and how to pop them out of the cardboard (pro tip: put the templates for each character into a little plastic baggie with that character's name on it, and keep the cardboard shell that you popped the templates out of, so you'll have a way to remake them when you lose them). They already knew to fetch the chalk and scissors, and basically got themselves right to work while I sat and dawdled over which princess I wanted to make.

Syd, of course, chose Ariel:

Excuse the chaos, and the inferior lighting that these short days necessitate. Solstice is coming soon!
 I was interested to see that with her expert knowledge after having made Star Wars felt critters, she chose to simplify the project for herself by not backing and stuffing her Ariel. After all, piecing the pretty front and putting in all the details are the fun parts!

I bet that if you wanted to make the project even easier, you could glue the pieces together rather than sew them, but you'd have to be very careful about where you put the glue, as you couldn't then embroider details through it.

Here's my Belle, with all her pieces together but not yet sewn, except for the jewel in the neckline of her dress:


You piece her together with a stab stitch--

--and then the fun part is embroidering on all the details!

Later on this day, as I was stuffing my Belle and Will was sitting across from me making yet another paper chain (our tree is bounteous with them this year!), we were discussing Belle, and whether or not she had Stockholm Syndrome, and if abduction was a legitimate method of finding a life partner. I told Will that if I were Belle, I'd have been sold on that first tour--the Beast would show me his library and I'd have said, "Yep, Buddy. I'll totally marry you. Just let me know when the priest arrives, and also have all my meals brought to the library."

Will snorted with laughter, but did not disagree with my sentiment.

You can do all kinds of things with these little stuffies, and if you had younger kids, it would be super cute to just make the entire set for them to play with, or to make all the pieced fronts, not stuff them, and use them on a felt board or for quiet play. We have our own way of using all the stuffies that we make from these kits, however:

These Christmas ornaments could not be sweeter.

Now I'm off to go hang up Syd's Ariel!

Thursday, November 9, 2017

How to Make a Girl Scout SWAPS Banner

Of course, girls can store the Girl Scout SWAPS that they've collected in a shoebox or plastic bin, and most girls do, which is fine, but frankly, in our house we have more wall space than we have shelf space, and so I thought that SWAPS banners would be a cute decoration for my girls' bedroom, as well as a way to organize and display their SWAPS that didn't mean there was one more plastic bin sitting untouched on a shelf.

I don't do that KonMari thing at all, but I do like our possessions to be actively used and loved!

If you've done any kid crafts, you likely have felt in your stash, and you may very well have an unused dowel hiding out in your garage, or a nice-looking stick in the backyard (after yesterday's all-day/all-night storms, which included me having to hide five young party-goers in the children's bathroom during a tornado warning, complete with their plates of cake because they wouldn't let go of them, we have LOTS of nice-looking sticks in our backyard!), which means that you could very well make this banner today, using supplies that you already own.

That's my favorite kind of project!

To make this Girl Scout SWAPS banner, you will need:

  • felt, any color, dimensions 12"x24": You can cut your felt to any size, of course, and if you're part of a council that's really into SWAPS, or you have several destinations planned where you know there will be SWAPS, you may well want to make yours larger--maybe a lot larger! Our council doesn't offer many SWAPS opportunities, however, so the only chances that my kids have to exchange them are at the yearly Girl Scout overnight at the Indianapolis Motor Speedway, and recently at the Girl Scout National Convention. If the pace doesn't pick up, then this banner will have plenty of room for the rest of their Girl Scout SWAPS.
  • letter stencils: I wanted to use my Cricut to make stencils, but the old version of Cricut Craft Room isn't playing nicely with my newish-to-me computer, so I used some large-format alphabet stickers as stencils instead. I think the letters actually worked out really well!
  • dowel or stick: This should be longer on each side of the felt so that you can use it to hang your banner. I found a 3' dowel in the garage and asked Will, who has earned her Cadette Woodworker badge, to saw it exactly in half for me.
  • sewing supplies. I used a sewing machine, but this would be simple to sew by hand, or even to hot glue.
1. Cut felt to 12"x24", then turn the top edge over by 1" and sew:

I made this channel pretty wide, because at the time I hadn't raided the garage, and I wasn't sure what sort of hanger I'd end up with. Stash PVC pipe was another final contender.

2. Cut letters out of felt:

It was pure happenstance and good luck that the stickers that I found to use as stencils fit perfectly on my banner. Yay!

3. Sew or hot glue the letters to the top of the banner:

Seriously, look how nicely they fit! I used hot glue, and put the top edges of the letters over my stitching line to hide it a little.

4. Add the SWAPS:
Notice the post-Halloween candy in her mouth.
One of the reasons why I wanted this banner was so the kids could organize their SWAPS by event. You could print each event and date on fabric and sew it on, but I just wrote it on cardstock. The day was starting to get away from me, and "done is better than perfect!"

You can see both of my labels on Syd's banner below, and how she's organizing her SWAPS by event. Just what I'd hoped for!

I hung the kids' banners in their room, in a piece of wall real estate exactly the right size for them, and next to the behind-the-door hooks where they keep their Girl Scout uniforms:

You might think that one kid is way more into SWAPS than the other, but I believe the reality is that Will hasn't remembered where she stashed all of her SWAPS yet (probably stuffed somewhere I don't want them, after hearing me prod the kids to clean their dang room already because we're having company).
I like that the items are themed together--hanging from the doorknob is even a washer necklace painted in Girl Scout colors!--and now I consider that entire space to be devoted to Girl Scout decor. I have a postcard-sized portrait of Juliette Gordon Low that I've been looking for a home for, and I'm wondering if I should paint the Girl Scout Law around the door frame (although surely that would also involve repainting that grody nonsense first...) or stencil a quote onto the high part of the wall above the door.

Any suggestions?

Tuesday, October 28, 2014

Tinkerbell and the Vampire

As the kids and I were packing on Sunday, I suddenly had a panicked thought and burst out with something like, "Oh, no! Kids, you have to go put your costumes on RIGHT NOW!"

Because if the kids are going to be in California with their grandparents for Halloween, then that's where they'll be wearing their costumes, and so if I wanted to take pictures of them in their costumes, it had to be before I packed them! Yikes!

Fortunately, the kids were excellent sports, and put on their whole Halloween costumes for me, just so I could take photos of them.

Sydney is Tinkerbell:


She created her entire costume with very little adult assistance--I showed her how to draft a dress pattern to her measurements, Matt showed her how to transfer it to fabric, I threaded elastic through the casing she sewed in the top of the dress, I helped her bend the wire of her wings, and I showed her how to glue the clear cellophane to the wire. Syd thought up the entire costume, then watched a Tinkerbell movie and paused it whenever Tinkerbell showed a new angle, so that she could sketch her design from all sides. She sewed her dress, cut out the details at the bottom hem, drew a template for the wire hanger wings to follow, then spent hours painstakingly hot gluing clear cellophane gift wrap to them.

Fortunately, because Syd can be quite hard on herself, her costume turned out just the way she wanted!

Well, except for the part about the wings making her really be able to fly. That part didn't work out at all...


Will's usually an easy girl to please about Halloween costumes. For her vampire costume, she let me wrap one of my old homemade Moby Wraps around her head as her hood. Matt bought her a black shirt and black pants from Goodwill, and although she was going to make her old standby, the plastic fork fangs, she actually received a set of fangs as a favor at a Halloween party, so she was good to go!
  

Again, this costume surprisingly doesn't confer any superpowers, either; nevertheless, leaping the chain that blocks the drive-in's driveway remains a fine pastime for young daredevils:


The kids will actually be trick-or-treating in La Jolla this year, and they've already been teased quite mightily about the treats that a swanky neighborhood like La Jolla shall surely yield--full-sized candy bars! Each kid her own pony!

For my part, my health is going to take an outstanding turn for Halloween this year, since unlike in previous years, I have not had to buy Halloween candy and then buy it again five days later because I ate it all, and in the best of all possible circumstances I will not spend all next week sneaking treats from the kids' Halloween stashes, either, because the day after Halloween they have another five-hour plane ride to get through.

Know what makes the time pass quickly during a five-hour plane ride?

Eating all your Halloween candy, I'm going to bet!

Tuesday, February 18, 2014

DIY Montessori Pin Flag Storage

As you probably guessed during my tutorial for setting up Montessori pin flags of all the Olympic nations, at some point or other Will and I have constructed ALL the pin flags.

Every flag.

Every nation.

Every state.

Every province.

Every continent.

It was a ton of work, spread out over many days, and I did not want to risk misplacing or flat-out losing any of these pin flags that we worked so hard on, so I created this manically organized storage system for them:

I store the pin flags in a three-ring binder, pinned into pieces of felt that I've cut to 8.5"x11" and hole punched to fit in the binder. The flags are alphabetized by continent and country, and before each set I've included a key, with each flag's name listed in order. The key is printed on cardstock, to give some structure for the felt pages.

Behind each key the flags are pinned in the same order, and this makes it easy to remove some for a special project, such as a pin flag map of the Olympic nations:

I can easily see which flags are missing, and see where they belong when it's time to put them back.

After each project, I tediously reorganize the flags back into their felt places, repairing any that were damaged, and then double-checking that all were returned and remaking any that are lost forever. It's not a super fun activity, but I do appreciate the order the next time I need to prepare another pin flag project.

Which will be next week. The Olympic nations are going away, and I think I'll set the United States up.

This post was shared with Keep Calm Craft on over at Frontier Dreams.

Wednesday, February 12, 2014

My Latest over at Crafting a Green World: The Kids are Sewing

See our Olympic nations Montessori map, before the kids got started on it?


Even though I may, personally, be feeling the late-winter blahs, I have to say that this may be the busiest Project Week I have ever witnessed. The kids have put together our entire set of Montessori puzzle maps and made their valentines for our big party tomorrow. Syd has drawn, worked on a model of the Statue of Liberty, finished her California vacation scrapbook, and built bizarre stuffed animal/toy car contraptions, all while listening to a never-ending selection of audiobooks. Will has built, painted, and mounted a birdfeeder; built, painted, and tested a pinewood derby car; built a model covered wagon, and helped me complete our set of Montessori pin flags. They've been to math class, been swimming, worked at our volunteer gig, and right now they're in the arena next to me happily trotting around on Cody and Lola. And it's only Wednesday!

I'd like to say that the early part of the week has been more restful for *me*, at least, but with the new plans running through my brain for a children's woodworking area and a homeschool pinewood derby competition, I just don't know...

Wednesday, November 6, 2013

My Latest over at Crafting a Green World: Comic Book Wallpaper and Felt Wizard Hats and Pumpkin Projects and My Bra

As a testament to how busy we've been over the past couple of weeks, I've been totally forgetting to show off to you what I've been up to with my other writing gig, so here's the catch-up:


My kid and I made her a witch hat out of felt


I'm particularly proud of that last project, since a great-fitting bra is VERY important to me, and also very hard to keep up with during my slow but steady weight loss. This alteration should keep this particular bra working well for a while longer, although I am eventually going to need to buy a bra with a smaller cup size.

Poor Matt is horrified.

Thursday, October 17, 2013

Tutorial: Roll-up Felt Hundred Mat

We have a laminated cardstock hundred grid that works with our number tiles, and I've recently realized that I can make some sturdy yet disposable hundred grids pretty easily from cardboard record album covers, but I was also wanting a hundred grid that would look nicer longer, and be easier to toss in my backpack for trips to the library or park to do schoolwork.

So I made one!

You make this hundred mat around the number tiles that you already own, so first you've got to make them. We have a set of clear one-inch number tiles that were great for matching to a printed hundred grid when the kids were littler, but now that they're older (AND have lost a couple of those tiles, sigh), I've made them a couple of sets of upcycled cardboard number tiles that are the same size, so they can be interchangeable. I've long wanted to make a set of number tiles out of Scrabble tiles, but I think their inevitable loss might break my heart, so...

Measure out the grid AROUND the tiles, so that when your kiddo puts a number tile on the grid, they'll still be able to see the border around the tile. A little extra space is always good for those fumbly kid fingers, anyway. For me, this meant measuring at one inch + 1 centimeter, and I still did a lot of double-checking:

Notice that I measured and drew this grid in chalk. I didn't end up making a mistake in my measuring, but if I did--chalk equals second chances!

When you've got the grid drawn out, get out a tiny paintbrush and some fabric paint, and carefully paint over your grid:

And that's it! You can roll up your mat, you can wash it, and you can play with it on the carpet:


I remember when Syd was first learning how to find numbers on the hundred grid, and now we're using it for multiplication and division. Ah, time...

Tuesday, March 5, 2013

My Latest over at Crafting a Green World: Postage Stamp Quilts and Handmade Memory Games


and a round-up of handmade memory games, including this felt and fabric scrap one that I've been working on:


I do love them (since I have a ton of that ecru felt, I'm looking forward to adding to the game using new scraps whenever I sew), but I have to say that they're highly engineered and really fiddly and time-consuming to create. I really regret deciding to make multiple sets all at once (one for us, one as a big sibling gift for two of the girls' friends, and one extra), as I am WEARY of the ironing, trimming, sewing, trimming, ironing, sewing, and trimming, and I'm going to have to force myself to complete at least that second set before we see our friends later this week.

Now the two baby gifts that I also need to make, neither of which I've decided upon yet? THAT I'm looking forward to creating!