Showing posts with label crafting. Show all posts

Thursday, October 27, 2022

Useless Halloween Decorations: DIY Cement Pumpkins

A few weeks ago, one of my teenagers asked me, "Hey, what Halloween projects are we doing this month?"

OMG I was thrilled. Stockholm Syndrome has set in, y'all!

Also, you guys. My family has TRADITIONS. Good ones, too! Ones that the teenagers like and happily anticipate! I messed up on a lot of parenting stuff, but traditions I figured out all by myself from scratch.

So, since Halloween projects are clearly a tradition (that I didn't know until now was actually a tradition, but okay!), every weekend this month a kid or two and I have been doing a Halloween project together. A couple of weekends ago Syd, Matt, and I did this--

--which, more on that later, but I'll just say that 1) a Jack-o-lantern is actually quite painful to wear on your head and 2) it was TOTALLY WORTH IT. 

And last weekend, Will and I took a couple of pairs of Syd's old ballet tights and made cement pumpkins!

Coincidentally, these were also a little painful, but also totally worth it!

To make cement pumpkins, you need:

  • legs from old tights. The parts that you use shouldn't have holes or runs.
  • Portland cement, with assorted mixing and measuring tools.
  • rubber bands.

1. Prepare your materials.

Cut a section of leg anywhere from six inches to a foot long, and knot one end.

Add a cupful of Portland cement mix to a bucket, then add some water and stir. You want the cement to be about the consistency of cake batter, so play around with adding more cement mix and water until it feels right. 

2. Fill the tights with cement.


Scoop cement into the tights and shake it down to the bottom. Add cement until you have the size of pumpkin you want, although remember to leave enough room in the tights to knot the top:


3. Add rubber bands.

Thump the cement-filled tights on the tabletop a couple of times to settle the cement, then adjust it so that the bottom knot is tucked into the middle bottom of the cement package and the top knot is centered at the top.

Begin wrapping rubber bands around the cement package:


Through trial and error, Will and I discovered that if the rubber bands are tight and cut really tight grooves into the cement, the tights and rubber band will be nearly impossible to remove from those grooves later. We highly recommend rubber bands that are wrapped more like the blue one that runs vertically in the photo below, NOT the pink one that runs horizontally:


4. Let cure, then remove the rubber bands and tights.

Allow the cement to cure for at least 24 hours, after which it should look something like this:


Loosen the tights by grasping the knots on each end and pulling them away from the cement:


Then, tear away the rubber bands and peel off the tights and discard:


They're quite dusty afterwards, so rinse them with the garden hose.


You can embellish these pumpkins in all kinds of ways, from shiny sealant to paint or decoupage, adding corks or twine or braided cord for a vine, felt or leather or book page leaves, etc. Will and I found, though, that all our pumpkins happened to look cute in a single stack on the coffee table, so that's what we did!

Thursday, August 4, 2022

Decoupaged Pressed Flower Greeting Cards, and a Real-World Practicum in First Aid

My Girl Scout troop's Folk Arts IPP meeting is a wrap!

Alas, for I did not meet my goal. At one point I asked the troop to start cleaning up after soapmaking while I went to see if the beeswax and coconut oil were completely melted for candlemaking. I swear I was gone for approximately fifteen seconds, but I came back into the room to the following:

KID #1: "[Name Redacted] hurt herself."
KID #2: "I see blood."
NAME REDACTED (bleeding profusely from the head and dripping blood onto the floor) begins to fall over.
KID #3: "I don't feel well."

And scene!

I also can't say that my first aid administration went perfectly, because how do you situate a kid when her head is bleeding so needs to be elevated, but she's also losing consciousness so her feet need to be elevated? Do you just prop her up like a little pretzel with her butt on the ground and her head and feet jacked up? Keeping her conscious felt pretty important so my co-leader and I put her feet up high and her head just on a pillow, but I'll clearly have to ask more scenario-specific questions at my next re-certification.

 But the good news is that the injury was actually just a side quest, and nobody actually got injured during either the cold-process soapmaking (during which the kids wore long sleeves, gloves, and face shields) or the poured container candlemaking (which, tbh, was pretty chaotic, so I think we just got lucky).

We did get a chance to press flowers in the microwave, but our first aid practicum used the time previously intended for decoupaging our flowers, so we'll save that for another meeting.

But until then, I was left with SO MANY flowers that I'd already pressed to give the kids plenty to work with, and since I'm uninterested in figuring out how to safely keep pressed flowers in my already overburdened craft supplies storage, later that week I snookered my own kids into helping me decoupage them, in the process further refining my almost perfect technique.

And now that technique IS perfect!!!

My old method for making pressed flower bookmarks came from this tutorial, which came from a magazine article, which came from a vintage Boy Scout manual. All of them called for decoupaging the flowers first onto waxed paper, and then using the method of your choice to adhere the waxed paper to a more structured paper.

My incredible innovation is just to... ditch the waxed paper. Decoupage the pressed flowers directly to the material of your choice, saving yourself a step and, I think, improving the overall look of the finished product. I also changed out the glue to one that dries stiffer, which I think makes the work sturdier and requires fewer top coats.

To test out this innovation, the kids and I made SOOOO many greeting cards! Will has a ton of thank-you notes to write and we're out of nice cards, so this was a good chance to replenish our stash.

To decoupage your own pressed flower greeting cards, you will need the following:

  • pressed flowers. I do have a new and improved microwave pressed flowers tutorial coming up, but until then, my original microwave pressed flowers tutorial does work well. 
  • backing material of your choice, ideally one with structure. I used this hemp watercolor paper and this Strathmore watercolor paper, and of the two I preferred the hemp paper. I really liked how the off-white color and visible fibers add to the overall look.
  • single ply of the cheapest disposable tissues you can find. If your tissues are multi-ply, separate them into the individual sheets. 
  • clear school glue. I used Elmer's clear school glue leftover from Syd's slime-making phase. 
  • paintbrush. A stiff paintbrush works better than a soft one. 
  • matte medium. I use this Liquitex matte medium. It's weirdly expensive, so I think you could play around with cheaper sealants, too.

1. Cut and fold paper to make greeting cards.

Will and I did this with a guillotine paper cutter, but you could do it by hand. If you've got 8"x12" pages, you can make two 4"x6" cards from each page. We made some that hinged at the top, and some that hinged on the side, mostly because we weren't paying attention to what we were doing.

2. Arrange pressed flowers on the greeting card front.

Queen Anne's Lace

This part is really fun! It was definitely assisted by the huge stash of flowers I'd already collected and pressed. Seriously, I took trips to the local parks to take little snippy-snips of the wildflowers growing there, waded around vacant lots next to strip malls, and sacrificed many of the lovelies from my garden.

Rose of Sharon

But having such a large selection of flowers to choose from made that completely worth it!

3. Use clear school glue to paint a single ply of tissue paper over the entire card front.

Gently set the tissue over the card front. Use your non-dominant hand to gently hold the tissue and the flowers in place, and with your dominant hand dip the paintbrush into clear school glue, allowing a generous coat of glue to remain on the brush.

Start with the center of one flower, and gently paint glue onto the tissue paper covering it. The glue will seep through the tissue paper onto the flower, rendering the tissue paper translucent:

Use the stiffness of the brush to coax the tissue paper into all the little nooks and creases of the pressed flower, aiming for maximum adhesion of the tissue paper to the flower and card. 

Rose of Sharon and fern

The tissue paper will make lots of wrinkles when you glue it to the card, which is fine. What you don't want are air pockets between the flowers and tissue paper, because those will stay visible in the final product.

Queen Anne's Lace

Work your way across the surface until the entire card front is covered. Leave the excess tissue paper in place until the whole thing is dry, which should take about a day.

Rose of Sharon

4. Trim the tissue paper and add embellishments.

Trim the excess tissue paper from the greeting card fronts. If possible, it is highly desirable to have the assistance of both a teenager and a cat for this step:


You can do anything that you want regarding embellishments, but I entertained myself by finding fun phrases and conversations from this vintage Spanish textbook that I found in a Little Free Library once upon a time:


Although some is random--


--some, I think, is quite apt!


Dab a little more clear school glue onto the back of each embellishment to place it, then use the pad of your finger to thickly coat the entire greeting card front in matte medium.

Chamomile

Let dry. 


You can add additional coats of matte medium, which I did for a couple of cards but ultimately decided that it's unnecessary, especially because matte medium is so expensive!

And here are some of our finished cards!

It's that Queen Anne's Lace from Step 2!

Chamomile from Step 4

Fern

Rose of Sharon from Step 2


I still need to make matching envelopes for these cards, but then they'll be ready for thank-yous!

Tuesday, December 28, 2021

How to Make a Display Board from Upcycled Girl Scout Cookie Cases

This tutorial was originally published on Crafting a Green World in 2017.

 Kids and their display boards, amiright? Science Fairs and History Fairs and Biography Fairs and 4-H presentations and I can't even imagine what else, just that it all requires a display board. 

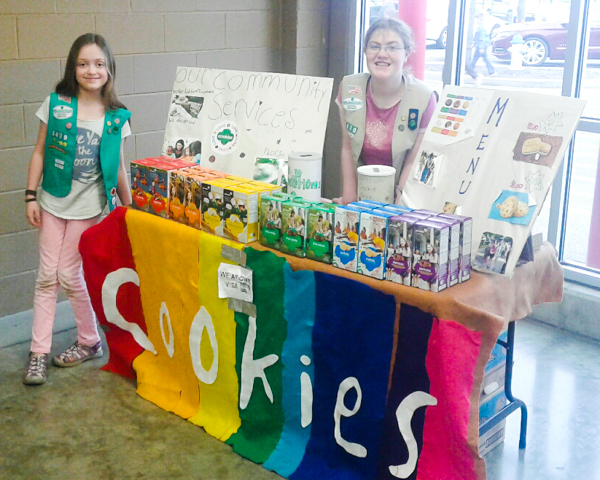
 Years ago, I made the kids re-usable tri-fold display boards, some out of chalkboard and some out of dry erase board, and we LOVE them and use them for all of our academic fairs. We used them for two years of Girl Scout cookie booths, as well, but this year, with a super-motivated troop of Girl Scouts whose collective goal was to sell at multiple booths every weekend all season, I deeply desired something lighter and more portable, something a kid could easily carry three of at a time. The display would need to stand up independently but also fold flat for storage. Oh, and it had to be upcycled, because obviously. 

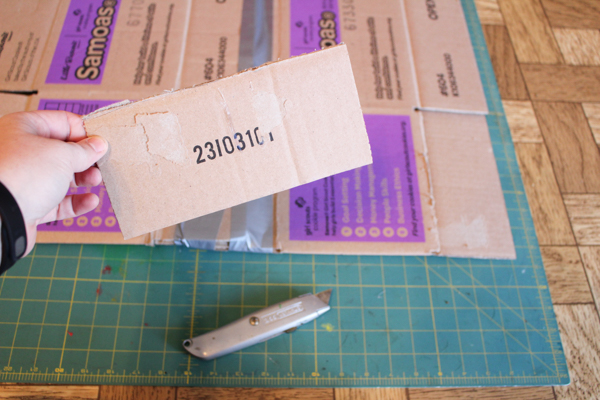
 Fortunately, I have LOADS of supplies available, what with the hundreds of Girl Scout cookie cases that are now in my house. This tutorial calls specifically for Girl Scout cookie cases, but you can substitute any type of shipping box that you have on hand, if you're creative with your modifications.

 You will need: 

  three Girl Scout cookie cases. It doesn't matter which type of cookie you use (I mention this because the box is a different size for each type of cookie), as long as you use at least two of the same type. 

If you don't know a Girl Scout, call your town's Girl Scout office or just pop by a Girl Scout cookie booth in progress and ask--they will undoubtedly be THRILLED to pawn off their empty cases on you so that they don't have to deal with them themselves! 

  duct tapeDuct tape isn't super eco-friendly, but it IS the best tool for this project. When you're ready to recycle your display board, pull the duct tape off and throw it away. 

  cutting mat and box knife. You don't even need a ruler for this project!  

1. Break down two Girl Scout cookie cases and overlap them. In the image above, you can see that I'm overlapping them about halfway across the flattened top flap. This is enough overlap to give the join strength, but I've avoided overlapping them at a fold to keep the display stable. Duct tape the join. 

 2. Cut off one flap. Decide which side of the display will be the front and which the back, and then cut off one of the flaps from the backside. Use your box knife to cut this flap in half, lengthwise, so that you've got two long tabs. Set them aside. 

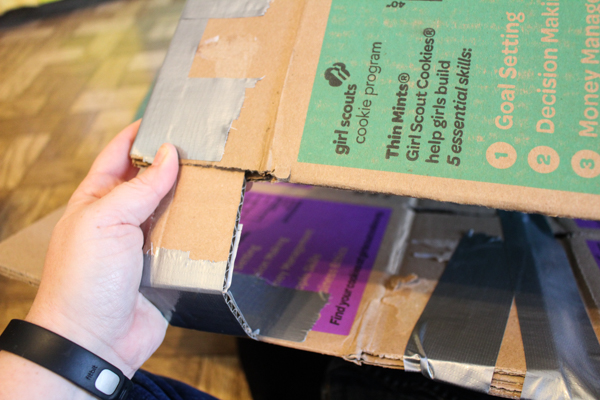
 3. Flatten the third box, then duct tape the long sides of the flaps at one end together. Check out the image above for details--don't tape up the bottom! 

 4. Center the third box on the backside of the display board, aligning the crease line just above the flaps that you duct taped in Step 3 with the bottom of the display board. Take another look at the image for Step 3 to see what this looks like. Duct tape the top of this third box to the back of the display board, but only along the top side. Look at the above photo to see how I've taped across that join on both sides of the flattened box, then taped down to give it more security. This entire flattened box should now be able to work like a hinge. Fold the flattened box along that lower crease line until it's easy to do so. 

 5. Duct tape the tabs to the bottom of the display board. Center each tab on that flap from the third box that you've taped the sides of--the idea is that the tabs will insert into those flaps to stand the display board up. 

 Again, duct tape each tab on both sides to make each a hinge, then support each with another couple of pieces placed perpendicularly. These tabs will get a LOT of wear! To assemble the display board, insert each tab fully into its slot:

 Your display board should then stand up on its own!  The kids in my Girl Scout troop covered the front of each display board with newsprint, then decorated it to make their displays. 

This technique would work well for a one-time display, but the paper got torn up WAY before cookie season was over--although the display boards themselves are still going strong! Next year, I'll direct the kids to sturdier embellishing materials. Feel free to send me suggestions for what to use in the Comments below!

Saturday, December 4, 2021

Make Sea Glass in a Rock Tumbler

This tutorial was originally published on Crafting a Green World back in 2016.

Yes, you can 100% make sea glass in a rock tumbler. It's super easy, and it comes out straight-up looking like sea glass. 

Here's how to do it.

How to Make Sea Glass in a Rock Tumbler

You will need: 

  rock tumbler. You want a good-quality metal one, something along the lines of the Thumler's Tumbler that we own. Good rock tumblers are pricey, but they make a great gift for a science-minded kid, so much so that if you don't have a science-minded kid of your own, someone you know probably has one and may in fact have a rock tumbler that you can borrow. 
  filler. This takes up the spaces between the glass pieces. You can use either ceramic media or plastic beads, both of which can be re-used. 
  coarse grit. Unlike rock tumbling, which requires coarse grit, fine grit, pre-polish, and polish, making sea glass in a rock tumbler only calls for coarse grit
  broken glass. You don't want anything too thin, like microscope slides, because the rock tumbler will abrade it so that it's too thin to be useful. I had great luck with vintage glass bottles, however. 
  hammer and towel. Gotta break that glass somehow! 
  tile nippers. These aren't necessary, but if you want to shape or trim your glass at all, you need them.

 1. Break some glass. As I mentioned before, I'm using vintage glass bottles to make sea glass, because that's what I have a million of and need to find more things to do with. I'm primarily choosing either the glass bottles that were broken when I found them, or that are of unimportant provenance. I clean up and polish the nice vintage glass bottles and display them around my house, even though I've frankly got too many of those, as well. 

 ANYWAY... my preferred method of breaking a glass bottle is to wrap it in a towel, set it on my driveway, then whack it with a hammer. From the mess of broken glass, I pick out the nice pieces that I want to tumble. I really like bottle necks and bottle bottoms (ahem...), and also the side pieces if they've broken into a shape that I think will look nice when tumbled. 


 Use the tile nippers to trim a piece of broken glass into a more interesting shape, or chip off the edges around a bottle's bottom. 


  2. Set up the rock tumbler. Use these instructions to make your tumbled glass. Note, however, that the instructions explicitly tell you not to use glass bottles. My experience is that you can, although you still want to avoid any glass that's too thin. A Coca-Cola bottle should work. A spaghetti sauce jar probably won't. 

 3. Check your work. When you open up your rock tumbler after five or so days, the inside will look like this:  


Instead of sifting out the tumbled glass, I pick it out of the matrix and examine it. A couple of times, a piece has cracked and needs to be set aside. Sometimes, a piece is perfect just the way that it is and I love it. Most times, though, the tumbled piece is almost perfect, but still needs some refining. For that, get the tile nippers back out. 

 For instance, after examining that bottle neck in the above photograph, I decided that I'd like it better if it was trimmed even closer to the edge, so I did: 


 4. Go for round #2. Pop any glass that you've trimmed, and enough new pieces to maintain the level in your tumbler, back into the barrel with the same grit and filler material. Give it a go for another five or so days, and then take a look. 

Repeat until you're happy! 


Saturday, November 13, 2021

How to Embellish a Composition Book with a Coloring Page

 This tutorial was originally published on Crafting a Green World in 2016.

Are you into coloring books? My kids and I are! We listen to a lot of audiobooks, podcasts, and read-alouds, and coloring is a great way to pass the time. 

 This means, however, that we have LOTS of lovely completed coloring book pages. I don't really have a problem with re-using and recycling paper, but often the pages are so thoughtfully and lovingly filled in that they just seem too pretty to toss. 

 At the same, the kids also have LOTS of composition books that they use for lots of different subjects. Composition books all tend to look mostly the same, mostly so that kids can mix them up and fight over them, I think. 

 Why not solve both problems at once, then? 

Here's how to embellish a composition book with a coloring book page, giving that pretty work of art a place to be shown off, and personalizing that composition book  so that everyone knows who it belongs to and what it's for. It's a little time-consuming, but it's not hard, and it's going to look really awesome when you're done.

   1. Do you need to prime your composition book? Even though composition book covers are glossy, they do pretty well with paint. Nevertheless, I usually cover everything that I paint with a no-sand primer. I lay my composition books open flat on my work surface, with the covers both facing up, when I paint them; I don't mind a little if a little bit of paint gets onto the edges of the top couple of notebook pages below, but if you do, spread out newspaper between the composition book covers and the notebook pages. 

  2. Paint the composition book covers. I've used both interior/exterior house paint and water-based spray paint for these book covers. I usually save our craft acrylics for smaller projects, although you can certainly use them here. 

 Even though the coloring book pages will be covering the center front cover of each composition book, I generally paint the entire cover, just so I don't have to worry about my placement later. Do whatever feels right to you. 

 Let all the paint dry well before you start the next step. 

  3. Trim and prepare your coloring book page. We have a family policy that we photocopy coloring book pages and color the copy, and we usually do this on cardstock, because everyone likes the color saturation of Prismacolor or Sharpie markers the best. This means that I don't have to worry about the translucency of a coloring book page, or the possibility of it being printed on cheap paper that won't take glue well. 

If you're worried about the quality of your own paper, feel free to back it with a nice cardstock or high-quality typing paper. You could even use scrapbook paper and make a nice border around the page for some extra embellishment. 

 Don't forget, of course, that you don't HAVE to use a coloring book page to embellish a composition book. If you want to embellish a composition book with wrapping paper, cut-outs from a magazine, comic book or dictionary pages, or anything else that you're dreaming of, that will work, too! 

  4. Adhere the coloring page to the composition book cover. I like to center mine, and I'm happy with my results using either spray adhesive (not eco-friendly) or Mod Podge (eco-friendly!). 

  5. Seal the composition book cover. Several more coats of Mod Podge, or a couple of coats of a spray sealant (not eco-friendly) or one coat of polyurethane (not great, but better than spray sealant) will seal and protect the cover of your lovely embellished composition book. 

 In my opinion, you don't need a reason to embellish a composition book, because the result is super cute, but here's one: these embellished composition books make great journals and sketchbooks, especially if you've colored the coloring page yourself. They also make cute presents, either for a parent using their kid's art, or for a loved one using something that you know they'll like. 

I mean, doesn't everyone need another notebook with a hand-colored dragon on the front?

Saturday, November 6, 2021

How to Make Reusable Chalkboard Gift Tags

This tutorial was originally published on Crafting a Green World in 2016.

Make reusable, DIY chalkboard gift tags for all of your holiday gift wrapping adventures!  

Okay, I DID find just one more cardboard record album cover craft to make with my scraps--reusable DIY chalkboard gift tags! These reusable DIY chalkboard gift tags came together in just minutes, from the scraps leftover from making my latest batch of album cover bookmarks. I'll be pretty excited to have them already in hand when the gift-giving season really starts rolling, and since they have a chalkboard side, we can use them over and over again.  

You will need: 

  cardboard. The base of these gift tags is an interesting piece of cardboard, upcycled from anything that you like. Record album covers are great, of course, but so is the cardboard packaging from your favorite foods, or perhaps even old calendar pages. 

  chalkboard tape. The reason why this project is so quick and easy is that a few months ago, I found a roll of chalkboard tape on sale, and I bought it even though I didn't have a project in mind for it (my husband haaaaaates when I do this, by the way, but look at that tape now, Matt. LOOK AT THAT TAPE NOW!!!). 

You could experiment with chalkboard paint instead, but my intuition says that it will warp your cardboard if you're not super careful. 

  chalk markers. Chalk markers will enable you to write messages on the gift tags that won't rub off. When you're finished, wipe it off with a damp cloth and it's ready to go again! 

  scissors or gift tag hole punch. I have a gift tag punch that I use for lighter materials, but it won't cut through record album cardboard. Anyway, it's cuter to freehand around fun images.  

To make these tags, simply cut out a rough outline of your graphic on your cardboard, then back it with the chalkboard tape. 

Having done that, you can cut out the exact outline that you want, cutting through both cardboard and tape at the same time for perfectly clean edges. 

 Punch a smaller hole for hanging at the top of your gift tag, then write your chalk message on the back.

   My only worry, now, is that the older of my two kids will wash off all of her sister's tags and write her own name in, instead. Fortunately, she's also my kid with messy handwriting, so I *should* be able to tell...

Saturday, October 30, 2021

Tutorial: DIY Magnetic Mosaic Kit

This tutorial was originally published on Crafting a Green World in 2016.

Do you ever have one of those moments when you look at something store-bought and think, "Hey, I could make that!" 

 That's what I thought one day when I took a good look at the magnetic mosaic kit that my kid was playing with in the car. Of course, not only did I decide that I could make that, but I also decided that I could make my own DIY magnetic mosaic set WAY larger, AND put it on the giant magnetic memo board that my husband and I put in our kitchen. That way, everyone can play!  

This is a very easy project, although it's a little time-consuming. The finished result, though, is totally gorgeous and super-fun. Here's how to make it!

DIY Magnetic Mosaic Kit

You will need: 

  small wooden cubes. I buy mine from Casey's Wood Products in Maine. 
  liquid watercolors and zip-top plastic baggies.
magnetic tapeNormally, I go for the strongest magnets possible in the size that I want, but these mosaic magnets are just for fun, not for sticking art to the wall. For the easiest project, choose tape in the same width as your wooden cubes.  


1. Stain the small wooden cubes. I've written a few tutorials for this process, so click here to see exactly how to stain wood with liquid watercolors

Unfortunately, my method does require the use of a plastic zip-top baggie (although I'm almost certain that you could also do this in a small glass jar), but the good news is that you can re-use that baggie indefinitely. I seal them and keep them with our liquid watercolors, and use them over and over again with the same color.  

This liquid watercolor stain is mostly water-resistant, but not completely. It's not intended for use by children who still mouth objects (and to be fair, neither are the small wooden cubes!), but if you deeply need the objects to stand up to the occasional immersion in water, then you can either soak them in vinegar to release the excess dye or you can seal them with your favorite clear sealant. 


 Let the cubes dry completely before you begin the next step. 

  2. Add the magnets. Cut the magnetic tape to size (you can usually do this by scoring the magnetic tape in the correct intervals as you measure it with a ruler on top of a gridded cutting mat, then breaking the tape at the scores) and remove the backing. 


 Although the magnetic tape will usually come with a sticky backing, that stuff is a joke. Instead, place a dab of hot glue on the back of each cube and glue that magnetic tape down yourself!  

3. Enjoy! We like this magnetic mosaic kit best on our large magnetic wall board, where anyone who happens by can play with them and change the pattern, but if you've got a metal cookie sheet, then you can play with these anywhere, and if you've got a metal tin, then you can even come full circle and play with them in the car.