I wasn't sure that this sticker maker was actually going to be a hit. Syd didn't touch it for the entire summer after I bought it for her birthday, and I'm the one who actually ended up getting it out early this autumn and messing around with it trying to figure it out.
But if there is one gold standard about parenting, it is this: if you want your kids to get interested in something, ignore them and get yourself interested in that thing. Whether it's dried apricots, The Lord of the Rings, or your latest awesome art supply, if you're into something and act like you don't know they're around, kids show up and try stuff out just to get into your business.
On an unrelated note, ahem, I have also been woken up by the children from every single nap I have ever tried to take since they've been born. I swear that a kid can need nothing from me, can flat-out reject my company, and as soon as I close my bedroom door, lie down, get comfy, and doze off, I hear, "Mom?" And it's always something stupid, like where are the scissors or are we supposed to be saving the French bread for dinner or can we go to the bookstore this weekend.
Literally TODAY I lay down on my bed for like five minutes to TikTok as my reward for mostly-ish picking up the house, fell asleep, and fourteen seconds later Syd was all, "Mom?"
To be fair, she was calling for me to see if I was ready to drive her to ballet, but still!
So when I got out the sticker maker stuff for the first time one day, set it all up at the kitchen table, figured out how to load and use the cartridges, and started cutting out some comic book pages that I thought might make excellent stickers--
--Syd found me and immediately figured out all the sticker stuff and off she went, making her own art into stickers:
She uses the supplies entirely to make stickers from her own art, and she prefers the simple adhesive roll, rather than the roll that both adds adhesive to the back AND laminates the front, because she likes to continue to add to and embellish her art even after it's made into stickers.
I don't make art, and so I've made stickers from comics, vintage books, and clip art, digital images, and the kids' scanned artwork all printed on plain copy paper. I also prefer the look of the unlaminated stickers, although I suspect that my comic stickers aren't particularly archivally sound.
I'd be curious to price out about how much each square inch of sticker costs, but I'm too lazy to do that right now. It feels cheap enough, though, that I wouldn't be sad letting the kids make stickers when their friends come over or bringing it out at a Girl Scout meeting.
I'm also very eager to try scanning, printing, and then making into stickers the fussy cut graphics that I like to decoupage onto wood blocks. I'd lose some eco-friendliness and the coolness of using the actual comic, but I could use graphics from comics that I'm not willing to cut up and a sticker might be more reliable and less messy than a piece of vintage low-grade paper and glue.
P.S. I can't let you go without mentioning that I'm also super into DIY stickers that I make using repositionable glue. These were awesome especially when the kids were little and sticking stickers everywhere, because they peel right off any surface--and stick right down again somewhere else!
A few weeks ago, I had the idea to compile all of my random and many must-dos of Indiana into a single Google Map. Not that we're actually visiting any of those scattered museums and doughnut shops and used bookstores and historic homes right now, sigh. But soon, hopefully!
And if nothing else, also putting all the state parks and locations of interesting waterfalls and public caves and land preserves on the map has helped me be more creative when figuring out spots for family hikes.
That's how we ended up at Sculpture Trails on the most beautiful day of last week. It's absolutely absurd that this was the first time I'd ever been there, as not only is it nonsensically close to where I live, but the kids and I used to carve scratch blocks for their aluminum pours back when they'd hold them at our local hands-on science museum almost a decade ago. So the fact that it took 13 months of a global pandemic to get me there is a little bit bonkers. Thank goodness for my hand-keyed Google map, I guess!
I was too excited at being out and about with family and friends to think any interesting thoughts while I was there, so instead here are all the photos I was delighted to take out there in the sunshine:
Because ultimately, everything is really all about me, I'm now feeling like my property needs more lawn art! Like, maybe not cast iron sculptures, but I could totally DIY something like this out of plywood and spray paint, right? Wouldn't it look lovely in my woods, perhaps just barely visible from the drive-in but only if the light is right and you happen to be standing in just the perfect spot?
Is there a line between "outdoor art installation" and "Dang, that lady's yard is tacky!", and if so, how does one come down on the correct side of that line...
...or even decide WHICH side is the correct one, lol?
If you enjoy canning, don't you have SOOOOO many Mason jar lid rings?
Those Mason jar lid rings, also called screw bands, can be re-used (unlike the lid tops, which you aren't supposed to re-use at all), but only until they start to rust or get bent or dinged, something that seems to happen with my rings, at least, after very few uses.
Sigh.
Fortunately, there are loads of ways to repurpose these rings so that you're not just adding them to the waste stream. And since it's December, my favorite way to repurpose ANYTHING this month has to be Christmas ornaments!
These Mason jar lid ring Christmas ornaments look a lot harder to make than they are. If you're artistic, you'll love using these to show off your skills, but even if you're not--hey, that's why clip art, stickers, and patterned paper were invented!
Supplies
To make these ornaments, you will need:
Mason jar lid rings. Repurpose ones that are no longer suitable for canning. Don't can? You know someone who does, or check on Freecycle or Craigslist--there is someone out there who would LOVE to give you their dinged-up canning supplies.
Ribbon. Stash ribbon is fine, but twine, hemp cord, or even thin chain would work.
Mat board or thick cardboard. For these particular ornaments, I used mat board scraps (does it still count as hoarding if you really do use the stuff someday?), but thick cardboard--something thicker than card stock or food packaging--would also be fine.
Decorative paper. Use scrapbook paper, old book pages or sheet music, or even wrapping paper.
Image for the ornament's front. My daughter traced the inside edge of a Mason jar lid ring, then created several pieces of original artwork for our ornament fronts, all of which I photocopied onto card stock so that we could make multiples. Anything fun and creative would make a beautiful ornament, however. If you've got scrapbook supplies, dig them out!
Spray paint (optional). It's not eco-friendly, but if you want to change the color of your Mason jar lid ring from rusted metal, this is your best option. I've made these ornaments both ways, and while I do like the painted ornaments better, it's not necessarily worth the time that it takes to paint them.
Glue. You need an archival glue suitable for paper and a separate, sturdier glue for the rings. I used spray mount for the former and hot glue for the latter.
Directions
1. Trace the inside edge of a Mason jar lid ring. This will be your template for cutting the decorative paper back, the mat board middle, and the featured image on the front.
2. Make a beautiful ornament front. The Mason jar lid ring makes the perfect frame for your original art. Whatever medium you prefer, whether it's watercolors, acrylics, markers, or charcoal, it will look adorable in this simple round frame. But don't forget that you can also use stickers, cut-outs, clip art, or anything else you'd like in order to embellish these ornament fronts.
3. Cut all pieces to size. The ornament front, mat board or card stock, and ornament backing paper should all be cut to your template. You can pop them into the Mason jar lid ring to check the fit--sometimes I've found that I haven't cut a piece carefully and have to trim it a bit. Better to do that now than when you're racing the hot glue gun!
4. Glue the ornament front, middle, and back together. Spray mount gives the most archival result, but an ordinary glue stick is also perfectly serviceable.
5. Do you want to paint the Mason jar lid ring? If so, do it now! Spray clear sealant, with or without painting the rings, is another option.
6. Tie ribbon onto the Mason jar lid ring. A lark's head knot is just about the easiest and most attractive of knots, and that's what you're going to do here. Tie the ends of the ribbon into a bow, and there you have your ornament hanger!
7. Glue the ornament piece to the Mason jar lid ring. I've tried several types of glue with this ornament, and none are really ideal. The most full-proof glue is hot glue, but you'll have to work quickly. Lay out the ornament, face-down, and the Mason jar lid ring, flat side down and with the ribbon at the top, and then quickly dispense hot glue around the inside edge of the lid ring. Immediately set the ornament into the lid ring and press it down so that it's flush against the flat side of the lid ring.
These ornaments are a great way to show off a kid's artwork--or your own! A matching set of complementary ornaments also makes a nice handmade gift.
But of course, I like them best on my own tree, displaying all of our homemade love for the season.
My obsession with using Girl Scout badges as homeschool units of study continues, as Will and I turned earning the Girl Scout Senior Collage Artist badge into an excellent and super fun study that I'll incorporate into part of a high school fine arts credit for her.
Step 1: Explore collage. Normally, I wouldn't have thought twice about taking a field trip to an art museum to look at collages, but... you know, there's a pandemic going on. Now that our local university's art museum has re-opened, I do think we'll chance a visit, but until then, I satisfied this step by requesting a ton of collage books from our public library and employing contact-free pick-up.
I actually ended up really liking what these books brought to our study, as we were able to look through not just fine art collage books but also casual how-to and craft books, which I think gave us more ideas about what we, ourselves, could do with collage.
Here are some of the collage books that we explored:
Our public library has a stellar collection of zines, so if we'd had more access to the library, or if I'd also been leading Syd through this badge, I was toying with the idea of centering all the activities on zine creation.
Next time!
Step 2: Focus on composition. For this step, Will did do one of the suggested activities, just because it looked like fun!
Since this was a for-fun activity, not really one that I had planned as part of her fine arts unit, I didn't make any criteria for neatness, precision, or craftsmanship. If I had, I might have showed Will how to use our paper cutter to make precise squares, or how to grid the paper lightly to ensure accurate placement, etc. But since this was our very first actual collage activity, and since Will isn't the most confident artist on the planet, "cubomania" turned out to be the perfect low-impact, high-interest collage to get her interested in digging deeper.
3. Create with color. Here's another suggested activity that worked perfectly as written and was also very fun! It tied well into a review of the color wheel, although, as you can see, Will chose to work entirely in greyscale:
Here are some of our color wheel resources:
3D color wheels. My Scouts have a varying level of patience with step-by-step directed activities such as this one, but this DOES make a beautiful hanging piece!
color wheels composed with strange paintbrushes. Sometimes it's not what you make, but how you make it that's the point of the activity. This project ties into the Outdoor Art badges by challenging kids to make the standard color wheel, but to paint it with something unusual. In this particular activity, I had my kids use tree branches, but it would be fun to have kids first collect a variety of nature finds to use--perhaps even without telling them what they'll have to use them for! I think older kids especially enjoy these kinds of physical challenges that are both unusual and maybe just a tad bit babyish. Who wouldn't want to play a little bit longer?
giant collaborative color wheel.Yes, this is written as a preschool art activity, but not all process-oriented art is solely for preschoolers! This would be a fun group activity to begin a color study, especially if you encourage kids to collect ephemera between meetings.
interactive color wheel. This is such a good idea! Instead of using a pre-printed template, though, I think it would be fun to have kids make their own card stock template, and then let them choose their own colors and color wheel combination. Think how much fun they'd have playing with their favorite colors in this wheel, instead of the standard assortment.
mandala color wheel.Here's a much more sophisticated color wheel that will make an appropriate challenge for an older kid.
spinning color wheel. This is a quick and easy activity that gets kids up and moving a bit.
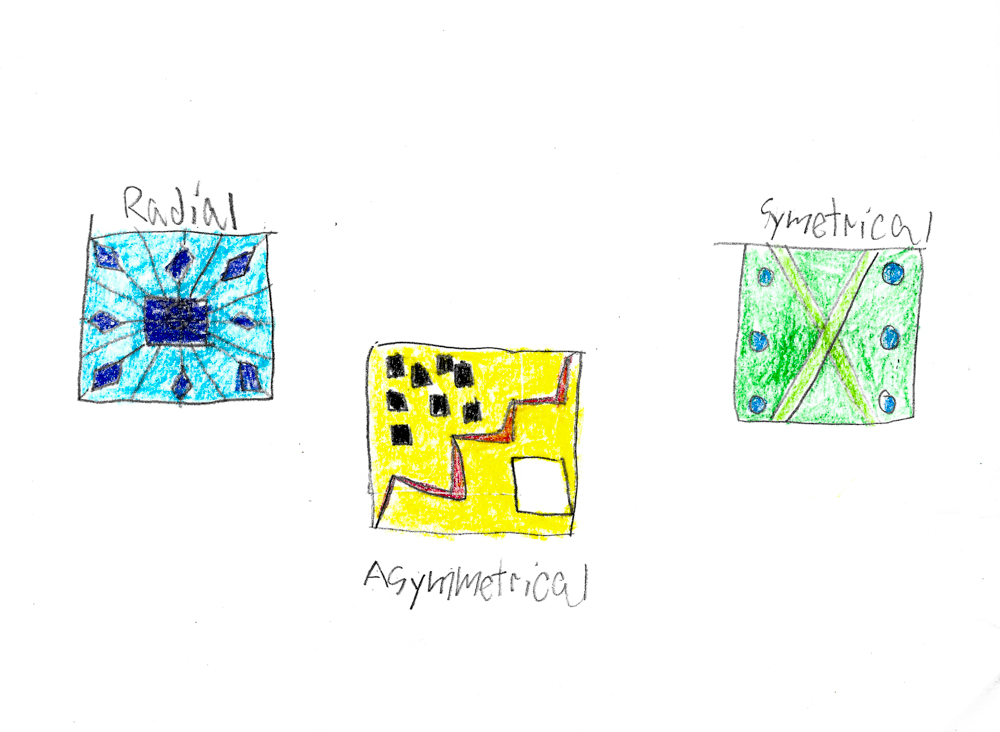
Step 4: Use found objects. Will and I went off the rails for the last two steps of this badge, and so instead of creating a found object collage, for this step we reviewed symmetry and how it effects artistic composition.
Afterwards, Will created a larger piece that incorporated three different types of symmetry into a single composition.
Step 5: Share a message. Until this step, each of Will's collages had been completed in a single sitting. Even if it took her a couple of hours and/or several episodes of Welcome to Night Vale, each time, when she got up from the art table, she had a finished product to show.
I wanted Will to have the experience of creating a multi-step, multi-day, more involved project, so instead of any of the "share a message" activities, we created that elaborate piece.
I used this large-format collage animal tutorial, and I LOVED it! The only step that we did not attempt was the free-form, process-oriented art while listening to music, and that's only because I have SO much large-format paper ephemera, some of which includes old kid art. So that's what we tore into strips--
--and used as the base for our collage animals:
Matt made us the tracers, and I was surprised when Will wanted to create not the dog that I'd just assumed she would, but an owl:
Black screenprinting ink worked great as a substitute for india ink, but polyurethane did not work as well as the resin called for in the tutorial would have. Definitely use the resin for realistically shiny eyes!
Imperfectly shiny eyes aside, Will and I are both very pleased with her large-format, multi-step, carefully-crafted owl collage:
It's now mounted high in our family room, so it can watch over our bookshelves and keep our books safe from mice.
Even though Will was my only Girl Scout who earned this badge with me, I think this is a badge that would work particularly well for Girl Scout troop meetings. It's set up so that completing one collage per meeting is very manageable, other than that last collage, but the tutorial for that one is written by an art teacher who lays out how to space it out over a period of days. Add in a socially-distanced field trip to an art museum, followed by a picnic and some free time outdoors, and you have a picture-perfect Girl Scout badge!
Want to do more with collage? Here are some of my favorite collage resources and projects, and even more collage projects and resources that are on my to-do list:
Jack-o-lantern. This is a little cheezy, yes, but so fun and festive to do on a holiday week!
reflection board. I think this would be such a cool starting activity for every Girl Scout meeting while you're working through the Collage Artist badge, or for the beginning of every school day if you're incorporating it into your homeschool. There's a lot to be said about the experience of getting into the practice of something, even if only temporarily, and I love this as an extension or alternative to journaling.
window cards. Here's a way to multi-task collage activities with a service project! You could use this activity to make Christmas or Valentine cards, in particular, because they both have iconographic silhouettes that come to mind. Kids could make them for their families or for nursing home residents.
tags and bookmarks. This could be another good pre-holiday activity, or you could forget the gift tags and just focus on bookmarks. The extra artistry and detailing that's called for with these types of projects can be extra-appealing to older kids, I've found, and sourcing materials should be easy, because you can simply ask kids to bring in some of their recycling!
magnets. These are similar to the tags and bookmarks, above. This project would work well with the Senior Room Makeover badge, since kids could also make an upcycled magnet board to go with it (pro tip: thrift old cookie sheets!).
postcards. You have to be a little more careful with postcards, but it's fun to see how things end up when they go through the mail! I recently did a similar project with my Girl Scout troop as an at-home activity, and the kids are all waiting with bated breath to receive them as I type this!
One of my favorite things to do on stay-at-home holiday days is explore new art supplies and craft projects with the kids. Over Thanksgiving break, we did several hours of origami, for instance, and ahead of us on this peaceful holiday vacation is latch hooking using the supplies that I splurged on this morning (and yes, I DID go to both the big-box craft stores so that I could use both of my 50%-off coupons, mwa-ha-ha!).
We did this even when we traveled for every holiday--I vividly remember introducing the kids to homemade modeling beeswax during one summer visit with my Pappaw, and dyeing dried pasta vivid colors during another Christmas visit a full decade ago. I'd happily give several years off my own life to have Pappaw back, but I will say that it is very, very, very nice to stay home for the entire Christmas holiday now. It's absolutely my favorite thing about Christmas.
On an earlier trip to both big-box craft stores to use another set of 50%-off coupons (Will also needed metallic embroidery floss for her recent obsession with making friendship bracelets, showing that my holiday-break-equals-new-craft-project tradition is passing itself down quite nicely!), I bought a small set of alcohol ink, and then I hit up Amazon for a small pad of Yupo paper, all recommended by this book, Creative Alcohol Inks, sent to me by a publicist:
The day after Christmas, while Will was off reconnecting with her best friend, the public library, after two entire days of it being closed, and Matt was at the gym, Syd and I sat down with a billion supplies and tried to recreate some of the techniques from Creative Alcohol Inks.
Just as with Sharpies and rubbing alcohol, alcohol ink, itself, is a fun process-oriented supply. The Yupo paper, too, is very forgiving, and I was able to goof around with the alcohol ink on a single piece of Yupo paper, then saturate it with rubbing alcohol and essentially wash all the ink off before doing it all again.
At one point Syd looked over at me and said, "Wow, that piece of paper has been through a LOT." Thanks, Kid.
When I was done messing around, I made one of the suggested projects from Creative Alcohol Inks, an embellished porcelain ornament:
My ornament isn't actually porcelain, but a clear plastic ornament coated on the inside with white acrylic paint. Pro tip: that makes it look like porcelain!
While I was playing around, though, Syd was steadily mastering everything about alcohol ink:
We had one mishap associated with the Yupo paper; it's technically a plastic paper, and apparently shouldn't be combined with long blasts from the heat gun that we were using to dry the alcohol ink (because I'm the kind of person who knows where her heat gun is but not her blow dryer #nOtLiKeOtHeRgIrLs).
You can see in the below photo how the corner of Syd's paper is warped from the heat gun--oops! Fortunately, short blasts worked fine, so I did not, in fact, have to go hunt down the blow dryer:
I have a new phone, which was my Christmas present from Matt (OT Question: How many presents do you and your partner exchange? Is it one? Is it five or more? I'm more of a multiple present person and Matt's more of a one-present person, but frankly, I always love my one present from him way more than I'm pretty sure he mildly likes his multiple presents from me. Dude is DIFFICULT to find presents for!), and this phone is amazing! And does time lapse videos! And from now on every one of my blog posts is going to include a time lapse!
So here's a time lapse of Syd's process creating something awesome from alcohol ink, Yupo paper, and paint pens:
How cool is that?!? Please ignore the fact that all of y'all have probably been able to do this on your phones for a decade by now and tell me it's super cool.
I'm really eager for Syd to scan in some of her alcohol ink creations and then embellish them in Photoshop using her Wacom tablet, but on this evening she was was more into hand-drawing on top of them.
Hey, do you want to know that looks like?
OMG, you DO?!?
Okay, here's a time lapse!
You're welcome!
And, fine, here are some still shots, as well, because having a fancy new camera on my fancy new phone doesn't mean that I'm not still obsessed with my behemoth single-lens manual camera:
Here's my finished product, hanging up happily on our Christmas tree:
And here are Syd's favorite two masterpieces!
You might remember that we had some trouble figuring out a good way to seal our tile art creations without desaturating the Sharpies, so I was super excited to see that Creative Alcohol Inks includes the specific supplies and techniques that you need to seal these creations.
Including yet another mention of resin, which I have been seeing mentioned EVERYWHERE lately, and it's making me more and more invested in the idea of buying some and playing around with it.
Perhaps a project for New Year's Day?
I received a free copy of Creative Alcohol Inks, because I can't write about a book until it's inspired me to spend an afternoon low-key sniffing rubbing alcohol and hanging out with my kid.