Saturday, November 28, 2020

How to Make Mason Jar Lid Ring Christmas Ornaments

I originally published this tutorial on Crafting a Green World.

If you enjoy canning, don't you have SOOOOO many Mason jar lid rings?

Those Mason jar lid rings, also called screw bands, can be re-used (unlike the lid tops, which you aren't supposed to re-use at all), but only until they start to rust or get bent or dinged, something that seems to happen with my rings, at least, after very few uses.

Sigh.

Fortunately, there are loads of ways to repurpose these rings so that you're not just adding them to the waste stream. And since it's December, my favorite way to repurpose ANYTHING this month has to be Christmas ornaments!

These Mason jar lid ring Christmas ornaments look a lot harder to make than they are. If you're artistic, you'll love using these to show off your skills, but even if you're not--hey, that's why clip art, stickers, and patterned paper were invented!

Supplies

To make these ornaments, you will need:

  • Mason jar lid rings. Repurpose ones that are no longer suitable for canning. Don't can? You know someone who does, or check on Freecycle or Craigslist--there is someone out there who would LOVE to give you their dinged-up canning supplies.
  • Ribbon. Stash ribbon is fine, but twine, hemp cord, or even thin chain would work.
  • Mat board or thick cardboard. For these particular ornaments, I used mat board scraps (does it still count as hoarding if you really do use the stuff someday?), but thick cardboard--something thicker than card stock or food packaging--would also be fine.
  • Decorative paper. Use scrapbook paper, old book pages or sheet music, or even wrapping paper.
  • Image for the ornament's front. My daughter traced the inside edge of a Mason jar lid ring, then created several pieces of original artwork for our ornament fronts, all of which I photocopied onto card stock so that we could make multiples. Anything fun and creative would make a beautiful ornament, however. If you've got scrapbook supplies, dig them out!
  • Spray paint (optional). It's not eco-friendly, but if you want to change the color of your Mason jar lid ring from rusted metal, this is your best option. I've made these ornaments both ways, and while I do like the painted ornaments better, it's not necessarily worth the time that it takes to paint them.
  • Glue. You need an archival glue suitable for paper and a separate, sturdier glue for the rings. I used spray mount for the former and hot glue for the latter.

Directions

1. Trace the inside edge of a Mason jar lid ring. This will be your template for cutting the decorative paper back, the mat board middle, and the featured image on the front.

2. Make a beautiful ornament front. The Mason jar lid ring makes the perfect frame for your original art. Whatever medium you prefer, whether it's watercolors, acrylics, markers, or charcoal, it will look adorable in this simple round frame. But don't forget that you can also use stickers, cut-outs, clip art, or anything else you'd like in order to embellish these ornament fronts.

3. Cut all pieces to size. The ornament front, mat board or card stock, and ornament backing paper should all be cut to your template. You can pop them into the Mason jar lid ring to check the fit--sometimes I've found that I haven't cut a piece carefully and have to trim it a bit. Better to do that now than when you're racing the hot glue gun!

4. Glue the ornament front, middle, and back together. Spray mount gives the most archival result, but an ordinary glue stick is also perfectly serviceable.

5. Do you want to paint the Mason jar lid ring? If so, do it now! Spray clear sealant, with or without painting the rings, is another option.

6. Tie ribbon onto the Mason jar lid ring. A lark's head knot is just about the easiest and most attractive of knots, and that's what you're going to do here. Tie the ends of the ribbon into a bow, and there you have your ornament hanger!

7. Glue the ornament piece to the Mason jar lid ring. I've tried several types of glue with this ornament, and none are really ideal. The most full-proof glue is hot glue, but you'll have to work quickly. Lay out the ornament, face-down, and the Mason jar lid ring, flat side down and with the ribbon at the top, and then quickly dispense hot glue around the inside edge of the lid ring. Immediately set the ornament into the lid ring and press it down so that it's flush against the flat side of the lid ring.

These ornaments are a great way to show off a kid's artwork--or your own! A matching set of complementary ornaments also makes a nice handmade gift.

But of course, I like them best on my own tree, displaying all of our homemade love for the season.

Saturday, November 21, 2020

How to Make Chalkboard Coasters

I originally published this tutorial on Crafting a Green World.

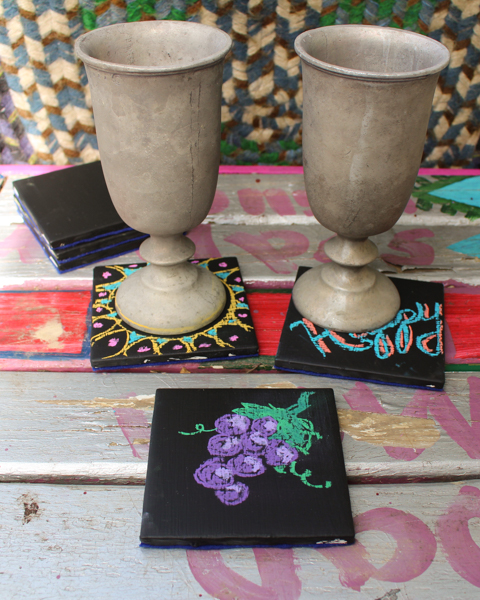
Here's an easy (and cheap!) project to spice up your holiday events: chalkboard coasters! You can use them every day just as they are because black goes with everything, but when guests come over, hand them the chalk and let them personalize their own coasters. It's fun AND avoids accidentally drinking from someone else's cup!

Supplies & Tools

You will need:

  • Tiles. Even brand-new, plain white tiles cost pennies at the big-box hardware store. And if you've got a ReStore near you, you can nab them for far fewer pennies. I used white tiles in this particular project, but don't be afraid to snap up super ugly tiles if they're even more of a steal, because the primer will cover all the tackiness for you.
  • Primer. You want a no-sand primer for sure, but color doesn't matter unless you're using tinted chalkboard paint. You can see in these photos that I'm actually using the tinted primer that I used to paint my daughters' bedroom this summer. Paint doesn't keep forever, so I'm using this stuff wherever I can!
  • Chalkboard paintUse any non-aerosol brand of your choice, but expect to paint on a few layers.
  • Felt. Feel free to be creative with this material, which will cover the bottom of your coaster. Felted wool sweaters, fleece, leather, old vinyl, etc., could all be used. Include the correct glue for your material; for felt, hot glue works well.

Directions

1. Prime your tiles.

Make sure they're clean, then coat the tiles with no-sand primer and let dry completely.

2. Cover the tiles with several coats of chalkboard paint.

This project is time-consuming in that it requires several coats of paint overall, each of which needs enough time to dry before the next coat, but it takes up little of your hands-on time:

3. Let the chalkboard paint cure.

This is an easy step to miss because the curing time for your chalkboard paint will be written in small type on the container. It's absolutely crucial to allow the paint to cure for the required time in order to have a nice-looking, long-lasting finished product.

4. Glue on the coaster bottoms.

There are three other humans who live in my house, and none of them can really be relied on to take a decent photo of me working. At least this one is in focus!

You can do this while the chalkboard paint is curing if it's at least dry to the touch:

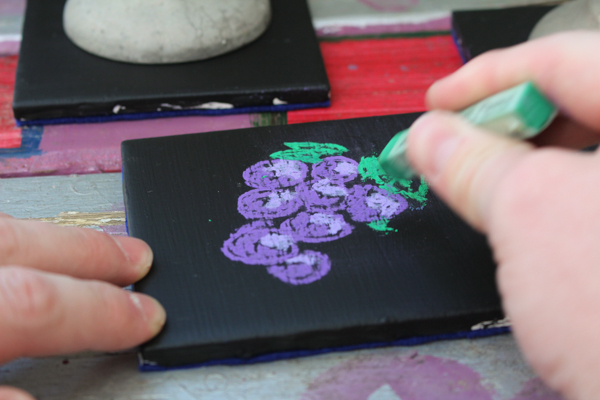
After the chalkboard paint has cured, your chalkboard coasters are ready to go! If you want to prepare them ahead of time, you can use a set of artist-quality chalk pastels to draw on designs that are as elaborate as you like:

Another option is to set up a few pieces of chalk with the tiles at your drinks station so that people can decorate their own coasters.

If you give your tiles as a present, include a piece of chalk and some brief written instructions--writing them on the coasters themselves would be cute! I've given these as presents a few times, and I've found that as obvious as it seems to me (because in my mind, if something holds still for long enough then, of COURSE, it's going to be turned into a chalkboard...), my recipients invariably look a little puzzled at first to be gifted with black coasters and a piece of chalk.

Tell them what the coasters do yourself, and watch their faces light up!

Wednesday, November 18, 2020

Return to Tulip Trestle


Four years ago, we first visited Tulip Trestle as part of our study of the physics of bridges. 

Recently, we went back.


It turns out that wandering around the base of a beam bridge is a pandemic-friendly way to hang out with friends we hadn't seen in person since early March. 

Is the weather chilly as hell? Then it's even better for germ-killingness!

I had further, more sinister goals in mind for this visit, as I carried Syd's precious pointe shoes in my coat pocket. Syd is highly reluctant to get them even dirtier and more frayed than they already are, which is a very fair point, but after eight months of dancing en pointe in our family room on our boring roll-up marley floor instead of the variety of stages and studios that she so much deserves, she's a little more willing to indulge her mother these days.


And, of course, there's the ever-present railroad track graffiti to keep one entertained...

And afterwards, if one hits up another couple of spots on the Southern Indiana Ice Cream Trail, the better to discover small local parks while one eats ice cream on a park bench while shivering (one park had a genuine tank AND an old-school super long metal slide of death!), you've got the perfect pandemic Sunday afternoon out of the house.

The cats barely knew what to do with themselves when we got back, they were so surprised to have had the house to themselves for five whole hours!

Monday, November 16, 2020

October Favorites: Neverland, Outpost Fristed, and Other Lost Worlds


Escapism seems to have been the theme for October! Will and I both spent lots of time visiting imaginary lands in the month that we missed both our much anticipated big mother-daughter road trip and all of our favorite Halloween activities.

Might as well spend October with the dinosaurs, then, or in Neverland!

Will's favorites of October include one book that I'm confident that she's read multiple times:

We LOVE our Arthur Conan Doyle in this family!

Here's some of the rest of what Will read in October:

Canterwood Crest, in particular, has long been some of Will's favorite escapist reading, partly because HORSES(!!!!!) but also because it's so delightfully absurd. I can't even tell you how many conversations we've had recently about why the main character calls herself poor when she's got that fancy horse of her own, and why the kids all have boyfriends and a bunch of boyfriend drama when they're all something like twelve years old, etc. To be fair, the boyfriend drama, in particular, IS odd, and after detailing to me the latest twelve-year-old boyfriend absurdity, Will expressed that she wished she could find a series that had all the same horse stuff and even the friendship drama but none of the gross boyfriend drama.

I was all, "Um, you realize that you're basically describing My Little Pony, right?"

If anyone has any suggestions for books with detailed horse plotlines and plenty of friendship drama but zero romance, please toss them my way!

As for me, I blew through a lot of fun nonsense in October. I was most amused by this hefty tome:

This book was the WOOOOOORST, and I LOVED it! At its best, the Twilight series was fun, hilarious nonsense. Bella embodies #NotLikeOtherGirls, and Edward is the clean-cut nice boy with a dark past, the most specialist boy in town, who treats gosh-darn little ole Bella like SHE'S the specialist girl! The first book is all, "My darling, I am wholesome and yet a monster," and "Oops, I'm dating a vampire!" hijinks.

It got even better in book two when Meyer made Jacob a main character and then got pissed because we all liked him better than we liked Edward because, you know... Jacob's FUN? The series got kind of gross from then on, because dude, Bella, please find a therapist you can talk to about how your vampire boyfriend dumped you (in the middle of the woods?!?) and now you're depressed and low-key suicidal. Alas, when Edward finally runs back into Bella's arms the entire series sort of shifts, and that previously-perfect Edward now reads more like an abuser with unlimited power and money. 

I wonder if negative fan feedback pissed of Meyer, because that last book? OMG. Like, you thought Edward acted like an abuser even though I clearly told you that it's only because women humans are simply inferior and have to be controlled? Well, now Bella's a vampire and she's finally his equal and she loves it! You liked Jacob more than Edward even though I clearly wrote Edward to be the perfect boyfriend? Well, I'm going to make Jacob fall in love with a literal baby! 

But now, you guys, Midnight Sun surpasses all of that. Midnight Sun reads like Meyer got herself overwhelmingly pissed at all the ways people have made fun of her Twilight series over the years and decided to get revenge on them all by BURNING. IT. DOWN. She took everything that anyone sincerely loved about this fun, hilarious serious and killed it dead.

Edward is a full-on stalker now, the creepiest of creepers. You thought he was wholesome? Suckers, he's a psychopath! You sincerely loved him back in the day? Joke's on you! And not only is he evil, but he's also obnoxious. I can't even tell you how many times he mentions the exact make and model of his fancy car, but I'm pretty sure I hurt myself rolling my eyes at the fourth reference. 

I am so curious about why Meyer wrote this book in this way. Was she sick of all the people making fun of her books (because god forbid people, primarily female-identifying, enjoy a fun, hilarious romance series without being mocked by the world for it) and decided to act like she's in on the joke by pretending like Edward was always god-awful and anyone who loved him was stupid? Did she decide that she no longer identifies with the overwrought romance that gave her fame and fortune and felt like her strongest move was to ruin everything sweet and innocent about it to show that she's a REAL writer now? 

Normally, when an author writes a book like this it's 1) a cash grab, 2) a love letter to their fans, or 3) a way to further build the world of the series and add new insight to our understanding of the characters. Midnight Sun pretends to be #3 and definitely achieves #1, but mostly?

It's just mean.

Oddly, I also read this book's polar opposite in October:

This book, you guys. THIS BOOK! I heard about it on TikTok, and immediately requested it from the library. Its basic premise, I suppose, is #1, because it was written to further the oeuvre of Peter Pan so that GOSH wouldn't lose its copyright. However, it is ALL love letter, and it is ALL world-building and magic and deeply insightful about what it means to grow up, what it means to not have to, what it means to not get to, and what it means to get stuck somewhere along in the process. It is exactly the kind of sequel that you deserve to read if you loved Peter Pan a long time ago.

Here's what else I read in October!

Yeah... I read a lot of graphic novels in October...

I have a new podcast obsession!

It's a dark fantasy narrative with great voice actors and a super scary premise and plot. I like it so much that I've started mainly listening to it when there's something else that I don't want to do. That's basically how the house got cleaned all throughout October!

Remember how back in the Before Times, I inexplicably loved to watch YouTube videos of people wandering around theme parks and eating all the food?

I found someone else to eat theme park food for my entertainment:

I don't cook, I don't eat at restaurants--I don't even like food, really, and yet I cannot stop watching this random woman delightedly eat weird  novelty theme park food.

I also really like to watch this random woman build elaborate dollhouses completely from scratch. Like, COMPLETELY from scratch:

My next quarantine hobby, perhaps?

P.S. Here's what Past Julie liked to read and listen to and watch!

Saturday, November 14, 2020

How to Make a Wine Bottle Cloche

I originally published this tutorial on Crafting a Green World.

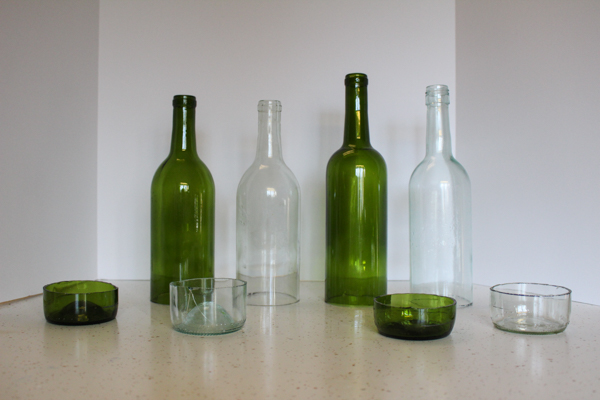
Even a light wind can ruin your candlelit outdoor dinner. To successfully have a candlelit dinner outdoors (whether you're roughing it or just being romantic), what you need for each candle is a cloche that serves as a windbreak while still letting in oxygen.

Fortunately, that type of cloche is as easy to come by as the wine bottle at your elbow!

This is a super quick and easy project, if you've got the right supplies. You will need:

  • empty wine bottle. Feel free to experiment with sizes here, upgrading to growlers or gallon jugs to make larger cloches--a gallon jug cloche is large enough to also shield food from pesky pests.
  • permanent marker and measuring tools.
  • Dremel with diamond bit cut-off wheel.
  • goggles and a dust mask. Safety first!

1. Remove the labels from your wine bottles. If you have plenty of time, you can use my method for cleaning old glass bottles, namely, a hot vinegar soak followed by some gentle scrubbing, to more easily remove the labels from your wine bottles. If you're crunched for time, however, you can get by with warm water, dish soap, a non-abrasive scrubby, and plenty of elbow grease. It sucked, but I got all the labels off of these bottles in less than half an hour:

2. Mark a cutting line on the bottle. All you need to do is cut off the bottom and top of your bottle to make the cloche, but getting a perfectly level line all the way around is annoyingly trickier than it looks. One day I'll buy myself a set of calipers, but until then, wrap a measuring tape around the bottle and adjust it, with the help of a ruler, until it's level:

When the measuring tape is level all the way around, use it to trace a line in Sharpie directly onto the bottle. This will be your cutting line, and whatever of the marker still remains afterward can easily be wiped away with rubbing alcohol or sanded away when you smooth the cloche's edges.

3. Cut the bottom off of each wine bottle using a Dremel with a diamond-bit cutting wheel. There are hundreds of tutorials for bottle cutting online, most of which rely on some sort of method to etch the bottle, then physical force or a temperature change to crack it along the etching line. These methods all fail too often to be worth it. Instead, buy or borrow a Dremel with a diamond-bit cutting wheel, and check out how quick and easy bottle cutting really can be:

See, doesn't that look nice?

You also need to cut the neck off of each wine bottle, or your candle won't get enough oxygen to stay lit. This cutting line doesn't have to be perfect like the bottom line, which determines how straight your cloche stands, so you can just eyeball your Sharpie line. The cut is much quicker, too--yay!

Discard the bottle top and bottom, sand down the edges with regular old sandpaper, and what's left is a useful wine bottle cloche. For the best results, make sure that your candle is shorter than the top edge of the cloche.

Feel free to play around with embellishing your cloche to make a luminary, making decorative cuts to the bottle's top edge, or choosing particular bottle colors for particular effects, etc.

Thursday, November 12, 2020

DIY Perler Bead Gift Tags


For how many months does one have to endure cabin fever before they get the idea to make personalized, reusable gift tags?

Just about eight, apparently!

But think about the time that it'll save me, not having to create and write out a brand-new gift tag every time I wrap a gift! Perhaps as much as five minutes at a time, depending on how much effort I would have put in!

Will and I were noodling around with Perler beads the other day and I was schooling her on everything Britney Spears (#FreeBritney, y'all) when I made these particular gift tags. I really wanted them to be round, but figuring out how to do an initial on the circle peg board is hella tricky!

Here's my S:

W is much easier, mostly because it can also be M!

Each gift tag also needs a hole for threading ribbon through, but if you need a Perler bead creation to stand up to wear and tear, it's best not to leave just a single row to support it. Two rows of Perler beads between the hole and the edge of the tag ought to do just fine!


You've also got to iron a Perler bead creation a little harder if you want it to be more than just a decoration. Some people only like the look of barely-ironed Perler beads with the holes nearly perfect, but it's got to be smooshed quite a bit more to make a gift tag that will last for the next forever years:


Not gonna lie, Perler beads are kind of tedious, so after Will bailed all I did was finish out my set:

I LOVE them, but I'm also going to be on the lookout for a MUCH quicker and less tedious method to make more reusable gift tags.

Because, you know, let's not even think about how many gift tags I'd have to write over the next however many years before I've saved myself time by making these babies!

Here are the Perler bead supplies that I used:

blah

Wednesday, November 11, 2020

I Turn Quizlet Flash Cards into Physical Flash Cards because I Am Stubborn and Ridiculous


And because the kid already has quite enough screen time without also studying her French vocabulary on one.

I am SUPER old-school to be so weirded out by this, I've learned. Syd doesn't even have a single physical, paper textbook in any of her public high school classes--actually, she only has a textbook at all in two of her classes! The other three classes just have... teacher-created lessons. And YouTube video links. Worksheets of unknown provenance. 

Don't tell her textbook-less algebra teacher, but I checked out a high school algebra textbook (and teacher's manual!) from our local university's library, and I've been referring to it quite a lot as I help Syd with her work.

I also print out most of her biology and French readings from the digital textbooks, which I know is the most appalling misuse of my personal resources, but you know what? The print-outs don't crap out in the middle of a timed open-book test, or refuse to load when an exhausted kid is coming up on a deadline, or lag when three other members of the household are in simultaneous but separate online meetings.

Flash cards, of course, don't have nearly that level of urgency, but I like having them physical. I like having them portable, so I can torment the children with them in the car, and I like having them readily available, so I can pester the kids with a couple whenever they randomly walk by.

So here's what I do to make my kids' lives more annoying. I take a Quizlet (you can often find Quizlets already made for whatever you're studying, even for specific chapters of specific textbooks)--


--tell it that I want to print it--


--and then set it up as 3"x5" index cards that print 16 to a page:


I use a guillotine paper cutter to cut the flash cards into rows, then cut each row in half, leaving each French/English word pair connected. To finish each flash card I fold it in half and glue it with a glue stick. It becomes the perfect, pocket-sized, double-sided flash card!

So yes, super old-school and resource heavy, but to be fair, I've been happily using flash cards with the kids since they were preschoolers. Here are just some of the things that we've done with them from preschool on up:
  • Laminate them and trace words with dry-erase markers.
  • Print two copies and match them or play Memory with them.
  • Print them tiny, add a pin, and use them with pin flag maps
  • Print them full-page and let the kids color the line art. 
  • Print them full-page and use them as display posters.
  • Leave them in the car and declare the first ten minutes of the first car ride of every day "memory" time--we did this for several years!
Here are some of my favorite flash cards that we've used:
  • addition, subtraction, and multiplication drill. I absolutely used these with the kid when they were memorizing their math facts. Yep, they LOATHED them, but you know what? Review only took a couple of minutes every school day, and it 100% helped seal the facts into their little-kid brains.
  • Chinese vocabulary flash cards. For a couple of years, the kids took a Saturday morning Chinese language class. The next week, I'd find flash cards for the vocabulary that they were studying so that we could review for just a couple of minutes daily.
  • European countries and capitals. We used these a couple of years ago when Will was studying AP European History and Syd was studying European Geography. Now that Will is studying AP Human Geography, I'll probably bring them back out!
  • French alphabet flash cards. These are pretty enough to print full-page and display on a wall--which is what we do!
  • sharks of the world. We used these a few years ago when we did a summer shark study, and since then I've brought them out a couple of times for Girl Scout badgework.
  • Story of the World timeline cards. Unfortunately, the original source for these no longer exists, but you can still find bootleg copies (ahem). We used the SNOT out of these when the kids were elementary years! We glued them to our big basement timeline, as well as laminating a set to use as memory drill. Once upon a time I even found a bootleg set of all the comprehension questions from the Story of the World books set up as flash cards, and we used the snot out of those, too!
  • zoo fact cards. I made these during the couple of years when Will's obsession led us to nearly every zoo in the land. It would be extra useful to make a set for a zoo or aquarium that you went to often. 
  • insect flash cards. We used these steadily for several summers in a row when the kids were younger, and I still pull them out at some point most summers, because we always end up swinging around to entomology.
  • sight word caterpillar. Syd has fond memories of the caterpillar that took over our walls and taught her the dolch sight words!