Tuesday, September 22, 2020

In Which Bridging Looks Very Different, but is Still the Same at Heart

 Normally, our Girl Scout Bridging ceremony is an excuse for a party! I love it as the one chance a year that we can generally get every Scout in my troop, plus a parent or two for each of them, in the same place at the same time to celebrate. We have a group photo, a potluck meal, and ample time to sit around in lawn chairs and gossip while the kids do their own kid things.

That did not happen this year.

Our traditional Bridging ceremony wouldn't work as-is during a pandemic, and the kids were uncertain what they wanted to do to replace it, so when I suggested that maybe we'd want to tack our Bridging onto a camping trip that we were planning, they agreed.

And that's what we did!


The Girl Scout camp that we went to has a rope bridge, so that's what I sent each of the Bridging kids across. It fit us perfectly, I think:

Overall, five of my Girl Scout troop of 13 Bridged to the next level this year, including both of my own kids. 

Syd, who in her three years as a Cadette earned the Summit Award, sold over 2,600 boxes of Girl Scout cookies, completed her Silver Award TAP, challenged her fear of heights, and volunteered for both the community and the Girl Scout organization, is now a Senior Girl Scout.

Will, who in her two years as a Senior Girl Scout also earned the Summit Award, sold over 2,000 boxes of Girl Scout cookies, volunteered far and wide, figured out what she wants to do for her Gold Award, and challenged herself to earn a huge number of badges in a wide variety of fields, is now an Ambassador Girl Scout. The next time she Bridges, it will be to become an adult member.

It's a privilege to watch my own kids grow up in company with the other amazing young women in my troop. It's an honor to be allowed to mentor kids through challenges, and a joy to watch them persevere, succeed, give their time and energy in service to others, work to learn something new, or just be happy together. I'm as excited for our next adventures as any of them ever are, and I'm particularly excited for our most imminent next adventure--we're going to earn the Space Science badges, and as part of that?

Two words: MODEL ROCKETS.

Sunday, September 20, 2020

In Which I am So Disorganized that I Surprise Even Myself

 Sooo... you know how for the past six years I've been griping that we must have lost a box or two during the move to our current house, because there's a bunch of random stuff I know I own but can't find?

Good news: I FOUND ONE OF THOSE BOXES.

Bad news: It contains NONE of the things that I'm missing. Not my two Master's diplomas, nor Matt's undergrad diploma. Not my favorite Steven King books from my childhood. Not my Space Camp windbreaker, which I miss so badly that I can't even stand it. 

Instead, this box appears to be a time capsule of the contents of my mending basket in my old house, plus some baby clothes that I'd been saving (which is awesome, because I hadn't even realized I was missing them!), plus some totally random stuff that I bet anything was just thrown in while we were moving.

Want to see what I was in the middle of mending in the summer of 2014?

The snap on Will's shorts:

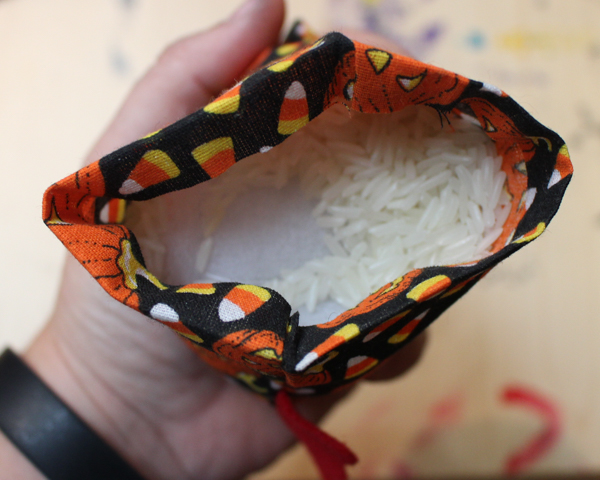
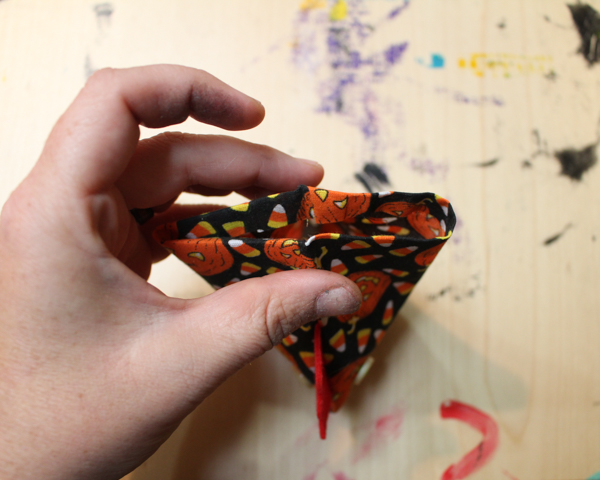
The drawstring on a dance bag that only needed to hold a pair of soft leather ballet shoes, a wee little leotard and pair of tights, a brush and bobby pins and bun holder, and a snack:


Now that kid has a dance bag the size of a duffel, and it holds street clothes, extra tights and leos, a jazz outfit, flat ballet shoes and pointe shoes, warm-up booties, a couple of dance skirts, tension bands, a brush and fifteen zillion bobby pins and hair bands, headphones, sewing kit, a water bottle...

..and that snack, of course!

Not pictured are two pairs of homemade pants with busted seams, and one of Matt's shirts with a hole under the arm. When I showed Matt the shirt and asked him if he still wanted me to mend the hole six years later, he said naw, and he immediately put the shirt on and wore it for the rest of the day. Nobody cares if you've got a hole in the armpit of your shirt when there's a pandemic!

Here's what I was apparently also in the process of sewing:

Tiny little stretch velvet leggings:


Syd tried them on but couldn't get them over her ballerina calves. I may have to find some more stretch velvet, though, because they're righteous.

Pillowcase dress from a thrifted hand-embroidered pillowcase:


Man, I really missed out with this one, because even though this would still work as a cute top for either kid these days, neither kid will currently be caught dead wearing a pillowcase top sewn from a sweet, hand-embroidered pillowcase, damnit.

Okay, check this out, though, because THIS makes up for a lot:


You guys, that is a $15 iTunes GIFT CARD, AND IT IS STILL GOOD! Christmas came early this year!

I also found a few keepsakes that I'd forgotten I lost. I was stoked to see some photos I'd printed from Will's pirate-themed eighth birthday party; I lost most of my digital photos a few years ago, so photos are especially precious to me now.

On that same note, I found two CF cards from my first digital camera. I don't own anything that even reads CF cards anymore, so I didn't even blink before I bought a USB thingy that reads memory cards.

You guys, THERE MIGHT BE PHOTOS I DON'T HAVE ON THEM! If there are, I will cry.

I don't know if I ever would have remembered on my own that I own this, but I am SO happy to have it:


It's a pillow sham that my Mamma sewed for me to match my navy bedspread. I don't know what I'll do with it, as it's not to my taste now (nor, if we're being honest, was it to my taste then, but I still remember being so pleased that she'd made it for me, nevertheless), and before I spotted it, in the bottom of that box, I'd completely forgotten about it. But it's brought back to me a vivid memory of my childhood bedroom, furnished with a heavy wooden bedroom suite that I'm certain only missed being mid-century modern because of my grandparents' old-fashioned taste. There was thick grey carpet on the floor, an over-the-door rack that held some of my paperbacks, and my very own tiny little TV,  massive boom box, and half-dozen favorite dolls sat on the dresser. I ruined the closet doors by gluing pictures cut out of Time Magazine all over them, god only knows why, and it's a wonder that we didn't get rats because I also liked to keep a stash of candy and Little Debbies hidden in a cubby behind my paperbacks--I never ate any of it, but knowing that it was there gave me a comfy feeling. 

I don't hoard food or paperbacks anymore, but I do still like to glue stuff to walls. I still prefer to fall asleep to the TV or music, I don't care which, I still have a soft spot for old-fashioned wood furniture, the kind that's hopelessly out of style and does not care, and I still think that handmade gifts are the most precious things that one can own.

Saturday, September 19, 2020

How to Make Realistic Felt Leaf Silhouettes

I originally published this tutorial on Crafting a Green World.

If you're in the mood to decorate your home for autumn, there's no better inspiration than the real leaves right outside!

You can bring them inside and they'll last for a while, preserve them and they'll last for longer, or you can use them as templates to make these easy and beautiful felt leaf silhouettes that will last as long as you like.

Supplies


Leaves

My kids and I have used both completely fresh leaves and pressed leaves. It's more difficult to trace an accurate outline of a leaf when it's fresh, but it does turn the project into one that can be done in less than an hour, instead of one that requires cooling your heels for a few weeks while your leaves are in the leaf press.

Cardstock, Pencil, Scissors, Chalk.

You could trace your leaf directly onto the felt, but I like to trace my leaf onto card stock, cut it out, and then use that template on the felt. It's an extra step, sure, but it's much easier to make more leaves using a single card stock template than it is a slippery leaf.

Felt

You can go two ways with your felt choice, and both are eco-friendly. Wool felt is a natural material, and Eco-fi, the most readily available type of felt found in big-box craft stores, is a recycled material, made from post-consumer plastic bottles. I own and use both types, although I do prefer the weight of my wool felt for this particular project.

Embroidery floss and needle (optional)

Sometimes, I enjoy embroidering the veins on my leaves.

Instructions

1. Go out and collect some leaves! Although this makes an especially fun autumn project, you'll likely want green leaves still on their trees. Give them a look over to make sure that they're whole, but don't freak out over small irregularities. One of the things that makes this particular leaf project so nice is that since you're copying actual leaves, each leaf will be different. None of that militant uniformity that you get from artificial greenery!

2. Press the leaves, if you're going that route. Even if you don't put them in a leaf press, you might decide, midway through trying to trace your first curvy, fiddly leaf, that you want to press your leaves for just a couple of hours, at least. Leaves are NOT perfectly flat like paper.

3. Trace the leaf onto card stock and cut out. Felt can hold a lot of detail, so really dig in and try to include as many of the interesting edge details that you can. Cut out the cardstock template, and if you're into it, now is a great time to stop, ID your leaf, and write its ID on the card stock. That way you'll know if you're making a felt red maple or silver maple leaf!

4. Trace the card stock leaf onto felt using chalk. I like using chalk because it shows up well on felt, can be brushed off or washed off with a little water, and is generally a LOT easier to find than the water-soluble marking pencil that I own but loathe because chalk works so much better.

5. Cut out the leaf silhouette from felt. You'll want fabric scissors for this, and even tiny thread scissors, if you've got them. The smaller and sharper the scissors, the easier it will be to capture all the details.

You can simply enjoy your felt leaf silhouettes as-is, or fancy them up with embroidery or fabric paint. You can string them into a garland, or tack them together to make a bunting. Add a loop and use them as name tags on gifts or as Christmas tree ornaments.

What will YOU do with your felt leaves?

Tuesday, September 15, 2020

Fabric Baskets for the Kitchen Shelves, or, Something New Makes Everything Else Look Old

 You guys, I might have made my kitchen uglier?

You know how sometimes, when you splurge on something shiny and new, it just makes everything around it look like crap? Like you get a new coffee table (forget the fact that we found our current coffee table sitting by the side of the road a decade ago--I am making a POINT!), and suddenly you realize that your couch is crappy. Or a new headboard, and now you can't stand your comforter. 

All I wanted to do was hide the clutter of a zillion small things on each of the shelves of our open kitchen storage--Will's endless tea bags, all of Matt's cocktail-making tchotchkes, my fourteen homemade and mismatched cloth napkins, etc. So I recalled this fabric basket tutorial, gathered up all my random lengths of random interfacing that are messily stored on my messy study shelves (that at least have DOORS to hide them!), found some stash fabric that didn't NOT match, and sewed seven new fabric storage baskets for the kitchen.

And I used up all my interfacing, so yay!

Unlike in the fabric basket tutorial, I did not pin down the top points or cut off the interior folds:


The baskets are 16" squares, with 3.5" corner tucks on all four sides. The ones that I used my stiffest interfacing in fit the shelf depth of 5" perfectly, but the ones without as much structure are a bit saggy--if you make these, use the stiffest interfacing you can sew!


And now all those tiny things are tidily hidden away, so why do I still hate these shelves?

Could it be because Matt has nowhere else to store his cocktail ingredients, so it looks like the kind of bar hidden behind a false wall of shelving in a gas station? 

Could it be because it's obviously a former literal window, turned into a pass-through when the house was expanded in the mid 1980s?

Could it be because the last time it was painted was that one time in the mid 1980s, and ham-handedly, at that?

Could it be the fact that the pass-through gives an AWESOME view of our messy front hallway?

Could it be the clash between the exact same linoleum of my childhood kitchen, that yellowed 1980s white paint, and that also 1980s-era bare wood?

So, there's absolutely no way that I'm going to replace the exact same linoleum that was on trend for my grandparents, nor am I going to make any modifications to make it less window-like, because to be frank, the shady renovations on my super-old little farmhouse are half the fun for me, but I *might* now be up for repainting, and maybe, if I'm feeling extra spicy, I might even wallpaper over that bare wood.

Here are my current wallpaper contenders. I might be really into that pizza slice one, but don't let that throw you--feel free to tell me which ones YOU don't hate, because I can just about guarantee that you have better taste than I do!

Saturday, September 12, 2020

How to Make a Bean Bag Chicken

I originally published this tutorial on Crafting a Green World.

These cute chickens make great little gifts, and since you can sew them up quickly completely from scraps, no two are alike! So search your scrap fabric stash, then sew yourself up an entire flock of lovable, snuggable, and highly-giftable bean bag chickens.

Supplies

  • Scrap fabric: 2 squares, 4.5"
  • Felt or fleece scraps, red and yellow/orange (you want a fabric that doesn't ravel for this, or you can get creative by upcycling plastic grocery bags or feed sacks)
  • Two matching buttons
  • A small piece of chalk
  • Stuffing or fiberfill
  • Any combination of dry rice/beans/peas/popcorn kernels
  • Cutting and sewing supplies, hand-sewing needle and embroidery floss

Directions

1. Cut two squares of fabric to the dimensions 4.5" x 4.5". I always use two identical prints, but you certainly don't have to.

2. Pin on the chicken parts. From the yellow or orange felt, cut a square that's about 1" x 1". Fold it in half diagonally, and pin it about two-thirds of the way up the right side of one fabric square. Notice in the above pic that the diagonal fold is on top and the two edges of the felt triangle are parallel to the sides of the fabric. Pin in place.

From the red felt, cut another square that's also about 1" x 1". Scallop the top to look like the top of a chicken's comb. Pin it with the scallops facing in and the opposite edge aligned with the top of the fabric square, about a fourth of the way from the top right corner.

Also from the red felt, cut a final 1" x 1" square. Fold it in half, and cut out two wattles. Angle these to be parallel to the diagonal fold on your chicken's beak, and pin them just below the beak, facing in.

3. Sew three sides of the beanbag. Put the two fabric squares together, right sides facing, and sew three sides together. You'll start with the top side, beginning with the end furthest away from the chicken's beak. Sew along the top, taking away the pin that holds the comb before you sew over it, then down the front, removing the pins and sewing the chicken's beak and wattle, then sew the bottom. Don't sew that fourth side!

Turn the beanbag right side out and iron flat.

4. Sew on the button eyes. It would be easier to do this step before you sew the three sides of the bean bag together, but I had a lot of trouble getting my eyes to line up nicely when I did that. Instead, I sew them on after the three sides are sewn and all the rest of the chicken features are in place. Feel free to try both ways and choose what works best for you.

To place the eyes, first, play with the placement of one eye until you're satisfied, then mark that spot with chalk. Use a pencil point or your finger to make a bump in the fabric at that spot so that you can feel where to make your mark on the other side of the chicken. Sew on each eye individually using embroidery floss.

Pro tip: Fold the open edge of the bean bag over a couple of times so that you have less fabric to deal with as you're trying to sew the button eyes on inside the bean bag. It gets much easier with practice!

5. Crease the hem. Fold the raw edges of the hem inside about a quarter of an inch, and iron.

6. Stuff the bird. Grab an amount of fiberfill about the size of your fist, and use it to fill the top of the chicken. Fill the bottom with one or two handfuls of dry rice or beans or popcorn kernels. Stuff the fiberfill down as tightly as you can, to make sewing the last side shut easier. It will loft back out over the course of several minutes.

7. Sew the final seam. You're going to sew this last side in an unusual way, so read carefully!

Take the two side seams and fold the opening so that these two side seams touch in the middle:

This is cattywampus to the way that you sew a regular bean bag, so make sure you've got it figured out before you start sewing. You'll know you've got it right when the bean bag looks like a pyramid, not a square. Edge stitch that final seam closed and sit your bean bag chicken down. It will sit on its flat butt, that final seam is its tail, and the top of the pyramid is its adorable chicken face!

8. Tidy up the beak. This is optional, but I find that for nearly every chicken I sew, I want to trim the beak just a bit to make a cuter shape. Usually, I give the bottom a bit of a curve or a slightly different angle so that the shape is more sophisticated and natural-looking than just a triangle with straight sides.

Once you've gotten the hang of these chickens, you'll find that they sew up quite quickly. 

They make great presents, and since you're using a varied combination of fabric scraps and stash buttons, each one has its own unique personality!

Friday, September 11, 2020

Perennial Sunflowers, all the Bees, and I am a Monarch Foster Mom

And to think that once upon a time, during the first full summer on our new-to-us property, we could not find a single bee.

Look at my yard today!

A few years ago, I failed in saving the seeds from our beloved Mexican sunflower, and instead, I impulse-purchased a perennial sunflower from an online seed company. It's even better than the Mexican sunflower, because not only is it big and beautiful and bright, but it also comes back to me every year without me having to have the very specific seed-saving skill-set!

Also, as I discovered just this spring, it transplants like a dream! When I was first planting things, I didn't understand at ALL how different my property's sun exposure would be in different seasons--that entire half of the yard that was sunny as hell all spring was... not sunny as hell after the elms leafed out, sigh. So even though I was terrified of killing it, I took a big leap of faith and tried to transplant some of that years-old perennial sunflower clump that was still beautiful and bright, but not getting so big anymore.

This whole sunflower garden lives on the other side of the house now, and it's flourished all summer, getting at least twice as tall as its sunflower sisters back over in the shadow of the elm trees:


Look at my BEES!!!


Way back in 2015, Will created a butterfly garden in this area of the yard, and although the rest of that garden is long-gone, the milkweed comes back every year, and every year we carefully weed around it and let it spread. It's a happy coincidence that right by this sunflower garden, then, is lots of lovely milkweed!

Every year, I also admire the monarchs that visit my flowers, and the monarch caterpillars that I see munching on my milkweed, but this year, I got the advice from my local native plants Facebook group that it's good to bring those little monarch caterpillars inside and feed them up in captivity, safe from predators. So when I went outside last weekend and saw monarch caterpillars all over my milkweed, never mind the fact that we were expecting a couple of friends of Syd's to come over for a socially-distanced backyard camp-out in just a couple of hours and I had not yet made our yard look like trash people do not live here, I nevertheless got a mask, got in the car, and went out solely to buy this exact kind of mesh hamper. It's perfect because it zips fully up and has openings in two sides, so it's easy to give my foster babies fresh noms twice a day. 

Look how much they love their noms!


I currently have one chrysalis at the top of my hamper, and four constantly-chewing caterpillars at the bottom of my hamper. I am so invested in their welfare, you guys!

Wednesday, September 9, 2020

If You Didn't Make a Vacation Photo Book, Was it Even a Vacation?

This photo is underexposed because I gathered all my vacation photo books up to photograph them on my deck, but then I got distracted looking through all of them and by the time I remembered I had actually wanted to photograph them, not just read them all, it was getting dark.

If you didn't already know that I'm middle-aged, check out my super expensive hobby of making photo books of all our family vacations!

They cost a zillion dollars each, but I like to pretend that 1) it would cost just as much to separately print the photos, buy a photo album, and mount them (it wouldn't), and 2) since I only buy them when Shutterfly has a good sale going, I'm saving money on them (I'm not). 

I don't even care, though. If ever there was a woman who enjoyed looking at her amateur photos of her happy family on vacation, that woman is I!

Also, I tend to upgrade my choice of album every time I make a new one, and then like it so much that I decide it's my new standard, but then the next time I make a photo book I buy an even bigger, even nicer one and instantly that one becomes my new favorite and so it continues. My first few books, for instance, are 8"x8" ones--one of them is even paperback! Then I got way into the 10"x10" book, because I could make my photos so much bigger--


--but that was before I made this 11"x14" vacation photo behemoth:


To be fair, though, this was a long vacation, and I took a LOT of photos, and unusually, many of them came out really well! I love this photo book the most:


Today, I finished the photo book from our 2018 vacation to California over Thanksgiving--

--and since Shutterfly had a couple of great deals going, I also finally bought the photo book from last year's vacation to Kauai, which I made at the very start of our pandemic staycation, along with, you know, a lot of bread, but couldn't bring myself to actually purchase because I'm pretty sure that pandemic staycations mean boom-time for purveyors of photo books, and so there were no sales of note to be found.

So I spent a zillion dollars on these two photo books today, but I SAVED something like fifty-plus bucks! And they're both going to be giant and awesome and I'm going to love them.

And now I'm all caught up on our family vacations back to 2016. Heck, I don't even remember off-hand what vacation we went on in 2015... clearly I need a photo book to remind me! See, they're USEFUL!

You guys, Shutterfly is one of those companies that tries to get free publicity by doing those viral marketing giveaway things, so here's a link that gets you (and me!) a free 8"x8" photo book. I have no idea if this is actually a good deal or not, but, you know, if you've been needing a gateway into the expensive hobby of vacation photo books, here you go!

Saturday, September 5, 2020

How to Make String Art

I originally published this tutorial on Crafting a Green World.

When I was a kid, we had a couple of pieces of string art, made by an aunt, framed and hung in our house.

I mean, it WAS the 1970s, the heyday of string art.

But whereas the 1970s craze was all about making a string art owl from a kit (which we had), or a string art sailing ship, also from a kit (which we had), you can now do quite a bit better.

A lot of the imagination that you can bring to string art now comes from how simple technology is to use. Can you imagine what my aunt could have created if she'd had access to clip art and a printer? Google Images? A Cricut?!?

Because I promise you that designing your piece is by far the hardest part of making string art, and even that isn't hard. I know you've got access to Google Images and a printer, after all!

So no more kits for you! I'm going to show you how to make string art the completely DIY way--from scratch, by hand. It's going to be awesome. Here's what you need:

Tools and Supplies

  • Wood, cut to size. I can always find some scrap boards to cut down over in my Garage of Mystery, but other good sources of wood are Craigslist, Freecycle, or your local Restore. Maybe you'll be lucky enough to score a finished plaque!
  • Nails. For this particular project, I'm using 1 1/4" ring shank underlayment nails. They're a little thicker than you need, but I'm doing this project with kids, and that extra width helps them keep their grip. Feel free to use whatever nails you like and have on hand.
  • Embroidery floss. This is another supply that you might just find that someone you know would LOVE to give you. There are a surprising number of people in this world who've given up cross-stitch!

Directions

1. Prepare your wood. This step can take a lot of different forms, depending on what wood you choose and the tools you have available. You can use everything from a pre-finished plaque to a pallet board, but whereas that pre-finished plaque is ready to go, but also pricey and unsustainably sourced, something like pallet boards or scrap wood might need to be cut to size and sanded down, but they're free and keep more resources out of the waste stream.

If you're preparing your own wood, don't skip sanding it--if this is one of your first woodworking projects, you'll be surprised at how much nicer your wood looks after it's sanded. My secret trick is to round the edges of the wood piece while I'm sanding it. It won't replace the services of a router, but just sanding all the edges makes the finished piece look more professional.

Staining and sealing the wood is optional, but if you choose to do so, remember to use water-based stain and sealant.

2. Create your template. Create a template for your string art on typing or notebook paper. You can draw freehand, of course, but Google Image is also your friend, and I love using my old-school Cricut. I mean, it can draw me a parasaurolophus at the size of my choosing! How AWESOME is that?!?

3. Nail directly onto the template. Place the template onto the plaque, and then begin to hammer nails right through the paper, following the lines of the template.

Try to keep your spacing and the nail heights even, but don't stress out too much. The one thing that you DON'T want to do is pull a nail out and leave an empty hole. Just work with where you're going!

Watch, as well, for narrow spacing. You can see above how I modified my parasaurolophus, as I noticed while I was hammering nails that some of my spacing--the tail, for instance, and certainly the legs--was going to be too narrow to look nice when wrapped with string:

Try to remember, though, that nobody is going to be looking at your project as closely and critically as YOU are, so roll with any imperfections that come along.

Once you've hammered in all the nails, tear the paper away. I had to get into a few little nooks with a pair of tweezers, but it wasn't difficult.

4. Wrap with embroidery floss. Now for the fun part! Wrapping the nail art with embroidery floss is the MOST fun, and you'll find that even kids who are too young to hammer nails (although don't dismiss their abilities without really thinking about it--you'd be surprised at how young a kid can handle a hammer!) can have a ball wrapping nails with yarn or embroidery floss.

Tie a knot around one nail (secure it with a little white glue to be safe), then wrap the floss around the perimeter of your piece to outline it. Weave in and out of the nails, wrap it completely around some nails, take a break to go back and forth across your piece--feel free to have fun!

Once the perimeter is wrapped, go back and forth across your piece at every angle, with no discernible pattern, to cover the surface area with embroidery floss. After a bit, you'll be able to notice spots that have gaps and you can easily cover those. This takes a LOT of embroidery floss, so be prepared to use at least an entire skein, and possibly more, depending on the size of your piece. Tie the floss off around a nail, and again, dot the knot with a little white glue to make sure it holds.

When you're finished, you can continue to embellish your piece (not everyone I know is as science literate as I am, so I made a label for my string art parasaurolophus), and mount a picture hanger on the back so that you can hang your new masterpiece in a place of honor.

And now you can make another one as a gift for someone else!

Thursday, September 3, 2020

Homeschool Math: Perfect Squares Hiding inside Area Models

Syd was simplifying radicals the other day, and not having a fun time of it. She was struggling to link the concept of factoring the radicand to simplifying, and I was trying, as usual, to think of hands-on manipulatives that might clarify the process. 

I did NOT find a way to model simplifying radicals using manipulatives, alas, but while I was playing around with the decanomial square I DID find a hands-on enrichment that kids who are first learning the concept of perfect squares might enjoy.

I like this little activity because it connects the mathematical definition of the perfect square with the Montessori-style sensorial skill of eyeballing it, or even measuring it by feel. Although you're technically not allowed to eyeball stuff as mathematical proof, pattern recognition via the senses is very important. That's how kids learn to read, for one thing, and it's how IQ tests are built, for another. 

Use this activity with a kid who's first learning, or reviewing, the concept of the perfect square. You can do it with paper area models that a kid can draw and color on, or you can do it, as I've done here, with the decanomial square model, which is extra fun because it has pieces you can manipulate. Kids could try to find the largest perfect square(s) that would fit inside the area model, or just find any perfect squares that would--whatever they find fun and you find helpful! Here are some models that show examples:

These first two are when I was still thinking I might figure out a way to model simplifying radicals. I LOVE combining manipulatives with a dry-erase board to help kids connect the model to the algorithm it represents.


For all these examples, I've pulled an area model from our decanomial square, and we're arranging the perfect squares on top of it, leaving, of course, a remainder since the area models aren't themselves perfect squares.


You can write algebraic equations with these, showing how to use the Order of Operations and/or solve for x. For example:

5 + 5 x 5 = 30

or

8^2 + 2^2 + y = 80

You just can't, you know, use them to model how to simplify radicals...

The search continues!

P.S. Here are the resources that I used to help both kids master radicals.

Six Months Ago: Homeschool Science: Dissect a Sheep Brain
One Year Ago: August Favorites: Soap Operas, Broadway Musicals, and Ballet Studios
Two Years Ago: We Went to Canada and Saw the World's Highest Tides in Fundy National Park
Three Years Ago: History of Fashion: How to Put on a Doric Chiton in Ancient Greece
Four Years Ago: Cruise to Alaska Day 7: Haines
Five Years Ago: Watercolor and Wood Burned Building Block Excess
Six Years Ago: Cardstock Covered Wagons on the Oregon Trail
Seven Years Ago: Demonstrating the Commutative Property of Addition using Cuisenaire Rods
Eight Years Ago: Cave Painting with Story of the World Ancient Times
Nine Years Ago: Giant Cardboard Constructions
Ten Years Ago: Have You Climbed a Tree Lately?
Eleven Years Ago: Where Small Things Will Soon be Sorted
Twelve Years Ago: Scooby Dooby Doo, Where are You?