Tuesday, January 16, 2018

Projects to Enrich the Girl Scout Cadette Book Artist Badge

The Girl Scout Cadette Book Artist badge is my favorite of the Cadette badges.

Because really, who doesn't want to earn a badge in bookbinding?!? The ability to make your own bound book is the best thing ever, and it's absolutely one of those skills that will grow with you throughout your entire life.

But of course I've never met a lesson plan that I couldn't futz with, so you won't be surprised to learn that I don't think that the Book Artist badge goes far enough. The bookbinding skills are excellent, but there's so much more to be said. You can't make a book without paper, for instance, and so papermaking, to me, seems essential.

Many lovely books also have decorative endpapers, so obviously you need to explore different ways to make artistic endpaper.

And Girl Scouts promise to use resources wisely, so I don't think you can talk about making new books without also talking about ways to productively re-use the tattered and torn old books already out there in the world.

So these projects, then, aren't necessarily projects that fulfill one of the requirements of the Cadette Book Artist badge--instead, they're projects that enrich it, that allow Girl Scouts to dig deeper and explore further, and that open up new possibilities for interested girls:

Papermaking


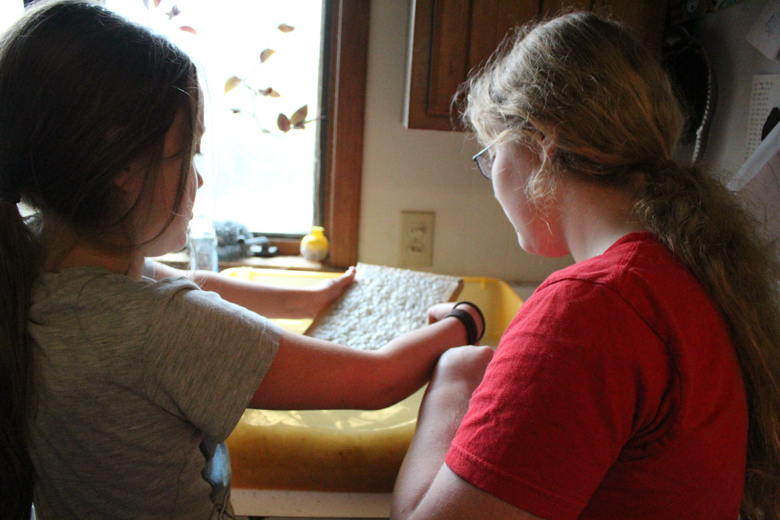
I think that an understanding of how paper is made is a great place to start when you're learning how books are made, and the process is surprisingly easy and kid-friendly. Here's one kid's very first piece of handmade paper:


Here are some ideas for papermaking:

  • basic handmade paper (we put comic books in ours!)
  • photo paper. This isn't exactly making paper from scratch, but rather making interesting photographs into pages for a book, with the idea that you can doodle and journal on them.

Artistic Endpapers

These are intended to be pasted down to the book cover to hide where it's attached, but they're lovely works of art in themselves, and since they're abstract, making them is a fun, process-oriented sensory experience.
  • alcohol ink and tissue paper. The tute specifically uses this for an album cover, but I think that you could cover a thinner piece of paper and make endpapers, as well. Tissue paper is easy to obtain, and alcohol ink is fun to play with!
  • printmaking with Styrofoam. This would be an easy project to gather the supplies for. Ask friends, family, and parents to save you the tops of their Styrofoam take-out containers for a month, and you'll have LOADS for printmaking.
  • shaving cream marbled paper. This project was SO FUN, and the paper turned out great! I highly recommend it.
  • wine cork stamps. Use these DIY stamps to stamp all over high-quality paper to make endpapers.

Upycled Book and Book Page Crafts

Girl Scouts use resources wisely, and there are so many discarded, unwanted, damaged books in the world that it would be a shame to learn all about how to make new books and neglect exploring all the ways that you can make old books new again.

And yes, many people, when confronted with book and book page crafts will say the following "I could never destroy a booooooooook!"

To that, I say, "Really?!? You're going to treasure that complete set of Reader's Digest Condensed Books, all fifty volumes that do nothing but offer five-page synopses of Moby Dick and A Tale of Two Cities? You're going to pass down to your children the thrift store copy of Green Eggs and Ham that has three pages missing and blue scribbles all over the rest?"

Of course you're not. Nobody actually wants books like those. But I'm going to take that Reader's Digest Condensed Book and teach my kids how to make a book safe out of it, say, and then they're going to keep secret treasures inside. I'm going to teach them how to take the covers off of that Dr. Seuss book and make their own journal, and then they're going to keep a diary inside of it. Here are some other ideas for making much better use of old books and book pages:


  • beeswax-coated paper. This is more a sensory activity than anything else, but if you cut the paper to shape, punch the holes, and then coat it in beeswax, you can make a pretty sturdy bunting out of it. Do the embellishing and decorating first, as well as the cutting and punching, and you'll have reusable gift tags. 
  • book page poetry. We did this project with an old Sweet Valley High book, and the poems came out awesome.
  • decoupaged book page mosaic tesserae. Older kids working on a more sophisticated mosaic piece could make these with proper safety gear on--broken glass is SHARP! For younger kids, buy flat-backed glass marbles and let them make them into magnets.
  • decoupaged monograms. You can buy letter blanks at any big-box craft store, or you can make your own out of cardboard.
  • decoupaged room decor. I think it would be fun to have every girl bring something from her room to decoupage. The lampshade in this tutorial would be quite the accomplishment!
  • padded envelopes made from book pages. If you need some small-scale padded envelopes, or perhaps packaging for a gift, this DIY looks much quicker and easier than even running to the store to buy some would be.
  • paper feather. These would make such cute party decorations or costume components.
  • paper flower. The tute calls for newspaper, but you could use vintage book pages just as easily.
  • paper scrap pendants. Make these with the leftover flurries of paper after a bookmaking project; if you have a multi-level troop, this project would also complete a step of the Junior Jeweler badge.
  • paper scrap magnets. Here's another way to use paper scraps, if you're not into pendants.
  • plasticized paper. This probably wouldn't make the book pages sturdy enough to make sit-upons, but maybe a picnic tablecloth?
  • upcycled artwork. This elaborate project lends itself well to process-oriented fun, but I bet it wouldn't be too challenging to make it come out cute, as well.
  • vintage book photo album. This would work well with old dime novels. Find one whose book cover lends itself to a cute theme!
  • watercolor and Sharpie-embellished book pages. Inspired by this blog post, the kids and I did our own drawings with Sharpie on vintage dictionary pages, and then embellished them with watercolor. 
P.S. Want more Girl Scout projects? Follow my Craft Knife Facebook page where I post what works and what DOESN'T work, right as it happens!

Friday, January 12, 2018

In Which I Write New Kids on the Block Mary Sue Fanfiction

In order to not be a hoarder (which is a losing battle, I'll go ahead and tell you), I've lately been going through some of the random piles of papers and keepsakes that I've collected over the years.

And yes, I HAVE been tossing some of it! I saved, like, napkins from places that I don't even remember. I have blurry photographs of people whose faces I don't know. Scrapbooks full of totally random pictures cut out of magazines. I have no idea what I was up to with that...

But of course there are treasures, as well. I was stopped dead this morning when I just happened upon a snapshot of Mac, sitting in front of some waterfall or other, looking pensive and perfect and so, so young. Now that snapshot gets to go on my wall, instead. I destroyed with happiness every member of this super dorky genealogy Facebook group focused on my grandparents' hometown by carefully unbinding, scanning every page  before carefully rebinding (thanks, Girl Scout Cadette Book Artist badge!), and then uploading the entire contents of my Mamma's autograph album from the years 1941-1943 to the group. You'd think it was Christmas all over again, with the enthusiasm with which my contribution was received. I'm pretty chuffed, as well, that my Mamma's album could bring so much pleasure to people still.

The most fun, though, is recovering things that were written by and for me when I was a kid. When I was in the fifth grade, I was out of school for a tonsillectomy, and the whole class made me cards. I found (and scanned, and uploaded to his Facebook timeline...) a get-well card that one boy made for me, a really elaborate card that was a combination of recipes that all involved murdering cats (you had to stir together a cup of motor oil with a cup of cat blood and its brains, etc.) and a bunch of really stressful reminders that we had a big project coming up and our teacher was going to be mad if I didn't finish. Thanks, Chris!

I found a letter that another friend wrote me a week after I left for college, in which he referenced America Online a lot (like, a LOT) and demonstrated this new thing that he'd discovered. It looked like this:

:)

Yep, my friend wrote 300 words explaining the smiley to me. Thanks, Josh!

In my own hand... or on my own typewriter, rather, because my Mamma bought me a typewriter when I was in elementary school and I used my aunt's old secretary manual to teach myself how to type... I found a lot of...

Well, it's a lot of fanfiction, I guess you'd say.

A lot of on-the-nose Mary Sue fanfiction.

A lot of on-the-nose, Mary Sue, New Kids on the Block fanfiction.

I was into New Kids on the Block the same as I was also into Ozzy Osbourne and Metallica and Bon Jovi and The Lost Boys and Top Gun, but something about New Kids on the Block seemed to lend itself especially well to fanfiction, mostly of the sort where I'm discovered by some happy accident and join the band or something. It was pretty good stuff.

Of course, in other of my works, higher adventures ensue. Here, for instance, my friend and I happen up a--gasp!--drug deal gone wrong, and it ends in a--gasp!--murder!


You can tell from my writing that I know a lot about both drug deals and murders.

Okay, this next part is pretty great. Jenika and I have run headlong through the shopping mall, through a door marked PRIVATE, and we've just slammed it shut behind us and are catching our breath:


Gasp! We've happened upon the New Kids on the Block, themselves! I have no memory of this Biscuit fellow, but in my story he appears to be some kind of handler or chaperone. I'm betting that in reality, there would have been more staff on hand to tend to the performers' needs, but whatever. I'm also pretty sure that they're not going to serve as some sort of proxy Witness Protection Program for two twelve-year-olds. I mean, did we even talk to the police? It doesn't sound like it!

But the baby blue eyes of Joey McIntyre, amiright?

So here's where the story gets kind of weird. Remember how I was into New Kids on the Block AND Metallica? Top Gun AND The Lost Boys? Well, I now seem to introduce some sort of additional me, and the two of us converse, and, well...


Yay, I'm a vampire! That always WAS my dream! Well, that and marrying one of the New Kids on the Block. So, you'll never guess what happens next:


YEAH, I showed all those junior high bitches who never believed in me! I DID, TOO marry Joey McIntyre! And I DID, TOO become a vampire! And I DID, TOO start a vampire rock band and we're really successful!

Did I mention that I was a weird and lonely child? I probably didn't have to, did I?

Thursday, January 11, 2018

Homeschool Math: Resources for Art of Problem Solving's Introduction to Algebra: Chapter 1


The big kid's eighth-grade math spine is Art of Problem Solving's Introduction to Algebra. To her, it feels like a big step up from Math Mammoth 7, which she pretty much breezed through with little outside assistance, and she is working through the text quite slowly, much more slowly than she'd do in an organized class.

Our focus, though, is that she actually deeply understands the concepts as she goes, which is far more important than zipping through at a steady pace.

Part of that process is providing a lot more scaffolding to the concepts than AOPS provides. By that, I mean that if a kid doesn't understand a concept when it's explained one way, then I find a couple more ways to explain it. I find a visual way to explain it. I find a hands-on way to work through it. I find drill problems to practice and cement it. That gets harder as the math gets more advanced--not because there aren't visual or hands-on ways to explain any math concept, because there always are, but because visual and hands-on learning is often neglected for older kids.

Here, then, are my hard-won extra resources for Art of Problem Solving's Introduction to Algebra chapter 1, which covers the order of operations, distribution and factoring, an introduction to equations, exponents, fractional exponents, and radicals:

Order of Operations

  • Order of Operations notebook pages. I use a LOT of material from Math Equals Love, and that's because it's excellent, relevant, and just the kind of visual, hands-on exploration that makes math make sense. Here, I used the practice problems with the kid so that she would have examples to put in her math notebook. We also discovered right away that her biggest issue with algebra is going to be writing out solutions step by freaking step. I still do not understand why she is balking at this, but she will actually erase a previous step and write the new one in its place rather than writing out the solutions. It's maddening. I've tried explaining to her every way I know how why writing out the solutions is important, but honestly, I think she's just decided to be stubborn about it. I now employ natural consequences in that if a problem is incorrect and she's written out the solution for it, I will mark exactly where she made her mistake and sometimes give her a hint about what to do next. If she's not written out the solution, I just mark it incorrect to try again, full stop.
  • Order of Operations worksheets. Drill problems, if you need them!

Distribution and Factoring

Introduction to Equations

Exponents, Fractional Exponents, and Radicals

  • The same Order of Operations notebooking pages, above, have a section on Negatives and Exponents that I think is necessary to review before beginning to learn exponent rules. I saved that section for the kid to do here.
  • Exponent Properties. THIS handout was the game changer for the kid's understanding of exponent rules. Before we completed these handouts (she and I both worked them, then compared our answers and discussed), she did not understand exponent rules and could not remember them. After we completed these handouts and discussed them, she understood them, and they were easy for her to memorize. Here's a little of my work in progress with the handouts:


See how working out the solution means that the math rule makes sense? Math rules. Make. Sense. If you don't understand WHY a math rule works, then you better figure it out, because there's no point in memorizing it otherwise.
  • Exponents Game. I don't usually make games and manipulatives anymore, as often they don't get enough use to justify the work and materials. I made this game, however, so that the kid would have some practice without having to write and write and write.
  • Here the Exponent Rules are broken down more quickly, as a review. I'm holding onto this to present at another time, if the kid seems like she needs to explore the concept again.
  • Exponent Rule Mistakes. We also didn't use these pages, but only because the kid was ready to move on. They're still a possibility if she needs to review the concepts again later.
  • Radicals. The kid started off absolutely baffled by radicals, so we used every single one of the resources here, other than the ones on rationalizing the denominator. Explicitly working through these resources on factoring radicals, adding and subtracting radicals, and multiplying radicals is the only way that the kid was then able to understand the AOPS section on them. We also both completed the entire prime factorization chart in one evening, because she was enjoying it (!!!). Previously, both kids have also memorized all of the prime numbers under 100, and I will tell you that has made life incalculably easier for both of them.
  • Two Methods of Prime Factorization. I taught the kid both of these methods, but we both tend to prefer the factor tree, I think because we have the primes under 100 memorized.
  • Exponent worksheets. Drill problems, if you need them!
  • Radical Expressions worksheets.

Enrichment

These resources don't always teach the specific Chapter 1 skills, but they're good for enrichment and to encourage a mathy mindset:
  • Algebra the Beautiful. Read this for yourself so that you've got a ready store of fun facts about the different concepts. You can also use it as a jumping-off point to add some cross-curricular studies into your mathematical mix.
  • Bill Nye's Solving for X. It's probably not going to teach a kid the concepts all by itself, but we LOVE Bill Nye!
  • Cyberchase Algebra. This could well be too young for your kids, but mine LOVED Cyberchase when they were very little, so it's mostly a nostalgia watch with a teeny bit of sneaky algebra enrichment.
  • Emmy Noether: The Most Important Mathematician You've Never Heard Of. Strong female role model!
  • Math Without Numbers. This will be too advanced for most kids this age, but it's great for changing YOUR way of thinking about algebra, which will then help your kids.
P.S. Want to follow along with my craft projects, books I'm reading, road trips to weird old cemeteries, looming mid-life crisis, and other various adventures on the daily? Find me on my Craft Knife Facebook page!

Tuesday, January 9, 2018

Homeschool Biology: CK-12 Biology Chapter 4--Photosynthesis and Cellular Respiration

The kids and I are using CK-12's 9th/10th grade Biology textbook as the spine for this year's biology curriculum--for Will, who is in the eighth grade but who is taking high school-level coursework, this will be recorded as Honors Biology on her transcript.

In addition to that textbook, we're using The Illustrated Guide to Home Biology Experiments as our lab manual, and of course we've got a plethora of other reading/viewing/listening resources and hands-on activities to enrich our study.


Chapter 4 of CK-12's Biology textbook is a meaty one, with lots of awesome hands-on enrichment to do--there's molecular modeling, experiments and demonstrations, and lots of observation. Here's what my lesson plans for the chapter looked like:

We split this chapter into three entire weeks--you could do this in one week, but it would be an awfully science-heavy week for you. The kids read the chapter in sections, and then complete the review questions at the end of each section, writing their answers in their science notebooks. On other days, we explored the reading/viewing resources that I'll list at the bottom of this post.

I also assigned specific resources and hands-on assignments for each section. After reading "4.1 Energy for Life," the kids read the entry on photosynthesis in The Biology Book. This book is awesome because it's a historical encyclopedia of scientific discoveries in the field of biology--you get a factual explanation of photosynthesis, but you also get to place its discovery and study into historical context.

Syd also watched the BrainPOP movie on photosynthesis, then took its comprehension quiz. She LOOOOOVEES BrainPOP!

After reading this section is also when the kids practiced modeling the process of photosynthesis at a molecular level, using Zometools:


This exercise is a good math and chemistry enrichment, but most of all, it helps kids understand that photosynthesis is a concrete process that can be measured. And that's good, because we're about to measure it!

I helped the kids run an experiment from The Illustrated Guide to Home Biology Experiments--Procedure IV 1.1: Observing Carbon Dioxide Uptake:


It's a surprisingly accessible experiment, although you'll have to order many of the supplies online, and it's super cool, demonstrating not just the process of photosynthesis but also the fact that science?

It's magic!

Will later remixed this experiment as part of her academic scholarship application for Space Camp, so it also lends itself to testing a ton of other variables. If I had it to do over again, I would probably run this experiment with the kids first, then require them to design and run a remixed experiment, variables of their own creation, independently. Will got a LOT out of having to do that for her application.

After the experiment, I required the kids to answer the questions about it in the lab manual. These were a little tough for Syd, but do-able.

We also ran the experiment Procedure IV 1.2: Determining the Effect of Light Intensity on Photosynthesis. I didn't want to buy the bulb that the book recommends, because it's spendy, so instead I used one of the heat lamp bulbs that we use to brood chicks. The kids still got results, but it took a LOT longer than it would have if I'd bought the proper bulb:


 I'd suggest buying the right one, but perhaps finding someone else who's experimenting with photosynthesis this year and splitting the cost.

Again, the kids both answered the questions about this experiment in the lab manual.

We didn't do any hands-on activities for the cellular respiration and anaerobic respiration units in this chapter, although Syd did watch the BrainPOP movie on cellular respiration and take the quiz afterwards.

Here are the YouTube videos that we watched during this chapter--I generally always use CrashCourse, SciShow, Khan Academy, and Ted-Ed as resources on YouTube:


And here are some of the other resources we used!

I'm randomly posting my lesson plans for Honors Biology out of order, because my life isn't confusing enough as it is, so although I haven't yet posted our work in chapters 2 or 3 of CK-12, here are my lesson plans for chapter 1 of CK-12 Biology.

Stay tuned, because we're on to the cell cycle now. Today, we're making meiosis cookies!

Friday, January 5, 2018

Homeschool Science: Demonstrate Carbon Dioxide Uptake and the Necessity of Light in Photosynthesis

The kids and I are using CK-12's 9th/10th grade Biology textbook as the spine for this year's biology curriculum--for Will, who is in the eighth grade but who is taking high school-level coursework, this will be recorded as Honors Biology on her transcript.

In addition to that textbook, we're using The Illustrated Guide to Home Biology Experiments as our lab manual, and of course we've got a plethora of other reading/viewing/listening resources and hands-on activities to enrich our study.


Time for more photosynthesis! After reading the chapter on photosynthesis in their textbook, exploring some other reading/viewing resources (more on that another time), and successfully modeling the chemical process of photosynthesis, the kids were well-prepared for a science lab that would allow them to see photosynthesis in action.

If you're following along with us in The Illustrated Guide to Home Biology Experiments, which makes a great lab manual for CK-12's 9th/10th grade Biology textbook, this is Procedure IV-1-1: Observing Carbon Dioxide Uptake. To perform this demonstration, we needed bromothymol blue, hydrochloric acid, several test tubes with rubber stoppers, and several sprigs of elodea, a water plant. If you're not doing this in the late autumn or winter, you can likely find elodea, or a similar water plant species, just by hiking to a local pond, but I bought ours from AquariumPlants on etsy. I've actually purchased elodea from this shop twice, because Will also wanted to use elodea for the experiment that she had to design and perform as part of her Space Camp academic scholarship application.

To set up this demonstration, we must turn the kitchen table into our science laboratory. That involves removing everything from the table, wiping it down, and laying newspapers down.

Boom! We have a science lab!

Syd measures out the correct amount of distilled water into a beaker:

Will adds bromothymol blue until its color is distinct:

Syd adds the blue-tinted water to select test tubes, some of which have sprigs of elodea already in, and some of which are going to be left empty:

The bromothymol blue solution in those test tubes will be turned slightly acidic not with carbon dioxide, which we know is required for photosynthesis, but with hydrochloric acid, which Will is adding a teensy drop of to each tube (notice the appropriate protective gear for once!):


Now we have some acidic solutions, but we expect that the bromothymol blue indicator will not change color when this plant is exposed to light:

Next, Syd introduces carbon dioxide to the remaining bromothymol blue solution, by the expedient means of blowing into it through a straw:


Science IS magic!!!

Now all Will has to do is fill the remaining test tubes with that solution--


--and here we have two springs of elodea, both in acidic solutions:

The kids put a test tube with elodea and bromothymol blue solution with carbon dioxide; a test tube with elodea and bromothymol blue solution with hydrochloric acid, and a test tube with only bromothymol blue solution with carbon dioxide into a dark room, and another set of the same in a sunny window:


They visit all of the test tubes every ten minutes to make observations. Within the hour, however, their experiment has a positive result:

See that test tube on the left? Its bromothymol blue is turning from yellow back to blue, and doing so first in the vicinity of the elodea sprig. This tells us that the solution is changing from acid to base, but the only thing added to that solution to make it acidic was carbon dioxide. The test tube with the hydrochloric acid solution is not changing. This tells us that the carbon dioxide is being depleted from that solution, but the only thing added to that test tube was elodea. The empty test tube with carbon dioxide added is not changing. 

This tells us that the elodea is depleting carbon dioxide from the solution. It's only doing so in the test tube that's in the sunny window; the matching test tube in the dark room shows no change.

This, then, tells us that photosynthesis takes carbon dioxide and requires light. 

And that was a good afternoon of science!

I'm slowly writing up our complete lesson plans for each chapter in CK-12 9th/10th grade Biology; here's chapter one.

Wednesday, January 3, 2018

How to Make a Super-Easy, No-Sew Pillow Cover


One of our planned family activities over winter break was a day trip to IKEA. Everyone loves IKEA, right? I mean, surely there is nobody, whether you're a hipster or a Gen-Xer or a Millennial, who could possibly hate affordable, clean-lined, Swedish interior design.

Surely, right?

You can definitely go overboard on it--I remember a decade ago visiting the rental house of a couple of friends for the first time. I walked in, looked around, and was all, "So... you guys like IKEA, huh?"

"I KNOOOOWWWWW!!!!" Molly wailed miserably. It was... a little much. Nobody really expects to walk into an Indiana student rental and find an Icelandic living room, you know? But everyone I know has some IKEA shit in their homes, and it's all pretty awesome.

And considering that the rest of the furnishings in our own house come from 1) our local university's surplus goods store, 2) the street, or 3) our own hands, and it shows, IKEA is a major step up for us.

On a related note, Matt found this sweet vintage music cabinet thing just sitting out by a dumpster the other day! It's hanging out in our garage for two weeks to make sure it doesn't have bedbugs, but then we're totally bringing it inside. Friends, when I was in college I slept on a second-hand mattress that my friend gave me when he moved, and HE found it by a dumpster before he slept on it for four years. Do. Not. Judge. Me.

So our trip to IKEA was supposed to result in a new mattress for one kid and a new computer/schoolwork station for both kids (all of which we found and Matt and I did not divorce over sawhorse-style table legs, although it was a close thing, and I got completely disoriented approximately 30 feet into the store and never really did find my bearings again), but all *I* really wanted were wooden magazine files to hold our comic book collection--classy, I know--and a shit-ton of throw pillows to hide our ugly yet comfortable couch that we bought from our local university's surplus goods store approximately 12 years ago, and who KNOWS how long the university used it in one of their dorm lounges, or how many students sat on it and did weird things on it?

I've replaced all the cushions, but trust me: you want my janky denim slipcovers and all the throw pillows you can fit on it.

Pillows are SUPER cheap at IKEA! I bought four 20"x 20" pillows and two 12"x 24" pillows, knowing that I can go back for more if I want, and I'm totally going to go back for more! The pillow covers, now, they were NOT super cheap, but if there is one thing that I have in spades, it is the fabric in my stash to make pillow covers out of.

And the fabric that I have the most of in stash these days is fleece, leftover from the making of mermaid tails and shark blankets.

This no-sew pillow cover, made from fleece, actually takes longer to tie than it would to sew it, but the tied fringe makes it look a lot nicer than a plainly-sewn fleece pillow cover would, and it's certainly much kid-friendlier of a project. In fact, for most of it you can use my tutorial for making tied dog/cat blankets, which my Girl Scout troop did with Brownie Scouts in September.

And yes, I DID make this pillow cover while watching Season 2 of The Crown. I am also spending my free time watching a bunch of dorky documentaries on the royal family bootlegged on YouTube, so there you go.

To make this super-easy, no-sew pillow cover, all you need are fleece, scissors, and a paper cutting template that measures 1"x 3". A rotary cutter and self-healing cutting mat will help you cut the fleece to size, but you could do without, if you had to.

Step #1: Put your fleece wrong sides together, two layers thick. Measure the fleece to dimensions that are 6" longer than your pillow on each side. For the 12"x 24" pillow that I'm covering in these pics, I measured my fleece out at 18"x 30". Cut out through both layers.

Step #2: Make a cutting template out of paper, dimensions 1"x 3". Use that to cut the fringes along the entire perimeter of the fleece, making sure that you cut through both layers each time. For the corners, you'll find that you naturally cut an entire 3"x 3" chunk out of each corner--that's okay! It's supposed to look like that!


Here's a gratuitous photo of Matt and Syd putting together one of the two computer workstations. Matt won the argument over what to get, and fine, they're perfect, whatever.


Step #4: While watching season 2 of The Crown, begin to tie each pair of fringes into a square knot. I give a little more detail in my tied blanket tute, but it's not hard.


Step #5: Only tie together three sides of your pillow cover. When you've got those three sides tied together, insert the pillow form and then tie the fringes on the fourth side. If you wanted to take the pillow out later, you could just untie them, but these throw pillows can be thrown entirely in the wash. 

I had meant to use all of the throw pillows that I bought for the couch, but after I made that black tied pillow cover, I realized that the Girl Scout fleece that I bought last month would be perfect for pillow covers for the 20"x 20" pillows, so I made one for each of the kids:

They use them as throw pillows on their beds, or cushions when they're hanging out on the floor, but they're also planning to use them as the pillows they take on a slumber party later this week, and I think they'd also work well for camping and summer camps.

Will liked hers so much that she made an identical one as a birthday present for a friend.

I'll show you the two pillow covers that I sewed out of faux fur another time (and why on earth I have so much faux fur in my stash pile I can't really tell you...), and when the kids and I head up to Indy to volunteer at the Children's Museum later this month, I think I'll make another trip to IKEA afterwards.

Obviously, I need to replace those three throw pillows that aren't going on the couch now, and I could use some more magazine files for my comic books...

Thursday, December 28, 2017

Christmas 2017: A Shark and Two Mermaids (But No Pony)

Christmas at home.

I never wanted to give up spending Christmas with my Pappa--one thing about being raised by your grandparents is that for as long as you can remember, you've always known that we creatures are frail and mortal--but I've known for years that after he passed, I would dearly love to spend Christmas at home.

Last year, my first Christmas after he (and then Mac--god, what an awful year that was) had died, was me mostly getting through the holidays intact, which I did. Mostly. This year, however, I was able to find the sweet as well as the bitter, and as I thought I would, I dearly loved spending Christmas at home.

Thirteen, as well, is being kinder to my Will than eleven and twelve were, but frankly, being more comfortable in her skin has made her into even more of a terror, although in a different way. She consented to visit Santa this year, for the first time since she was ten, so that I could have my Christmas picture, but she came away from that meeting telling everyone she met that Santa was going to bring her a pony.

"Uh, no he isn't," Syd would try to correct. "He said he couldn't fit a pony cage on his sleigh."

"Huh-uh!" Will would insist, smugly, daring her father and I to so much as try to talk sense into her, "Santa SAID he'd bring me a pony!"

Strangers would ask her what she wanted for Christmas. "I'm getting a pony!" she'd announce, and just smile brattily at us when we tried to react to the excited squeals of everyone listening.

That kid. I swear.

Thankfully, Santa DOES have the sense that his mother gave him, because this is what Will found on her stocking on Christmas morning:

Her father and I have told her ever since we moved into this house that we would be happy to buy her a horse, but she'd need to do all the research and legwork to figure out exactly what infrastructure we needed and how to install it first, and figure all of the expenses so that we could work it into our budget. Thank goodness that Santa is on the same page!

Fortunately, Santa's replacement surprises seem to have hit the mark:
That's Choc-ola, a local chocolate soda that's actually not full of crap, so yay!
This  little one also had plenty of surprises:

She was just as excited to receive HER favorite dream food, gummies--and lots of them! 

My little crafter also made everyone else's gifts, too. She made Will a beautiful black lab out of Sculpey:

You can't tell as well from this angle, but she made me my favorite My Little Pony character, DJ Pon-3:

And she wrote a book for Matt, in a book that she actually bound herself:


That kid, I swear. 


We tried to make her gifts special, too:
Fat unicorns are kind of an inside joke in our family, so this is a fat reindeer.
Over the course of The Nutcracker run, I convinced all of the Mother Ginger Boys that they were in fact Mother Ginger's deadly assassins, and then I had to deal with them karate chopping and high kicking backstage when I was supposed to be keeping them quiet. Oops!
 

The kids thought that the present that they picked out for Matt was the funniest thing on the planet:

It's a potholder that says "Pizza's here!" on it, and has a picture of a family eating pizza around the dinner table.

Get it? We don't cook and instead order a lot of pizza!

Good times.

I had meant to make most of my family's gifts, but wow, why didn't y'all tell me that handmade gifts take a billion years to make! It was INSANE! In the end, I managed to make one small and one big gift for each kid, and the stuff that I had intended to make for Matt he's just going to have to get on our anniversary, because man, that did NOT happen. I had to send Matt and both kids out on a bunch of fake errands all day on Saturday just so I could finish panic-sewing Will's big gift.

 But yes, it was crazy, but it was so worth it. We now have a small mermaid--

--and... 

...a girl-sized mermaid!

We also have...

...a girl-sized shark!


It's not a pony, but I do think that she managed to like it, nonetheless:

I love the fact that Christmas is at the beginning of the break, because now we can just enjoy each other, put together puzzles and do crafts and read together, and I don't have to panic-sew a single thing.