Tuesday, September 12, 2023

I Read The Class and Now I'm Depressed about the State of Public School Education in America

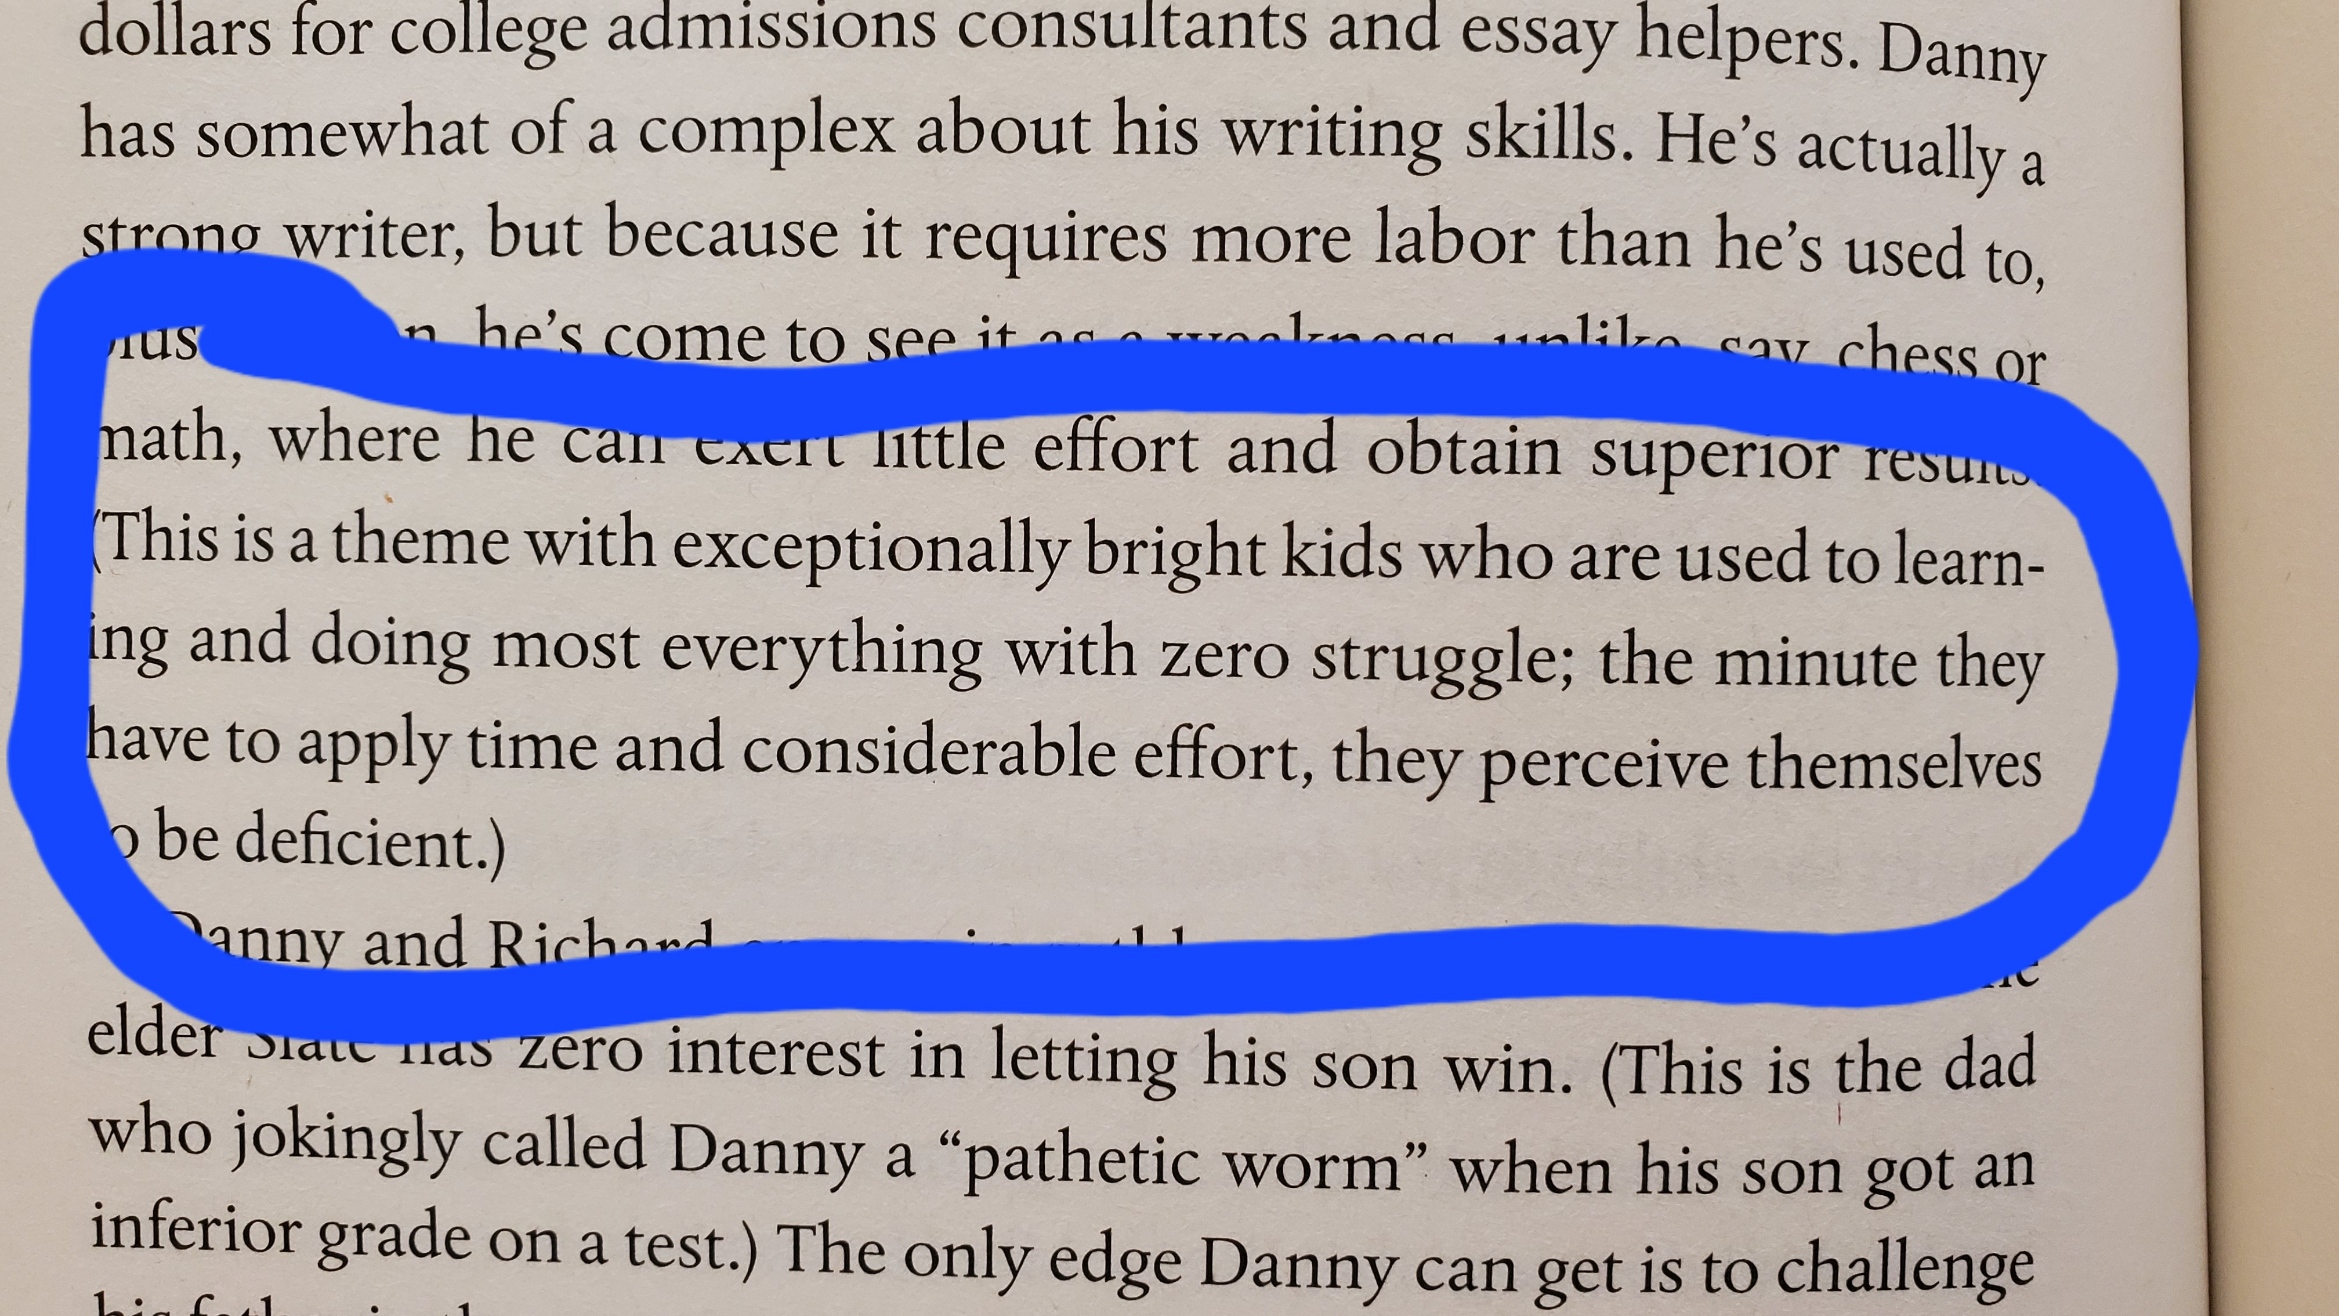
Texted this to my own exceptionally bright, perfectionist kid. Nobody has ever called me subtle!


The Class: A Life-Changing Teacher, His World-Changing Kids, and the Most Inventive Classroom in AmericaThe Class: A Life-Changing Teacher, His World-Changing Kids, and the Most Inventive Classroom in America by Heather Won Tesoriero
My rating: 5 of 5 stars

I love this book, and this book makes me sad.

The Class is written with such compassion and gentleness when it comes to the stories that it tells about the central protagonists, the real children involved in one specific science class in the wealthy, high-class community of Greenwich Connecticut. Tesoriero clearly spent quality time with these kids, and was likable and trustworthy enough to be invited to their promposals and told all the fun little details about their daily lives that, in turn, give her writing life. Her tone when telling their stories is comfortable, a bit gossipy (but in a nice way), but always, always kind and respectful. It would be so easy to typecast a kid as a “character” in her book, so easy to lampoon a kid’s silliness or naivete for laughs, but this never happens. Instead, Tesoriero uses small details that she’s witnessed about the kids’ interactions to illustrate their personalities in a way that feels completely natural and true, and I love how thoughtful and careful she is.

Here's an interview with Tesoriero in which she gives an excellent overview of her book. It's a little long, but you get all the main points and some of the more interesting little details that brought the book to life for me:


The novelty of Tesoriero’s topic is what makes me sad. Tesoriero writes about a unicorn of a science class: an exceptional, privileged teacher of exceptional, privileged children who attend an exceptional, privileged school in an exceptional, privileged town located in an exceptional, privileged part of the country. I haven't looked up how their school district is funded, but if it's property taxes as is usual, they should have plenty of money. Even so, one of the premises of the science class is that the teacher, Bramante, has the skills and the connections to stock the classroom with professional-quality, niche lab equipment that would be otherwise out of the reach of even the most well-funded school, so again, other than in this unicorn situation with this unicorn teacher, wealth is a barrier to recreating this exceptional classroom and these exceptional results.

I'm interested in education philosophies as they connect with education access, and in my amateur research, whether you want the crunchiest, earthiest education or the STEM-iest, most academically rigorous education for your kids, the kicker is ALWAYS money. Here's a short video talking about Montessori and Waldorf and the issue of money to show that these exceptional experiences, wherever they lie on the spectrum, are ALWAYS expensive (and in my short time in the Montessori system, I can tell you that all the other parents but me were R.I.C.H.):


In The Class, the children’s level of achievement is exceptional mostly because of their privilege, and while Tesoriero does acknowledge this privilege, as do most of the children, she completely leaves alone issues of equity, or how on earth this kind of program could ever possibly be reproduced in other schools, or what it says about the overall environment of public education in America. That’s likely because this particular scenario is clearly inequitable, can’t be reproduced in most other schools, and has only dismal things to say about the ways that public school education is, overall, failing the majority of America’s children. All of that is deliberately not the scope of this book, but the book’s very existence begs those questions.

It was interesting, then, to see the small inequities that DO plague the lives of these exceptional, privileged children. Kids who should have won specific science fairs don’t win them. Kids who do win are cyberbullied. One kid, who is clearly THE most exceptional kid, is denied admission to Harvard, but another kid, depicted as entitled and wasteful of some of his many opportunities (but still exceptional! Because privilege!), but also described as wealthy, with parents who are both Harvard alumni and active donors to Harvard, is offered early acceptance. But even though I might want to mock the pettiness of any slight in the shadow of such overall overwhelming opportunity, it’s impossible to, because Tesoriero treats these setbacks with respect; these are children, their setbacks are real to them (if so out-of-scale as to be wildly unreal to me, ahem), and these are the life lessons they’re learning.

But seriously, though--don’t worry about the kid who didn’t get into Harvard; he got into TONS of other schools, and ended up turning down a $267,000 scholarship to Duke, one that would have included room and board and study-abroad, to attend Stanford. As a parent who’s currently got a range of side hustles going on to try to cash-flow as much of my own kid’s college tuition as possible so she can graduate as debt-free as possible, it’s a big challenge for me not to put my petty hat on for that scenario. 

I’ll be a little more petty about the kid who worked out a deal with the high school to basically allow him to test out of all of his classes for his final two years while he lived across the country in an apartment his parents rented for him and worked on his multi-million dollar invention. The super fancy international science fair thing he got invited to disrespected him, I guess(?), so he just didn’t go, and then they asked his mom for $600 to reimburse them for what they’d spent on his no-showness. THEN the bougie high school that had been essentially not making him go there for the last two years threatened to withhold his diploma because he didn’t take the wellness class he said he’d take, and OMG, would Yale withdraw their acceptance if he didn’t have his high school diploma? Nvm, they sent his diploma to him anyway. 

Just… you know, in my house, the most recent money/attendance blow-up with my own teenager involved her getting called into her part-time job on a night that she had ballet class, and I was pissed because I had to ask the ballet program if she could make up the class on another night rather than simply skip it, and they were weird about it but nevertheless, I persisted, because I paid fifteen dollars for that stinking class and fifteen dollars is FIFTEEN DOLLARS!

Okay, I’m taking my petty hat off again.

View all my reviews

Sunday, September 10, 2023

Pumpkin Pounding: A Halloween Project for Small Children


This tutorial was originally posted on Crafting a Green World way back in 2009! 

Encouraging my children's independence is VERY important to me. Not only is it easier for me to parent two small children who can pour their own milk and put on their own coats and carry their own balance bikes up and down the front porch stairs, but it's also a priority in my parenting that my girls see themselves as capable individuals who can handle challenges and perform the meaningful work of day-to-day living. 

Because of that, carving pumpkins into Jack-o-lanterns can be a really frustrating experience. 

I do permit my children to cut with sharp knives (with supervision), but not to use them on something as thick and unwieldy as a pumpkin. Although there are around-the-house materials that make pumpkin carving an activity more appropriate for small children (subject for a later post), my girls' favorite Jack-o-lantern craft is something that we call pumpkin pounding.

Pumpkin pounding is a hands-on activity that uses real tools on a real pumpkin, and each of my girls was able to do it with help at age two, and independently by age three. The best part, however, is that in the end, depending on how enthusiastic a pounder your kid has been, you end up with a real, live Jack-o-lantern for sitting on the porch steps and popping a candle inside. 

You will need:
  • field pumpkin that's not too round. You want to be able to sit it on its various sides, as well as its butt, and not have it roll all over creation.
  • hammer. You can lay out a variety of hammers for your kids to experience, but the best tool for them is one that's as light as possible but has the widest hammer head
  • nails. Again, lay out a variety to try out, but the best ones are as wide as possible with the widest head
  • knife and scraping tool and whatever else you'll need to cut the top of the Jack-o-lantern and scrape the insides
1. Set the pumpkin up in a space where kids have enough room to swing a hammer, and where they can get in the correct hammering position--a low table or the floor or a bench, etc. 

Be prepared to leave the pumpkin in that space for a few days, to give the kids the chance to come back over and over to this activity independently. 

2. Show your child how to press the tip of the nail into the pumpkin flesh until the nail is held there by itself. That's the safest way to hammer, but older children can also be taught how to gently tap the nail into place with their hammers. 

For kids younger than three, you may need to set up a handful of nails like this for them to hammer. 


3. Let your child hammer nails into the pumpkin. 

Remind them not to hammer the pumpkin just for the heck of it, but pumpkins are extremely sturdy and surprisingly forgiving, and even though your kid will hit the pumpkin a LOT, and HARD, as they're aiming for that nail, it's not going to crack.  


4. At about five years of age, your kid can also learn how to use the claw end of the hammer to lever the nails back out of the pumpkin when she's done hammering. Otherwise, you'll probably need to do this, so give her plenty of nails to work with before she needs your help. 

5. The Jack-o-lantern will show best with as many nail holes as possible, so feel free to take a whack at the pumpkin yourself. It's amazingly cathartic. 

6. When everyone is completely finished with the pounding (and this may take several days), cut off the top of the pumpkin, and scrape out the insides to finish it. Pop in a candle, and enjoy your pretty pumpkin. 

My kids and I are, for some reason, inordinately fond of our autumn-themed craft projects. What are your favorites?

Monday, September 4, 2023

I Read Pitch Perfect and Compared it to the Movie


Pitch Perfect: The Quest for Collegiate A Cappella GloryPitch Perfect: The Quest for Collegiate A Cappella Glory by Mickey Rapkin
My rating: 3 of 5 stars

“It is Saturday evening, April 30, 2005, and the stage is empty save for twelve women dressed in identical black pants, buttoned-up black shirts, and red ties. Evynne describes their look as ‘sexy stewardess.’”

So begins the non-fiction book that’s the basis of one of my favorite film trilogies, Pitch Perfect!


I do like this type of non-fiction, and I’ve read several similar titles (Pledged - Secret Life Of Sororities and The Class are two recent books that come to mind), but for me, quite a lot of the charm of the book Pitch Perfect is picking out all the little references that show up in the film Pitch Perfect. I already knew (Thank you, Dr. Google!) that all the competitions were real competitions, but it was super cute to see that Divisi, the female a cappella group from the University of Oregon, IS the Barden Bellas! The movie picked up so many Divisi details, from their “sexy stewardess” outfits with “unfortunate-looking green-and-yellow scarves” to the attrition in numbers that led to their desperation early one fall semester to pick up new recruits, ANY recruits… and then in walks a plucky new girl. When I found their album, Undivided, on Spotify and played it? 

It was like the Barden Bellas were singing to me! In later parts of the book, there’s a very node-like tonsillectomy! There’s a weirdly mean rival group! Even Divisi's much-touted performance of “Yeah,” when I found it on YouTube, had some similar choreography to the Bellas’ show-stopping number at the end of Pitch Perfect.

Here's the famous Divisi number, "Yeah," at the 2005 International Championship of Collegiate A Cappella:

For a fun comparison, here's the Bellas' Pitch Perfect performance:


The chapters on the male a cappella groups didn’t excite me nearly as much, although I still found them interesting to read. Yes, the album Code Red by the Tufts Beelzebubs is impressive--

--and it was interesting to read about the controversy, but… then there’s another whole discussion of their next album, Shedding, and how IT was made, and a list of all the awards that IT won, and we’ve just really gotten into the weeds of collegiate a cappella album creation here.

The chapters on the Hullabahoos were more compelling, probably because Rapkin depicted them as being a LOT more fun… or a lot more of a hot mess. Whichever. Like, a Hullabahoo member literally peed on the Beelzebubs’ car?!? A Hullabahoo knocked into the CEO of the major company they’d been flown out to perform for. The Hullabahoos were invited to sing the national anthem at a Lakers game--and then piddled around their hotel for so long that when they finally left they got caught in a traffic jam and THEY MISSED IT. Just, OMG you guys.

I had a lot of fun ready referencing the groups and performances throughout the book, and I’d totally have paid for an accompanying CD/DVD, even though many of the performances that I found were so impossibly corny that I couldn’t actually watch them. Is there a word for someone singing and performing so earnestly that you high-key want to die while you watch them? But the ready-reference was important research, because some groups were so awesome that I didn’t want to die watching them! “Yeah” is fun and adorable, and the Hullabahoos’ “Royals” is well-sung and surprisingly understated, considering the singers are all wearing voluminous robes in cartoonish prints.


While I enjoyed what I read, I really wished we could have dug deeper into the inner workings of some of these musicians, something that I totally get possibly wasn’t an option, because, you know, they’re real humans and we don’t necessarily get to own their thoughts. But some of these singers clearly had a LOT going on that impacted and was impacted by their a cappella passion, and I’d love to hear more about how an obsessive passion like that affected them. Lisa Forkish turned down her dream school for YEARS to sing with Divisi, but then later… she finally went to that dream school! What helped her decide to move on? Ben Appel was the music director of the Beelzebubs, and then all of a sudden, he had to leave the entire school to get help with his mental health. Surely, his all-consuming a cappella commitments did NOT help with his struggles… or did they? I’m very interested in the world of extreme hobbies, and I would LOVE to know.

The only real problem with Pitch Perfect, and the reason why it’s a three-star book instead of a five-star one for me, is Rapkin’s use of offensive language regarding gender expression and sexual identity. There's a whole "funny" story that hinges on a homophobic slur that Rapkin himself writes--he's not even quoting anyone!--and Rapkin really needs to say that he’s sorry. Just because of that, I was stoked to see that in chapter eight, he makes fun of a poster that a Divisi member makes by hand, in which “a cappella” is spelled incorrectly--and then in chapter twelve, who is it who writes the word “a capella” in his very own book? Why, none other than Rapkin himself! Check your spelling AND your homophobic language, Mister!

View all my reviews

P.S. Want to follow along with my craft projects, books I'm reading, road trips to random little towns, looming mid-life crisis, and other various adventures on the daily? Find me on my Craft Knife Facebook page!

Saturday, September 2, 2023

Homeschool Science: How to Grow a Pumpkin out of Another Pumpkin


This tutorial was originally posted on Crafting a Green World way back in 2015!

My kids just harvested the pumpkin plants that they've been nurturing all spring and summer. It was quite an exciting achievement for them, and even more so because they've actually been following this process for almost a full year now. 

Almost a full year ago, they first picked out some organically-grown, heirloom pumpkins, and these newly harvested pumpkins came directly out of the body of those. It was a fascinating process, a pretty easy way to grow pumpkins, and a great way for a kid studying botany to follow the life cycle of a plant throughout its entire lifespan. 

Here's what we did: 

1. In the fall or winter, choose your pumpkins. Have the kids look for organically-grown, locally-raised, heirloom pumpkins. We found ours about this time of year--I can tell, because the kids drew Jack-o-lantern faces on them in Sharpie, since of course we weren't going to cut them. 

2. Store them all winter. I don't have any great tips for this, and our own storage didn't go perfectly. The kids had chosen several, and we kept them all winter on our nature table. Every now and then, I'd walk by and notice that a pumpkin was starting to rot, and so I'd toss it out in the bushes for the chickens to eat. Now that I think about it... THAT'S why we have two volunteer pumpkin plants in those bushes this year! We actually got loads of pumpkins from those two vines! 

This winter, I plan to store our pumpkins in our root cellar. We'll lose the opportunity to have all those conversations that naturally occurred as the sight of a pumpkin caused a question to pop into a kid's head, but more pumpkins should survive the winter that way. 


3. In the spring, cut them open and fill them with dirt. Set up a work space outside, give the kid a knife, and have her cut open the top of her pumpkin. Note all of the seeds inside, chat about it, remove a seed for dissection and study under the microscope, etc. 

Have the kid fill her pumpkin all the way to the top with good-quality potting soil, then water it. 

These pumpkins are a little tricky to put under grow lights, since they're so much taller than the other seed flats that you'll also have under there, but if you can manage to start them indoors, it'll be well worth it. On the other hand, this year I deliberately had the kids choose small varieties of pumpkins, so that they could plant them directly in the garden and still have time for the pumpkins to mature. 


4. Plant the pumpkins. Have the kid dig a hole deep enough to cover the entire pumpkin, and then plant it. You don't want any pumpkin sticking up out of the soil to rot, but covering it with dirt will allow it to decompose in the ground and turn into lovely nutrients for the pumpkin seedlings.  

5. Cull the weaklings. One of the coolest things about this project is that your kids will see a LOT of pumpkin sprouts coming out of that pumpkin! Even at nine and eleven, my two thought that this was pretty awesome. 

Of course, they'll have to continually pinch off the weaker ones--I had mine pinch off half of the seedlings at a time, every time, until they were left with one lone winner. 

This step does take supervision. My younger daughter accidentally pinched off her best seedling pretty late in the game, and ended up not getting a pumpkin at all from that particular plant. She was SUPER bummed! 

6. Weed and water. For the rest of the summer, the kids can care for their pumpkins just as they do the rest of their garden. This is a great opportunity for a garden journal, or weekly measurement, or other monitoring of the plant's progress. 

7. Harvest. In the late summer or early fall, your kid can harvest her pumpkin, knowing that she not only grew it herself, and not only from seed, but actually from last year's pumpkin that she also picked out. Does she want to make it into a pie, or save it to make a pumpkin next year?

Thursday, August 31, 2023

The Post-Girl Scout Cookie Season Cookie Prep Meeting


Every year, the most annoying thing about Girl Scout cookie season is figuring out how to fit in a Girl Scout troop meeting to prep for it. My troop has been selling cookies so long that they don't need a training meeting, just an email with relevant dates and any changes from last year. But every year we always DO need something new prepped, new donation cans or signage or other marketing materials--and who has time for that between Winter Break and a cookie sale start date of early January?

This year, we had a collective revelation: why not have a post-Girl Scout cookie season meeting to prep for the next year's sale? We know exactly what materials we need to replace, we've got brand-new marketing ideas fresh in our minds, and we won't have to rush or be stressed out. As an added bonus, we've got a full stash of empty cookie boxes to use as crafting supplies. 

Y'all, our plan worked BRILLIANTLY! The meeting was relaxed and low-stress, the kids had tons of ideas, and I've got the comfy feeling of knowing that we'll be going into our next cookie season with almost all of our materials already created and ready to go.

During this post-cookie season meeting, Seniors earned the My Cookie Network badge and Ambassadors earned the Cookie Influencer badge.

Pre-Meeting Prep Work


Before the meeting, I ordered the badges, printed photos of the troop doing cool stuff over the years, bought postcard stamps, formed an agreement with our local animal shelter that they would love to have the corrugated cardboard cat scratchers we wanted to make, and met up with various other troop leaders here and anon to take their empty corrugated cardboard cookie cases off their hands. 

As a Little Brownie Bakers troop, the kids really wanted to taste-test the ABC Bakers cookies. We also had a brand-new cookie this year, the Raspberry Rally, that NOBODY had tasted because it hadn't been available for in-person sales! Raspberry Rally was only available as a shipped cookie, during a specific ordering window only, so my night owl teenager got onto the troop's Digital Cookie site at 12:01 am opening day and ordered us some Raspberry Rallies.

Good thing she did, because by 9:00 am other parents and troop leaders were already in the Facebook group griping that it was sold out!

I asked around my Craft Knife Facebook page to find someone whose kid was an ABC Bakers Girl Scout, and I bought the troop a selection of ABC Bakers cookies that we could compare to our Little Brownie Bakers cookies.

My own Girl Scout had to miss most of this meeting, so to earn the part of the Cookie Influencer badge that she'd miss, she baked the Original Girl Scout Cookie, using the original recipe, to share with the rest of the troop during the meeting.

Step 1: Become an authority in your cookie business.


Because kids were earning two levels of badges simultaneously, we ended up doing activities somewhere in the middle. When these Girl Scout Seniors level up and want to earn the Ambassador badge, we'll just do different activities!

To be an expert in the Girl Scout cookie business, you need to know all about your cookies--how they look, how they smell, how they taste. You should also know how to compare/contrast them with other cookies from the same bakery and the other bakery, and other commercial and homemade cookies.

We taste-tested my teenager's homemade original recipe Girl Scout cookies, both so we would know how those original cookies tasted and how they compare to their closest cousin, the Trefoil. 

Here's the original Girl Scout cookie recipe. The dough wants to be sticky, but refrigerate it instead of adding extra flour, or your finished cookies will be bland. It's impossible to make a truly authentic recreation, however, and your Girl Scouts should try to guess why!

Do YOU know? It's because none of these ingredients are the same as they were way back in 1922! Your eggs, milk, and butter were farm-fresh and unpasteurized, organic and grass-fed. Your sugar was made from beets, not sugar cane. Even flour manufacturing has changed numerous times since then. Also, ovens! This cookie recipe calls for a "quick oven," which most modern interpretations set at about 350 degrees, but there weren't thermometers, so cooks just sort of figured out a method and used their own experiences to set the temperature, which would also have fluctuated constantly.

We also taste-tested the Raspberry Rallies, and surprisingly, nobody was a fan! Some kids thought they would taste better frozen (we LOVE frozen Thin Mints in this troop!), and I personally thought they would have been delicious with a raspberry jam layer. But alas, they were just Thin Mints with raspberry flavoring instead of mint. And interestingly, my council has ALREADY sent out an announcement that we won't be selling them next year! Goodbye, Raspberry Rallies--we hardly knew ye!

The main event, however, was the Blindfolded Taste Test. I brought enough bandanas so that each person who wanted to play could have their own, and a couple of kids who didn't want to play helped me. The taste-testers blindfolded themselves, and the helpers and I donned disposable gloves (we use these for all our Girl Scout food prep!) and set dueling cookies before each taste-tester. The only tricky thing to remember is which baker you put on which side! When we'd handed out the two cookies for that round, the taste-testers sampled them both and announced 1) which cookie was more delicious, and 2) which cookie they thought was our Little Brownie Baker version vs. which was the ABC Baker version.

This activity was so fun for everyone! Of course, it only works when the cookies from different bakeries look identical, so it didn't work for, say, Thin Mints, which are smooth when they come from Little Brownie Bakers but crinkly when they come from ABC Bakers--


--but for Trefoils, Do-Si-Dos vs. Peanut Butter Sandwiches, Samoas vs. Caramel deLites, Tagalongs vs. Peanut Butter Patties, and Adventurefuls, they're similar enough that you can't tell them apart without looking very closely... which you can't do when you're blindfolded, mwa-ha-ha!

Our troop of cookie experts had a lot of fun comparing and contrasting and mostly--but not always!--guessing our own cookies correctly, and we had plenty of leftovers so that everyone could take more samples to taste-test home with them.

Step 2: Set cookie business goals and develop a new skill.


After the taste-testing, we spent the rest of the meeting working on these various projects while chatting and munching cookies!

At our Girl Scout cookie booths, the kids sometimes use posters and sometimes don't, but unlike some of our other decorations, we don't really have a good stash of ready-to-go posters. Time to fix that! I set out quarter-sheets of posterboard, along with lots of photos of our troop doing cool stuff over the years, and markers, pencils, glue sticks, etc. The kids could work individually or in groups, with the goal of making posters each tightly focused on one NON-COOKIE theme. 

Because do you know why people buy Girl Scout cookies even if they're not super revved up about the cookies?

They buy cookies to support Girl Scouts! So kids who can talk confidently about what they want to do with their cookie profits, as well as show off all the cool stuff they've already done with their cookie profits, inspire the people who want to support Girl Scouts to support them even more. It's also good for the kids to remember the purpose of all the hard work they put in selling cookies, as well as to celebrate all their awesome adventures.

And on this day, the kids made some great posters! Now we've got posters about camping, about high adventure, about friendship, and about our troop trip to Mexico that we can mix and match at cookie booths. Since they're smaller, we can set up a couple at a time, even, and I think they'll be interesting enough to draw eyes to them... and over to the kids' cookie booth!

Step 3: Create and share your value proposition.


The activities we did for Steps 2-4 could be swapped to meet any of these steps, to be honest, because a good marketing campaign is multi-faceted. So just as those posters do a wonderful job sharing the kids' value propositions, it turned out that making, writing, and sending postcards made from upcycled Girl Scout cookie boxes enabled many of the kids to learn a new skill!

Tell me: do YOUR Girl Scouts know how to write, address, and stamp a postcard? Because many of mine didn't! It took some of them a few tries to get everything laid out properly, so even better that we were using perfectly free, easily recyclable materials!

For this activity, the kids each picked a couple of the troop's shipped cookies customers and wrote them a personal thank-you note. They thanked them, said something they learned during cookie sales or something they'd use their cookie profits for, and finished with something else thankful that wasn't a thank-you. This was also a good time to sign the troop thank-you notes that we give, along with a box of Girl Scout cookies, to businesses that let us have a cookie booth on their property. For those thank-you notes, I mount a cute troop photo to a trefoil that I cut out of green paper, then just have the kids sign the back. It's cute, quick, and easy!

Step 4: Create a marketing campaign.


All of this is part of an integrated marketing campaign, but for this specific step, I got the kids to stock the troop back up with decorated donation cans. At each cookie booth we have one donation can for donating cookies to charity (for the past couple of years, our troop has been donating cookies to the city's emergency youth shelter), and one donation can for donating money straight to our troop. I don't understand why these donation cans get SO beat up over the course of a Girl Scout cookie season, but OMG we are constantly needing to replace donation cans! On top of that, we try to keep at least two full cookie booth set-ups to make busy selling weekends easier, so we're looking at six new donation cans nearly every single year.

Fun fact: the only correct donation cans are either 1) a plastic protein powder canister or 2) a giant plastic peanut butter jar. In my top photo, I don't know what that can on the right is, but it's not going to last, sigh.


Step 5: Leave a legacy.


It's important to pay good works forward, so just as the community supports these kids by buying Girl Scout cookies from them, the kids also give back to the community in other ways. We've got our yearly cookie donation to the youth emergency shelter, but this year, I also thought it would be nice to upcycle some of our massive pile of cardboard waste by creating these corrugated cardboard cat scratchers for our local animal shelter.

Look how many the kids were able to make during the course of just one meeting!


I'd love to find a way to encourage the troop to make more cat scratchers independently during the course of the next cookie season, because we have SO much cardboard waste, but I don't know--they're pretty time-consuming, and teenagers are the busiest people I know!

The kids LOVED this meeting, and it worked really well in so many ways: we got a lot of genuinely productive work done, we did some charity work, we ate delicious snacks, we got to be creative, we looked at cute pictures of our troop over the years and went, "Awww!", we had plenty of time to chat while our hands were busy, and we learned new things like how to address a postcard and how Peanut Butter Patties taste just a little different from Tagalongs. 

I hope our upcoming meeting, in which we're going to plan a Harvest badge to earn, start planning a big 2024 troop trip, and get several kids started on their Gold Award paperwork, goes just as well!

P.S. Want to follow along with my craft projects, books I'm reading, road trips to weird old cemeteries, looming mid-life crisis, and other various adventures on the daily? Find me on my Craft Knife Facebook page!

Tuesday, August 29, 2023

Homeschool High School Biology: The ProtistsThat Live in the Local Lake

You will never want to even touch pond water again after completing this biology lab.

But you WILL want to have an aquarium full of pond water living in your home so you can keep hundreds of thousands of microscopic protozoa pets!

This lab is a companion to CK-12 Biology 8.4, which is the chapter on protists.

Observing prepared slides of protists is a good preliminary lab, because it allows your high schooler to review proper microscope usage and how to make microscope drawings, and to get an idea what the live protists might look like. 

Here are the lab instructions that I wrote for my teenager, and here are the materials that we used for the lab:

There was a blast from the past on the package of microscope slides:

I used to shop in that independent educational toys and teaching supplies store ALL THE TIME when my children were wee. The dollhouse I bought one toddler to celebrate her toilet training came from there, as did the PlaySkool circus set that the other kid picked out for her sixth birthday present, about an hour before she broke her leg on the playground and it turned out that a huge Playskool set was absolutely the perfect thing for a kid with a cast on her leg to play with for a solid month!

Fifteen years after picking out that dollhouse, my teenager collected water from a local lake, brought it home, dropped a single drop onto a microscope slide, and put it under the microscope to see what lives there.

A lot, it turned out!


In the above video, I think I see an amoeba, but I think that all the larger creatures are perhaps nematodes? I haven't even looked to see what the teenager identified them as in her lab notebook, but I'm sure her guess is better than mine!

The next video is by far my coolest:


I'm pretty sure those are stalked ciliates! The teenagers and I have done this lab several times, and I've only seen these particular critters once! I'm think all the critters swimming around them are Euglenae. Or maybe Paramecia? 

Those two videos are taken at just 100x, so you can see how much you can see even at that low magnitude. 400x, below, gives you more detail, but we don't use any additives to slow down our protists, so anything speedier than that oozy amoeba at the bottom right is hard to see.


This is a different water sample on a different day. I think that might be another Euglenoid because of its chloroplasts, which perhaps makes the critters that I previously thought were Euglenae actually Paramecia. I should probably get off my butt and go see what the teenager identified everything as, because I'm sure that she did more research than I'm currently doing!


The identities might be a bit sketchy, but the point of this particular lab isn't specifically to correctly identify every protist. Think of how much the teenager learned about sample collecting, microscope usage, and protists in general, as well as the practice that she got writing a lab report, problem-solving in science, and making decisions about identification. 

And most importantly, she got to see all the magic that lives out of sight in our local lake!

This protist lab pairs well with this macroinvertebrate identification lab, as well as this larger Water unit

Sunday, August 27, 2023

DIY Cat Scratcher from Upcycled Corrugated Cardboard Boxes

This tutorial was originally posted on Crafting a Green World.

This upcycled cardboard cat scratcher is a great way to use up all your corrugated cardboard boxes. Cats love it, and it's a useful donation to your local animal shelter.

There comes a time in every person's life when they find themselves simply awash with cardboard. Maybe you just finished unpacking from your latest move. Maybe you went a little too ham on the most recent gift-giving holiday. Maybe your Girl Scout troop sold 2,000 boxes of Girl Scout cookies and now you have 250 empty cookie cases to show for it.

Whatever the situation that has left you with too much corrugated cardboard, I have the perfect solution: an upcycled cardboard cat scratcher!

Cats LOVE this style of cat scratcher, and it's a great one to make for them because it's eco-friendly on both ends: use upcycled cardboard to make it, and recycle it when you're done with it. Make a few of these cat scratchers and tuck them around your space so your cat never has an excuse to sharpen their claws on your furniture. If you don't have cats, make these cat scratchers anyway and donate them to your local animal shelter. My local animal shelter specifically requests this style, and my Girl Scout troop enjoys making and donating them.

This cat scratcher is an improved version of the two types that I made back in 2020. In the years since, I've refined my style to what my own cats and the animal shelter prefer, and redesigned the scratcher to be sturdier and more easily recyclable. My own cats do still really like that round one from the 2020 tutorial, and that's a great style if you've got a lot of room to devote to a nice, big cat scratcher. This version here, though, has a more inconspicuous profile, transports better, and my local animal shelter says it works better in their cat enclosures.

To make this upcycled cardboard cat scratcher, you will need:

  • lots of corrugated cardboard. If you're using Girl Scout cookie cases, you'll need about five per cat scratcher. Otherwise, prepare to cut up more cardboard than you thought you'd need--this cat scratcher uses a LOT!
  • measuring and cutting tools. At the minimum, you need a ruler and a pair of sturdy scissors. The work will go quicker with a quilting ruler, self-healing cutting mat, and craft knife.
  • hot glue gun and hot glueYou're not going to use much, but this is still an essential component.

Step 1: Cut the bottom off of a box.

Choose a cardboard box whose area at the bottom has the dimensions that you're looking for in a cat scratcher.

Measure 2" up from the bottom of the box all the way around, then cut. Reserve the rest of the box for Step 2.

The bottom of this box will be the base for your cat scratcher.

If necessary, reinforce the bottom box flaps with hot glue.

Step 2: Cut corrugated cardboard into strips.

Flatten and/or disassemble a corrugated cardboard box, then examine it to see which way to cut. You want to cut across the corrugations, not parallel to them. When you cut, the cut edge of the box should show a cross-section of the corrugations--that's what the kitties love to dig their claws into!

Use a ruler and craft knife to cut a 2" wide strip down the cardboard, then repeat until you've cut up the entire box. Recycle or repurpose any leftover cardboard.

Measure the length of your box bottom, and cut the cardboard strips to this length. Recycle/repurpose any end pieces that don't reach the correct length.

Continue cutting cardboard into strips until you have enough strips to completely fill the box bottom. If you're making these from Girl Scout cookie cases, it takes about five cases, including the one you cut the box bottom from, to make this cat scratcher.

Step 3: Insert strips into the box bottom, gluing as you go.

After you've got enough strips, dump them all out of the box bottom and set up the hot glue gun. Lightly glue the strips together as you reinsert them.

This is my biggest improvement over the 2020 version of this cat scratcher; when the strips weren't glued together, I found that occasionally my cats would snag their claws into one and pull it out of the box! THIS cat scratcher keeps all its strips nice and snug inside for ultimate cat scratching perfection.

Step 4 (optional): Glue the cat scratcher to the base.

If you want to make the cat scratcher REALLY sturdy, then after all the strips are glued together, carefully pry the whole thing out of the box bottom, then use hot glue to lightly glue it back in. This will keep even the most enthusiastic cat from pulling the entire cat scratcher out of its base.

Either way, the added beauty of this corrugated cardboard cat scratcher is that it's DOUBLE-SIDED! When a cat has worn one side of the scratcher down, carefully pry it out of the base (the hot glue should peel away fairly easily, if you weren't too enthusiastic when you glued it), flip it over, and reinsert it, re-gluing it as necessary.

The model for this tutorial is Dill, one of the three-week-old kittens plus mama cat (also in some pics) that I'm currently fostering for my local animal shelter. I'll keep them safe and happy here with me until the kittens weigh at least two pounds and are at least eight weeks old, and then I'll bring everyone back to be speutered and adopted. Kittens this young don't do well in a shelter setting, and foster families are crucial to their survival, well-being, and proper socialization. If you've got space in your living area and your heart, please reach out to your local shelter and ask about their foster programs

This is one of my all-time favorite upcycling projects. It's a nearly-waste-free way to turn trash into treasure, it fills an incredibly useful niche in cat gear that you'd otherwise have to buy new, and it's a simple, cheap donation project that directly benefits the most innocent creatures in your local community.

I challenge you (and me!) to make every unwanted corrugated cardboard box that comes into our lives into a cat scratcher for use or donation.

P.S. Want to follow along with my craft projects, books I'm reading, road trips to weird old cemeteries, looming mid-life crisis, and other various adventures on the daily? Find me on my Craft Knife Facebook page!