Monday, January 24, 2022

Homeschool Reading and Rhetoric: Poetry Tea


The funnest part of homeschooling is... making things fun, I guess? At least, my favorite part is having an idea for something super educational that I think the kids will like, then doing it and finding out that it IS super educational, and the kids love it!

It is such with Poetry Tea. 

Studying poetry doesn't have to be a chore, and to be honest, I think most homeschoolers probably use this Brave Writer invention to make it super fun. As with most homeschooling topics, though, most of the cute tips and tricks and ideas are geared towards younger learners. I'm living proof, though, that Poetry Tea is also an excellent way to incorporate poetry into a high school curriculum!

In anticipation of Poetry Tea, I ask both the kids to choose a poem that they will read aloud, and to let me know its title and author. Once upon a time, I had high hopes of the kids flipping through the several poetry anthology books that I have in the house, but what they actually do is just hit up the Poetry Foundation website. Or choose something random by Shel Silverstein. 

After the kids have told me their poetry picks, I research until I've got a low-key sort of lesson plan that I can sneakily tack onto one of their poems. For our September Poetry Tea, for instance, the younger teenager chose a Shel Silverstein poem (of course), but the older teenager chose a William Blake poem (probably because it's short. Brevity is a uniting theme in all their poem choices...). 

I can work with William Blake!

The older teenager's poem was "Ah! Sun-Flower." I found an analytical breakdown of the poem to walk through with the kids, including an explanation of the poem's structure and form and a list, with definitions, of all the literary devices used in the poem. All those key terms become spelling/vocabulary words for them to memorize afterwards. 

I also read through this William Blake biography so I could pull out things the kids would find interesting (visions of God! An obsession with Gothic art!), and so we could discuss how his background and experiences might have informed the choices that he made as an artist and a writer. I know that authorial intent isn't exactly the most highly approved method of literary analysis, but I was a Medievalist in grad school, and dang if we weren't all about looky-looing into how the background and experiences of those long-ago writers informed the choices they made!

And happily, one of the cool things about William Blake is that he WAS a writer AND an artist, so I could also sneak in some art history and art analysis. Blake even illustrated his own poetry--including "Ah! Sun-Flower"!


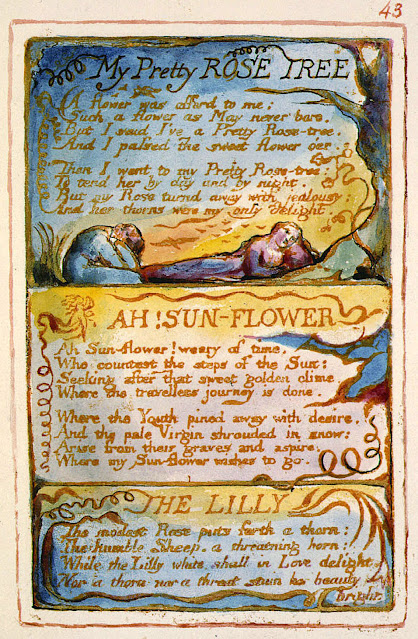
The illustrations don't add a ton to one's understanding of the poem, but you can still discuss his technique, use of color, workflow, etc. 

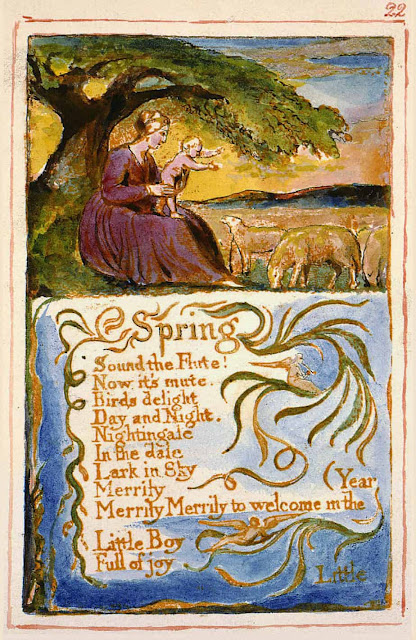
I printed color copies of the above Blake facsimile, and the two below, so we could examine them during our Tea:


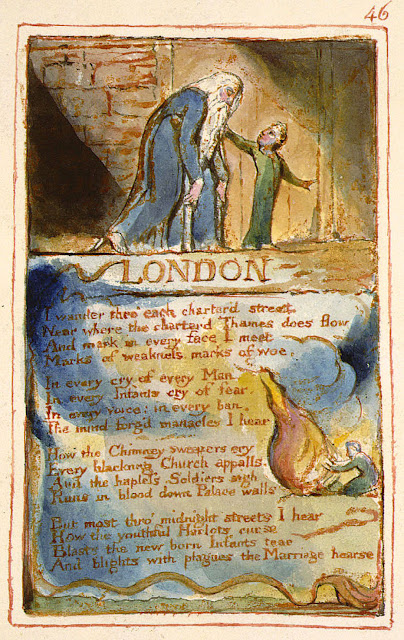
I also planned out a reading of "London" as MY poem, and an analysis of it that would place it into conversation with "Ah! Sun-Flower."

To be honest, though, all of the fun, for the kids, of Poetry Tea is the adventure of trying out a different tea shop each time. The kids enjoy trying different teas, and there's always some kind of tasty snack that I can treat them to, and, you know, there's always some kind of hijinks or haphazard chaos that ensues. This particular Tea's hijinks included, but were not limited to, the following:
  1. The younger teenager drove there and the older teenager drove back, both on their pretty new learner's permits. We encountered a small driveway! And a small parking lot! And a narrow parking space that needed backing out of! And about forty roundabouts! 
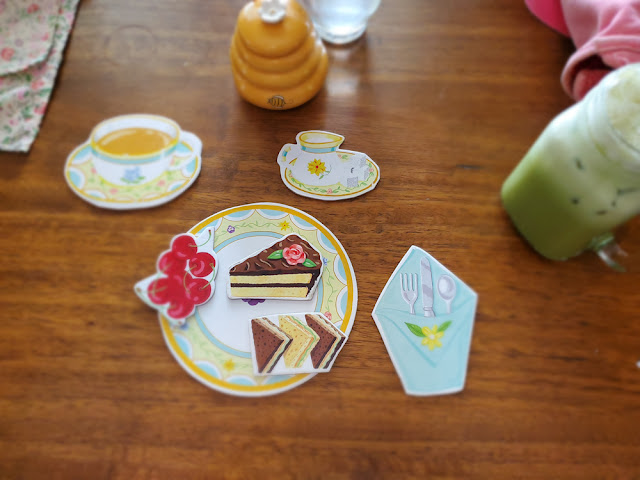
  2. The food and the drinks at this particular tea shop were terrible. TERRIBLE! Nobody but the older teenager liked anything they got, and just between us, that's only because the older teenager is about as picky as a goat. My matcha tea was powdery, and the younger teenager's scone was basically, like... also powdery? I want to scrape off my tongue just thinking about it, shudder.
  3. The place did, however, have an awesome selection of board games, and we played several rousing rounds of this very fun children's tea party game (ooh, I think it's this one!)--


--before I could even remotely consider redirecting them to the poetry that was the actual purpose of our visit.

I usually give the kids an assignment or two to complete afterwards; after this Poetry Tea, they got their list of literary and structural terms to memorize, and they each had to choose a different William Blake poem and write me an analytical essay about it.

We usually spend about an hour goofing off, drinking tea, and reading and discussing poetry. The actual poetry reading and discussion is probably less than half that, but considering how much you can get done with a 1:2 teacher:student ratio, that's probably more than you'd reasonably be able to cover in a week of public high school classes. I mean, consider how each student researched and selected a poem to read aloud; read aloud their poem; discussed every poem as a group, listened to a brief lecture on the biography of William Blake; discussed that biography, with special attention to building context between other current and former areas of interest; analyzed two poems line-by-line; listened to, discussed, and analyzed line-by-line the teacher's choice of poem; compared/contrasted two William Blake poems; viewed, critiqued, discussed, and analyzed the author's illustrations of his poems, and received, discussed, and had the opportunity to ask questions about their next assignment. And that's not even including all the soft skills of driver's ed, tea shop etiquette, carrying on an interesting and polite conversation, and trying new food/drinks.

It happened that I was finishing up the course descriptions section of the older teenager's transcript around this time, so I popped William Blake into her course resources for Honors English 12:

Because I don't usually write myself a syllabus or firm lesson plans for these Poetry Teas, it's super important to put the poems we covered into the kids' resource list soon afterwards, or I'm likely to forget that we ever did it, and there is NOTHING that we do for high school that I don't put onto the kids' transcripts somewhere!

Teenagers march on their stomachs, but if you've got younger learners, you probably want some more hands-on and engaging resources to make Poetry Tea fun. Here are some options!
  • Poetry prompts are fun for all ages--even adults!
  • Poetry journal. This is another clever idea for all ages. It would be fun to have kids write or even just paste each poem into the journal to create their own anthology. 
  • Copywork. My kids really liked copywork before they realized that it was, ahem, work. This could go well with a short poem in its entirety, or maybe just a rhyming couplet or special stanza of a longer poem. 
  • Response activities. Tangled poems, reassembled poems, and after poems!
  • Art projects. Illustrations, collages, and ripped poetry are fun and artistic responses. 
  • Song and poem pairings. I LOVE having the kids listen to music on various themes, and I love this idea to pair selected songs and poems.
  • Shel Silverstein resources. In case you, too, end up reading a Shel Silverstein poem every month!
  • Block building. This would be awesome fun for the super young kid, and I don't think you need to confine yourself only to Humpty Dumpty, either. All poems are fun to knock down!
  • Memorization. Some kids find this really fun, and it's a good way to build up their stamina for memorizing information.
And here are some of our favorite poetry resources:
P.S. Want to follow along with my craft projects, books I'm reading, dog-walking mishaps, encounters with Chainsaw Helicopters, and other various adventures on the daily? Find me on my Craft Knife Facebook page!

Saturday, January 22, 2022

Tutorial: Stenciled Bean Bags

 This tutorial was originally published on Crafting a Green World way back in 2010!

I like to make educational toys for my girls--matching games from their artwork, file folder games, extension activities for the books they read, anything that will allow them to incorporate what I want them to learn into the pleasures of their lives. These particular bean bags were inspired by my three-year-old, who hasn't yet memorized her numbers. Sure, she can count on her fingers and plays a mean game of Uncle Wiggily, but sit down long enough to figure out the difference between a 5 and a 9? Eh. Why not just call everything an 8? 

 The beauty of the stenciling, however, is that you can put anything that you want on these bean bags--kids' names, states and capitals, letters (I really want to make this alphabet bean bag set), or instructions for the craziest Game Night game ever! Here's how to make them: You will need:
  • fabric scraps measuring at least 4.5" square. I used quilting cotton, but canvas, upholstery remnants, felt, and even vinyl would work, although you might need to modify your stenciling method with a different fabric
  • sewing machine with a medium-weight universal needle and matching thread. I top-stitched around these puppies twice to make them secure, so I'd advise a thread that will blend, not fetchingly contrast, with your fabric here.
  • dried beans. I used pinto beans, which were the cheapest, and used about three pounds of dried beans for 30 bean bags. Any dried legumes, rice, or even cherry pits would also work.
  • freezer paper, sponge brush, and professional-quality fabric paint for freezer paper stenciling
1. Cut out two squares of 4.5" fabric for each bean bag that you want to make. 


 2. It's easy to paint the stencils on your fabric before you sew it together. I used my Cricut to cut the stencils directly into my freezer paper, and I stenciled the positive image of each number on one side and the negative image on the other side. If you haven't tried freezer paper stenciling before, it's easy--check out my freezer paper stencil tutorial for more tips and tricks. 

 3. Making sure that the stenciled images on each fabric square are aligned in the same direction, face the two sides of each bean bag together and sew around 3 and one-half sides--you're going to leave yourself an opening half of one side long for stuffing your bean bag. 

 4. Clip the corners of each bean bag to reduce bulk, then turn them right side out, using a chopstick or dull pencil to push the corners out nice and sharp. 

 5. Top-stitch twice around three sides of each bean bag--don't top-stitch around the side that has the opening, because you'll do that one after the bean bag is stuffed. 

 6. Fill each bean bag with dried beans. I like mine nice and stuffed, but in order to top-stitch easily and neatly close your opening, leave a least an inch's room at the top. 


 7. Top-stitch the side with the opening twice. This will neatly close the opening and give that side the same sturdiness as the other sides, while allowing it to match, as well. 


 Now they're ready for tossing!

Thursday, January 20, 2022

Homeschool Astronomy: Spectroscope Lab

 Will completed this Astronomy lab as part of the chapter on radiation in her astronomy textbook. It was cheap, it didn't require much setup, it was simple to complete, and, most importantly--it was fun and interesting!

Spectroscope Lab

Materials:

Pre-Lab Work (Answer these questions in your Astronomy Lab Notebook):

  1. Complete the online spectroscope lesson.
  2. List the colors, from longest to shortest wavelength, as observed in the solar spectrum. What do the dark lines in the absorption spectra of stars indicate?

Procedure:

  1. Aim the spectroscope at a variety of light sources:
    1. LIGHT SOURCES TO TEST (list the exact sources that you test in your Astronomy Lab Notebook):
      1. desk lamps
      2. computer screens
      3. television screens
      4. sun (don't look directly at the sun)
      5. light bulbs
      6. candle light
      7. flame from the stove
  2. For each light source, draw a box that models the spectroscope's display.
  3. Use colored pencils to draw the spectrum that you see for each light source. Include the numbering.
  4. Using the data you gathered, give more information about each light source. Can you name the type of light bulb, or discuss its energy efficiency? Can you name any elements or chemicals in the flame sources?

Post-Lab Questions:

  1. Which colors/wavelengths of light had the most energy? Which had the least?
  2. What color of light do you think would be most useful for a plant doing photosynthesis, and why?
  3. Which color of light would be most useful as a source of energy for a solar power plant? Why?
  4. Give an idea for an experiment that tests any of these concepts further. You may not describe the same experiment with different materials.
Will was able to do this lab independently, without needing me for an extra set of hands. Here she is observing the spectrum of candlelight:


And here's part of her lab report!

I used to have such high hopes for this kid's handwriting. And I kid you not--it has taken until literally last year to get it this legible. It's my biggest homeschool failure.

We could do even more cool spectroscopy with a good chemistry setup, but it's looking like chemistry will be the one science that we don't DIY during Will's high school years.

Other than, you know, the time we made rocket candy for her sixth grade science fair, or put sulfuric acid on limestone for geology, or all the other chemistry-adjacent stuff that I probably should have been tallying up for at least a credit's worth of high school chemistry by now...

P.S. If you want a ready-to-use version of this lab, here's a Google Doc of the Spectroscope Lab assignment sheet.

P.P.S. Come find me over on my Facebook page, where I often talk about the labs and experiments that we're doing as we're doing them!

Tuesday, January 18, 2022

The Putting Away of Childish Things... For Now


During the first year of the pandemic, back when we were all home all the time, Matt helped the kids do a HUGE clean-out of old toys from their playroom. I about wrung his neck when I saw the size of their donation pile, then hid in the bathroom and sobbed for a dramatically long time, then barely spoke to him for most of a week, and yet of course it had to be done sometime.

Although I don't know why it couldn't wait until after I've died of old age, but whatever. If the guy couldn't stand sharing his work-from-home office space with a billion toys that hadn't been played with in years, then he couldn't stand it, I guess. Or they're all just heartless and have no souls with which to appreciate the precious childhood memories locked into those toys.

ANYWAY!

Souls or not, they knew better than to so much as lay one finger on the things that I've made for the children over the years. Which just means that now, of course, I've got to take those precious memories--I mean stuff, of course it's all just stuff, ahem--off the shelves with my own hands and put it all away somewhere.

I dealt with the kids' play silks first, keeping only the ones that still looked pristine or that the kids had helped me make, washing them and hanging them out to dry and then folding them up and sealing them away in plastic.

Next, Syd helped me deal with the kids' HUGE collection of bean bags. The kids adored bean bags for a ton of years, and every so often I'd make them a new set. Rainbow bean bags. Stenciled bean bags. Halloween bean bags. Bean bags with their art on them.

Again, we kept only the ones that are still perfect and the ones that the kids did the decorating for. That still resulted in quite a stash!


Bean bags don't wash, so I only had to air them out (okay, and photograph them!) one more time before putting them in plastic:


I hope the kids appreciate all the extra room they've now got for their boring teenager stuff, humph! And next we've apparently got to go through their nearly infinite supply of small plastic animals (I'd say we should have bought stock in Schleich, but they're pretty much all secondhand), because who needs an entire wall of toy animals when you're a teenager?

I mean, I probably only have to store them away until both kids move out, and then I can get all of my favorite toys of theirs back out and remodel their room into a shrine to their childhoods...

Sunday, January 16, 2022

How-to: Organic Terrycloth Hooded Towel with Applique


This tutorial was originally posted on Crafting a Green World back in 2013.

There's nothing like hopping out of the pool and into a comfy, soft, bounteous towel. But big beach towels are hard for little kids to manage, and that bleached, dyed terrycloth can be scratchy and harsh on damp, delicate skin. 

It's an organic terrycloth hooded towel to the rescue! This hooded towel isn't for babies--if you start with your own organic terrycloth fabric, you can sew this hooded towel with proportions perfect for big kids. Organic terrycloth won't add any extra chemicals to your kiddo's tender skin, and it's softer than those cheap-o novelty beach towels. 

And just in case there's any doubt who that awesome hooded towel belongs to, there's plenty of room on the back for a monogram, done superhero-style in the case of my superhero-loving kiddo, who's decided that her hooded towel does, indeed, look a LOT like a superhero's cape. 

 Need a superhero cape/hooded towel for your own kiddo? Read on for the tute: 

1. Take your kiddo's measurements, and figure out yardage. First, measure your kiddo's height--look how she's grown! 

Your hooded towel will be in the shape of a square turned diagonally, so this height measurement will be the diagonal length of the square. To calculate the length of each side of the square, use the Pythagorean theorem, in which c equals the diagonal and both a and b equal the lengths of the other two sides of the right triangles made from the square with that diagonal. No, you don't want to do that math? Fine, use this square calculator, but don't forget that your geometry teacher TOLD you you'd need the Pythagorean theorem one day! 

Using the Pythagorean theorem, and then rounding up to the next inch, I discovered that each side of my square needed to be 36" (do not include a seam allowance here or anywhere else on this project); this was a yay, because it meant that I could sew the entire hooded towel for my seven-year-old from one yard of organic natural terrycloth. 

Now, measure the top of your kid's head from front to back; this will be the altitude of the right isosceles triangle that makes up the hood. To cut a right isosceles triangle to this altitude, fold the remaining terrycloth to the bias, measure the altitude, and cut. 

Fold the terrycloth to the bias to measure the altitude of the triangle formed by the fold.

2. Make homemade bias tapeCut printed or undyed organic flannel on the bias at a width of 4", then make bias tape out of it. You will need enough bias tape to cover the perimeter of your square and the base of your triangle. 

3. Sew bias tape to the hood. Just sew the bias tape to the base of the triangle; the other two edges of the hood will be covered later. 

Sew bias tape to the base of the triangle forming the hood, then pin the raw edge of the triangle to one corner of the towel.

4. Attach the hood to the towel. Line up the two raw edges of the hood with the two raw edges of one corner of the towel. Pin well. 

Sew the bias tape around the perimeter of the towel.

5. Sew bias tape to the towel. Sew bias tape entirely around the perimeter of the towel, mitering the corners (here's how to miter corners with bias tape). When you come to the hood, you'll be encasing both the raw edges of the towel and the raw edges of the hood with that bias tape. 


I basted the applique to the towel’s back, then went back over it with a satin stitch.

6. Applique the hooded towel. Your hooded towel is perfectly serviceable at this point, but it might still need some personality. You can cut a monogram, or really anything that you wish, out of flannel, center it onto the back of the hooded towel, and applique it on using your machine's satin stitch. NOW it's got some personality! 

Friday, January 14, 2022

Handmade Christmas: Homemade Nutcracker Stuffies


Syd and Matt helped me make the BEST Christmas gift for our favorite baby.

I wanted to make our favorite baby a set of Nutcracker-themed stuffies to go with a board book retelling of The Nutcracker that I'd bought for her (Will's bookstore scratch-off birthday present has been a great excuse for me to do a bunch of shopping in local independent bookstores), but I couldn't find ANY patterns for anything close to what I had in mind...

... so I commissioned my favorite artist to make some!

Syd drew me five Nutcrackers on her Wacom, and then I commissioned my favorite graphic designer to lay them out in just the right way that I could have them printed as a fat quarter from Spoonflower:

And then I took over doing some actual work myself!

I matched each character up with a complementary color of solid cotton from my stash--

--drew a simple outline around each character (Frixion heat-erasable pens for the win!) and cut them out--

--and finally put each one right sides together with its backing fabric, sewed it most of the way around, turned and stuffed it, and ladder-stitched the opening closed. 

I am delighted with our little set of Nutcracker stuffies--


--and I think they're the perfect size to cuddle or play imaginary games with.

Since I had to mess around with Spoonflower so much to figure out how to format Syd's design and get it published to the site, I went ahead and did the whopping four extra steps required to actually list our design for sale!

You can find our Nutcracker stuffie patterns here. The set is ideally printed as a fat quarter, but if you buy a full yard you *should* be able to get four sets? I'm in the process of testing that theory out as we speak, because I want to have a few finished sets on hand to list in my Pumpkin+Bear etsy shop, so I'll let you know! I also have an eye towards asking Syd to make one more character for the set--perhaps Fritz or the Sugar Plum Fairy?--and maybe I'll find some copyright-free graphics of Nutcracker sheet music that Matt can also make into a fabric print. I think it would be fun to back the stuffies with that instead of having to find your own backing fabric.

My favorite part of making something brand-new isn't the original inspiration, or the problem-solving and creating required to bring my idea to fruition--it's the inspiration THAT project brings for ever more and better iterations of itself!

Wednesday, January 12, 2022

We Eat Oatmeal; I Make Soap


I have several different cold-process soap recipes that I want to try, but we don't really *need* several simultaneous batches of soap, nor do I really have the space to store several simultaneous batches of soap... so somehow I've convinced myself that it makes the most sense if I get to make a new batch of cold-process soap every time we finish a canister of oatmeal.

Seriously, though--that waxed cardboard oatmeal container is the perfect size and shape for a batch of soap!

This is eucalyptus olive oil soap, and it smells AMAZING.

Back when Will was earning the Girl Scout Homesteading badge (don't worry if it doesn't sound familiar to you--we made it up!), I checked out every single soapmaking book from every single library I have access to, and I fell in love with this one:

Olive oil is the base for all the soaps in this book, and the variety of recipes comes from playing around with different natural additives, many of which I already own. It turns out that I really like olive oil soaps, and I REALLY like soapmaking recipes that call for a fairly limited number of ingredients, especially not fourteen different oils! Olive oil soaps are also supposed to be pretty hard, and I like how long each bar of soap lasts. 

So far, I've made the basic olive oil soap twice--once just the way the recipe was written, and once with eucalyptus essential oil added. It was super easy to plug the soap recipe into this essential oil calculator and get the correct amount of eucalyptus oil to add, and I'm SUPER happy with how scented the soap is! It's all sliced and curing on the ledge behind my bathroom counter right now, and the whole bathroom smells delightfully refreshing. No clogged sinuses for me! Syd and I made the rosemary soap with similarly pleasing results, and today, thanks to cooking the last of our oatmeal for breakfast on Monday, I made the cinnamon soap in the 45 minutes between finishing hand-sending course descriptions to each of the colleges Will is applying to NOT through the Common App and getting the kids to help me clean the house:

SO much olive oil! The recipe also calls for cocoa butter, ground cinnamon, and a teeny bit of cinnamon leaf essential oil. Cinnamon leaf essential oil is a skin irritant, but you can use it at 1% in soap since it gets rinsed right off.

I wish I'd taken another photo after I stirred in the cinnamon--this will be my first dark brown soap!

I currently have a lot of bottles of essential oils with miniscule amounts in them, so I'm thinking that my next batch of soap will involve some serious essential oil calculator machinations and odd combinations--does cedar wood and lemongrass sound good to you? Or maybe rose absolute and jasmine?

First, though, we have to eat more oatmeal!