Thursday, August 20, 2020
Homeschool STEAM: An Introduction to Designing Robots (and Badly-Designed Robots!)
Saturday, August 15, 2020
How to Remove Wax from a Jar Candle
I originally published this tutorial on Crafting a Green World.
Here's a shout-out to my fellow VERY thrifty crafters!
I like to do a lot of wax crafts, but beeswax is expensive, and lacking my own set of beehives, my budget can't quite keep up with my habit.
Fortunately, I also have a lot of jar candles around the house, some homemade (with more lovely beeswax!) and some gifted or store-bought (with various qualities of wax, but often most likely the cheapest). When these candles burn down there's always still some wax left at the bottom and around the sides of the container. Reclaiming that wax is a simple process, and when I'm done, I have all-new wax to craft with!
It's worth it even to reclaim that cheap wax of unknown (but probably petroleum-based) provenance. You can use it to make fire starters, or dye it and use it to make wax seals. Perhaps you have an origami boat that you'd like to waterproof?
The possibilities for reclaimed beeswax or soy wax are endless, of course, including remaking your own jarred or poured or dipped candles.
And don't forget that you can also reuse the jar that the candle came in! I'll show you how to get it squeaky clean near the bottom of my post.
Supplies
Here's what you need to reclaim the wax from your jar candles:
- used jar candles
- crockpot*
- oven mitts
- silicone molds
*Save yourself some trouble and hit up your nearest thrift shop for the cheapest crock pot on the shelf, and then use it only for crafting. I bought this crock pot from Goodwill for $1.50 probably a decade ago, and it works perfectly for me and then lives out in the garage when I don't need it.
Directions
1. Cover your work surface with newspaper, then ready your crock pot.
Because I promise you that you do NOT want to spill melted wax all over your kitchen. Just... you really don't.
2. Add the jar candle containers and water to the crock pot.
Oh, if only it were so easy! So here's the thing: those nearly empty jar candle containers are going to want to FLOAT, dagnabit. It's super annoying, and also, you really don't want to get water in the containers with the beeswax.
What you have to do, then, is wedge the containers in so that they can't float away. Setting a ceramic plate on top of them works well, as does filling Mason jars with water and setting them in the crockpot to take up all the rest of the available space.
3. Melt and pour.
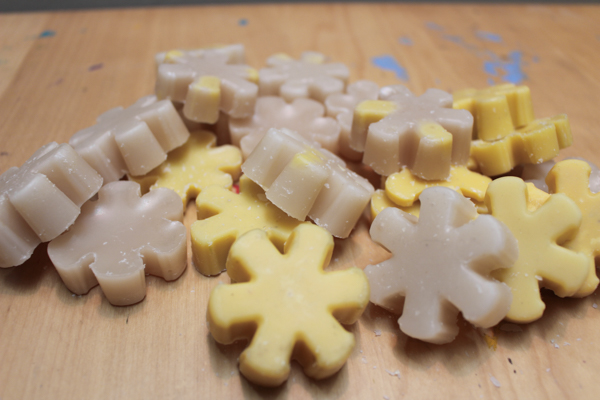
After everything is wedged tightly into place, all you have to do is turn your crock pot on and wait for the wax to melt. I like to pour the melted wax into silicone molds, not only because the wax slips out so easily when it's cooled, but also because afterward, you have lots of manageable little blocks of wax that it's then easy to melt again and use for all your projects.
Often, your melted candle wax will have soot or wick fragments in it. If so, pour it through a layer of cheesecloth to catch the impurities.
4. Store reclaimed wax separately.
It's worth it to always store this reclaimed wax separately from your other wax stash. If you have no idea what type of wax you've reclaimed, you obviously don't want to mix it in with your lovely soy and beeswax, but even if it's soy or beeswax that you've reclaimed, you still don't want to simply add it back to your stash. Reclaimed candle wax is fine for making more candles, but I certainly wouldn't want to use it for the skin care products that I also make using beeswax.
Now, what about those reclaimed jar candle containers? Even with the wax melted and poured out of them, you'll notice that they're still waxy. The trick to getting them squeaky clean is to completely immerse them, right side up, in a large pot of water. Make sure there's plenty of water covering the top of the containers. Heat the pot of water on the stove, and when the water temperature reaches the melting point of the wax that the candle containers once held, the remaining wax will melt and float to the top of the water.
You have to play around with this method a bit and keep a good eye on the pot, because your wax of unknown provenance is going to melt at an unknown temperature, and if you have several candle containers in the pot, you're probably going to be dealing with a different melting point for each of them. But when all the wax has finally melted and floated up to the top of the water, you can take the pot off the burner and let the water cool.
Skim the solidified wax off of the cooled water and toss it, and then you're free to check out your former candle containers. They'll likely still be sooty and need a good scrub-up, but after that, they're ready to reuse or upcycle.
Might I suggest that you use them to make another jar candle?
Friday, August 14, 2020
Crafts for the Apocalypse: Syd's Girl Scout Silver TAP
My kid wrote a book!
For Syd's Girl Scout Silver Award, she wanted to focus on the problem of tweens and teens spending too much time on screens. Syd really enjoys crafts and recipes and likes to follow tutorials to make new creations, so she decided that making a set of craft and recipe tutorials for other kids to follow would be a fun way to encourage them to put down their phones and pick up the cardboard and scissors.
Thus began one of the LONGEST Silver Award TAPs in history. OMG, I had NO IDEA what an involved process this would be, particularly when accomplished by the world's pickiest perfectionist.
First, Syd had to brainstorm and then settle on possible crafts and recipes. Then she had to test each one, discard the ones that she wasn't happy with, and decide on a final line-up. Then she made them all again, sometimes a few times, until she had the perfect process for each one. Then she wrote each tutorial, and went through a few revisions on some of them, because it's tricky to write a tutorial!
Fortunately, tutorial writing is exactly within my very specific skill set.
Syd sent a draft of her tutorials to our Girl Scout troop to be beta tested, and revised some of the tutorials again based on her feedback. As all this was happening, and for the next several months after the tutorials were finished and polished, she was also creating all the art. She went through several drafts to create an original character to model the finished projects, and then a zillion drafts as she drew each of the illustrations.
And, of course, the book needed an overarching theme, both for the illustrations and the cover art and title.
Thanks to the pandemic, the entire book became... apocalypse-themed.
When Syd was FINALLY happy with her illustrations and art, she imported it all into Adobe InDesign and Matt showed her how to do even more edits and make the layout:

Monday, August 10, 2020
July Favorites: The Latest Book in the Series
Saturday, August 8, 2020
How to Make a Shadow Box from Corrugated Cardboard
I originally published this tutorial on Crafting a Green World.
ALL MY THINGS bring me joy. I am not giving up a single one of my priceless possessions, whether that possession is a dragon egg-themed Easter egg, a tiny skull-shaped bottle, a handmade polymer clay narwhal, or the name of my home state cut out of a license plate.
Why do I have the name of my home state cut out of a license plate? Don't remember. Don't care. But I am KEEPING IT.
As I've discovered, one's priceless possessions look less like you're a hoarder when they're displayed nicely so that you can enjoy them, not piled up on top of your dresser gathering dust. Storing your little treasures nicely is as easy as arranging them in a shadow box, and making that shadow box is as easy as cutting and pasting.
You learned how to do that stuff in kindergarten. You can totally do this.
Why make a shadow box instead of buying one? Well, it's cheaper, for one thing. And it's better for the environment because these shadow boxes are made from corrugated cardboard and old papers, not particle board and plastic. And you will absolutely LOVE the way that you can customize each shadow box to have exactly the shape and the shelves that you want.
Seriously, hot glue is a miracle of science.
I think that these DIY shadow boxes look nice, and most importantly, they keep your stuff stored and on display so that you can enjoy it. Check out how to make your own, and then get your own stuff off your dresser and displayed like you love it!
Supplies & Tools
You will need:
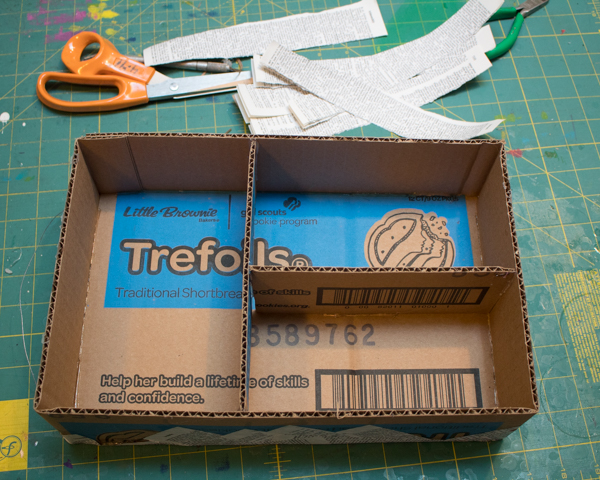
- Corrugated cardboard. All of the cardboard that I'm using in this project comes from cases of Girl Scout cookies. Ask a Girl Scout of your own, and I'm sure she'll be thrilled to offload some to you, too.
- Xacto knife
- Metal Ruler
- Self-healing cutting mat.
- Hot glue gun and hot glue.
- Stash wire, sturdy enough to hold your shadow box full of treasures
- White glue, water, and a container to mix it in
- Paper. I've used old book pages, sheet music, comic books, and even plain newspaper for these shadow boxes.
- Optional materials: paint and polyurethane sealant. Paint can cover ugly papers, such as newspaper, and polyurethane sealant will make your shadow box sturdier and easier to wipe off, and will keep the surface from getting sticky over time (that can sometimes be a problem with glue-based decoupage, so definitely consider it if you plan to put something legitimately precious in your shadow box)
Directions
1. Make the outside frame of the shadow box.
Find a box whose area you like for your shadow box, and break it down and lay it flat on top of your self-healing cutting mat. You'll be cutting the top and bottom off of the box, and then cutting it into a strip that will equal the depth of your shadow box. I really like three inches for this, although I used four inches for the shadow box that holds my friendship rocks and that depth works well, too.
Open up the strip that you cut and stand it up on your cutting mat; this is the outside frame of your shadow box!
2. Add a back to the shadow box.
Set your shadow box frame on top of another piece of corrugated cardboard with at least the same area as the frame; if you're using Girl Scout cookie cases, one of the larger sides of a second case is perfect for this.
Hot glue the back to the frame all the way around, and then cut away any excess cardboard.
3. Add shelves.
Cut more corrugated cardboard strips the same width as the shadow box frame, and then use those strips to add shelves to the shadowbox. Use hot glue to tack the shelves down, but you'll be securing them much better a little later.
4. Add a hanging wire to the shadow box.
Hot glue a length of wire or cording to the sides of the shadow box, making a loop that goes over the top of the shadow box for hanging. Don't secure the hanging wire to the back of the shadow box (as I did on my very first attempt at making this project), because if you do, the shadow box will tend to tip forward when it's filled and hung. Securing the wire to the sides of the shadow box will even out its balance a little better.
5. Decoupage the shadow box.
If you liked the look of the raw cardboard, you could be just about done with your project there. I think these shadow boxes look nicer and are sturdier when decoupaged, however. To do this, choose a fun paper and tear it into strips. Pour a 1:1 mixture of white glue and water into a jar and stir it up. Piece by piece, dip a strip of paper into the mixture, strip off excess glue with your fingers, and smooth it onto the shadow box.
Overlap as necessary to cover the entire surface area of the shadow box. I like to cover the back first, let it dry, and then cover the front.
Covering the front will take a lot more time, as you use lots of paper to cover all those fiddly corners and seams.
Let the glue dry well, and then you can paint or seal your shadow box if you wish. After that, it's ready to be enjoyed!
Friday, August 7, 2020
I Organized our Embroidery Floss into a Card Catalog
I don't think I've ever shown you much of the vintage card catalog that lives in our study. That's mostly because instead of being cute and interior-designy, it's got drawers full of photos and messily, haphazardly organized craft supplies, and on top is where I keep all my messy, haphazardly organized WIPs.
We're not really Architectural Digest over here. I know, because Will's obsessed with their videos!
To be honest, I only really care about organizing something when it effects the children's functionality. I don't mind opening every single drawer and poking into every single cupboard to look for the one thing that I want (well, I *mind*, but not enough to change my behavior...), but I VERY much mind the kids having to do the same thing when all they really want is to use the tool they're looking for to create something cool. It doesn't take much frustration like that before the kid just gives up and does something else.
They always know where their video games are!
So when Will got onto a friendship bracelet kick, and then Syd got interested in embroidery, I wrote on my to-do list the task of organizing our embroidery floss stash. It was a giant tangle of embroidery floss, because of COURSE it was, and stored in 1) a vintage sewing box of my grandma's (honestly, the tangled embroidery floss in that box probably WAS my grandma's!), 2) a cardboard box, and 3) a plastic shopping bag, because I am literally that classy.
Here's my inspiration for my beautiful card catalog organization! Using my card catalog to organize the embroidery floss hadn't occurred to me before I saw this post, but as soon as I saw that top picture, I was all, "YES!!! I CAN DO THAT!"
And bonus points: the poster board that I wanted to use to create the little in-drawer organizers was still laying chaotically on the floor of the homeschool closet, after the kids and I had used some of it for a project... a while ago.
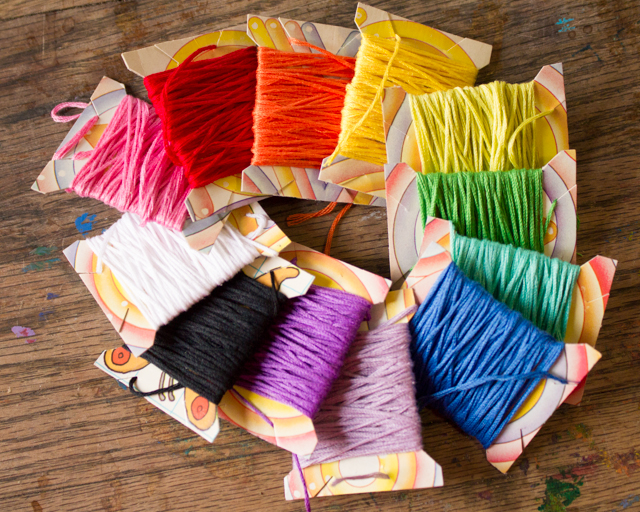
I used my good old cardboard embroidery floss spool tutorial--

--to make sixty more spools from old record album covers--at this point, I've only got a vintage Nutcracker record album cover left in my stash, so yay for upcycling! I'm going to have to start collecting empty macaroni and cheese boxes, though, to fulfill my constant need for cardboard for crafting.
I managed to, at some point, snooker each person in the family into helping me wind some embroidery floss onto spools by the simple expedient of doing this activity on my bed, next to the only television in the house, mwa-ha-ha! Syd helped while we watched a TERRIBLE monster movie on Amazon Prime, Matt helped while we watched a documentary on competitive synchronized swimming, and Will helped me while we watched one of my current favorite films, The Aeronauts: |
| I apparently didn't even bother to make my bed on this particular day, so you get to see what color my sheets are, you lucky duck! |
r/HobbyDrama taught me that DMC floss has perfect consistency between dye lots, so I did label all of our DMC flosses, just in case that knowledge comes in handy one day. Otherwise, Syd organized the flosses for me so that they look pretty, and now all of our embroidery floss is neatly wrapped around spools tidily arranged in posterboard organizers that are stored out of sight in a single labelled card catalog drawer.
Hell, I'm going to have to organize all the other card catalog drawers now, aren't I? At least I have plenty of poster board left!
Tuesday, August 4, 2020
How to Homeschool in Indiana
HOMESCHOOLING IS ALLOWED IN INDIANA
Sec. 1.5. As used in this chapter, "school" includes a public school, a charter school, a state accredited nonpublic school (as defined in IC 20-18-2-18.7), and a nonaccredited nonpublic school.
BEGIN HOMESCHOOLING BY THE AGE OF SEVEN; PROVIDE AN EDUCATION EQUIVALENT TO THAT GIVEN IN PUBLIC SCHOOLS
Sec. 8. A student is not bound by the requirements of this chapter until the student becomes seven (7) years of age, if, upon request of the superintendent of the school corporation, the parent of a student who would otherwise be subject to compulsory school attendance under section 6 of this chapter certifies to the superintendent that the parent intends to:
(1) enroll the student in a nonaccredited, nonpublic school; or
(2) begin providing the student with instruction equivalent to that given in the public schools as permitted under section 28 of this chapter;
not later than the date on which the student becomes seven (7) years of age.
HOMESCHOOL FOR AT LEAST 180 DAYS PER YEAR
Sec. 5. A student for whom education is compulsory under this chapter shall attend school each year for the number of days public schools are in session:
(1) in the school corporation in which the student is enrolled in Indiana; or
(2) where the student is enrolled if the student is enrolled outside Indiana.
HIGH SCHOOL STUDENTS TRANSFERRING TO HOMESCHOOL MUST SIGN A FORM OF ACKNOWLEDGEMENT
Sec. 28.6. (a) This section applies to a high school student who is transferring to a nonaccredited nonpublic school.
(b) Before a student withdraws from a public school, the principal of the student's school shall provide to the student and to the student's parent information on a form developed by the department and approved by the state board that explains the legal requirements of attending a nonaccredited nonpublic school located in Indiana. The principal and a parent of the student shall both sign the form to acknowledge that the parent understands the content of the form.
(c) If the parent of the student refuses to sign the form provided by the principal under subsection (b), the student is considered a dropout and the principal may report the student to the bureau of motor vehicles for action under section 28.5(g) of this chapter. The student is considered a dropout for purposes of calculating a high school's graduation rate under IC 20-26-13-10.
INDIANA HOMESCHOOLERS HAVE NO PRESCRIBED CURRICULA; INDIANA HOMESCHOOLERS "MAY" PARTICIPATE IN PUBLIC SCHOOL ACTIVITIES WITH PERMISSION
Sec. 12. (a) A school that is:
(1) nonpublic;
(2) nonaccredited; and
(3) not otherwise approved by the state board;
is not bound by any requirements set forth in IC 20 or IC 21 with regard to curriculum or the content of educational programs offered by the school.
(b) This section may not be construed to prohibit a student who attends a school described in subsection (a) from enrolling in a particular educational program or participating in a particular educational initiative offered by an accredited public, nonpublic, or state board approved nonpublic school if:
(1) the governing body or superintendent, in the case of the accredited public school; or
(2) the administrative authority, in the case of the accredited or state board approved nonpublic school;
approves the enrollment or participation by the student.
(c) A student who attends a school described in subsection (a) who also enrolls in a particular educational program or initiative as permitted under subsection (b) may be offered the opportunity to participate in state standardized assessments, but such participation is not required.


