Thursday, February 3, 2011

Princess on Paper

Here is an assortment of artwork that Sydney has created in the last couple of weeks:


Do you sense a theme?

Tuesday, February 1, 2011

Artist's Paper Valentines: Prismacolor Marker on Bristol Board

We're getting a bit of a jump on Valentine's Day this year, since our homeschool group's Valentine's Day party is this week. So even though I have many more and more elaborate Valentine's Day projects planned for me and the kiddos in the next coupla weeks, our actual Valentines need to be sweet and simple.

A gorgeous Valentine doesn't need to be elaborate; professional artist's markers are beautifully saturated when used on sturdy white Bristol board, and all I need to do is cut the Bristol board into hearts and hand them over to the kiddos to draw on.

It's funny how each girl's personality is easy to see in her Valentines. Sydney has princesses, and princess gardens, and princesses watering their gardens on her Valentines:

And more princesses, and one prince:
And, of course, a fancy signature on the back of each one:
Willow, on the other hand, has this kind of farmer girl nature study going on with her Valentines:
She's got a pepper, and a pumpkin, and the Loch Ness monster, and some deer drawn with a really great perspective. I may hide that deer done as a line drawing and keep it for my ownself.

Monday, January 31, 2011

The Fashion Show Project: Sydney's Dress

Let me begin by saying that yes, I am as horrified by Toddlers and Tiaras as you are, and no, I have no desire to ever walk on a runway, myself. Like wearing make-up, dresses of any sort, or basically anything other than jeans, T-shirts, hoodies, and combat boots, runway modeling is just another one of those girl-type dreams that I had nothing to do with.

For my little girl, however, it's another story entirely, as fashion is queen in her four-year-old mind, and so, bravely smiling but with many secret qualms, I entered us into our town's Trashion/Refashion Show.

I like the idea of showing Sydney that real fashion is, at its essence, about creation, not consumerism. That fashion design is empowering. That dressmaking is a skill, and an art. Never mind that I don't really care about real fashion--the kid does, so that's where we're homeschooling for a while. Whether or not our ensembles are chosen for this juried show, it's now our mother-daughter project to refashion ourselves a couple of runway outfits.

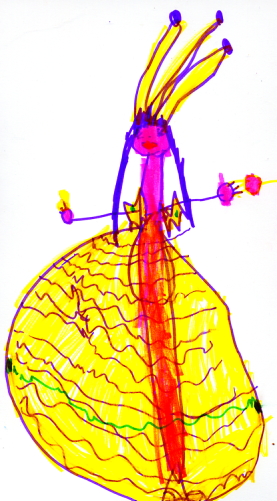
I put Syd in charge of visualizing her design. Here it is:


Please pay particular attention to the tall crown, the color scheme of bright fuschias and purples, the sleeve and arm detailing, and the butterfly wings. Those will be important later.

For a refashion entry, the entire ensemble must be constructed almost entirely from fabrics originally constructed for another purpose. Syd and I went to Goodwill one fine Sunday and found the perfect selection of fabrics for her design. We chose one main fabric, the centerpiece of her design, and then two other fabrics for detailing and accessories. I was worried that Syd would want to adhere so strictly to her original drawing that we wouldn't be able to find anything that would match closely enough, but the true trouble lay in dissuading her from being so delighted in every single thing that she saw that she wanted to completely alter her design to fit every new fabric. The main fabric, however, was an easy pick--here it is, just graduated from its former life as a woman's skirt:
Here it is, reincarnated:
I chopped off the skirt on both sides and then sewed it back together to fit Sydney's high chest measurement. I kept the entire length of the skirt, and so the dress is now about knee-length on Syd. The skirt had an invisible zipper in the back, which is now the zipper to the dress--I goofed on my seam allowance a bit, and so the dress is alarmingly snug, but Syd says it's comfortable, and fortunately the fashion show, if our outfit is chosen, is in just a couple of months.

Out of the extra material that I cut off of the sides, I preserved an entire length of the lace-embellished fabric--I finished the seam on either side of it and used it as a halter strap for the dress:
The tulle shrug is sewn across the entire length of the halter strap; it used to be part of the skirt's underskirt, shown here:
I like the extra bit of tulle at the neck because it covers Syd's shoulders, and I think it looks really nice from the back:
Syd is THRILLED with her outfit so far, and I'm relieved that it turned out so well. There were a couple of shaky moments during construction, and if our outfit is chosen for the fashion show I plan on bringing my entire sewing arsenal in case of last-minute emergencies.

Next up--a crown!

Saturday, January 29, 2011

Homeschool Science: It's a Pizza Party!

Ah, pizza science. There's nothing better to take away the pre-lunch blues on yet another cold, slushy, grey winter day when nobody wants to leave the house but nobody particularly wants to be at home, either, than baking up a nice, warm, delicious pizza pie.

Especially if it's the four-year-old doing the baking.

While Will spent the morning immersed in a book (her current faves: The Incredible Journey, and yet another series about yet another family that is up to its ears finding homes for yet more foster animals), Syd got out the pizza party science kit that her Grandma Janie gave her for Christmas, and off we went.

First on the docket: yeast is gassy.

Syd measured out 1/4 cup of warm tap water (she even took its temperature, to make sure it was between 95 and 105 degrees), 1/4 teaspoon of sugar, and 1 1/2 tablespoons of yeast, and stirred them together in a small clear bottle. I stretched a balloon out to cover the opening, so that it looked like this:
Then I hid the whole shebang away over in the corner over a heating vent. Just forget about it for now, okay?

Next, Syd and I mixed up a super-simple pizza dough recipe, and although I don't usually proof my yeast, I did this time, so that Syd could notice, if she wished, that we were putting the same stuff in the dough that we just put in the bottle.

She noticed. Yay.

I also generally use a no-knead bread dough for my daily baking, but I do love to watch little hands kneading bread dough:


 Syd set the yeast to rise and went off to play ponies, and in just a couple of hours the dough was twice its size and...remember the balloon?

The balloon looked like this:
It's this gas that also makes the bread dough rise--yeast eats starch and gives off carbon dioxide, expanding the gluten and yummifying the dough.

Once the dough was sufficiently yummified, Syd rolled it out, put it in a pan (Isn't that a good-sized pan for a personal pan pizza for a four-year-old? I'm now officially on the look-out at thrift stores and yard sales for some little patty pans for the girlies), and added her ingredients of choice--tomato sauce, cheese, and soysage crumbles:

 We baked it, tasted it--
And Chef Sydney declared her lunch to be absolutely perfect.

Friday, January 28, 2011

Cornstarch Glue, and Valentines, Too


Have I spoken to you of my famous kid, spokeschild for the line of bulk cornstarch for sale at Kodo Kids? I traded them usage of the photos from my oobleck tutorial, and they gave me an awesomely big bag of cornstarch, along with a couple of scoops and a chute for it.

We have made SO many things with our cornstarch:
  • scented powder
  • oobleck
  • more oobleck
  • pudding
  • gravy
  • some more oobleck
  • and, most recently, cornstarch glue
Cornstarch glue is more like school paste than Elmer's glue, but it's strong and sturdy, and it's WAY cheaper and less wasteful than those darned glue sticks that we go through like crazy.

The recipe is simple:

1. Stir together one part cornstarch to three parts water, with perhaps one drop of essential oil or a couple drops of food coloring, if you wish. I've seen recipes that call for a 1:2 ratio, but I've tried that before, and the result for me was crumbly and nearly unworkable, and the kids refused to use it.

You'll be tempted to use a whisk, but the cornstarch mixture is going to get pretty thick all at once, so really it's best to use a wooden spoon or a fork. Stir continuously--it won't take very long.

2. Heat the mixture over medium heat, but turn it down to medium-low as soon as you feel the mixture start to get thick. It gets thick quickly, and you want to be able to take it off the heat as soon as it looks smooth but translucent, exactly like Vaseline in consistency.

3. Pop the cornstarch glue in an old butter tub, and keep it in the refrigerator when you're not using it.

To apply the glue, you can use a popsicle stick or even a butter knife. It's perfect for kid craft projects, anything from their everyday stuff to Valentines--

 
--which we are quite immersed in these days, as you can well imagine.

P.S. Do you love fun and eco-friendly kid crafts? Then you'll love my Craft Knife Facebook page!

Wednesday, January 26, 2011

The Littlest Photographer

Guess who found a brand-new camera in her stocking this Christmas?


It's become Sydney's mission in life to document all things "pretty", whether that be a toy dino with snow on its face or a self-portrait plus Gracie in a strangle-hold.

Cameras and kids are the most wonderful combination. I'm loving my introduction to the way that Sydney sees the world.

Tuesday, January 25, 2011

Snuggly Warm, Snowy Cold Photo Shoot

My house has rotten lighting (I'm house hunting, by the way--know of any good two-story non-ranch houses on around five acres of land, no more than a 20-minute commute from a good graphic design job, for under $200,000?), and so I have to do my product shoot outdoors. It's challenging enough in the summer, when I have to find the perfect spot of indirect lighting, but in the winter, when I have to find that spot on a sunny day...well, the Midwest isn't really famous for that.

I tried to compromise by shooting some indoor shots next to an east-facing window blocked by scrub trees, but combined with a model prone to making goofy faces, I only got a few keepers out of dozens of shots:
 
 
 However, even though it was stinkin' cold so I only got my I Spy quilt done, I did discover that the snow makes an excellent photo backdrop:
 
 It's so hard to put a quilt into one shot, and so I think that this corner-to-corner angle is going to be my new go-to quilt shot:
 And then, of course, there's fringe:
The I Spy quilt is now up in my pumpkinbear etsy shop, to be followed by some more one-of-a-kind listings as soon as we get some more snow!