Wednesday, December 8, 2021

The Kid and I Made a Duct Tape Dressform


You might remember that Syd has a passion for fashion design, yes?

She and I are especially happy that now she's homeschooling again, she's once again got plenty of time to dive into all these big passions of hers. Along with her academic work and her everyday art projects, I've been encouraging her to design and make some bigger, more ambitious art projects. The planning and troubleshooting are great skills to practice, and the projects, themselves, are always sources of inspiration for Syd to teach herself something new. The four-foot-tall acrylic painting on canvas that now hangs in our front hall taught Syd not just a billion more things to know about acrylic painting, but also got us discussing and making decisions about how artists obtain and use reference images, and what's acceptable professionally versus academically.

So when Syd started thinking about planning her next Trashion/Refashion Show design, I started thinking about ways to make the project even more open-ended for her. We decided that one good way to help her elevate the sophistication of her designs is to make her a custom dress form.

And what should we make this custom dress form out of?

DUCT TAPE!!!!!

We used this Etsy Labs tutorial as our spine, but I got the expanding foam idea from this tutorial.

I bought this set of duct tape way back when the kids and I were making duct tape wallets and I wanted them to have a lot of color options:

Five years later, I still have some remnants of the least popular colors from that set left. I've been using them whenever I need duct tape, of course, but this project used up every single last little bit, and I'm pretty thrilled to 1) have had just the random supply that I needed when I needed it, and 2) have all those rolls of duct tape GONE!

Syd put on a baggy old T-shirt, and we had a hilarious time wrapping her in tape. That morning was definitely a contrast in homeschooled kids--Will, hard at work on her calculus homework, and Syd, hard at work on being mummy-wrapped in tape. 

Side note: personally, I find the calculus easier to mentor. Will's kind of homeschool work is easy for me to identify as "proper" work, and I have really been struggling to find my legs homeschooling an art kid whose schoolwork looks so different. She's over there bopping along, listening to a podcast and drawing in her sketchbook, working hard on improving her draftsmanship or whatever, and I'm over here trying equally hard not to nag her about reading the rest of her biology chapter, or working on her poetry essay. Anyway...

After we finished wrapping the kid in duct tape, I cut it off her and we taped it back together and stuffed it full of newspaper and expanding foam.

Three expanding foam pro tips:
  1. Buy the kind that says minimal expanding, or it'll expand so much that it will warp the dress form.
  2. Resign yourself to using the entire can at once. I used half a can, then cleaned it off according to the directions and set it aside. But when I came back to it, I couldn't for the life of me get it going again! I had to go buy another can, and they're not the cheapest thing at Menard's. This time, though, when I got through half a can and felt like the dress form was done, I handed the rest of the can off to Matt and was all, "Pretty please go wander around outside and fill in cracks and stuff." I think the chicken coop will be insulated exceptionally well this winter!
  3. Do NOT be this kind of fool:

You know I'm not squeamish about getting my hands dirty, and I have zero problems walking around for days with hands stained by fabric dyes, permanent markers, or other colorful mishaps. But not only did this stuff NOT come off for many, many, many days, but it also irritated my skin the entire time, and when I got desperate and tried applying straight acetone, I irritated my skin even more. 

Just... wear gloves, you know? Not that hard. Please remind me of that often.

It actually wasn't a bad thing that I ended up using two cans for this project, because the waiting period allowed me to see what spots still needed a little more foam after the previous batch had fully expanded. 

I wasn't sure if sometime Syd would want to do more with the dress form's neckline, so I left it unfinished but later put a piece of cardboard over it to keep the newspaper stuffing inside:


Once upon a time I bought a yard sale dress form that hasn't ever gotten much use because it's never mimicked the size of anyone I'm sewing for, but it does have an excellent stand that works perfectly for this project!


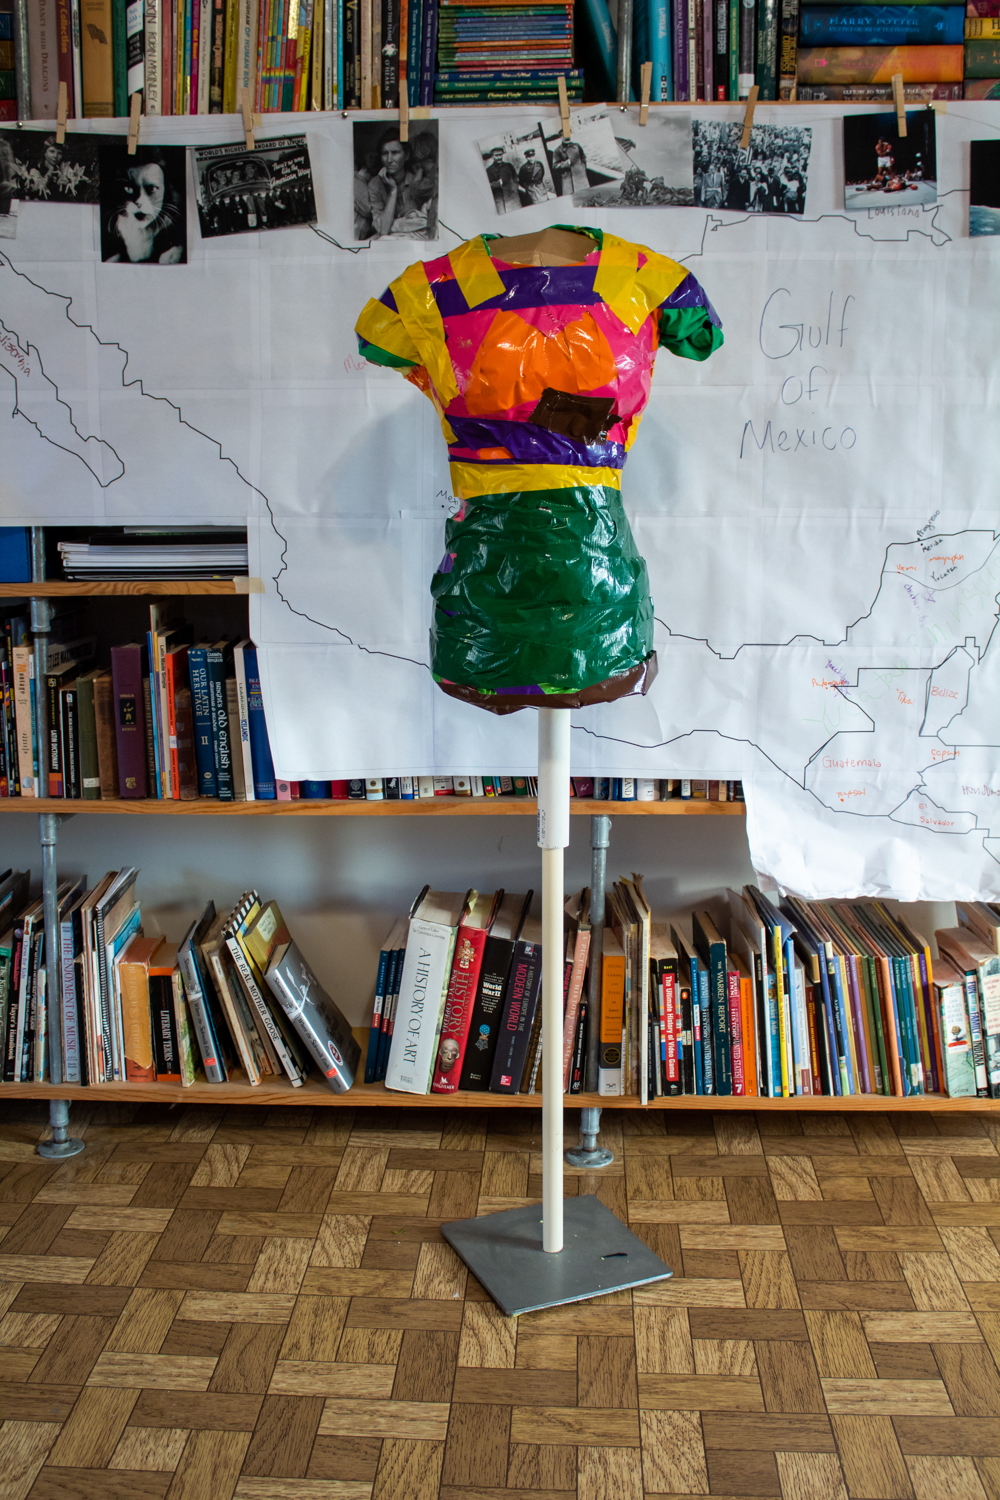
That wider PVC pipe goes through the dress form and is adhered inside with expanding foam, so it can't be removed. The narrow PVC pipe fits inside that wider one, and over the metal rod of the stand, so it can be removed if Syd wants to work with the dress form on a table top. But Matt also cut it so that when you put it on the floor stand, it exactly matches Syd's height!

And yes, I've made her pose for MANY photos with her dress form twin. It's hilarious.

Saturday, December 4, 2021

Make Sea Glass in a Rock Tumbler

This tutorial was originally published on Crafting a Green World back in 2016.

Yes, you can 100% make sea glass in a rock tumbler. It's super easy, and it comes out straight-up looking like sea glass. 

Here's how to do it.

How to Make Sea Glass in a Rock Tumbler

You will need: 

  rock tumbler. You want a good-quality metal one, something along the lines of the Thumler's Tumbler that we own. Good rock tumblers are pricey, but they make a great gift for a science-minded kid, so much so that if you don't have a science-minded kid of your own, someone you know probably has one and may in fact have a rock tumbler that you can borrow. 
  filler. This takes up the spaces between the glass pieces. You can use either ceramic media or plastic beads, both of which can be re-used. 
  coarse grit. Unlike rock tumbling, which requires coarse grit, fine grit, pre-polish, and polish, making sea glass in a rock tumbler only calls for coarse grit
  broken glass. You don't want anything too thin, like microscope slides, because the rock tumbler will abrade it so that it's too thin to be useful. I had great luck with vintage glass bottles, however. 
  hammer and towel. Gotta break that glass somehow! 
  tile nippers. These aren't necessary, but if you want to shape or trim your glass at all, you need them.

 1. Break some glass. As I mentioned before, I'm using vintage glass bottles to make sea glass, because that's what I have a million of and need to find more things to do with. I'm primarily choosing either the glass bottles that were broken when I found them, or that are of unimportant provenance. I clean up and polish the nice vintage glass bottles and display them around my house, even though I've frankly got too many of those, as well. 

 ANYWAY... my preferred method of breaking a glass bottle is to wrap it in a towel, set it on my driveway, then whack it with a hammer. From the mess of broken glass, I pick out the nice pieces that I want to tumble. I really like bottle necks and bottle bottoms (ahem...), and also the side pieces if they've broken into a shape that I think will look nice when tumbled. 


 Use the tile nippers to trim a piece of broken glass into a more interesting shape, or chip off the edges around a bottle's bottom. 


  2. Set up the rock tumbler. Use these instructions to make your tumbled glass. Note, however, that the instructions explicitly tell you not to use glass bottles. My experience is that you can, although you still want to avoid any glass that's too thin. A Coca-Cola bottle should work. A spaghetti sauce jar probably won't. 

 3. Check your work. When you open up your rock tumbler after five or so days, the inside will look like this:  


Instead of sifting out the tumbled glass, I pick it out of the matrix and examine it. A couple of times, a piece has cracked and needs to be set aside. Sometimes, a piece is perfect just the way that it is and I love it. Most times, though, the tumbled piece is almost perfect, but still needs some refining. For that, get the tile nippers back out. 

 For instance, after examining that bottle neck in the above photograph, I decided that I'd like it better if it was trimmed even closer to the edge, so I did: 


 4. Go for round #2. Pop any glass that you've trimmed, and enough new pieces to maintain the level in your tumbler, back into the barrel with the same grit and filler material. Give it a go for another five or so days, and then take a look. 

Repeat until you're happy! 


Tuesday, November 30, 2021

Homeschool Art History: A Timeline of the History of Photography


The kids and I are doing a short art history study on the history of photography, so it's a fine time to bring back our absolute favorite homeschool staple: the DIY timeline!!!

We still speak often about our big basement timeline, and I wish so much that we'd continued it in this house. But its magic lives on, I suppose, in the kids' happy memories, and in their eagerness, even at the ripe old ages of 15 and 17, to DIY this photography timeline with me.

I used A Chronology of Photography as my main resource for deciding upon the photos to include. I added in additional photos of LGBTQIA+ history and the history of People of Color, but looking at our finished timeline I can clearly see that I need WAY more non-Eurocentric photos, too, yikes. I also added in photos of important events, like the first Moon landing, World War 2 events, etc., because I want the kids to remember that photography, along with its artistic value, is an important way to explore and analyze history. Photographs are also cultural artifacts that speak to the time, place, and culture of their creation, so it's helpful to also source photos where those aspects are easy to identify.

 To get a high-quality image of a photograph, do a Google Image search, click Tools to reveal a set of filters, then filter the Size for Large:

Anyone else obsessed with the Cottingley Fairies? The kids and I talk about these world's greatest pranksters ALL THE TIME. 

Even though the photographs that I'm printing for this project are only about a quarter-page at the widest, if I'm going to the trouble to find and download an image, I like to get the largest size possible.

Because what if next year I need a wall-sized version of the Cottingley Fairies photos, hmm? What then?!?

I rename artwork images Title Artist Year, and put them in folders that I'll hopefully be able to make sense of later, ahem. 

Once I had a good selection of photos representing the history of photography, I sent the images to Matt, he put them four to a page for me, and I printed them onto cardstock and cut them out:


On the back of each photo card, I wrote the work's title, artist, and year, and that was our stack of photos all ready to go!

To play a game with these, deal out a few photos to everybody, and leave another stack of photos as a draw pile. Take the top photo from the draw pile, read out its title, artist, and date, then place it down to start your timeline.

The goal of the game is to place your photos in their correct spots on the timeline. You put your photo where you think it goes, then turn it over and read out the title, artist, and date. If your photo is in the correct spot, your turn is over. If your photo is incorrect, correct it and then draw another photo. The first person to correctly place all of their photos is the winner!

The game gets harder as it goes on and you fill in all those big gaps in time!

Look at that lovely, long timeline, chock-full of fascinating moments of history and interesting artistic interpretations:

I wanted to leave our timeline on display--maybe the kids will memorize some dates, and maybe it'll allow us the space to have more conversations about some of these images--so Syd and I tacked twine to the front of our big bookshelves, then the kids transferred the completed timeline to it:

We're slightly overlapping the map for our Meso-America study--oops!

The result isn't quite the big basement timeline of our memories, but it IS chaotic and messy enough to remind us of it!


The kids are currently working on a separate photograph analysis project, so we'll definitely add those photos to this timeline, and now that it's up I might as well keep adding more photos relevant to our other studies. You know how much I love context!

And then we'll take some photographs of our own!

Here are the resources that we've used so far:


Sunday, November 28, 2021

DIY Washi Tape with Upcycled Materials and Simmering Holiday Resentment

 I ran out of washi tape this week, smack in the middle of trying to get out a bunch of Pumpkin+Bear orders (all of which are packaged using washi tape!).

I really didn't want to go out and face the post-Thanksgiving shopping hordes just so each of my packages can contain its customary three inches of washi tape, and also I'm very much deep in the Consumerist Pit of Despair at the moment, fueled by having done almost all my holiday shopping and OH MY GOD WHY DO THINGS COST MONEY?!?

And then I remembered "Syd's" sticker maker...

In the photo below I've got a wallpaper sample, comic book page, and scrapbook paper, and Syd's Xyron has the Permanent Adhesive cartridge installed:

I squared up each piece, then cut them into quarter-inch strips:

It actually made a lot!


I'm currently storing them in a binder clip tacked to my study wall, and I'm very curious to see how long they last before I get to try out some new papers:

I've just noticed all the washi tape of years past on that wall, lol!

Alas, I finished packaging all my Pumpkin+Bear orders before I had the idea to upcycle ephemera into washi tape (but do not be sad, because I used my favorite measuring tape tape to package my orders, instead), so I couldn't test drive my brand-new washi tape on the packages.

Fortunately, that Pit of Consumerist Despair that I'm wallowing in DOES mean that I've got another very important use for DIY washi tape!


Also, Matt committed my #1 Co-Parent Gift-Giving Foul: when I thoughtfully informed him of the latest Christmas gift that I selected and purchased and wrapped for our children (the one in this photo, actually!), his response was NOT "Thank you so much for this burden of emotional labor that you are lifting, and for the magical memories you are ensuring for our precious children. I've also been thinking about what gifts the kids would like, and my contributions will be wrapped and ready for the tree soon, with their recipients and dollar amounts recorded in the Excel spreadsheet so we can make sure we're under budget."

Nope, instead he wrinkled his nose and replied, "Where are we going to put THAT?!?" He insists that this question, asked whenever I come home with any object, whether it's a refrigerator box or a roll of washi tape, is asked purely for informational purposes, but you and I both know the truth. You and I also both know that from now on, there's only one person in the house who's going to know the contents of 99.9999999% of the Christmas gifts under the tree this year and Matt can be just as surprised as the kids to see the presents that they open.

And THEN he can figure out where we're going to put them!

Saturday, November 27, 2021

How to Design and Create a Wood Star from Scratch

I'm back again with more tales of the Wonders of Geometry! 

 Have you ever found an online tutorial or template that you love, but it's not quite exactly what you're looking for? Maybe the thing that you really wanted to make is a few inches bigger or smaller or has a differently angled curve. The heart wants what it wants, you know? There's often no need to settle for something less than your vision because often, creating your own template from scratch is surprisingly workable. Here, for instance, I'm going to walk you through how to create a template to make a wood star. 

 No matter how big you want your star to be, or how many points you want it to have, you can make the pattern for it completely from scratch, and the assembly is the same no matter which type you create. So grab your ruler and grab your scroll saw, because it's time for some hands-on geometry!

Tools & Supplies

To make your own wood star from scratch, you will need:
  • Scrap wood. Old barn wood is practically de rigueur for making wood stars (and you should definitely score some if you can!), but old pallet wood gives much the same effect and is often much more easily obtainable, and scrap pieces of clean, new wood require less sanding and much less prep work before painting.
  • Ruler and compass, OR template and a straight edge. You can draw your star template completely from scratch using a ruler and a compass, or you can skip a few steps by using my template of concentric circles with divisions already marked.
  • Scroll saw or circular saw. Technically, you can use any saw that will cut a straight line for this project, but I like using a circular saw.
  • Sandpaper. A palm sander is unnecessary but saves a ton of time.
  • Wood glue and wood putty. Because your star won't come together by magic!
  • Drill and bit (optional)

1. Create the Pattern for Your Wood Star

If you want to start completely from scratch, use your compass to draw a series of concentric circles on a piece of large-format paper. Start with a circle with a radius of 1", and draw each successive circle with a radius 1" larger, until you've reached the maximum diameter of the star that you want to make. For a large star that makes a good tree topper, I like a circle with a radius of 7". For a smaller star that makes a good ornament, I like a circle with a radius of 4". Next, choose the number of points that you want your star to have, double that number, and evenly intersect your circle with that number of lines. For a four-point star, then, you'll need to divide your circle into eighths, and a traditional five-point star will need a circle divided into tenths.

 There are a LOT of benefits to having a spouse who's a graphic designer, and one big benefit is being able to get custom concentric circles divided according to my specifications! The pattern piece for your wood star will be a diamond. To draw the diamond, you're going to use your segmented concentric circles template. The bottom of the diamond is the center of the circle, and the top point will touch the largest concentric circle. Make a dot where one of your lines touches this circle. Go to the next line that segments the circle, and decide which smaller concentric circle represents where you want the widest part of the diamond to be. Make a dot where that line touches that circle, then connect the two dots using a straight edge. The next line around the circle gets a dot up high, and the line after that gets a dot down low. Connect all those dots, and you've got half your template made. To finish it, trace the lines from each low dot down to the center of the circle. This will complete your star, which is now made from a series of identical diamonds. Below is the template on which I drew a four-point, five-point, and six-point star in different colors: 


 My largest circle on this template has a radius of 7", so the entire star will be 14" in diameter. I chose the circle with a 3" radius to mark the widest part of the diamond for each star.

2. Cut the Star Pieces Out of Wood


Cut out just one of the diamonds from your paper template, and trace it onto the wood. Repeat until you have all the diamonds that you need to construct the star, then cut them out.

3. Sand the Star's Points


Arrange all your diamonds so that they make your star, and make sure that they're all nice and even and everything fits together snugly. Don't worry if you've got some gaps, because you can fill those in later with wood putty. 

 In the photo above, see how my star fits together nicely, but looks raggedy around the edges? The faces that will show on the finished star aren't super smooth, either. Solve this issue by sanding all of the faces that will show on the finished star, and then use the sandpaper to round the edges on the star's points. That's all it takes to turn your star from chunky and amateur to polished and professional!

4. Glue the Star Together

Gluing the diamonds together to construct your star is a pain in the butt, because your star probably won't have any parallel lines to clamp onto. I've seen woodworkers use shims to correct awkward angles while clamping, and I've also heard of woodworkers advocating using tape instead of clamps for these kinds of irregular figures, but my main strategy is just to fuss over it. 

 When the glue has cured, sand away any excess from the front and back of the star. If you plan to paint it, fill in any gaps in the joins with wood putty, then sand again when the putty has cured.

5. Embellish!

There are so many fun ways embellish and display these stars! To turn your star into an ornament, drill a hole through the top point.  To mount it on a dowel as a tree topper or table stand, drill a hole the width of your dowel into the bottom. You can draw and paint on your star, decoupage it and glitter it, or leave it simple and unadorned. 

 However you choose to embellish your star, a couple of final coats of polyurethane will seal it and keep it new-looking and shiny, because a star this beautiful and well-crafted is a keepsake and heirloom!

Sunday, November 21, 2021

How to Earn the Girl Scout CSA Outdoor Art Badge (Without Doing Any of the Suggested Activities, Ahem)

Whenever I teach multi-level Girl Scout leaders and we get to talking about badges, I always tell them that a great way for multiple levels of Girl Scouts to simultaneously earn a certain badge is to do none of the suggested activities. 

Your troop of Cadettes, Seniors, and Ambassadors want to earn the Space Science badge at each of their levels? Don't do any of the activities suggested for any of those levels. Instead, make up your own activities

So when six of my CSA Girl Scouts wanted to come together to earn the Outdoor Art badge last month, we threw out the badge books and instead used a Shared Google Doc to figure out what we actually wanted to do.

After seeing that the kids were mostly interested in various carving skills, I steered the meeting towards one that would involve exploring our local area's limestone industry, then engaging in hands-on experimentation with limestone art, and expanding into other ways to carve and embellish sculptural art.

We met on the campus of Indiana University-Bloomington, and while standing under the Sample Gates we talked about how and where limestone was formed. Our area is unique because the band of Salem Limestone underneath it is quite narrow and only spans the length of two counties. That's why we see so many old quarries around here--they had to be put close together, because that's where the limestone is! 

Salem Limestone has good consistency and small grains because of the way that the waves constantly agitated the shallow sea that once existed above it. It's strong, easily carved, and holds detail well. And yet, until the rail industry was extensive enough to provide transportation, Salem Limestone was only a local industry. That's why we see so many old residential houses with limestone facades--there was loads of limestone to be had locally, and no outside markets to buy it up!

When railroads came to the area, however, Salem Limestone became a national industry. That's why there are so many train tracks and rail trails in our area--there used to be railroads everywhere to transport that limestone!

Labor reforms were eventually necessary to the industry. Limestone carving was difficult, manual labor, and before reforms, workers would tell stories of how unemployed people would just stand next to the quarries all day. If a manager saw that a worker wasn't working as hard as they thought he should, the manager would fire that worker on the spot and call a bystander in to take his place. Even after reforms, limestone carving remained difficult, manual labor, but it paid a living wage and was the expected career of several generations of families. 

The evolution of architecture styles and building materials eventually tanked the Salem Limestone industry, and now it's mostly used for niche, high-end architecture and university campuses that utilize the "collegiate gothic" style. When the industry tanked, people who'd worked in quarries for their entire careers, after their parents and grandparents had worked in the same quarries for their entire careers, and who expected their children to also work in the same quarries, were let go. They had no other readily marketable skills, no disposable income used to further their education, and there was no other nearby industry that they could easily transition to. Their children were also stuck without access to the careers they'd planned, and even with a university right in town, one whose buildings were built from their parents' and grandparents' labor, they didn't have the income or necessarily the academic preparation for higher education. That's partially why our area has such a weird income/education/culture divide--it economically hobbled whole swaths of long-term residents who now fight for employment and housing and cultural ideals against the hyper-educated residents who are here because of the university.

Never let it be said that I led a single Girl Scout meeting without bringing up politics and social justice and the price of long-term rentals in town!

So after we were all inspired to seize the means of production and legislate universal pre-K and build low-barrier shelters for the unhoused, we went on a walking tour of the IU campus to see some examples of limestone architecture. The kids were asked to bring binoculars--

They did look at interesting architecture with their binoculars, but spent a rather shocking amount of time also looking at innocent passersby...

--and cameras, and were instructed to take photos of interesting architecture as part of their badge activities. 

Here's Franklin Hall, which began as the university's library:


It's been extensively renovated and turned into the home of the university's Media School--


--but the John Milton quote remains relevant:


This is the Student Building:


The clock tower has 14 bells that chime every 15 minutes, and can also be played live. In 1990 that whole tower burned down and had to rebuilt using the original 1905 plans.

We walked around and photographed a few more buildings and the campus cemetery, although the kids were definitely more excited about the non-architectural things that we also saw, like squirrels, a wedding party trying to take photos in the rain, a random couple of students breaking geodes on the street, etc.

After we had seen all the awesome limestone things, we settled down to make our own awesome things! With such a diverse cast of characters, I'm never entirely sure who knows what, so I started with a basic lesson for everyone on pocket knife safety, how to hold a knife while whittling and carving, and how to sharpen a knife. Then Matt and my co-leader and I set up stations so the kids could explore various carving and embellishing skills.

Here's Will at the limestone engraving station:


Hoadley Quarry gave Matt several pieces of limestone for hand carving and engraving. I brought my workhorse Dremel and a set of engraving bits, and only lost one to an over-zealous Girl Scout!

We set up a separate station for limestone hand carving, with the larger pieces of limestone, a sandbag and old towel to brace the limestone, and my set of stone carving tools that's similar to this one

These two stations also had safety glasses, because nobody likes a corneal abrasion!

The kids could use their own pocket knives or my set of wood carving tools to carve soap or twigs:


I showed the kids these super cute twig gnomes, and some of them tried it out, while others did their own thing.

We had a couple of stations set up with wood burners. The kids could burn details into their wood carvings, or wood burn a wooden spoon. It was a little early for holiday gift-making when we met, but a wood burned spoon would make an awesome gift!

I also brought my acrylics, brushes, and water cups and set up a station in case a kid felt more like surface decoration than carving, and a couple of kids used this space to paint their twig gnomes or experiment with adding detail to their limestone engraving.

Overall, this was a super successful Girl Scout meeting! The kids all tried new things, all found something they liked doing, all learned some useful things and still had time to chat and mess around. I feel like the relevance of studying a local industry that's so visually apparent in their daily lives added meaning to the badge work, and hopefully helped them contextualize some local issues.

And if nobody's parent gets a wood burned spoon for Christmas, it's not my fault!

Saturday, November 20, 2021

How to Make Origami Hearts

This tutorial was originally published on Crafting a Green World back in 2016.

Curious about origami? Wanting to bust some paper stash? Make origami hearts! 

 These little origami hearts are quick and easy to make, and they look adorable. Here's how to fold them: 

  1. Start with a strip of paper. Any paper will do for this project, from brown paper bags to wrapping paper scraps to bits of your favorite scrapbook paper. You can also play with the size of your strip, although I tend to always use the same size strips that we use for our paper chains: 1"x6". 

 HINT: I work a lot with upcycled papers and scrapbook paper, and I've gotten into the habit of cutting down my scraps at the end of a project into the three types of paper ephemera that I use most often: 1" circles, 1.25" hearts, and these 1"x6" strips. They store more easily and attractively, and whenever the kids and I have the urge to do some crafting, we've already got a ready stash of our favorite supplies. 

  2. Valley fold your paper strip in half. Crease the fold with the back of your thumbnail.  

3. Fold each side down to meet the center line. Crease the fold.  

4. Flip the piece over to the back side, and turn it upside down. 

 5. Fold each of the two top pieces down to meet the bottom straight edge. Crease the folds.  

6. Fold the corners of each of the top two pieces down to meet in the middle. This is the trickiest part to get even, since you don't have a vertical line of symmetry here to guide you. If you'd like, you can always fold that line yourself; you'll have two extra creases on your heart, but it won't affect anything.  

Turn your piece back over, and you'll see your heart! 

 If you'd like to make sure that your heart stays flat, you can always glue those top four corners down.

 These hearts are so quick and easy to make that you'll have a pile of them before you know it, and that's okay! They make good embellishments for Valentines, and cute embellishments or even gift tags for presents. Thread them onto floss for a simple bunting, or stamp your business info on them and hand them out with your handmade products. 

 Or, you know, just hoard them because they're so pretty. That's what I do!