Sunday, December 13, 2020

All The Christmas Crafts

This is a repost of a round-up that I wrote in 2014. I recently decided to make it the home base for all of our Christmas craft tutorials, so I added all the ones that I've written since 2014. Because whether you're big or small, Christmas is a great time to drag out the craft supplies and bond with your family over popsicle sticks and hot glue guns!

One of the reasons why I enjoy blogging is the feeling of re-discovering an old post, especially when it's something that I've otherwise forgotten completely about. That time when Syd painted the wall with peanut butter. The day that Will threw a fit in a modern art museum. A glimpse of her protectiveness toward her sister.

This particularly applies to Christmas crafts, since they're often done and displayed within the day, and I don't tend to keep them for the next year (gasp, I know!). So, in honor of Christmas Recipe Day and Christmas Craft Day and Christmas Ornament Day on our Advent calendar, and my deep desire to save some time and avoid reinventing the wheel, here's my definitive round-up of all of my Christmas crafts that I can unearth:


Big stars are tree toppers, and little stars are ornaments!


In my opinion, those clear glass baubles exist solely to be filled with cuteness.


There's scope for making any kind of art that you want to illustrate these ornaments.


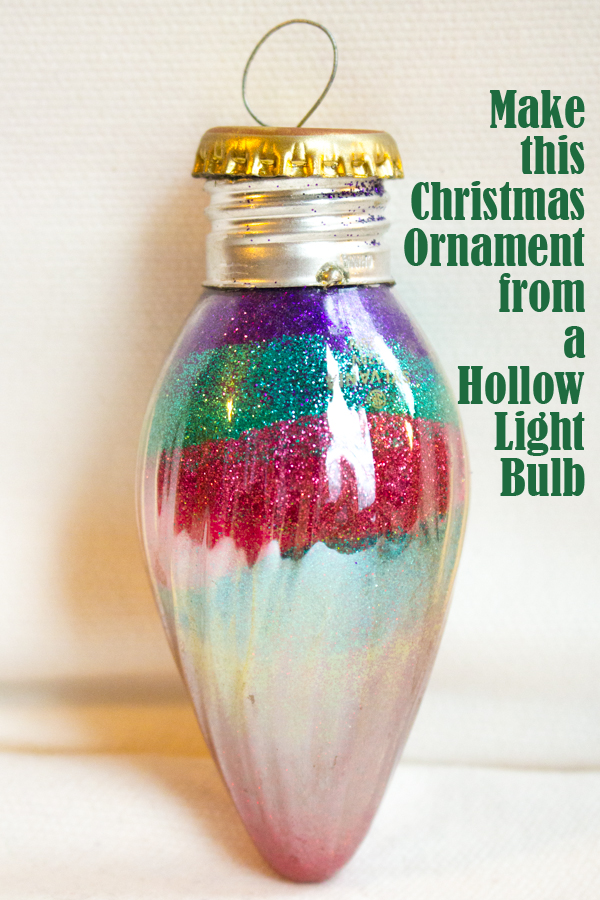
This one uses a hollowed out light bulb as a base for a regular filled ornament.


This is a fun process-oriented craft... and it's good for using up the last bits of various paint pots!


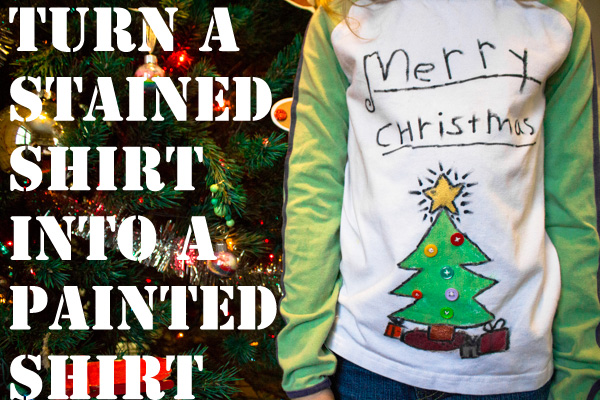
I was surprised at how much effort Syd put into this project. It turned out stinkin' adorable, too!


Do you love a puzzle that has some missing pieces? Turn your favorite perfect sections into ornaments!

cinnamon dough ornaments

This might be my favorite Christmas craft. We make them every year.


This is a super fun, super messy, VERY hands-on craft.

Icelandic laufabraud

The kids made this for their Geography Fair project in May, but it's actually a Christmas recipe!


When teenagers choose the Christmas craft...

dipped pinecone ornaments

These are crazy pretty, and they last for freaking ever. I'm partial to the crayon-dipped ones.

popsicle stick ornaments

The more glitter, the better!

waffle cone Christmas trees

These are quicker and easier to make than gingerbread houses.

sticker Christmas cards

These were dead easy for me to organize and for the kids to make, and I think that they turned out really cute.

chalkboard gift wrap

This is especially fun, because you can do it right on brown paper (I do a lot of wrapping in brown paper bags).

upcycled CD wish list ornament

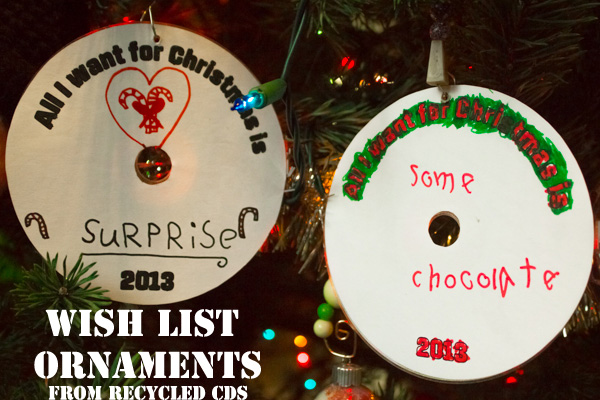
Some parents don't like it when I bring this project to our ornament crafting party, but I think it's cool to remember what the kids wanted most each year.

painted popcorn garland

The look cute even when they're plain, but if you've got some teeny spritz bottles, you can make them really special.

beeswax ornaments

I think that these would look even cuter poured more thinly, so I'm going to have the kids try that this year.

gingerbread houses, steps one and two

I don't go through all this trouble every single year, but when I do, this makes the most EPIC gingerbread houses of all time. I'm going to do it this year.


Starting with a coloring book of ornaments made this a super-easy toddler/preschooler craft.

overhead projector Christmas tree

It's been a while since we've whipped out the overhead projector--we pretty much only use it now for tracing images that we want to be large--but there was a time that this puppy could save any dreary day for me!

collage window card

This required parental wielding of the x-acto knife when the kids were littler, but their random selection of collage papers, and their distribution, looked quite artistic.

coloring page Christmas ornaments

If you've got a scanner, so that you can shrink down regular coloring pages either before or after the kids have colored them, then you can use pretty much any image here.

painted wooden Christmas ornament

This is another easy one for littles. You start with those wooden die cuts that you can get most places, and they don't even have to be holiday-themed--we've got some pretty sweet dinosaur ornaments on the tree, thanks to this craft!

used sandwich bag ornaments

The first time that we did this, the kids weren't old enough to iron. They like this project even more now that they can!

record album cover ornaments

These are so fun for the kids, now that they have the hand strength to cut through cardboard.

felted sweater stockings

I made these, but the kids definitely have the sewing skills to do this now.

Whew! Honestly, I don't even think that these are the entirety of all the Christmas tutorials that the kids and I have done over the years, but I've got to go take a shower, then put Syd's hair up in her flat performance bun, then get the kids to gather up all the stuff that they'll need for the rest of the day and evening (ballet uniform, quiet  activity, school work, water bottle, and packed dinner for Syd, and aerial silks uniform, fat check for her recital costume, library books to return, water bottle, and packed dinner for Will), then drive them to Girl Scouts Co-op, then come back home and work out real quick, then drive back and pick them up, then drive Syd over to Matt's office and drop her off, then take Will to aerial silks, then take her to the library for LEGO Club, then go home and make and mail an etsy order. 

And oh, hell, I just this second got an email from the ballet department saying that the kid's got to bring foundation to her dress rehearsal tonight. Whatever kind of make-up foundation is, that's what I'm going to be buying instead of working out this afternoon. 

Saturday, December 12, 2020

4 Ways to Cut Glass Bottles (including the One Way that Actually Works!)

I originally published this tutorial on Crafting a Green World.

The ability to cut a glass bottle all by yourself is the Camelot of crafting. We've all heard of people doing it, we've seen the YouTube tutorials, we've for sure seen the awesome stuff you can make from a cut glass bottle, and yet... if you've ever tried it for yourself, you know that it's not that simple, is it?

If you haven't cut a glass bottle before and you think that it IS simple, go try it. I'll wait here until you come back pissed off and scratched, having cleaned up the mound of shattered glass that you were left with.

Done? Okay, great! Now hang out with me here while I run through the three most popular methods of cutting glass bottles that seem to show up most often online, and I'll tell you why they suck. Your reward is that when I'm done, I'm going to walk you through the one way of cutting glass bottles that actually works like a charm. It takes some special tools, but it's easy and it WORKS.

But first, the three methods that don't work:

Method #1: Score and Tap

It's a bummer that this method is so unreliable because it's the one that's the most commercially available. Most store-bought bottle cutting kits include a jig for the bottle, a wheel that etches the bottle, and a tool for tapping it:

 Here's the bottle cutting kit that I owned for a decade before it finally pissed me off enough that I gave it away.

The idea is that you place the bottle on the jig, turn it so that it's etched by the wheel, and then tap it to break the glass neatly at the etching. Here's an example of what a typical bottle cutter kit looks like:

It... kind of works? Ish? The method is sound, but the problems are that one, it's got a big learning curve, so your first 20-50 bottles aren't going to come out right. Two, it's unreliable, so even after you've finally got the hang of the method, you're still going to crack a bunch of bottles. There's just no getting around it. And that's a lot of waste for a process that's supposedly all about removing glass from the waste stream.

Method #2: Hot and Cold Water

This method is similar to the process above, except that instead of tapping the scoreline, you alternate pouring hot and cold water on it, using the physics of temperature to neatly break the bottle:

That's the idea, at least, but again, a method that involves breaking the bottle, however carefully engineered, is still going to subject you to a lot of trial and error. It's a more elegant solution in that you don't have to physically smack your bottle with a hammer, but you're still going to get so many bottles with wayward cracks, no matter how much you practice. It's not worth the waste.

Method #3: String and Fire

Oh my gosh, I so badly wish that this method worked better because you KNOW how much I love myself a good fire! For this method, you only slightly endanger your life by soaking a string in a flammable substance, wrapping it around a bottle, and then SETTING THAT STRING ON FIRE:

YAAAAAASSSSS!!!!! Who does not love setting stuff on fire?! Unfortunately, not only is this method exactly as unreliable as the first two but it also, you know, physically endangers you. Sigh...

Method #4: Just Cut It, Bro (the one that works!)

Okay, Sugar, you've been so patient with me first telling you all the ways that don't work for cutting a glass bottle that now I'm going to give you a present by telling you the way that DOES work.

You might have noticed that the three unreliable methods that I've shown you all have something in common: they break the bottle. Sure, you can get the hang of it and break the bottle just right more often than not, but there's still too much luck involved for my taste. In my opinion, the best method for cutting a glass bottle is to do just that: get yourself a rotary tool with a glass-cutting bit, and cut that bottle!

I use an older Dremel 4000 with a diamond cutting wheel attached. That, plus a trickle of water, plus some safety gear, plus a few grits of sandpaper, is all you need to cut a bottle accurately every time, no luck needed, with a very short learning curve.

Directions

1. Mark your cutting line.

Do this with a Sharpie, not masking tape or anything water soluble. You can mark curves, but keep in mind the turning radius of your cutting wheel--it's not a jigsaw.

2. Put on your safety gear.

You absolutely need a breathing mask to do this method. No excuses. I am not responsible for you filling your lungs with glass dust, so don't even think about not doing what I say. I use this type of mask, which is also good for soapmaking. The bottle will get slippery when it's wet, so a rubber glove on your bottle-holding hand won't steer you wrong, either.

 Me + weapon + victim: let the games begin!

3. Start the water flowing.

Run your faucet or hose so that lukewarm water will trickle over your bottle, right at the spot where you're cutting. Keep that water at your cutting location the whole time you're cutting. If your aim is off, you WILL crack that bottle, so don't let your mind wander.

4. Cut slowly, all the way around.

Hold the bottle steady in your non-dominant hand, and the Dremel steady in your dominant hand. Keep the Dremel itself out of the water, but make sure that water is flowing over your cutting location, and then just let the cutting wheel do all the work. Be especially careful when you're almost all the way around, as that last half-inch or so is the most likely to chip.

5. Sand the edges.

You can grind down sharp edges using a grinding bit on your Dremel, but I actually love the way that this guy sands down his glass by hand, and so I do mine the exact same way:

The only difference is I stop after the 320 grit because I just need to not cut my face off via my new drinking glass, not have the shiniest rims on the block:

My favorite thing about this method is how consistent it is. Whether you've got a bumpy, embossed glass, or a thin-walled beer bottle, or a wine bottle made of HUGELY thick glass, you'll cut it pretty much perfectly, pretty much your first time trying. It's way better than breaking your bottle and hoping for the best.

Thursday, December 10, 2020

It's Homemade Ornament Night!

 It's a real phenomenon that the more excited I get each year about making magical memories! With my teenagers! Who will not always be living here in my pocket to constantly make magical memories with!, the less excited the teenagers get about doing boring stuff. With their boring mother. Who is ever more boring and less exciting every year that she lives in their pockets and tries to make them do boring stuff with her.

These days, I unashamedly bribe the teenagers with snacks whenever I have a magical memory-making moment in mind, something like, "Hey, let's all decorate the tree together, and look, I've made us hot cocoa and two kinds of popcorn!", or "Let's have a family ornament-making evening while we listen to Christmas music... and eat the Christmas candy that your grandparents sent us!"

We are all of us, from the dog on up, pretty food-motivated over here...

And that's how I manipulated all of us into spending the evening together around our big, beat-up IKEA table, listening to Christmas music, eating candy, and making some new ornaments for our tree:

This folded paper star ornament was super fiddly, but it uses the same paper strips that I have a zillion of leftover from making paper chains with little girls.

I finally got it just right:


And now it can hang out with its paper chain cousins!


Syd painted one of my smaller wooden stars:


And only added a little bit of teenaged flair, sigh...


Here's the star made from wood so old and interesting that I couldn't bear to sand it down and paint it something else:

I let Matt browse my Christmas Pinboard after he promised not to make fun of me for anything he found there, and he made this popsicle stick Nutcracker head:

Don't worry, because Matt's new Nutcracker has plenty of other Nutcracker friends to pal around with!


It is very possible that we ate entirely candy for dinner, and I didn't get to bed until the teenagers' idea of "early," which means that I'm exhausted already today, but the memories made were, indeed, very magical, and it was very, very worth it.

Saturday, December 5, 2020

Make a Steampunk Snowman from Upcycled Gears

This post was originally published on Crafting a Green World.

Way back in the day, my very first editor at Crafting a Green World wrote a post entitled "Steampunk is the New Green." Steampunk isn't so new now, but it's still a heck of a lot of fun to play with!

By this point in our collective steampunk obsession, we've definitely used up all of our old watch parts, and everyone's outgrown swim goggles have been painted black and had silver studs glued on, but there are still plenty of components to be found.

Here, I'm modding a steampunk snowman using the wooden gears from a child's old DIY marble coaster kit and some wire pulled out of an analog clock. Add in my special trick for making metal paint look grungy, and you've got yourself a brand-new-to-you made-entirely-from-old-stuff steampunk snowman.

Supplies & Tools

You will need:

  • The gears and a couple of other parts from one of those DIY wooden marble coaster kits. Wait a couple of months for the tween to make it, play with it, and get tired of it, and then rescue it from dusty oblivion.
  • White primer
  • Bronze or gold acrylic paint
  • Brown or black acrylic paint
  • Water-based polyurethane sealant
  • Hot glue
  • Other steampunk-themed ephemera

Directions

1. Figure Out Your Basic Snowman Layout

Obviously, you need a big gear for the snowman's butt, a medium gear for its torso, and a small gear for its head. I gave my kids my box of stash ephemera and they added a few more bits and bobs, like eyeballs and arms and wire to twist all around.

2. Paint All Of The Snowman Pieces

Start with white primer, and make it a no-sand primer if you're not sure what material your snowman pieces are made of. Follow that with a few coats of gold or bronze acrylic paint, so that all your snowman pieces look industrial and metallic.

3. Add A Grungy Patina

Making your snowman look like it's had a hard few centuries in the icicle mines is easy to do. First, coat all the pieces in a thin layer of water-based polyurethane sealant. Then, while that layer is still wet, pour out a little more sealant onto a palette.

Sidenote: my super sophisticated palette for this project is a piece of aluminum foil covering the folding plastic table that why, yes, I DID HAUL IN FROM MY GARAGE INTO MY FAMILY ROOM. One kid is hogging the actual family room table with her actual schoolwork, and the other kid is hogging the studio table sewing her entry into our town's annual Trashion/Refashion Show. They're only being charming and industrious in this way because I've banned them from screens until 5:30 pm, just so you know. Anyways, add a small dab of black or brown paint.

Stir the paint into the polyurethane sealant until it's a blotchy mess and you're a little worried about it, then use your paintbrush to daub it all over all of your snowman parts. It seems bonkers, but you really do want to take off most of the shine and put on lots of obviously grimy bits. After you've got some nicely grimy spots, you can even add another bit of black paint to your polyurethane sealant mess and daub on a few even dirtier spots.

If you really hate it, you can go back over the whole thing with more metallic paint and make it shiny again, but I think you'll like it!

4. Glue The Snowman Pieces Together

You could use an epoxy glue like E6000 here, but honestly, hot glue is a billion times quicker and does the job just as well. It's always a bit of a trick to keep the front of your project looking clean of glue, but you can add more glue to the back for reinforcement if you need to.

5. Embellish Your Snowman (Optional)

Depending on what you have on hand and how artsy you're feeling, there are lots of fun embellishments that you can add. For instance, one of my kiddos decided that she wanted to add even more detail to the distressing that I did with acrylic paint and polyurethane sealant, so she got out her set of chalk pastels and a paintbrush and did her thing, and then I hit the entire snowman with a quick spray of clear glaze.

After the glaze dried, I wrapped some of that thin copper wire I found in an old clock around the centers of the gears to make them look like these woven embroidery floss ornaments (which you also upcycle cardboard for, making it another great eco-friendly project!).

Depending on what you, yourself, have on hand, other awesome embellishments could come from jewelry charms, other small gears, and clock parts, cardstock cut into cool shapes and embellished (I think my own snowman could really use a pair of cardstock mechanical wings!), or anything else that you can think of!

6. Add An Ornament Hanger

Using that same thin copper wire, I tied a lark's head knot around the snowman's gear head and made a hanging loop. Leather or a necklace chain would also work well for this.

Our happy steampunk snowman is large enough that it could have been our tree topper, except my other kid had already made a giant 3D origami star for the tree topper this year. So instead we hung it on our Christmas tree, where it shares real estate with a scrapbook paper chain, a felt Darth Vader, and a couple of old lightbulbs filled with colored sand and glitter.

Perhaps steampunk snowman will top our tree next year!

Friday, December 4, 2020

Homeschool Science: Stages of Mitosis Cookie Models

Say that you're a high school junior whose mother assigned her a microscope lab to observe, identify, and sketch the stages of mitosis in a root tip. 

Say that you're worried that the stages of mitosis might still be a tad fuzzy in your mind, but you're pretty over all that sit-down-and-study business, because it's been a long week, and also you crave sugar.

You can study the stages of mitosis just as well by making cookies modeling the stages of mitosis!

We did this exact same activity a couple of years ago, during one of our (many) times studying cells, but those cookies were a lot simpler--though still delicious. One of my favorite things about spiraling back around to the same topic, and even to the same activity to study the same topic, is that every time you come back you can add to the kid's base level of knowledge, which then goes up every time you come back. You can contextualize, go into greater depth, perform more sophisticated analysis--all the good stuff! Two years ago, the kids' stages of mitosis cookie models were pretty simple, showing essentially just the cell membrane and the chromosomes. This time, Will also added the major cell organelles, because more candy is always better!

Will used my favorite cut-out sugar cookie recipe, and I made her a nice, big batch of cream cheese frosting to go on top. She carved the cookie shapes that she needed--

--baked them, and then it was time for the fun part!


Did you know that the after-Halloween sales are the best place to buy most of your decorating candy for Christmas cookies? You can divert some of them to stages of mitosis cookies, as well.

Did you know that if you microwave a Starburst for 3-5 seconds you can sculpt with it? It makes a great nucleus!

The food crafting got a little too sticky and chaotic for my tastes VERY quickly, so I don't remember what organelles most of these candy embellishments are supposed to represent, but Will knew what they were at the time, so that works for me. 


Thanks to her slightly unconventional study method, her microscope lab went swimmingly and now takes pride of place in her Biology lab notebook.

And the stages of mitosis were delicious!


P.S. Here's the book that Will's using to add a lab component to her biology study:


P.P.S. Want to see what other messy, chaotic, educational activities we get up to every day? Check out my Craft Knife Facebook page!