Saturday, October 24, 2020

How to Make a Fairy Garden

A fairy garden is easy to make, and nope, it actually doesn't require any of those porcelain or plastic store-bought fairy garden accessories.

After all, the fairies don't go to Hobby Lobby for their furniture--they MAKE it!

Fairy gardens also don't have to be as elaborate as the ones that you see showing off all of their store-bought fairy accessories. Sure, a fairy garden wonderland is cute, but not everyone likes "cute."

But I promise everyone can like a fairy garden!

All you really need to make a fairy garden are a couple of small plants and suitable potting soil, a container, and appropriate handmade, found, recycled, or natural embellishments. The fairy garden becomes a magical place based on these elements alone... that's kind of WHY it's magical, you know? Simplicity is, indeed, beauty.

So scavenge up some recycled and natural materials, and let's make a fairy garden!

1. Prepare an appropriate growing environment for your plants. This step is the key to the entire fairy garden--you need the right plants, the right container, and the right soil. Make a garden that looks pretty but doesn't take care of your plants the right way, and it'll be dead within the month.

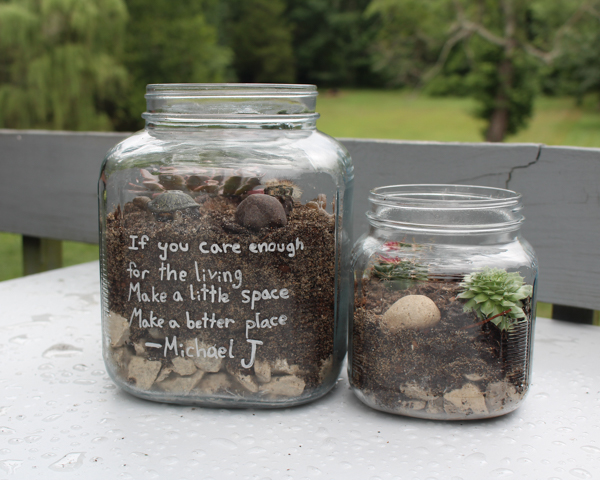
I like to start with the container. For the set of fairy gardens that I made last week, I knew that I wanted to use some old glass storage jars whose lids are... well, I don't know. Maybe the fairies took them.

For a glass container like that, I didn't want plants that would spread a ton, or get too bushy. Moss would have been cute, or a little bonsai, but after wandering around the greenhouse, and learning that they were randomly out of the venus flytraps that I'd REALLY wanted, I decided that a little desert fairy garden would be cute, like a fairy terrarium.

That meant succulents and cacti! Succulents and cacti both need a lot of drainage, so I put in a bottom visible layer of gravel (you could use aquarium gravel for this, or decorative river rocks, or shells, etc.), then the kid helped me mix up an appropriate potting soil for succulents and cacti--basically, potting soil plus playground sand plus peat moss or perlite. I'm ashamed to say that I used peat moss, even though I loathe buying it because its harvesting is VERY problematic, because I couldn't find the alternatives that I wanted and I needed to get the fairy gardens finished so that they could be birthday presents.

Rushed shopping and crafting is often not eco-friendly shopping and crafting, dang it.

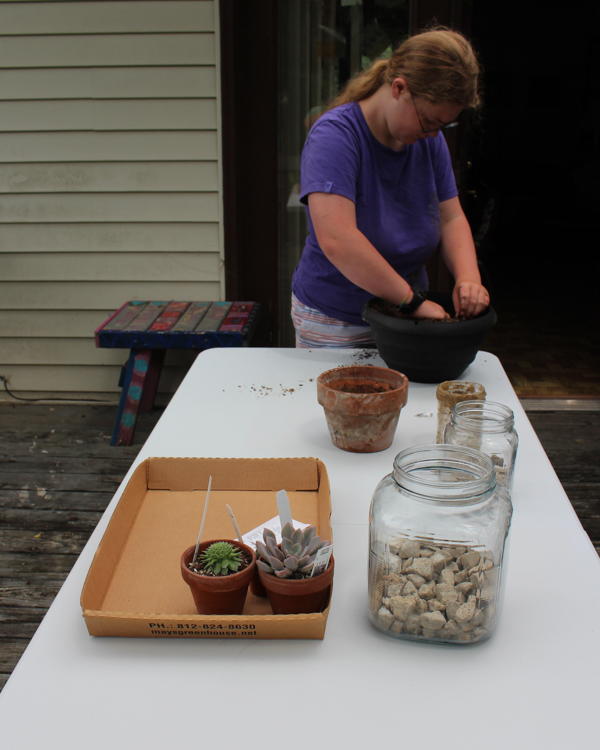
2. Add potting soil and plants to the container. Just like in a real garden, bigger plants go in the back and smaller plants go in the front, and offsetting them to each other allows them all to be seen.

As you place the plants, begin visualizing what fairy garden embellishments you want to add, so that you'll be sure to have room.

3. Decorate your fairy garden. This is the fun part! To decorate your garden, check out these handmade fairy garden decorations for inspiration, or look around your home and yard and repurpose found items. Since my kids have been small, they've adored using their little toy animals as fairy garden decorations, and dollhouse furniture also often works well.

As you're embellishing, don't forget the container itself! One of our fairy garden birthday presents needed to be Michael Jackson-themed, and I thought about making Shrinky Dinks or polymer clay models, but it turned out that a relevant quote from one of his songs, written on in paint pen, was all that was really needed to make it perfect.

If you give your fairy garden as a gift, don't forget to include care instructions for the plants, and the appropriate fertilizer, if necessary. Giving the recipient a bottle of distilled water, a little bottle of liquid fertilizer, and a handwritten sheet of when and how much to water can be all the difference between a birthday present that's a huge hit and one that's an eventual source of guilt and self-recrimination.

Looking for more fairy garden inspiration? Check out my kid's junkyard fairy garden here, and this super easy, super magical chia sprout fairy garden that's perfect for preschoolers.

Thursday, October 22, 2020

15 DIY Potion Bottle Tutorials


Raise your hand if you, too, have a giant plastic bin full of old bottles.

No?

Okay, raise your hand if you, too, have a place back in your woods where the owners of a 1950s drive-in used to dump their trash.

Alright, that explains it. If you don't have a vintage dump on your property, then you're excused from maintaining a collection of vintage bottles of dubious quality.

It's my two-part long-running plan to 1) get all those bottles and other random pieces of assorted trash out of our wooded wonderland, and 2) upcycle as much of it as possible instead of making it part of someone else's dump. Matt particularly objects to Step 2 of this plan, as so far it's mainly resulted in me filling our 1910 general store chock-full of dirty old bottles, but still. 

This autumn, Will and I have been inspired to try to make some of these old bottles into spooky potion bottles for Halloween. After I clean them, here are some of the tutorials that we're going to try:

  1. bottles embellished with scrapbook paper. It's not spooky, but it's super cute! I don't have Halloween-themed scrapbook paper, but I do have some Halloween-themed fabric that would work equally well.
  2. bottles embellished with white paint and sandpaper. I think we're going to paint completely over most of our bottles, but I do have a few clear bottles to play with. For those, it would be interesting to try this tutorial that involves sandpapering and partly painting the bottles, so that they look spooky but still see-through.
  3. colorful potion bottles. I really like these bottles as an alternative when you want to make potions but you don't want them to be "spooky." These are definitely potions made by (or from!) mermaids and unicorns!
  4. embossed skull on a bottle. The author of this tutorial used a styrofoam skull, but I've got a couple of different skull molds, so I'm wondering if papier mache, or even plaster of Paris, wouldn't work just as well.
  5. faux mercury glass potion bottles. Mercury glass makes potion bottles look very antique and authentic!
  6. free printable labels. This DIY potion labels don't reference any popular media, so they would work for your standard fairy tale kitchen.
  7. handmade apothecary. This is the most beautifully elaborate possible use for all of these DIY potion bottles! I'd like to imagine it as the play kitchen of a particularly morbid child.
  8. hot glue and paint. Will and I are definitely going to try this tutorial. Instead of regular craft acrylic paint, however, I think I'm going to try mixing it with baking soda to give it more of a ceramic look.
  9. hot glue and paint labels only. Here's the same hot glue and paint method, but only over the part of the bottle that has the label. This leaves the rest of the bottle clear to show off your spooky ingredients!
  10. matte black potion bottles. I want our bottles to each be unique, but I DO love the uniform look of all of these matte black potion bottles. I've got this exact spray paint, so maybe I'll at least have a matte black potion bottle section in our apothecary...
  11. papier mache embellishments. There are so many beautifully embellished potion bottles in this post, but my favorite is the papier mache eyeball!
  12. poison apple bottle. I am obsessed with all of the DIY poison apple tutorials that I've seen this fall. I just need to find a round bottle in the dump!
  13. resin potions. I hadn't thought that we'd fill our bottles with anything special... until I saw this post about making potions using resin!
  14. sticker paper potion labels. These are my favorites of all the free potion labels I've found, and the clear sticker paper is genius!
  15. transferred labels. Instead of gluing labels to the bottles, this author used an image transfer method. 
Considering all the Halloween sewing projects and recipes I've also been wanting to try, as well as all the scary movies I'll be sad if I don't re-watch for the hundredth time before Halloween, I think we've got enough to keep us entertained until it's time to start Christmas crafting!

P.S. Want to see even more of our fall projects, like the from-scratch apple pie and the bloody guts cinnamon rolls? They're over on my Craft Knife Facebook page!

Saturday, October 17, 2020

How to Remake a Puzzle

I originally published this tutorial on Crafting a Green World.

There are lots of cute ways to upcycle an old puzzle into something completely new, but what if what you'd really prefer is simply another puzzle?

I mean honestly, have you ever looked at the picture on the front of a puzzle and thought, "Huh. I could do better than that!"

Well, you absolutely can!

It's surprisingly easy and doesn't take a ton of artistic talent to remake a puzzle into one that's brand-new-to-you.  This is a great craft for kids or a great way to make an educational toy for a kid. Here, for instance, I've remade a very odd puzzle (I'll show you in a minute, but trust me--it's ODD!) into a puzzle of the digits of pi. What classroom wouldn't want to have that on the shelf in readiness for a rainy-day recess?

Here's how to remake a puzzle of your own!

Supplies Needed

An old puzzle to upcycle

I have a very firm Puzzle Policy, which consists of this: we buy puzzles only from thrift stores or yard sales, never spending more than a buck or two. We happily put together our puzzles, knowing that it's highly likely that there will be missing pieces. When there are, we don't care, because we still had the fun of putting together the puzzle and anyway, it only cost a couple of dollars; I'll recycle or upcycle that puzzle, then, with a clean conscience.

When the puzzle gods smile down upon us, however, it's a real treat, and then when I put the puzzle back in the box I'll securely tape it shut, tape on a note that reads "NO MISSING PIECES," and donate it to a thrift shop to move on to some other lucky soul. So even though my family loooooved putting together this very, very, VERY strange puzzle, it has two missing pieces, so recycled or upcycled it must be:

Acrylic paints and brushes

You'll be watering the paints down, so a little will go a long way.

Paint Pens

These can be pricey, but you don't have to buy a full set if you're planning on a limited color scheme. I got by using only black for this project.

Spray sealant (optional)

Aerosol sprays are the WORST, but if you feel like you have to seal your work--I would only if it's quite detailed and delicate--then you'd better use this instead of a brush-on sealant, which will go on too heavy and stick the puzzle pieces together.

Directions

1. Assemble the puzzle, turn it upside down, and make any necessary repairs. When my kids were younger and much more emotionally attached to their puzzles, I figured out how to make a pretty decent replacement for missing pieces--it's at least good enough to make the puzzle complete again, although of course you can tell the difference:

Here's my tutorial for how to repair a puzzle by recreating missing pieces. Give it a try!

2. Paint the puzzle with watered-down acrylic paint. Watercolors would work, but wouldn't be vibrant, and acrylic straight from the tube would be so thick that the puzzle pieces might stick together. Instead, use a paint palette to water down your acrylic paints, and use those to paint your puzzle.

Pro tip: to avoid the colors bleeding together, let an adjacent color dry before you paint right up next to it.

3. Add details with paint pens. Since the acrylics have been altered to behave more like watercolors, when you want to add detail to your painting, you'll want to use paint pens. These are spendy, but they're absolutely terrific for fine work, and you can add tons of detail that you'd otherwise need the tiniest paintbrush for.

After all the paint and glue has dried, the only thing left to do is work your brand-new puzzle!

As you can see, this puzzle is even more fun than working one whose only claim to fame is that you bought it from a store, and the more time that you put into it, the better it can look. I kept mine pretty plain, because my children are heathens and wouldn't appreciate it anymore if I'd spent fifteen more hours on it making it look cute.

You could add a ton more embellishments with the paint pens alone, and there's nothing to stop you from adding even more decorative elements, such as Swarovski crystals, glitter, or anything else that you fancy.

Wednesday, October 14, 2020

September Favorites: Rick Riordan is the New Tamora Pierce

I've been reading Chernow's awesome Hamilton biography since August. I love it, but it's slow going.

September was a strange month for reading! You're not going to believe this, but Will read ZERO Tamora Pierce books in September. She has now simply read every single book that Tamora Pierce has ever published--re-read them all, actually, some of them numerous times, and I guess now she has to wait for Tamora Pierce to write another book or for the passage of time to dull Will's memory of enough plot points to make them worth yet another re-reading.

I did not do a lot of reading, as I spent most of September busy being a raging stress beast and in my free time I primarily ate Cheez-Its while watching DIY, travel, and cat videos on TikTok. But what I DID read?

Um, it was mostly Rick Riordan.

I don't know what to tell you other than Syd's recommendations are spot-on, and Magnus Chase is delightful. I should probably clear off my library TBR shelf a little before I jump into the Lost Hero series, but then off I'll go!

Seriously, though--I didn't even read an Aubrey/Maturin book in September, even though there's one right there on my library shelf! Ooh, I did finally finish the March trilogy, though:

I don't know how you could read this and remain unsympathetic to the struggle for civil rights that still hasn't been won, or read this and still pretend not to recognize the racist extremism that's behind police brutality and systemic inequalities. That's not what our country is supposed to be built on, and John Lewis is a stone-cold hero for what he did to reverse it. May we all be strong enough to carry on his legacy.

Will has recently resumed her best life, as the public library has recently resumed its in-person hours! Patrons are only allowed to stay for one hour, so it's still not the halcyon days of spending an entire afternoon in her favorite chair, reading through a giant stack of books before picking out another giant stack to bring home, but it's enough time for her to breathe in the library smell (corona-free, hopefully...), walk the library aisles, and browse all the library books, before picking out that giant stack of home-reads.

If you look closely at Will's favorites from September, I think you might find a couple of new authors vying for Tamora Pierce's coveted spot as favorite author:

I'm pretty sure Will re-read all of the Wings of Fire books because there was a new-ish one that she hadn't read yet, and you know you can't go into the latest book of a series cold on every single detail of the series so far!

Here's the rest of what Will read in September:

Just between the two of us--I think the library missed her, too.

Recently, I got brave enough to begin again the daily two-mile walk that was my mid-morning sanity saver... until a dog near my turn-around spot started chasing after me and barking and terrifying the snot out of me every time I walked past its yard. I had visions of it hamstringing me and then gnawing on me at its leisure while I twitched in the road and tried to find the telephone app on my phone--have I ever told you that I have literal nightmares of being in an emergency and needing to call for help but not being able to find the phone app on my phone? I know, I know, it's RIGHT THERE on my home screen, and I don't even have that many other apps for it to get lost in, but the anxiety is anxious about whatever the anxiety feels like being anxious about.

Anyway, I finally decided that a daily walk is a much better emotional catharsis than bursting into tears mid-afternoon... so now I just turn around right before the scary dog's house. So I guess it's more like a 1.9-mile walk, but the point is that I have time to binge podcasts again, which is when I remembered that I never did get around to listening to Finding Fred:

I'm only halfway through the series, but so far it's gorgeous. Mr. Rogers wasn't perfect because, you know, he was an actual human person, but he came as close to perfect as I imagine that any actual, human person could.

My favorite YouTube video of September is actually sort of related to Mr. Rogers! Syd found out that in the UK (or rather, in practically every English-speaking country other than the US), the letter Z is pronounced "zed." Obviously, this made her curious to learn if they also change the alphabet song to match.

Reader, they do!

I think it was Will who instigated searching this video out because of something that SHE read, but really, who would ever pass up an opportunity to watch a crow learn physics through hands-on, problem-based activities?

I would happily homeschool a crow any day!

My reading goals for October are to finish both the Hamilton biography and the newest Twilight book that I'm slowly making my way through. The Hamilton biography is taking me forever to read because even though it's super interesting, it's also a LOT, and so I've generally just been reading a chapter or two a day while I drink my morning coffee--the time of day that I'm most prepared to buckle down into Revolutionary-era politics! Midnight Sun, though... It. Is. So. BAD! It reads like fanfiction, a kind of "I'm going to rewrite Twilight from Edward's point of view because he's my favorite and also I'm going to make him a sociopath. Oh, and I'm really going to hit his wealth hard." There are numerous self-serving references to how much money he's got and what he spends it on--fast cars, amiright?--and there's a VERY long scene, early on, in which Edward works through I'm thinking five different very elaborate scenarios for murdering his entire biology class, including Bella.

Like, vividly described scenarios. Of a teenager mass murdering his fellow students and teacher. I'd ask who the hell WRITES that kind of thing these days, except that obviously people can write about whatever they want, but it seems like an awfully strange thing to write about Edward Cullen, the romantic vegan vampire upon whose back the author's entire fortune was built. Just burn it all down, I guess, Stephanie Meyer! 

So even though the book is TERRIBLE I keep making myself slog through it (it's also something like 650 pages?!?), reading the most appalling parts out loud to whoever happens to be near me. OMG like the scene in which, in the middle of the night, Edward climbs the outside of Bella's house, crawls in through her open second-story bedroom window, and sits in a rocking chair across the room from her all night, watching her sleep, listening to her breathe, and smelling her blood. And they don't even KNOW EACH OTHER YET. Okay, I know that Twilight is basically a punchline now, but at one time there were a bunch of girls and women who were sincerely into picking up what Meyer was putting down, this ideal of a dream-boat boy who's got it all and is truly special and happens to be utterly devoted to YOU, you know? And then pop culture came along and laughed at them and shamed them for it, because of course anything that girls and women love must be laughable and shameful, right? And then, after decades have gone by and Meyer is sitting on top of an absolute dragon hoard of money that these girls and women have paid her, she puts out this book that's all, "Ha-ha! I'm in on the joke, too, you fools! That boy you used to love is a sociopathic stalker and when you thought he was being romantic he was imagining how he'd get away with drinking your blood and wearing your skin!"

And do NOT even get me started on how I'm pretty sure that she only made Jacob fall in love with a literal baby because she was pissed that a bunch of her readers thought he was a cuter boy than Edward.