Showing posts with label writing. Show all posts

Saturday, July 3, 2021

Turn a Coloring Book Page into a Postcard

This tutorial was originally published on Crafting a Green World in 2017. 


 Drowning in cute, completed coloring book pages? Here's a fun way to give those pages another life while spreading some joy around. All you need to transform your coloring book pages into fun postcards are: 

  completed coloring book pages. As I've probably mentioned before, we photocopy all of our coloring book pages onto cardstock before we color them, but I've also made a postcard out of a vintage Archie comic book page, at the bottom of the pic, so that you can see how this method will work even with thin, cheap paper. 

  cardboard/thick card stock and adhesive. Adhesive-backed cardstock makes this job even quicker and easier, but almost all of it that you'll find has a texture that means you'll have to write your postcards using ballpoint pen. If you want to use your own cardstock or cardboard, choose a thin, even adhesive for this. I have an emergency can of spray mount (which is not eco-friendly) that I try to whip out only when it's absolutely necessary, but you can use regular glue, if you apply it lightly then press the postcard between pieces of waxed paper with a weight on top. 

 The only thing that you need to do to turn your coloring book pages into postcards is apply an adhesive backing (I do this first, making sure to cover a larger dimension than I'll want, so that I don't have to painstakingly match two perfectly-sized pieces afterwards), then fussy cut your postcard to the correct dimensions. There's even a little wiggle room in postcard dimensions, so you can be sure to capture the perfect part of your graphic. 

 If my kids are going to be using the postcard, I'll flip the finished postcard over and then, with a ruler and a pen, draw the line separating the address from the message, and the lines for the address. Sometimes I'll even ink in a little square for the stamp. If I don't do this, the kids will be sure to run over the space for the address, and it sucks. 

 These quick-and-easy little postcards are especially nice for sending to loved ones who will appreciate your beautiful artwork--I like to build up a stash,  then let my kids use them for thank-you notes and quick messages to grandparents.

Saturday, June 26, 2021

How to Make Postcards from Food Packaging

This tutorial was originally published on Crafting a Green World in 2017.

Save those empty cookie and cake mix boxes! Here's how to make postcards from your empty food boxes. Ones that you can really mail! 

 If you thought that my DIY coloring postcards were easy, then you're in for an even bigger treat, because postcards made from food packaging? Kind of the easiest thing EVER. Seriously, you don't even need a tutorial for this business. All you have to do is grab yourself some cardboard food packaging, the dorkier the better (check out my Funfetti, Friends! I can't tell my daughter no!).

How to Make Postcards from Food Packaging

Cut the postcard to any of the dimensions allowable in the USPS postcard regulations. These regulations call for a postcard height between 3.5" and 4.25", and a length between 5" and 6". Cardboard food packaging already meets the USPS regulations for postcard thickness. 

 As long as your postcard stays within these allowable dimensions, you can play a bit with the edges. I like to round the corners (although if you don't have a corner rounder, which is, I admit, a kind of ridiculous tool to own, it can be tricky to get these rounded corners to look completely even). You can also very lightly scallop the edges of your postcard (check out this postcard of the Grand Canyon to see what that looks like), although be sure that you stay within the allowable dimensions. 


I like to draw a line separating the message of the postcard from the space for the address, and sometimes I like to also draw guidelines for the address and a square for the stamp, just to make it look more balanced. If you have Sharpies or paint pens, you could also embellish the front of your postcard--doesn't Tony the Tiger want to wear a golden crown on his head? 

Friday, August 14, 2020

Crafts for the Apocalypse: Syd's Girl Scout Silver TAP


My kid wrote a book!

For Syd's Girl Scout Silver Award, she wanted to focus on the problem of tweens and teens spending too much time on screens. Syd really enjoys crafts and recipes and likes to follow tutorials to make new creations, so she decided that making a set of craft and recipe tutorials for other kids to follow would be a fun way to encourage them to put down their phones and pick up the cardboard and scissors.

Thus began one of the LONGEST Silver Award TAPs in history. OMG, I had NO IDEA what an involved process this would be, particularly when accomplished by the world's pickiest perfectionist.

First, Syd had to brainstorm and then settle on possible crafts and recipes. Then she had to test each one, discard the ones that she wasn't happy with, and decide on a final line-up. Then she made them all again, sometimes a few times, until she had the perfect process for each one. Then she wrote each tutorial, and went through a few revisions on some of them, because it's tricky to write a tutorial!

Fortunately, tutorial writing is exactly within my very specific skill set. 

Syd sent a draft of her tutorials to our Girl Scout troop to be beta tested, and revised some of the tutorials again based on her feedback. As all this was happening, and for the next several months after the tutorials were finished and polished, she was also creating all the art. She went through several drafts to create an original character to model the finished projects, and then a zillion drafts as she drew each of the illustrations. 

And, of course, the book needed an overarching theme, both for the illustrations and the cover art and title.

Thanks to the pandemic, the entire book became... apocalypse-themed. 

When Syd was FINALLY happy with her illustrations and art, she imported it all into Adobe InDesign and Matt showed her how to do even more edits and make the layout:


When Syd was happy with the layouts, she sent a pdf back out to the Girl Scout troop to proofread, made more corrections based on their feedback, and then made even more corrections after feedback from the MEAN GRAMMAR AND PUNCTUATION MOMSTER. 

Originally, Syd had the idea that she could present physical copies of her activity book to kids, perhaps at day camps or after school programs, possibly with a kit included or possibly in concert with some in-person programming. Obviously that was out, thanks to the apocalypse, so instead Syd created a blog to host free downloadable pdfs of her book, and then promoted it.

Syd still wanted to give out *some* copies, though, so she decided to have a few copies printed and drop them off in Little Free Libraries around town. She wrote a budget proposal and presented it to our Girl Scout troop for the funds, then emailed back and forth with a local printing company to get her order made.

And at long last, Syd had real copies of Crafts for the Apocalypse in her hands!


But only briefly, as off they went into all the Little Free Libraries in town:


I had hoped (and advocated for, and nagged about) the project would be completed and the paperwork submitted before Syd began her public school adventure this week. The paperwork isn't submitted, because apparently none of the brilliant minds in this family are brilliant enough to figure out how to create a multi-page pdf (SIGH!), but the rest of the work is done and the forms are filled out and the essays are written, so perhaps today will be the magical day when the pdf fairy comes down from on high to compile the essays and time logs and forms into one clean and efficient multi-page pdf.

This was the perfect project for Syd, even though it turned out to be way bigger than it needed to be for the Silver Award (the suggested time commitment for a Silver Award TAP is 50 hours; Syd put in over 90, and even then didn't log everything). She got to exercise her creativity, express her love of art and making things, and work through the big challenges of maintaining a giant project independently. 

And of course, the fact that her project concluded with a connection to Will's Silver Award TAP is especially sweet to me.

Now... on to Gold!

Twelve Years Ago: I'm a Wench

Friday, March 27, 2020

How to Make an Easy Felt Travel Journal Holder

You know, for all of that traveling that you're currently (not) doing!

Sigh...

Seriously, though. With all of this home-time and that anxiety ball in the pit of my stomach (I keep offering it a snack, but alas, it's stress, not hunger), buckling down on big projects has turned out to be a decent way to keep myself distracted.

You probably know by now how much I love to travel with my kids, AND you probably know that I generally make them keep a travel journal while we're on our adventures. Letting them pack their own notebook to use as a travel journal, though, generally just means that they're keeping it in whatever random, previously half-filled notepad or sketchbook that they've just happened to come across while packing, and they never remember where their journal is afterwards and they NEVER seem interested in preserving it for posterity.

GRRR!!!

Combine this with the fact that, fingers crossed, my Girl Scout troop has a big tripped planned this summer that we've been planning together for years and no I don't want to think or talk about it right now, and I'd like them to keep travel journals, too, and I've decided that what I need to do is just turn the whole thing into a Big Production.

STEP ONE: When my Girl Scout troop can one day meet in person again, I've prepped this DIY hardback journal activity for us to make together. We're going to use mat board, duct tape, and large-format newsprint that I have in my stash (craft supplies hoarders make great Girl Scout troop leaders!), and the kids can decorate the covers with Sharpies.

STEP TWO: Remember me complaining every now and then about how I have an absurd amount of stash felt? I have SOLVED THAT PROBLEM, and one of the ways that I did so was by making a monogrammed felt travel journal holder for every kid in my Girl Scout troop!

As usual, please excuse the terrible quality of these photographs. This is the fifteenth day of our Pandemic Staycation, and I want to say that it's rained something like 13 of the past 15 days. 
These travel journal holders are absurdly easy to make, and easy to level for different abilities. At the minimum, they require only two straight seams, and you could easily hand-stitch them.

Instead of the satin-stitch applique, you could hot glue the felt embellishments to the cover (or use fabric glue if you want your travel journal cover to be washable).

Instead of the grommet, you could sew two ribbon ends to the travel journal cover's envelope flap.

Here's how I made this set of felt travel journal holders:

1. Make the pattern. Your pattern should be two travel journals + 2.5" wide and one travel journal + 2" tall:


2. Cut out the felt embellishments. I wanted the first letter of each kid's first name on the cover. I'm kind of over the hassle of using my old-school Cricut now that the company took down the design software that supported it (not cool, Cricut!), but fortunately I was smart years ago and cut myself a whole set of my favorite alphabet in cardstock!


OT: I'm definitely in the market for another cutting machine, so tell me if you've got one that you love. It has to have design software that lets me create my own designs, and it can't be a Cricut!

3. Attach the embellishments. Do this before you sew up the sides! The front of your travel journal holder is also the side that has the extra 2.5" length for the envelope flap, so make sure you keep that in mind when you place the applique:


Again, you can glue your pieces to your travel journal holder, or hand-stitch them, but my sewing machine, whose thread tension lately has been concerning me considering the local repair shop is closed for the pandemic and they're also super mean to me whenever I go there, was behaving admirably for a change so I buckled down and satin-stitched fourteen letters to fourteen travel journal holders before it could change its mind.

Don't worry, my sewing machine TOTALLY changed its mind when I started the project after this one, which was sewing 14 cloth napkins. It took me something like 12 cloth napkins to get the thread tension adjusted to a more or less workable level, just in time for me to have to figure it out all over again for my next project...

ANYWAY...

4. Sew the two side seams. I didn't take a lousy photo of this step, because you've seen me sew side seams before. Put the two sides of your travel journal holder wrong sides together, leaving an extra 2.5" on the side you want to be the front, and straight stitch them.

5. Add a closure. The whole point of the travel journal holder is to hold your travel journal, so you have to have a way to fasten it shut so your travel journal doesn't fall out!

I played around with a few ideas, and I'm quite pleased with the one that I finally settled on:


The grommets were maybe a little more fiddly than I should have used with felt, but if you place the grommet well away from the cut end of the envelope flap you shouldn't be able to put more tension on it than it can handle. I did mess up while placing one grommet and it looked like it might tear away, so I hand-stitched around that one and now it's SUPER sturdy.

The elastic is whatever is the most narrow from my stash, cut to twice the width of the travel journal holder, threaded through the grommet, and then tied off. It doesn't put a ton of tension on the travel journal holder, but it will definitely keep everything inside.

Along with the travel journals that the kids will make for themselves, I plan for their travel journal holder to contain one pencil and one pack of 10 fine-line Crayola markers. You can go for fancier supplies if you want, but my travel journal aesthetic has always sort of been rough-and-tumble, sturdy-and-cheap, decent-quality-but-I-won't-cry-if-I-lose-it. 

Now, here's hoping that we have need of these travel journal holders this summer!

Monday, March 11, 2019

Earning the Girl Scout Senior Customer Loyalty Badge... While Selling 1,000 Boxes of Girl Scout Cookies!

It took me YEARS longer than it should have to realize that "Oh, the Girl Scout cookie business badges--you're supposed to have the girls earn them DURING COOKIE SEASON!"

D'oh!

That's why there are the same number of cookie business badges at each level as there are years in that level; girls can earn one badge a year during cookie season, and then earn the financial literacy badges in the off-season.

I caught onto this literally last year (sigh...), so this is the first year that we're doing it properly. During cookie season this year, Syd earned the Cadette Marketing badge (more on that later), and Will earned the Senior Customer Loyalty badge.

And here's how she did it!

Step 1: Show how cookie money helps girls. 

Technically, I think I could have counted this as already completed, since Will helped run the goal setting station at our service unit's cookie rally this year, but she also counted the hours that she worked there for her Service to Girl Scouting bar, and we don't double-dip. 

Instead, Will came up with an even better idea!


Matt helped Will make brochures about her Silver Award to display at cookie booths and to hand out to interested customers. Since she already had the essays that she wrote for her Silver Award application, and the photos that we took of her project, Will just needed to add some text specifically about how she used cookie profits as her funding source.

I really liked this particular activity for a lot of reasons: 1) It's not the same old poster, which teenagers have made a billion of by this age. 2) Because it's not the same old poster, it's a new challenge. I am a MAJOR proponent of practicing all kinds of writing, and writing a brochure is a legitimately useful skill to have. 3) Brochures don't take up a ton of space on our already-crowded cookie booth table, but they're still visible and accessible. And 4) they're a conversation starter for Will when she has an interested potential customer. It's a ready prop and something for her to talk about.

And speaking of conversation starters...

Step #2: Connect with former cookie sellers.

The activity that Will chose for this step is such a clever one: she was to make a list of things that potential customers tend to say (and by the time a girl is a Senior, she likely has a loooong list of these), and then brainstorm replies that are respectful, interested, and engage the potential customer.

Because, as I tell the girls all the time at cookie booths, for a lot of customers the chance to talk to real, live Girl Scouts is half the fun of buying Girl Scout cookies. Sometimes it's old folks who don't get opportunities to interact with kids. Sometimes it's little kids who don't get opportunities to interact with big kids. Sometimes it's lonely folks who don't get opportunities to interact with anyone. And sometimes it's former Girl Scouts who are feeling nostalgic and supportive. So part of the job of selling Girl Scout cookies is representing Girl Scouts in a cheerful, polite, respectful manner.

Unless it's the other two kinds of people who want to talk to real, live Girl Scouts. Because sometimes it's someone with a conspiracy theory in their head who wants to rant at children about Planned Parenthood or "America's Obesity Epidemic," and sometimes it's someone who shouldn't be around children, so it's good that we're all at least standing by the check-out lines in public and with at least two adults right there watching everything. For the former folks, I've told the kids to just look at them and smile and let them rant, because you don't have to say a word if someone's not even asking you a question, and for the latter folks, I told them that if one more person tries to pat them on the head or the shoulder, that they should jerk back and scream like they'd been scalded. 

Seriously, don't touch the Girl Scouts. High fives and fist bumps are acceptable, although frankly, after all the lectures that I've also given the children about how dirty your hands and money are, they'd really rather you didn't touch them at all.

ANYWAY, let's get back to the nice people who just want to buy some cookies while getting to talk to a real, live Girl Scout, mkay? For this activity, Will thought up things that potential customers tend to say to her, particularly things that particularly flummox her as to a reply.

Things like: I used to be a Girl Scout when I was your age!
Or: My sister was a Girl Scout.
Or: Wow, cookies sure were a lot cheaper 20 years ago.
Or: It's too bad you don't have blah-blah-blah cookie anymore.

When people say things that aren't directly related to the transaction, that's them trying to open a conversation, and the way to respond politely (as well as to inspire customer loyalty!), is to continue the conversation by asking an interested, relevant question. But that can be so hard in the moment, so Will thought up several ways to respond to each of her common customer prompts. She realized that she could ask people who used to be Girl Scouts what their uniforms looked like, or how many cookies they sold each year, or what their favorite badge was. When people comment about the cookies themselves, whether they're complaining that they cost more these days or that they don't have the best flavor anymore, she could ask them how much cookies used to cost, or what their favorite type of cookie used to be, or if they prefer fruit flavors over chocolate, or... anything, really. Just something that sounds interested and is relevant. That's the lesson.

3. Build your customer list.

So here's where the badge went off the rails a bit. The badge book wants girls to collect email addresses, so that in Step 5, you can start a year-round newsletter. 

I mean, really?

Consumer privacy is important. I don't let my girls give out their names and email addresses to businesses, and I sure don't want them collecting other people's names and email addresses, either. I really didn't have any ideas for how to help Will attain this step, so I threw it at her and she decided to do the activity suggested on her Digital Cookie site, which was to gain five new customer emails and send them a Digital Cookie link. She asked her grandmother, who came through with the names, and that was that done. I guess the lesson turned out to be networking, because she'd never thought to ask her grandmother for potential customer contacts before, and a couple of those contacts DID end up buying cookies, so there you go.

Just... no email list of strangers, though. Yikes.

4. Create a customer appreciation program.

This step was dead easy, because I always have the girls write thank-you notes to their Digital Cookie customers and any other customers that they know personally. It's a nice chance to remind the girls that many people who buy Girl Scout cookies do so not for the cookies, but for the girls, and it's nice business writing practice. 

5. Keep your customer connection going all year long.

Since I've already established that I was not going to permit my child to make a year-round customer newsletter, she needed another activity that would remind her customers about Girl Scout cookies--and the good feelings that they get from cookies!--outside of cookie season.

Will settled on the idea of sending a Girl Scout cookie-themed Christmas card, again to the customers whom she knows personally and to her Digital Cookie customers. She mapped out a couple of ideas by hand, and then Matt helped her make the final project.

Did you know that the best way to get a good image of a Samoa is just to photograph it yourself?


We haven't had these Christmas cards printed yet, but here's the finished design on my computer:


Aren't they super cute? Will decided on postcards because they're cheaper, so the back side of each card will just have a brief handwritten note and a reminder to save the date for cookie season.

I think the timing will work well for these cards, since our Girl Scout cookie season does come just a couple of weeks after Christmas. There were also a lot of interesting design challenges that Will had to figure out in the making of these cards, and since Matt helped her, she learned a lot about the graphic design and production process.

I had a lot of doubts about parts of this badge, and not a lot of great ideas about how to work around the parts that I didn't like, so I'm thrilled at how well everything actually worked out. Will faced some appropriate challenges and learned new skills, practiced writing to different audiences, developed her social awareness, and grew as a businesswoman. 

And she got our Christmas cards all figured out for us for this year, so that's a bonus.

Wednesday, January 23, 2019

Hera Jones and the Megalodon: Earning the Girl Scout Cadette Screenwriter Badge

The Girl Scout Cadette Screenwriter badge has so far been the easiest Girl Scout badge for a girl to earn independently. It's a terrific creative writing experience, and one that I felt very little need to add extra enrichment activities to. Syd enjoys writing, and so she read the badge activities herself and followed along, doing the necessary research along the way to come up with a pretty authentic-looking screenplay.

I should have suspected what was to come when, during Step #1: Decide What Makes a Good Script Good, Syd chose to watch the Jurassic Park movies for the activity "Watch one movie or three shows in your favorite genre." To be fair, though, our whole family loves dinosaur movies, AND loves killer giant animal movies (we've also all seen all of the Jaws movies together, even the super terrible ones), so it's pretty typical for us to watch one or another of the Jurassic Park or Jurassic World movies for funsies.

Dinosaur-shaped chicken nuggets are generally not optional. We're classy like that.

After that one step completed all together, Syd insisted on working on the rest of her screenplay alone. I wasn't allowed to read any of it until it was finished. Much as I love making sure all those participles don't dangle and those plurals form themselves correctly (oh, the frustration of that tricky "y"!), I love it even more when I get such a pure, unadulterated look inside my child's big, big, BIG imagination.

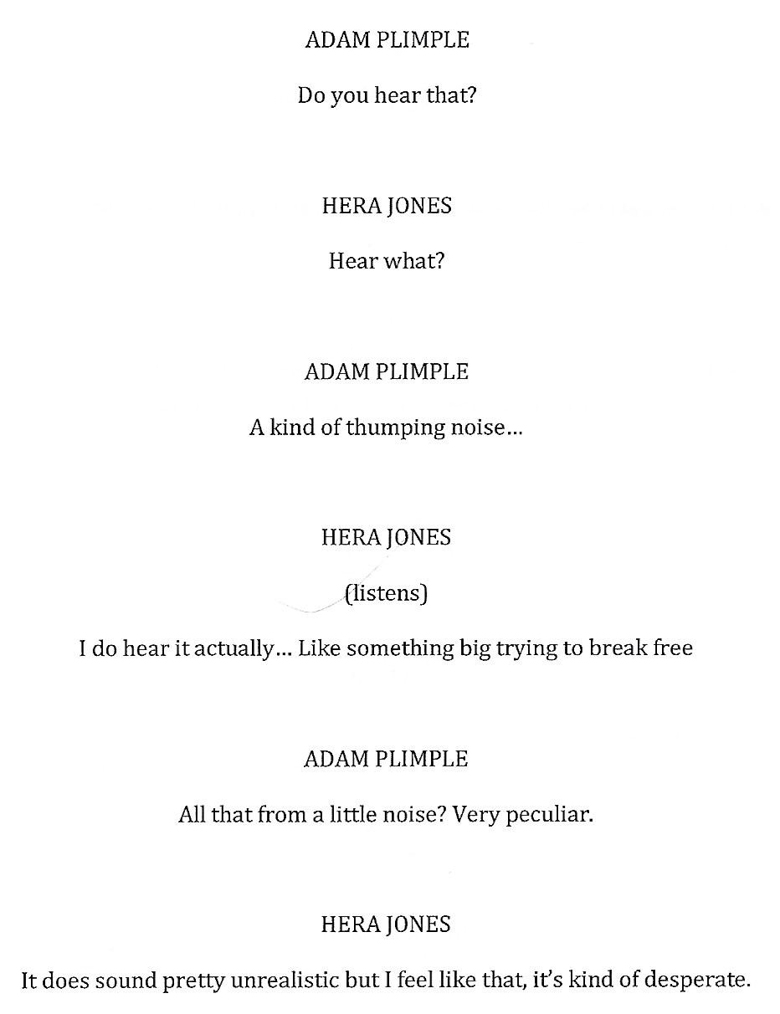
Let's all look together at excerpts from Hera Jones and the Megalodon, shall we?

Just for fun, we begin with a little bit of sexism and some good ole divorce humor...


And then there's a little bit about the assistant, whom Hera Jones HATES, although that could possibly be because the assistant is competent and Hera Jones is the kind of woman who breaks science like it's a brittle, 65 million year-old T. Rex skull.


That last aside, you guys? THAT'S what you call foreshadowing.

What, by the way, IS Hera's job? At this point I still have no idea, other than that it may involve "fossil research" and, as we're about to learn, it includes tools and a boat.


Okay, now we're going to learn why Hera hates the assistant, Miss Kraken--she's super weird and kind of crazy and really mean.


Miss Kraken, though, right?!? Great name!

Okay, still don't know what Hera Jones' job is and where it's located, but this boat ride is pretty long, and now they're apparently, I'm told (that dratted tricky "y"!), sailing through a storm.


In case you're wondering: yes, this level of snark IS modeled in our family on a daily basis. Also, things are about to get exciting.


I skipped a page that consisted solely of Hera and a professor sniping at each other, but I guess that I shouldn't have, because here he is again!


Okay, they're researching and island! And here they are! Yay! And Hera rescued Professor Plimple but she still seems to low-key hate him.

So they're walking around in a cave now. We'll just assume they can see. 


We're going to have to figure out some kind of filming technique to represent the passing of time. Actually, it looks like we're about to have to up the special effects budget by a LOT.


Well, the good news is we'll be able to stop paying the actor playing Professor Plimple...

Also, I haven't played D&D with Syd before, but I'm clearly going to have to introduce her to the Chaotic Neutral alignment, because Hera... hmmm.


Ah, here are where Hera's fossil research skills are going to come into play!


Action scene!


I love Hera's assessment about what it takes to succeed in the fossil research business. I do know a few paleontologists, though, and I must say that yeah, showing up riding a megalodon probably would be a sure-fire way to get noticed.


And... back to work!


You'd think Hera would want to get a little rest before going off on her next adventure, but she did promise the Head Researcher that she would do a good job, you know.


Syd has also never seen Knight Rider, but we're a little bit in Knight Rider territory here, what with all of her adventures taking place conveniently in or near bodies of salt water. 

Whatever. Everyone loves a big-budget fight scene, regardless of how much sense it makes.

So I'm a little confused about what's going on here--I think she's just riding the megalodon around the open ocean?--but I highly approve of the addition of the US Navy to the proceedings:


Okay, you guys, I'm going to warn you: to earn the Screenwriter badge, a Cadette has to write a 12-page screenplay. And we are about to reach the end of page 12...


And now we're on page 13. How many tweens do YOU know who will willingly write more than the required number of pages? Prepare yourself, Friends.


And thus end the adventures of Hera Jones and the Megalodon.

I think that was a Girl Scout badge well earned, don't you? Syd learned how to compare/contrast films within a single genre, she researched and then utilized the writing conventions of a screenplay (which is great practice, by the way, for writing anything with structured requirements, from a business letter to an answer for an essay question to a public speech), and she wrote a complete piece of creative writing, juggling multiple characters with different personalities, incorporating plot and a story arc, and using necessary details to convey scene changes and action. She visibly grew in confidence during this process, and she and I are both quite pleased with her accomplishment.

Often, the Cadette Screenwriting badge is paired with the Cadette Digital Movie Maker badge; Syd hasn't shown much interest in this, but don't you think that Hera Jones and the Megalodon would make an awesome animated short film?!?

I do!!!

I'm going to encourage Syd to consider that, but regardless of her choice, we'll definitely be doing a couple of visual art extensions of this project. I love this tutorial for creating a movie poster, and I'll be using it for Syd's art lesson one week. For another art lesson, we'll discuss and look at storyboards and Syd can storyboard a couple of her scenes.

We didn't use many additional resources for this badge, but here are three that I found helpful:


I definitely recommend looking at some real screenplays to give your writer a visual example of what she's meant to be doing.

And now, onto the Cadette Marketing and Robotics badges and the Think Like a Programmer Journey!

Monday, July 23, 2018

8 Grammar Extension Activities for Late Elementary and Middle School Kids


What a fun title, right?

Except that grammar IS fun, or at least there are plenty of games and activities that can make it fun.

The point of adding grammar extension activities even to a packaged grammar curriculum is that it's unfortunately easy for a kid to master the format of the way that grammar exercises are presented in their curriculum, but not be able to translate that to "real" sentences in the real world. That's why I dropped First Language Lessons--the kids could easily complete the exercises in the books, but couldn't diagram the simplest sentence that I wrote for them if it didn't follow the formulaic pattern that it always did in the book. Analytical Grammar is working MUCH better, fortunately!

These grammar extension activities, then, are (mostly) fun, but most importantly, they get a kid to think about grammar in different contexts, with different types of sentences in different situations, than they tend to see while doing their regular grammar work. The kids like it because they get to do something different, and it generally brings some other skills and activities, like creative writing or problem solving, into the mix.

I don't have as many of these activities as I do, say, for math enrichment, because I tend to offer these grammar extension activities more like monthly rather than weekly, but most of these have more playability, too, so we can do them over and over rather than finding something different every single time, like I also do with math. But here are some of the kids' favorites:


I made my own Cards Against Humanity-type game by writing a series of independent clause cards and coordinating conjunction cards. To play, as a group we draw one independent clause card and one coordinating conjunction card, and then we each complete the sentence with our own made-up independent clause.


It practices the grammar of compound sentences, as well as handwriting and creative writing, and it's the most fun of all of our grammar extension activities!


Grammar Board Games


This particular board game, Grammar Scramble, is out of print, but there are actually a ton of grammar board games around that you can try out.


 Grammar Scramble works well because it provides some scaffolding to build basic sentences, but you can also extend them in a ton of ways to earn yourself more points, so there's built-in incentive to unlock the patterns of grammar.

Daily Twitter Grammar Exercises

These Daily Grammar Workouts on Twitter are fun because the results are compiled via poll, so you can participate or just check back later to see if you agree with the winning answer. The topics vary, too, so you might find a review of something previously learned, or something all-new to discuss.


Homeschooling doesn't mean that you can't play group games! If you're part of a co-op or just know some other kids who are at the same grammar level as your kids, you can get them together and play this fun grammar-themed version of Quidditch!


I really like the idea of these popsicle sticks, because they're manipulatives that you could use for several years over several levels. Kids could self-generate words for the sticks, or write their current spelling words. You could label them, or build sentences. There are so many ways to use a controlld vocabulary!

Mad Libs


Oh, my gosh, there are so many Mad Libs books and games, and the best part is that kids choose these themselves, as leisure time activities, because they're fun! We did Mad Libs both to and from Dayton, Ohio, last month, as Syd's choice of activity, and the only quibble that I had with it is that every time Syd would say "word ending in -ing," I would correct her with "gerund. It's a gerund. Why can't they just say 'gerund?'"


The basic set-up is very simple, but the beauty of these dominoes is that you can add parts of speech and word examples to extend the game. 

Linking Verb Chain

I don't normally think that you need to memorize all the words of a certain part of speech, but if a kid is feeling really not confident about a particular part of speech, it can help! Here's an example of memorizing linking verbs, and in our homeschool, I had the kids memorize prepositions a few years ago. They've lost it now, but at the time it was valuable for them to have all the examples memorized when they were having trouble using logic to identify prepositions. Now they can identify prepositions using contextual clues, so don't need to have them memorized.


Most grammar activities are basic and geared for the very young learner, so I'm always on the lookout for activities like these, that explore more advanced concepts and are fun for older kids. If you know of anymore great ones, pretty please let me know!

P.S. Want a ton more homeschooling resources and ideas? Check out my Craft Knife Facebook page!

Monday, May 21, 2018

Adventures in Bullet Journaling

I am very much the person who writes things down, if you haven't already noticed, ahem. I have, after all, apparently been keeping very detailed--and very odd--to-do lists for upwards of twenty years, and they've always included other bits and bobs, such as story ideas, lesson plans, diagrams of weird things I want to build, itineraries for trips I haven't (yet) taken, etc.

So why on earth add one more blank book to my backpack?

To keep my book list in one place.
To have a place to plan my garden.
To track my hikes.
Travel journaling!
Noting something nice, or something important, that happens each day.
Tracking all the cities, states, and countries I've visited.
Movie reviews.

I've been using Beyond Bullets (which I received free from a publicist) to give me inspiration, and this Grids and Guides book (which I also received free from a publicist, but that was literally back in 2016 so I don't think it counts anymore--oops!). I really like both of these--Beyond Bullets is better than just looking through Instagram for inspiration, because it has more hand-holding, and a LOT more ideas to look at all at once, and the Grids and Guides journal has several different types of page grids so that you can do some really different layouts, or just experiment with all of them to see what you prefer.

I've been working on my bullet journal for about three months now, and here's what I have so far--and what's working and what is absolutely NOT!

Here's my list of books that I've read, and the date that I completed each one. I do NOT love how it looks:


I wanted it to look like a bookshelf, with the book titles looking like books, something like this bullet journal or this book tracker, or this one. I didn't do it right, though--it turns out that if you try to draw books as if they were rectangles then they look like rectangles, not books. I also wanted to be able to include a sentence to remind me about each book, but I don't have room to do that with every book using this format.

BUT I really like the look of the bookshelf!

I'm going to continue filling this page out the way that I started, but I'll hopefully have come up with a better idea by the time the page is full.

I took this calendar format from Beyond Bullets, and I LOVE it!


This was a big win, because it's exactly what I wanted to be able to record, and it came out looking great, too. I wanted a way to keep notes when I travel, but there's no space for that in my planner. This calendar format is really good for it, however--I still have to be thoughtful about what to include, so it keeps it to the highlights. I kept this travel journal partly during our Spring Break trip to Nashville, finishing writing up the last couple of days at home.

I also really like this travel journal with the route marked, and this one with the photos. The kids own that instant camera, but aren't in the habit of taking it on trips. I do not need one more thing (or to pack one more thing!), but I super want one of those travel photo printers.

I often look back at my planners from previous years to see when a particular event usually takes place, but I like the idea of keeping these seasonal calendars to keep track of overarching activities:


I'm going to have to move that Girl Scout outdoor badgework to April or early May next year, though--in the space of a week in mid-May, the temperatures went from the 40s to the upper 80s, and I'm not sure they're coming back down until the fall. Sigh...

I wanted to keep track of the fun things that we do as a family, and I saw several cute "quilts" for that in Beyond Bullets and in other journals on Instagram, but I don't think it's going to work for me:


I don't think I'm going to use the bullet journal for things that I have to keep track of every day, although there are things that I would like to track every day. Ah, well...

Here's another useful layout that I've made, though--my garden!


It's a work in progress as my garden comes together, so I've only got down what I've actually got placed and planted so far. The penciled squares represent some perennial herbs that I don't want to move (and can't identify...), so I'll likely build more rows aligned with them when I plant the rest of my veggies. I want to include information and instructions, but I can already tell I won't have room, so perhaps I can tape seed packets to the facing page, as well.

I expect this page to be super helpful, because by the next year I've forgotten much of what I did in the garden the previous year--I'm sure, for instance, that last year I knew the names of those herbs!


Here's another layout idea that I got from Beyond Bullets, and it is my favorite thing ever:


It's a map of all the states that I've visited! I printed a one-page map of the US from Megamaps (I have used that site all the freaking time since the kids were toddlers!), and used my graphite pencil transfer method to transfer the map to a double-page spread in my bullet journal. Then I used Prismacolor watercolor pencils to color in all the states that I've visited. I only count states if I actually did some sightseeing in them, and I don't count them if they were just drive-through states, so that's why there are some weird gaps. I've definitely been in Idaho and Nebraska, but I didn't stop unless it was at a gas station or motel, so they don't count.

I'll be coloring Maine in later this summer!

I also want to add a map of the world where I can color in countries I've visited, and maybe one of North America where I can draw in roads and highways, because I think it would be interesting to see my various vacation routes over the years.

I have a ton more pages in my journal, and a few ideas for more pages to add. I like this layout for movies that I've watched, and this menstrual cycle tracker, and a bullet journal-sized circular perpetual calendar where I can put birthdays and holidays. I'm also in a Facebook group for parents who use bullet journals for homeschooling, but I haven't actually thought of any way to do that for myself, yet.

Got anymore ideas for me?