Showing posts with label recycled crafts. Show all posts

Saturday, February 12, 2022

How-to: DIY Color Viewers


This tutorial was originally posted on Crafting a Green World in 2015.

Got a kid who's in love with color? These DIY color viewers will help her see the world in a whole new light! 

These color viewers are a project that is suitable for a wide range of ages. Toddlers and preschoolers will incorporate them into their sensory play, while older kids (who do still love their sensory play, of course!) will be able to use them for a variety of scientific observations and experiments--colored shadows, color mixing, the properties of light, the properties of the eye, etc. 

 Also? They're just plain fun! 

 Here's how to make your own set of color viewers: 

  1. Gather ample cardboard to upcycle. You'll need two pieces of cardboard for each color viewer. I have a horrifying collection of used shipping boxes that I was pretty thrilled to raid for this project, but cereal or cracker boxes, moving boxes, or my most common go-to, cardboard record album covers, will also work well. 

  2. Cut cardboard to size. This size will depend on the size of the cardboard pieces that you're using; to minimize waste, I cut my cardboard to the largest size that I could--about 5.25"x8.5". Cut two pieces for every color viewer that you want to make. 

  3. Cut a window into the cardboard. Measure 1" in on all sides, and cut out to make a frame. 

  4. Cut the cellophane to size. As with my DIY 3D glasses tutorial, it's the colored cellophane that really makes this project. Measure the window that you've cut into the cardboard, then cut each piece of cellophane, one per color viewer, 1" longer than that measurement by both length and width. 

  5. Glue the cellophane to one cardboard frame. Lay one cardboard frame wrong-side-up (for instance, I put the outsides of my scuffed and labeled shipping boxes to the inside of my viewers), then run a line of hot glue along the entire perimeter of the window. Carefully center and set the cellophane down over the window, and press in place. 

  6. Glue the second cardboard frame to the first. Run another line of hot glue around the frame, then center a second cardboard frame and set it down on top of the first, right-side-up. These color viewers are sturdy enough for even toddler play, but if you've got a smaller kid who still likes to gnaw, you'll probably want to cover the outside edges of the cardboard frame with clear packing tape so that the kid's saliva doesn't soften and wear away the cardboard. 

Older kids will mostly do this, though: 

 Then she looked at her sister through it, informed her that she was green and therefore made of puke, the sister screamed in outrage and began to chase her, and I might have possibly gone inside and locked the door.

Tuesday, December 28, 2021

How to Make a Display Board from Upcycled Girl Scout Cookie Cases

This tutorial was originally published on Crafting a Green World in 2017.

 Kids and their display boards, amiright? Science Fairs and History Fairs and Biography Fairs and 4-H presentations and I can't even imagine what else, just that it all requires a display board. 

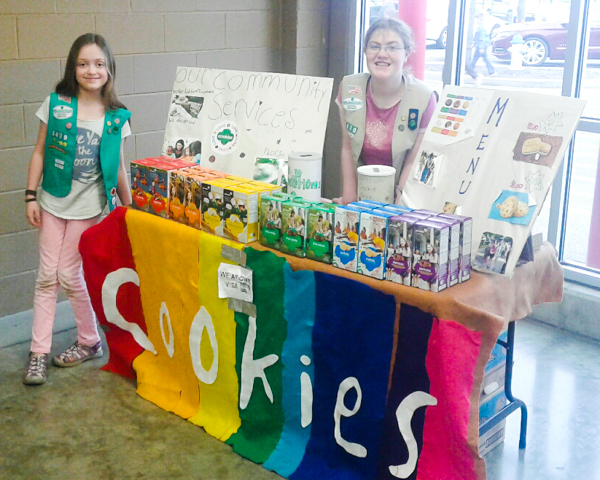
 Years ago, I made the kids re-usable tri-fold display boards, some out of chalkboard and some out of dry erase board, and we LOVE them and use them for all of our academic fairs. We used them for two years of Girl Scout cookie booths, as well, but this year, with a super-motivated troop of Girl Scouts whose collective goal was to sell at multiple booths every weekend all season, I deeply desired something lighter and more portable, something a kid could easily carry three of at a time. The display would need to stand up independently but also fold flat for storage. Oh, and it had to be upcycled, because obviously. 

 Fortunately, I have LOADS of supplies available, what with the hundreds of Girl Scout cookie cases that are now in my house. This tutorial calls specifically for Girl Scout cookie cases, but you can substitute any type of shipping box that you have on hand, if you're creative with your modifications.

 You will need: 

  three Girl Scout cookie cases. It doesn't matter which type of cookie you use (I mention this because the box is a different size for each type of cookie), as long as you use at least two of the same type. 

If you don't know a Girl Scout, call your town's Girl Scout office or just pop by a Girl Scout cookie booth in progress and ask--they will undoubtedly be THRILLED to pawn off their empty cases on you so that they don't have to deal with them themselves! 

  duct tapeDuct tape isn't super eco-friendly, but it IS the best tool for this project. When you're ready to recycle your display board, pull the duct tape off and throw it away. 

  cutting mat and box knife. You don't even need a ruler for this project!  

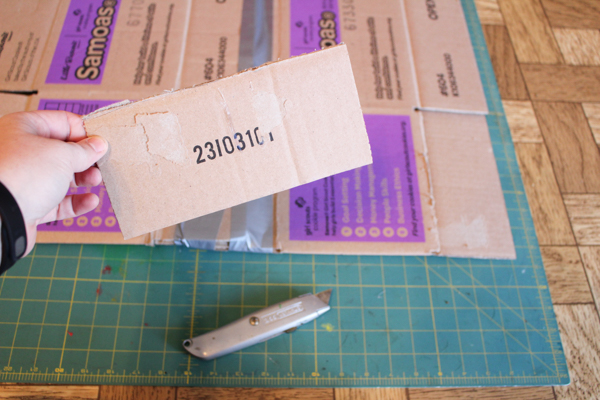
1. Break down two Girl Scout cookie cases and overlap them. In the image above, you can see that I'm overlapping them about halfway across the flattened top flap. This is enough overlap to give the join strength, but I've avoided overlapping them at a fold to keep the display stable. Duct tape the join. 

 2. Cut off one flap. Decide which side of the display will be the front and which the back, and then cut off one of the flaps from the backside. Use your box knife to cut this flap in half, lengthwise, so that you've got two long tabs. Set them aside. 

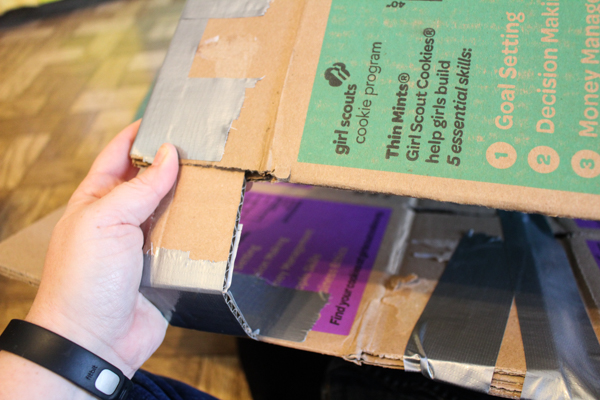
 3. Flatten the third box, then duct tape the long sides of the flaps at one end together. Check out the image above for details--don't tape up the bottom! 

 4. Center the third box on the backside of the display board, aligning the crease line just above the flaps that you duct taped in Step 3 with the bottom of the display board. Take another look at the image for Step 3 to see what this looks like. Duct tape the top of this third box to the back of the display board, but only along the top side. Look at the above photo to see how I've taped across that join on both sides of the flattened box, then taped down to give it more security. This entire flattened box should now be able to work like a hinge. Fold the flattened box along that lower crease line until it's easy to do so. 

 5. Duct tape the tabs to the bottom of the display board. Center each tab on that flap from the third box that you've taped the sides of--the idea is that the tabs will insert into those flaps to stand the display board up. 

 Again, duct tape each tab on both sides to make each a hinge, then support each with another couple of pieces placed perpendicularly. These tabs will get a LOT of wear! To assemble the display board, insert each tab fully into its slot:

 Your display board should then stand up on its own!  The kids in my Girl Scout troop covered the front of each display board with newsprint, then decorated it to make their displays. 

This technique would work well for a one-time display, but the paper got torn up WAY before cookie season was over--although the display boards themselves are still going strong! Next year, I'll direct the kids to sturdier embellishing materials. Feel free to send me suggestions for what to use in the Comments below!

Saturday, December 4, 2021

Make Sea Glass in a Rock Tumbler

This tutorial was originally published on Crafting a Green World back in 2016.

Yes, you can 100% make sea glass in a rock tumbler. It's super easy, and it comes out straight-up looking like sea glass. 

Here's how to do it.

How to Make Sea Glass in a Rock Tumbler

You will need: 

  rock tumbler. You want a good-quality metal one, something along the lines of the Thumler's Tumbler that we own. Good rock tumblers are pricey, but they make a great gift for a science-minded kid, so much so that if you don't have a science-minded kid of your own, someone you know probably has one and may in fact have a rock tumbler that you can borrow. 
  filler. This takes up the spaces between the glass pieces. You can use either ceramic media or plastic beads, both of which can be re-used. 
  coarse grit. Unlike rock tumbling, which requires coarse grit, fine grit, pre-polish, and polish, making sea glass in a rock tumbler only calls for coarse grit
  broken glass. You don't want anything too thin, like microscope slides, because the rock tumbler will abrade it so that it's too thin to be useful. I had great luck with vintage glass bottles, however. 
  hammer and towel. Gotta break that glass somehow! 
  tile nippers. These aren't necessary, but if you want to shape or trim your glass at all, you need them.

 1. Break some glass. As I mentioned before, I'm using vintage glass bottles to make sea glass, because that's what I have a million of and need to find more things to do with. I'm primarily choosing either the glass bottles that were broken when I found them, or that are of unimportant provenance. I clean up and polish the nice vintage glass bottles and display them around my house, even though I've frankly got too many of those, as well. 

 ANYWAY... my preferred method of breaking a glass bottle is to wrap it in a towel, set it on my driveway, then whack it with a hammer. From the mess of broken glass, I pick out the nice pieces that I want to tumble. I really like bottle necks and bottle bottoms (ahem...), and also the side pieces if they've broken into a shape that I think will look nice when tumbled. 


 Use the tile nippers to trim a piece of broken glass into a more interesting shape, or chip off the edges around a bottle's bottom. 


  2. Set up the rock tumbler. Use these instructions to make your tumbled glass. Note, however, that the instructions explicitly tell you not to use glass bottles. My experience is that you can, although you still want to avoid any glass that's too thin. A Coca-Cola bottle should work. A spaghetti sauce jar probably won't. 

 3. Check your work. When you open up your rock tumbler after five or so days, the inside will look like this:  


Instead of sifting out the tumbled glass, I pick it out of the matrix and examine it. A couple of times, a piece has cracked and needs to be set aside. Sometimes, a piece is perfect just the way that it is and I love it. Most times, though, the tumbled piece is almost perfect, but still needs some refining. For that, get the tile nippers back out. 

 For instance, after examining that bottle neck in the above photograph, I decided that I'd like it better if it was trimmed even closer to the edge, so I did: 


 4. Go for round #2. Pop any glass that you've trimmed, and enough new pieces to maintain the level in your tumbler, back into the barrel with the same grit and filler material. Give it a go for another five or so days, and then take a look. 

Repeat until you're happy! 


Sunday, November 28, 2021

DIY Washi Tape with Upcycled Materials and Simmering Holiday Resentment

 I ran out of washi tape this week, smack in the middle of trying to get out a bunch of Pumpkin+Bear orders (all of which are packaged using washi tape!).

I really didn't want to go out and face the post-Thanksgiving shopping hordes just so each of my packages can contain its customary three inches of washi tape, and also I'm very much deep in the Consumerist Pit of Despair at the moment, fueled by having done almost all my holiday shopping and OH MY GOD WHY DO THINGS COST MONEY?!?

And then I remembered "Syd's" sticker maker...

In the photo below I've got a wallpaper sample, comic book page, and scrapbook paper, and Syd's Xyron has the Permanent Adhesive cartridge installed:

I squared up each piece, then cut them into quarter-inch strips:

It actually made a lot!


I'm currently storing them in a binder clip tacked to my study wall, and I'm very curious to see how long they last before I get to try out some new papers:

I've just noticed all the washi tape of years past on that wall, lol!

Alas, I finished packaging all my Pumpkin+Bear orders before I had the idea to upcycle ephemera into washi tape (but do not be sad, because I used my favorite measuring tape tape to package my orders, instead), so I couldn't test drive my brand-new washi tape on the packages.

Fortunately, that Pit of Consumerist Despair that I'm wallowing in DOES mean that I've got another very important use for DIY washi tape!


Also, Matt committed my #1 Co-Parent Gift-Giving Foul: when I thoughtfully informed him of the latest Christmas gift that I selected and purchased and wrapped for our children (the one in this photo, actually!), his response was NOT "Thank you so much for this burden of emotional labor that you are lifting, and for the magical memories you are ensuring for our precious children. I've also been thinking about what gifts the kids would like, and my contributions will be wrapped and ready for the tree soon, with their recipients and dollar amounts recorded in the Excel spreadsheet so we can make sure we're under budget."

Nope, instead he wrinkled his nose and replied, "Where are we going to put THAT?!?" He insists that this question, asked whenever I come home with any object, whether it's a refrigerator box or a roll of washi tape, is asked purely for informational purposes, but you and I both know the truth. You and I also both know that from now on, there's only one person in the house who's going to know the contents of 99.9999999% of the Christmas gifts under the tree this year and Matt can be just as surprised as the kids to see the presents that they open.

And THEN he can figure out where we're going to put them!

Saturday, November 6, 2021

How to Make Reusable Chalkboard Gift Tags

This tutorial was originally published on Crafting a Green World in 2016.

Make reusable, DIY chalkboard gift tags for all of your holiday gift wrapping adventures!  

Okay, I DID find just one more cardboard record album cover craft to make with my scraps--reusable DIY chalkboard gift tags! These reusable DIY chalkboard gift tags came together in just minutes, from the scraps leftover from making my latest batch of album cover bookmarks. I'll be pretty excited to have them already in hand when the gift-giving season really starts rolling, and since they have a chalkboard side, we can use them over and over again.  

You will need: 

  cardboard. The base of these gift tags is an interesting piece of cardboard, upcycled from anything that you like. Record album covers are great, of course, but so is the cardboard packaging from your favorite foods, or perhaps even old calendar pages. 

  chalkboard tape. The reason why this project is so quick and easy is that a few months ago, I found a roll of chalkboard tape on sale, and I bought it even though I didn't have a project in mind for it (my husband haaaaaates when I do this, by the way, but look at that tape now, Matt. LOOK AT THAT TAPE NOW!!!). 

You could experiment with chalkboard paint instead, but my intuition says that it will warp your cardboard if you're not super careful. 

  chalk markers. Chalk markers will enable you to write messages on the gift tags that won't rub off. When you're finished, wipe it off with a damp cloth and it's ready to go again! 

  scissors or gift tag hole punch. I have a gift tag punch that I use for lighter materials, but it won't cut through record album cardboard. Anyway, it's cuter to freehand around fun images.  

To make these tags, simply cut out a rough outline of your graphic on your cardboard, then back it with the chalkboard tape. 

Having done that, you can cut out the exact outline that you want, cutting through both cardboard and tape at the same time for perfectly clean edges. 

 Punch a smaller hole for hanging at the top of your gift tag, then write your chalk message on the back.

   My only worry, now, is that the older of my two kids will wash off all of her sister's tags and write her own name in, instead. Fortunately, she's also my kid with messy handwriting, so I *should* be able to tell...

Tuesday, October 26, 2021

DIY Cardboard Minecraft Heads Make an Easy(ish) Halloween Costume


You remember how much the kids used to love Minecraft, right?

Well, turns out they still do. Honestly, I think most of their play these days involves hanging out with their buddies on their servers, rather than mining and crafting, but I guess there's nothing like a global pandemic to highlight the benefits of a social, virtual, sandbox game.

Minecraft is also a pretty good source of Halloween costumes! The heads are simple constructions with easy-to-add details, and those heads are so notable that you can pull together whatever clothes you've got on hand for the rest of the costume and it still looks fine.

For these two Minecraft costumes, I drove over to the county recycling center and liberated an absolutely massive cardboard box from its path to the cardboard dumpster. It was large enough that each kid could cut her Minecraft head from one of the box's original vertices, giving her three good edges and one good corner as a head start.

I measured each kid's shoulder width, and that was the length of each side of her cube. The kids cut each face to be that measurement squared, then assembled them into a cube using copious amounts of duct tape (good thing they did this project BEFORE Syd and I made her a duct tape dress form, because now we no longer have copious amounts of duct tape!). 

The kids primed their cubes, then each used a ruler and pencil to mark out each face of their cube into an 8x8 array.

Then they painted!


When the painted heads had dried, each kid measured the circumference of her head, the cut a hole in the bottom of the box to fit. Pop the box on, and you're a Minecraft character!

Left to its own devices, the cardboard box shifts around alarmingly on one's head, so each kid engineered her own solution to make the head wearable. Syd made herself a head brace out of cardboard, bamboo skewers, and hot glue. 

Will just stuffed a blanket into the top of the box. Honestly, Will's one-second method worked better than Syd's painstakingly-crafted method, as Syd's brace gave way halfway through our weekend trick-or-treating event and she spent the rest of the time just holding the box under her arm like a Minecraft Headless Horseman.

Will also made her eye holes bigger, so it's also possible that she simply didn't care when the head shifted around:


The real winner of our trick-or-treating event, however, was Luna! I followed behind the kids with Luna, not trick-or-treating (but still wearing my DIY Hogwarts robe, of course!). Several times, someone handing out candy approached me and asked if they could give Luna a treat. And she wasn't even in costume!

Luna scored a few dog biscuits and an entire bag of dog treats, but the real prize was this genuine pig ear:


Luna was delighted with it, but because I had to keep the kids in sight, I refused to let her lie down with it immediately and start leisurely munching like she wanted to.

As a compromise, she simply carried it around in her mouth for the whole time we trick-or-treated, looking absolutely adorable and charming everyone who saw her.

Saturday, October 9, 2021

Make a Folder from a Cardboard Record Album Cover

This tutorial was originally published on Crafting a Green World in 2016.

You're going to have the coolest school supplies on the planet when you make yourself an upcycled folder from a cardboard record album cover.  

Cardboard record album covers are perfect for this project--they're a little sturdier than your regular dime a dozen cardstock folders (which is a good thing!), but still light and easy to carry, and their prominent graphics both recall the look of your favorite themed folders and are unique to your own old-school interests. 

Seriously, where else on the planet am I going to find a Simon and Garfunkel folder for myself? 

 Tip: To find cardboard record album covers to upcycle, check out yard sales and thrift stores. People barely know how to properly store records anymore, which means that a lot of the ones that you can pick up on the cheap have been mistreated and are now completely unplayable. Unplayable records are records ripe for upcycling! 

How to Make a Folder from an Album Cover

You will need: 

  cardboard record album cover. You'll need one entire record album cover, as well as one additional piece of cardboard of the same dimensions. Two record sets will provide the necessary cardboard, or you can utilize part of another record album cover. 
  x-acto knife and self-healing cutting matWhile cutting the cardboard to make one of these folders, I sliced a gigantic piece of flesh almost completely off of my index finger. I then proceeded to half pass out in the middle of the floor, bleeding profusely, while my two children hovered over me, horrified, and repeatedly asked me what to do.  It's important to make memories with your children, Friends! 
  duct tapeDuct tape isn't an eco-friendly craft supply, but it IS the best supply for the job here. You're also not going to be using a ton of it, and the folders that you make are sturdy enough that they should last for a super long time, so I'm comfortable with it. If you're not, play around with perhaps stitching or lacing up your folders, and then tell me all about it in the Comments below!  

1. Measure and cut your cardboard record album cover. For this folder, you will be using both the front and back of one cardboard record album cover, keeping them attached on the left side to form the folder's natural fold. The height of the record album cover, 12", is perfect for a folder. 


To get the correct length, 9.5", cut the excess 2.5" away from the right side of the cover. Watch your fingers!!! 

 Slit open the top and bottom of the record album cover, leaving the left side attached. 

  2. Measure and cut the upcycled folder pockets. From a second piece of cardboard, measure and cut two rectangles with the dimensions "9.25 x 5". Notice that the length of the cardboard is slightly less than that of each folder half--this will decrease bulk at the fold. 

The height of each pocket is up to your discretion, although 4"-5" looks proportionate and will do a good job holding your papers. 


  3. Tape the hinge of the upcycled folder. Measure out a piece of duct tape that's a little longer than the height of the folder, then cut it in half lengthwise--you'll have the easiest time if you use duct tape scissors (I own this pair). Use one of the halves to cover and strengthen the folder's hinge.  

After you've folded the duct tape to cover both sides of the hinge, trim off the excess at each end. 


  4. Place and tape the pockets. Turn the folder over and place the cardboard pockets on each side, lined up with both the bottom and outside edges. Use the second half of duct tape to cover the inside hinge, catching both cardboard pockets.  

Overlap or trim off any excess tape at each end. 


  5. Tape all the other edges. You can now cover the perimeter of the folder with duct tape, again measuring out the correct length for a side and cutting it into two lengthwise.  


Fold each piece of tape under to cover both the outside and inside edges of the folder, and don't forget to make sure that the tape catches the edges of the cardboard pockets, too. Trim excess tape after you've taped each side.  


These folders really are SUPER sturdy, and will stand up well to being tossed into a backpack and used all year. And next school year, you can use them again!

Saturday, October 2, 2021

Make a Cardboard Record Album Cover and Duct Tape Bookmark

 This tutorial was originally published on Crafting a Green World in 2016.

If you need something a lot sturdier than plain paper, but you still want to craft with some upcycled materials, then this cardboard record album cover and duct tape bookmark is for you! 

 The vintage cardboard record album cover, taken from a damaged record, makes an awesome front for your bookmark, while the duct tape strengthens the entire thing and covers up the back of the bookmark, concealing any stains or rips or other flaws. 

 Got a favorite record album cover that you've been wanting to upcycle? Here's how to make a cardboard and duct tape bookmark for yourself! 

 You will need: 

  vintage cardboard record album cover. Take this from a record that's no longer playable, and do something else awesome with the record

  duct tapeIt's not an eco-friendly crafting supply, but when used in moderation, it's SUPER fun! Check out the time that the kids and I made duct tape wallets!

  hole punchYou can use any size, although I think one that's just slightly wider than the diameter of your yarn looks better than one that's really wide. 

  yarn or embroidery floss. Choose a color that matches your bookmark.  

1. Cut out your bookmark. Using a favorite bookmark as a template, trace a bookmark outline onto a scrap of cardboard record album cover (these are the scraps leftover from my upcycled record album cover folder project), then cut it out. 

  2. Back with duct tape. I LOVE our duct tape in novelty colors, and I have a pretty great time matching cute duct tape colors to stuff. For the most eco-friendly project, make the bookmark no wider than your roll of duct tape.  

3. Cut the duct tape away from the bookmark. If you have duct tape scissors, this will be MUCH easier to do. 

  4. Add the tassel. Punch a hole at the top center of the bookmark, then cut off a length of yarn or embroidery floss that's about double the length of the bookmark. Thread it through the hole and tie a square knot.  

This cardboard and duct tape bookmark would make a pretty cool present when presented along with a brand-new book, and an especially cool present if you can manage to make it from someone's favorite album.

Friday, October 1, 2021

DIY Potion Bottles


Will and I had a ton of fun making these spooky potion bottles for our Halloween decor, but I was the most stoked to figure out that I could make them from the antique (but worthless) bottles that we're continually pulling out of the back of our woods.

Dear 1950s, please stop leaving your trash lying around.

To make these spooky potion bottles, I first scrubbed 70 years' worth of mud out of some old amber beer bottles. I have so many of these lying around that I'm sick of them, and while I ought to just recycle them, I always feel like I ought to DO something with them, you know? I mean, they're part of history!

It's the history of people bringing beer to a drive-in movie, guzzling it, and then throwing out the bottles, so, not exactly interesting history, but still. History.

When the bottles were clean and dry, I painted them with the primer plus flat black spray paint that I'm currently obsessed with (it's the new slate grey!), then Will and I drew our designs on the bottles using pencil and traced over them with hot glue.

My hot glue devil's trap is pretty killer, right? Lay the hot glue on thick, so that it stands out really well later, and rub away all the little hot glue strings so they don't mess up the painting that you'll do later. 


After this step, you're mostly just going to be dry-brushing the bottles in different colors, letting them hang out to dry between coats. It took Will and I a couple of days to finish, but most of that is hands-off time.

We used artist's acrylics for all the painting. Just between us, I use them even when craft acrylics are called for, because I like how thick the paint is, and how saturated the colors are.

The first coat to be dry-brushed on should be black. Don't worry about covering the entire bottle, which should already be flat black; instead, you're deliberately covering the hot glue, especially in the cracks and corners where it meets the glass.

The next color to be dry-brushed on is whatever you want for the final color of the bottle. Will and I made all of our bottles grey (slate grey?!?), but brown/bronze would be really cool, too.


You still want to mostly cover the bottle with this color, but leave a lot of the base color showing underneath. Also try not to get any of the paint into those areas where the hot glue meets the glass; you want those lines and cracks to stay black to emphasize the embossed look you'll be adding later.

After this, Will and I added a few more colors, just a little and very lightly, to give the bottles more depth and texture and age. Some darker and lighter greys, a little bit of brown, tiny bit more of black, etc. It was a nice day, we were listening to Halloween music, and Matt was puttering around outside, too. Why not hang out, add a zillion more colors, and enjoy your kid's company?


My devil's trap looks pretty great, right?


I don't have a good picture of this next step, because I was having too magical of an afternoon to even so much as breathe too loudly, much less take tutorial photos. But in the background of the below photo, you can see that Will is finger-painting silver paint onto the very top of her hot glue designs. 


Use your absolute shiniest, most silver paint, and dab it on so that none of it gets into those cracks that you so carefully painted black and kept that way.

Is there much better than shirtsleeves weather on a sunny early October day?

To make the tops, we used whatever bits and bobs and fancy little things that I had squirreled away. You can sand the winery stamp off of a real cork--

--then slice it and shave it down so that it looks like it's a stopper in use when you glue it to the top of your bottle. 

You can glue any further embellishments to the top of the cork, but I have a billion eye pins on hand, it it worked really well to add my embellishments to the eye pin, push it through the top of the cork all the way through the bottom, and then glue the bottom so it didn't show.


Use an epoxy glue to attach the cork to the top of the bottle--

--and then sit back and admire your handiwork!


Will and I had a lot of fun making these, and we both think they look super awesome. I wouldn't be opposed to adding a few new bottles to our set every year...

...and we might just leave them out all year round, especially considering the large percentage of the rest of our decor that also wouldn't be out of place in a Halloween store.