Showing posts with label drawing and painting. Show all posts

Saturday, July 10, 2021

How to Upcycle a Coloring Book Page into a Bookmark

This tutorial was originally published on Crafting a Green World in 2017.

Need another idea for how to upcycle a coloring book page? Here's how to turn it into a sturdy bookmark, the easy way! 

 My kids and I love coloring books, as I'm sure you can tell from all of the tutorials that I post on ways to upcycle coloring book pages. Well, here's one more for you! 

 This coloring book page bookmark looks especially nice when made from one of those adult coloring book pages with lots of patterns, or when fussy cut to pick out an extra-cute detail from a larger coloring book page. It's also a good way to upcycle a coloring book page that the artist has abandoned partway through--you know they NEVER go back to finish those old pages. 

 If you use a page that's colored by a kid, these also make great little handmade gifts to family and friends. When going through the latest stack of finished coloring pages, for instance, I found a couple of springtime pages that will look great made into bookmarks and tucked into Easter cards for the grandparents. Want to try it out for yourself? Read on! 

 You will need: 

  coloring page. You can use anything that you want for this, although remember that coloring books made from cheap paper are NOT acid-free. They're fine for short-term use in a book, but you wouldn't want to put one of those bookmarks in a book and then forget about it for twenty years. 

Many adult coloring books advertise that they use acid-free paper, however, and because I have two kids, we have a family rule that if you want to color something from a "nice" coloring book, you have to photocopy it first. This increases the playability of the coloring book, makes for a more satisfying coloring experience, as the kids usually choose to copy their page onto cardstock so that they can use permanent markers or our artist-quality colored pencils, and generally means that the finished product will be acid-free. 

  backing material. Again, you've got a lot of choice in this. You want a sturdy back to your bookmark, because wishy-washy bendy bookmarks SUCK, and also because your coloring book page probably has another drawing on the back or bleed-through from the front. My favorite backing material is adhesive card stock, although you'll see that I use duct tape for a couple of the bookmarks below. Other options include any sort of card-weight paper and your own adhesive. 

  hole punch and embroidery floss or yarn. This adds the perfect last detail to your bookmark. Feel free to also add beads! 

 1. Back and fussy cut the bookmark. I like to apply my backing paper first, even though it does make the placement less accurate.

Applying the backing first, though, makes the bookmark easier to trim without getting adhesive onto your scissors. 

Cut the bookmark to shape and then add the backing and THEN trim, however, if fussy cutting the absolutely perfect bookmark is your highest priority. 

  2. Hole punch and add yarn or embroidery floss. I like to use double the length of my bookmark in embroidery floss. I knot it at the bookmark, then knot each of the threads near the end to prevent unraveling. You can use several pieces of embroidery floss at one time, if you want. It makes the bookmark look even nicer!

Saturday, May 22, 2021

Tutorial: DIY Watercolor Business Cards

This tutorial was originally posted in Crafting a Green World back in 2017.

 I have a small handmade business, and it's important to me to use handmade, eco-friendly business cards for it. 

That doesn't mean that I LIKE to make business cards--it's tedious, you have to make, like, a thousand at a time, and all you're going to do is give them away so you can't even enjoy them AND you have to go and make a thousand more, sigh... 

 So I am a huge fan of handmade business cards that take as little time as possible to make. And these watercolor business cards may be the quickest! I cheated a little with these cards, as I usually prefer to hand-cut my business cards from recycled cardboard, such as cardboard food packaging or old record album covers. But I scored a half-used stash of these Avery business card sheets (thank you, Freecycle!), and the fact that these cards are white, for a change, is what makes this tutorial work. 

 To make your own watercolor business cards, you will need: 

  white heavy cardstock or business card printer sheets. If you don't mind seeking out one store-bought supply, these printer sheets made for business cards are the poop! Get the kind that are uncoated and come away with clean edges, and your life will be so easy. Otherwise, look for a super-heavy cardstock or upcycle some thin cardboard that's been bleached white. 

  watercolors. You can use solid watercolor palettes and a paintbrush, but in these pics I'm using liquid watercolors, both in miniature spritz bottles and with eyedroppers. Yes, we ARE still using this DIY liquid watercolor spray paint that I first set up for my kids six years ago! 

  printed or stamped business card information. You could print your business card info onto the back of your sheets, but I use this customizable stamp set for all of my handmade business cards. 

 1. Watercolor your business cards. I spritzed a little paint onto my business card sheets as a background, then used an eyedropper to add more drops of color. I let some colors bleed into each other, and I inclined some of the pages so that the colors would run. Just go for randomness and let the chaos take control! My darker colors, when dropped heavily, left a very light shadow on the backside, where I'm going to put my business information. I like this effect, as it carries over the watercolor theme, but if you're using a different type of paper than I am, you might want to test it first to see how much color the backside shows. As you're working, you're going to think that what you're doing does NOT look cute. Just carry on--I promise it'll look cuter in a minute! Leave the pages to dry. 

 2 Seal the card fronts (optional). If you're going to use these cards at craft fairs or otherwise out and about, give them a quick coat of your clear sealant of choice, and let them dry. Watercolor is water-soluble (duh!), so you wouldn't want a customer to pick up your business card, walk out into the rain, and then get paint all over their hands. 

3. Separate the business cards. Don't they look a LOT cuter now? The chaos of the random watercoloring translates very well to a small canvas. I especially like how the color carries over to the edge of the cards, so that they look pretty even from the side. 

 4. Add your business information. If you didn't print your business information onto the printer sheet, then add it on now to the backside of the cards. This leaves the front side as its own miniature work of abstract art!

Saturday, February 27, 2021

How to Make a Chalkboard Easter Egg

This tutorial was originally published on Crafting a Green World back in 2017.

 This is one of the easiest Easter egg crafts that you can make, and one of the longest-lasting, too! You'll love the ability to decorate your chalkboard Easter eggs in a different way every year. 

Heck, if you have kids, they'll enjoy decorating these chalkboard Easter eggs in a different way every day! 

 To make the chalkboard Easter eggs, all you need are: 

  wooden or papier mache egg. These are commonly found at craft stores now. I like to avoid buying plastic eggs, but if you already have some on hand, you can use many kinds of chalkboard paint on plastic--check out the instructions on your paint for details. 

  chalkboard paint. Eco-friendly chalkboard paint does exist, but I haven't personally tried it, as I'm still working through the 32-ounce can of Disney chalkboard paint that I bought years ago--that stuff really lasts! I've also not tried tinted or homemade chalkboard paints, but again, they do exist.

 Chalkboard paint is super easy to apply. Yes, you can apply primer first, especially if you have primer tinted toward the color of chalkboard paint that you're using, but for the particular wooden eggs in this project, some were unfinished new wood and some were previously painted white, so I didn't bother with primer. 

 You're also meant to use a foam brush or foam roller to apply your chalkboard paint, but with these small surfaces, I used a regular bristle paintbrush that I had on hand. I might have had to apply an extra coat or two over what I would have had to do with a foam brush, especially on that white egg, where my brush strokes showed up exceptionally well, but after four coats, even the white egg was covered cleanly, and the paint on such small surfaces dried quickly enough that the two extra coats weren't a huge waste of time. 

 There are a lot of tutorials that tell you that you have to condition your chalkboard before you can really draw on it, but unless the instructions on the container of chalkboard paint call for this step, I don't do it, and personally, my projects have never suffered from "ghosting" or any other of the ills said to be caused by lack of seasoning. 

 I love these chalkboard Easter eggs because you can decorate them as elaborately as the Easter eggs that you see in children's picture books. And if you used white or light brown chalkboard paint, the effect would be even more realistic!

P.S. Need even more ways to get festive for Easter? Check out ALL my Easter crafts here!

Saturday, February 20, 2021

Woodburned Easter Eggs with Watercolor Stain

This tutorial was originally published on Crafting a Green World in 2017.

 A great way to avoid buying plastic Easter eggs is to make your own stash of eco-friendly Easter eggs that you can re-use year after year, or embellish store-bought Easter eggs made with natural materials, such as wood, ceramic, or papier mache. 

 We've done all of the above, including making DIY papier mache Easter eggs and wool felted Easter eggs, but I enjoy adding to our stash every year--for one thing, I've got two kids to whom I'm hoping to pass down our beautiful handmade eggs, so I need a good stash, and for another, I'm never quite sure that we get *every* single egg back from every single Easter egg hunt... 

 One of the easiest ways to have a beautiful stash of heirloom Easter eggs is to buy wooden eggs and then embellish them. To wood burn and stain them, you'll need just the following: 

  wooden Easter eggs. I'm a HUGE fan of Casey's Wood Products, and I've purchased a ridiculous number of wooden objects from them over the past several years, including pretty much every size of wooden egg. I look for the items made in Maine, and of second-quality. 

  wood burner. I own this one, and although I don't love it, the price was certainly right, and it's worked for me for probably six years by now, so I certainly don't have much to complain about. I really want these alphabet brands that you can use with a wood burner, and if they fit mine, then that would certainly raise my opinion of it! 

  watercolors. Use liquid watercolors if you're wanting to stain the wood, and any watercolors if you're wanting to paint on details. The method itself is super easy, and a great family activity. 

1. Draw your design in pencil. This is something the the whole family can do while sitting around the table together. Add in some music or an audiobook and you've got the perfect hour before bedtime in my family! 

My kids prefer to draw scenes onto their eggs (I have one kid who draws dragons on everything, including every holiday decoration for the past three years), but I think these eggs look really interesting with little designs and patterns,  zentangle-style, done all over them. I especially like it because it's something that you simply can't do with most eggs, so it adds to their interest and appeal.

 You might want to watch against penciling in too many tiny details, as you'll soon be wood burning them, but I've actually found that my wood burner can get quite a bit of detail if I use a light touch. 

 2. Wood burn your design into the egg. If you're wood burning noobs, you can designate a "practice egg" for yourself so that you can play around with the wood burner and get a feel for it. It doesn't really work to use any old scrap of wood for practice, because the wood burner will burn each type of wood differently. 

 My kids have been using the wood burner since they were both pretty small; they still don't totally have the hand for it--they tend to press too hard and have a lot of stop-and-starts--but they're quite capable of doing it, and they love it. 

  3. Embellish with watercolor. If you're looking to stain your egg all over, you can do it with any color of liquid watercolor--my tutorial for that is here

If you want to paint details onto your egg, you can do that with any watercolors and a small paintbrush. Manage your expectations by realizing that the watercolor will flow along the grain of the wood, often unexpectedly, so don't expect rigid lines demarcations except where you've wood burned. 

  Optional: Seal the completed Easter egg. Oh, my gosh, y'all, I get so many questions about this! People really, really, REALLY want a non-toxic, eco-friendly, food-grade wood sealant that will stand up to a kid putting a stained and sealed toy into her mouth. 

I am sitting right here and killing that dream for you. Your sealant can be non-toxic, eco-friendly, and food-grade, OR it can stand up to a kid putting it into her mouth. If your kid is still putting her toys in her mouth, just... don't stain it those beautiful watercolor colors until she's older. If a kid mouthing your Easter eggs is not a concern for you--and if you're head-scratching right now, I promise you that it's such a concern for SO many people that I had to write it first--then check out the following options for sealing your wooden Easter egg. 

  1. Don't seal it. It doesn't really need it if it's just coming out to play around Easter time. 

  2. Use this homemade beeswax wood polishTest it on your practice egg first. I, personally, don't love sealing stuff with beeswax polish, but a lot of people do, so there you go. 

  3. Use a polyurethane alternative. Here are a few to play with

  4. Use a non-eco-friendly product. I know, I know, but it's my personal philosophy that if we use eco-friendly products whenever possible, then we have the wiggle room to use something not eco-friendly whenever it's legitimately the best solution. Sealant and aerosol spray mount are two products that I do own and use, simply because I haven't yet found acceptable, eco-friendly alternatives. If YOU know of great, eco-friendly alternatives, let me know right this second! 

 I store our stash of Easter eggs year-round with our other holiday decorations, and bring them out sometime after St. Patrick's Day every year, when they once again strike us as new and colorful and festive and fun. Sometime after Easter, I might buy a few more plain wooden eggs to have on hand, because the next year, we're for sure going to want to decorate some more!

P.S. Need even more Easter crafts? Here are all my Easter tutorials right there in one place!

Saturday, November 28, 2020

How to Make Mason Jar Lid Ring Christmas Ornaments

I originally published this tutorial on Crafting a Green World.

If you enjoy canning, don't you have SOOOOO many Mason jar lid rings?

Those Mason jar lid rings, also called screw bands, can be re-used (unlike the lid tops, which you aren't supposed to re-use at all), but only until they start to rust or get bent or dinged, something that seems to happen with my rings, at least, after very few uses.

Sigh.

Fortunately, there are loads of ways to repurpose these rings so that you're not just adding them to the waste stream. And since it's December, my favorite way to repurpose ANYTHING this month has to be Christmas ornaments!

These Mason jar lid ring Christmas ornaments look a lot harder to make than they are. If you're artistic, you'll love using these to show off your skills, but even if you're not--hey, that's why clip art, stickers, and patterned paper were invented!

Supplies

To make these ornaments, you will need:

  • Mason jar lid rings. Repurpose ones that are no longer suitable for canning. Don't can? You know someone who does, or check on Freecycle or Craigslist--there is someone out there who would LOVE to give you their dinged-up canning supplies.
  • Ribbon. Stash ribbon is fine, but twine, hemp cord, or even thin chain would work.
  • Mat board or thick cardboard. For these particular ornaments, I used mat board scraps (does it still count as hoarding if you really do use the stuff someday?), but thick cardboard--something thicker than card stock or food packaging--would also be fine.
  • Decorative paper. Use scrapbook paper, old book pages or sheet music, or even wrapping paper.
  • Image for the ornament's front. My daughter traced the inside edge of a Mason jar lid ring, then created several pieces of original artwork for our ornament fronts, all of which I photocopied onto card stock so that we could make multiples. Anything fun and creative would make a beautiful ornament, however. If you've got scrapbook supplies, dig them out!
  • Spray paint (optional). It's not eco-friendly, but if you want to change the color of your Mason jar lid ring from rusted metal, this is your best option. I've made these ornaments both ways, and while I do like the painted ornaments better, it's not necessarily worth the time that it takes to paint them.
  • Glue. You need an archival glue suitable for paper and a separate, sturdier glue for the rings. I used spray mount for the former and hot glue for the latter.

Directions

1. Trace the inside edge of a Mason jar lid ring. This will be your template for cutting the decorative paper back, the mat board middle, and the featured image on the front.

2. Make a beautiful ornament front. The Mason jar lid ring makes the perfect frame for your original art. Whatever medium you prefer, whether it's watercolors, acrylics, markers, or charcoal, it will look adorable in this simple round frame. But don't forget that you can also use stickers, cut-outs, clip art, or anything else you'd like in order to embellish these ornament fronts.

3. Cut all pieces to size. The ornament front, mat board or card stock, and ornament backing paper should all be cut to your template. You can pop them into the Mason jar lid ring to check the fit--sometimes I've found that I haven't cut a piece carefully and have to trim it a bit. Better to do that now than when you're racing the hot glue gun!

4. Glue the ornament front, middle, and back together. Spray mount gives the most archival result, but an ordinary glue stick is also perfectly serviceable.

5. Do you want to paint the Mason jar lid ring? If so, do it now! Spray clear sealant, with or without painting the rings, is another option.

6. Tie ribbon onto the Mason jar lid ring. A lark's head knot is just about the easiest and most attractive of knots, and that's what you're going to do here. Tie the ends of the ribbon into a bow, and there you have your ornament hanger!

7. Glue the ornament piece to the Mason jar lid ring. I've tried several types of glue with this ornament, and none are really ideal. The most full-proof glue is hot glue, but you'll have to work quickly. Lay out the ornament, face-down, and the Mason jar lid ring, flat side down and with the ribbon at the top, and then quickly dispense hot glue around the inside edge of the lid ring. Immediately set the ornament into the lid ring and press it down so that it's flush against the flat side of the lid ring.

These ornaments are a great way to show off a kid's artwork--or your own! A matching set of complementary ornaments also makes a nice handmade gift.

But of course, I like them best on my own tree, displaying all of our homemade love for the season.

Saturday, November 21, 2020

How to Make Chalkboard Coasters

I originally published this tutorial on Crafting a Green World.

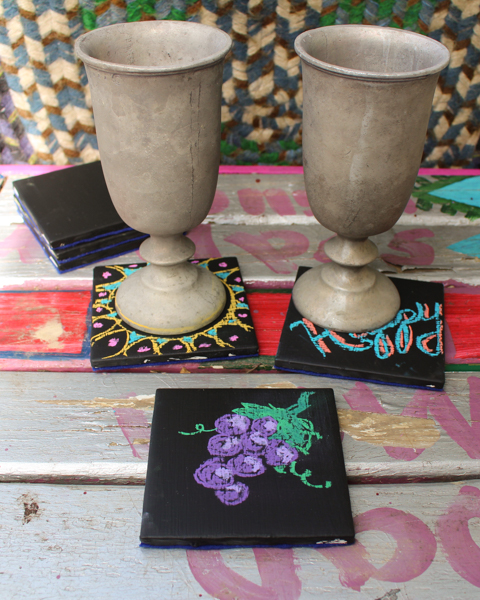
Here's an easy (and cheap!) project to spice up your holiday events: chalkboard coasters! You can use them every day just as they are because black goes with everything, but when guests come over, hand them the chalk and let them personalize their own coasters. It's fun AND avoids accidentally drinking from someone else's cup!

Supplies & Tools

You will need:

  • Tiles. Even brand-new, plain white tiles cost pennies at the big-box hardware store. And if you've got a ReStore near you, you can nab them for far fewer pennies. I used white tiles in this particular project, but don't be afraid to snap up super ugly tiles if they're even more of a steal, because the primer will cover all the tackiness for you.
  • Primer. You want a no-sand primer for sure, but color doesn't matter unless you're using tinted chalkboard paint. You can see in these photos that I'm actually using the tinted primer that I used to paint my daughters' bedroom this summer. Paint doesn't keep forever, so I'm using this stuff wherever I can!
  • Chalkboard paintUse any non-aerosol brand of your choice, but expect to paint on a few layers.
  • Felt. Feel free to be creative with this material, which will cover the bottom of your coaster. Felted wool sweaters, fleece, leather, old vinyl, etc., could all be used. Include the correct glue for your material; for felt, hot glue works well.

Directions

1. Prime your tiles.

Make sure they're clean, then coat the tiles with no-sand primer and let dry completely.

2. Cover the tiles with several coats of chalkboard paint.

This project is time-consuming in that it requires several coats of paint overall, each of which needs enough time to dry before the next coat, but it takes up little of your hands-on time:

3. Let the chalkboard paint cure.

This is an easy step to miss because the curing time for your chalkboard paint will be written in small type on the container. It's absolutely crucial to allow the paint to cure for the required time in order to have a nice-looking, long-lasting finished product.

4. Glue on the coaster bottoms.

There are three other humans who live in my house, and none of them can really be relied on to take a decent photo of me working. At least this one is in focus!

You can do this while the chalkboard paint is curing if it's at least dry to the touch:

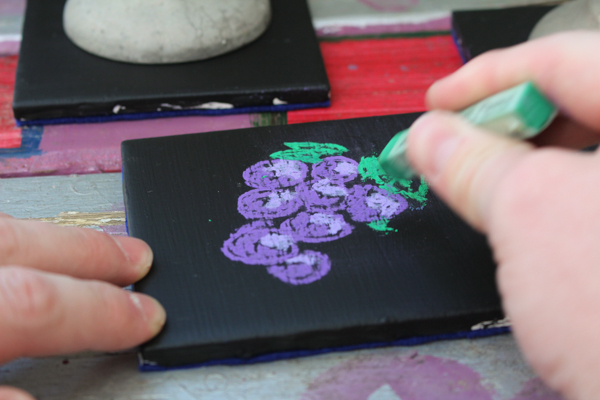
After the chalkboard paint has cured, your chalkboard coasters are ready to go! If you want to prepare them ahead of time, you can use a set of artist-quality chalk pastels to draw on designs that are as elaborate as you like:

Another option is to set up a few pieces of chalk with the tiles at your drinks station so that people can decorate their own coasters.

If you give your tiles as a present, include a piece of chalk and some brief written instructions--writing them on the coasters themselves would be cute! I've given these as presents a few times, and I've found that as obvious as it seems to me (because in my mind, if something holds still for long enough then, of COURSE, it's going to be turned into a chalkboard...), my recipients invariably look a little puzzled at first to be gifted with black coasters and a piece of chalk.

Tell them what the coasters do yourself, and watch their faces light up!

Saturday, October 10, 2020

How to Upcycle a Crystal Head Vodka Bottle into a Sugar Skull Candle Holder

I originally published this tutorial on Crafting a Green World.

Y'all, I drank some vodka so that my kids and I could make this project. Friends, I am always working for YOU!

It's October. You need a sugar skull candle holder.

There are skull-shaped vodka bottles for sale in liquor stores.

Let's play!

Supplies

To make your own sugar skull candle holder, you will need:

  • Skull-shaped glass bottle. I'm using empty Crystal Head vodka bottles (hiccup!), but there are other skull-shaped glass bottles around.
  • Rust-Oleum Paint+Primer spray paint, heirloom white. I don't love spray paint, obviously, because it's not eco-friendly, BUT this exact color in this exact brand is the perfect bone color.
  • Paint pens. We used both Sharpie and Beric paint pens. I, personally, preferred the narrower tips of the Beric pens, but both brands show up well and don't flake off or smear.

Directions

  1. Clean and paint the skull-shaped glass bottle. There's a neat trick that you can do to paint a bottle: stick a pole in the ground, upend the bottle over the pole, and get the whole bottle, top, and bottom, in one go! I, however, didn't feel like digging around for a pole, so I just turned the bottles upside-down after they dried and sprayed on another coat. No big deal.
  2. Decorate the bottles with paint pens. Have a lot of fun with this! Draw patterns and designs or focus on one big concept; either way its going to look absolutely awesome.

This is a great project for a kid to do if they can treat paint pens respectfully. Teach them all about the Day of the Dead, let them look at lots and lots of images of real sugar skulls, and then let them be as creative as they like.

If you want to seal your sugar skull candle holder with a clear sealant, you can, but in this case, I don't really think it's necessary. I also didn't want to make my own sugar skull candle holder shiny.

The Crystal Head vodka bottle fits a standard-sized taper candle, and I'd recommend cutting a cardboard circle out of recycled food packaging to fit around the candle so that you're not in any danger of wax dripping onto your beautiful creation.

P.S. Want to make a REAL sugar skull? Check out my walk-through here!

Thursday, October 8, 2020

Constellations on My Kitchen Shelves

 Remember how I tried to improve my kitchen shelves by sewing fabric baskets to hide all the crap that we shove on them, but that just made me see how ugly the shelves just... ARE?

Laboring under the delusion that paint and wallpaper are cheap ways to spruce up a space, I decided to spruce up this particular kitchen space by painting and wallpapering it. 

Like, for REAL painting and wallpapering it. As in, not using whatever paint I happened to find in the garage, but deliberately shopping for and purchasing brand-new paint. Not "wallpapering" by decoupaging my favorite comics or Harry Potter paperbacks all over the shelves, but purchasing actual, legitimate, real-live wallpaper.

Will volunteered to assist me with taping off the shelves. Thank goodness for that kid!


I painted the trim around the shelves, permitted Matt to talk me down from the wallpaper of cartoon T-rexes eating tacos, and instead bought this constellation wallpaper, on account of my mid-life crisis has turned out to consist of taking up once again my childhood love of astronomy.

In retrospect, I wouldn't pay this much for wallpaper again. I underestimated the square footage of what I needed to cover, and so instead of having a nice, big surplus of wallpaper to use on other projects, I had thankfully enough wallpaper to cover the shelves, but only enough extra to cover a couple of tin cans, so I guess look forward to my upcoming tutorial on covering tin cans with wallpaper to use as utensil holders!

Also, as I was painting the trim, I noticed that the super old paneling on the kitchen walls is peeling away, so... that's cool, I guess.

ANYWAY, here are the shelves all nicely painted and wallpapered!


Pretend like you don't see any bubbles in that wallpaper, please. It's important that you do this for me. Instead, feel free to notice the peeling paneling below the shelves. What on earth am I supposed to do about that?!?

Next up, Matt has plans to build a roll-out shelf next to the refrigerator--something like this! His hobby is mixing cocktails, so he can put all of his bulky bottles of alcohol and mixers there instead of in the kitchen nook, and wouldn't it be absolutely wonderful if he could also fit some of the crap that we now toss on top of the refrigerator so I can't reach it? Even better, perhaps he could fit some of the things that I've thrown in those fabric storage baskets, so that there would be fewer baskets in the nook and you could actually see that expensive wallpaper!

I'm also toying with the idea of thrifting some fabric and putting up a curtain to block the view of the messy hallway from the kitchen, and the view of the messy kitchen from the hallway. It would involve putting a couple of holes in the expensive wallpaper that I JUST put up, though, and I'm afraid that it would look tacky, as well. I don't always have a clear visual idea ahead of time about what's going to look tacky or not...

What do you think, guys--are you on Team Curtain or Team View into the Messy Next Room?

Monday, August 24, 2020

The Summer of the (DIY) Wooden Stars

You guys, I have been without a working sewing machine for SOOOO LOOOOONG!!!!!

Fortunately, my "good" sewing machine didn't break until AFTER I'd sewn plenty of cloth masks for everyone, but when it broke, it broke for good.

(See what I did there?)

The day that I heard that my sewing machine was unrepairable, I switched it out at the repair shop (I drive to one in the next town, now, on account of I'm still scared of the people who run the one in my own town) with my beat-up old sewing machine, the one that Matt replaced for me as a present a few years ago when IT broke, but I still keep it around because it has an awesome bobbin-winder.

In another piece of good luck, my beat-up old sewing machine is old enough that its parts are mostly metal, which means that it WAS repairable... or at least, that's what the repair shop has told me. They've also tell me, every time we call (once a week!) for an update, that they've finished their repair and all they need to do is test it.

You would think that a sewing machine repair shop, when faced with a machine that they've already repaired and are now simply storing and not being paid for, would be eager to do the very last thing that they have to do to that machine before they can 1) get it out of their workshop and 2) get paid money in exchange for their goods and services. If you think that, though, you're likely not mentally or emotionally suited to run a sewing machine repair shop.

And that's why, in all my new-found non-sewing time, I've been experimenting with a wide variety of non-sewing productive things to do with my hands.

And somehow in that process, I became obsessed with making wooden stars?

I don't know. It's weird. The whole thing started out being normal--I figured I'd make our Christmas tree a nice wooden star tree topper. Then I made a smaller one as an ornament. Then I had some wood leftover, so I made a couple more. Then I found some more wood. Then I thought that maybe I could paint some of the stars, so I found some more wood.

At this point, I'm basically out of scrap wood, so I'm about to go and tear apart a wooden pallet and see if I can also make stars out of pallet wood. If I can--I'll just be frank with you; I'll probably make a LOT more.

To be fair, though, the process is quite satisfying! Here's one star just after I cut it out of some super old board that was probably in our garage when we moved here:


Here I am about to sand the snot out of it (pro tip: get a quarter-sheet palm sander because it's cheaper to buy full sheets of sandpaper and tear them to size yourself)--


--but then deciding that it would be terrible to ruin that gorgeous patina and instead just sanding the sides and curving the edges:


Here's a larger version of the star from that same wood. Check out the old nail holes!


Here I am spending some art time with Will. She's coloring the world's most epic fantasy landscape, I'm gluing wooden stars together, and we're both listening to Welcome to Night Vale:


I cut some other stars out of such clean, nice wood that I didn't bother priming them before I painted them:


I want all that nice wood to show between the layers of my rainbow!


Here's the finished tree topper, all set up and ready to go in my Pumpkin+Bear etsy shop!


It was SO MUCH FUN to make. The second that I scrounge some more wood out of nowhere I'm going to make another!

Our Christmas tree is already so busy that I forced myself to make this very sedate, lightly stained and sealed only, tree topper for our home:
It's a weensy bit wonky, but it was the very first one that I made!

I am, however, right this minute working on painting a galaxy onto yet another giant wooden star, so who knows if our tree topper will stay regal and sedate and simple this year, or if it will be conquered by galaxies or rainbows--or both!