Tuesday, October 26, 2021

DIY Cardboard Minecraft Heads Make an Easy(ish) Halloween Costume


You remember how much the kids used to love Minecraft, right?

Well, turns out they still do. Honestly, I think most of their play these days involves hanging out with their buddies on their servers, rather than mining and crafting, but I guess there's nothing like a global pandemic to highlight the benefits of a social, virtual, sandbox game.

Minecraft is also a pretty good source of Halloween costumes! The heads are simple constructions with easy-to-add details, and those heads are so notable that you can pull together whatever clothes you've got on hand for the rest of the costume and it still looks fine.

For these two Minecraft costumes, I drove over to the county recycling center and liberated an absolutely massive cardboard box from its path to the cardboard dumpster. It was large enough that each kid could cut her Minecraft head from one of the box's original vertices, giving her three good edges and one good corner as a head start.

I measured each kid's shoulder width, and that was the length of each side of her cube. The kids cut each face to be that measurement squared, then assembled them into a cube using copious amounts of duct tape (good thing they did this project BEFORE Syd and I made her a duct tape dress form, because now we no longer have copious amounts of duct tape!). 

The kids primed their cubes, then each used a ruler and pencil to mark out each face of their cube into an 8x8 array.

Then they painted!


When the painted heads had dried, each kid measured the circumference of her head, the cut a hole in the bottom of the box to fit. Pop the box on, and you're a Minecraft character!

Left to its own devices, the cardboard box shifts around alarmingly on one's head, so each kid engineered her own solution to make the head wearable. Syd made herself a head brace out of cardboard, bamboo skewers, and hot glue. 

Will just stuffed a blanket into the top of the box. Honestly, Will's one-second method worked better than Syd's painstakingly-crafted method, as Syd's brace gave way halfway through our weekend trick-or-treating event and she spent the rest of the time just holding the box under her arm like a Minecraft Headless Horseman.

Will also made her eye holes bigger, so it's also possible that she simply didn't care when the head shifted around:


The real winner of our trick-or-treating event, however, was Luna! I followed behind the kids with Luna, not trick-or-treating (but still wearing my DIY Hogwarts robe, of course!). Several times, someone handing out candy approached me and asked if they could give Luna a treat. And she wasn't even in costume!

Luna scored a few dog biscuits and an entire bag of dog treats, but the real prize was this genuine pig ear:


Luna was delighted with it, but because I had to keep the kids in sight, I refused to let her lie down with it immediately and start leisurely munching like she wanted to.

As a compromise, she simply carried it around in her mouth for the whole time we trick-or-treated, looking absolutely adorable and charming everyone who saw her.

Monday, October 25, 2021

Ice Cream, Hamburgers, and Jug Rock

I guess one thing that the pandemic has reminded me of is how to travel small. I very much miss all the big trips that I haven't taken, especially the missed opportunities to travel with my kids while I still have them, but these tiny travels make memories, too, and are very easily done during that one day a week when no kid has ballet or community college class or a horseback riding lesson or work or volunteer obligations.

We've been using the Southern Indiana Ice Cream Trail as a chance to travel small. Matt plans out one or two stops whenever we've got a completely free day, and I figure out a nearby random tourist activity.

Like Jug Rock! It apparently has its own mascot!

Jug Rock is a freestanding rock formation made of sandstone, and is apparently the tallest of its kind east of the Mississippi:


Clamber all around it so you can work up an appetite, then head over to Bo Mac's Drive-In for ice cream!

I had possibly the most delicious ice cream of my life: a peanut butter crunch blizzard:

Luna seems to have also quite enjoyed the last lick of Will's blueberry blizzard:


Syd, though, chose not just an ice cream but also a "red cream soda," a new-to-her beverage with a charming name and delightful color. I didn't remember ever having tasted red cream soda before, either, so I tasted hers... and found myself suddenly very small, sitting in the Fellowship Hall of Midland Heights United Methodist Church, drinking red cream soda from a bottle while I waited for Mammaw to get out of Bible Study.

I guess Big Red is the flavor of my childhood!

Matt loves the ice cream trail so much that the kids and I made him a DIY hamburger trail, with all the best burgers the southern half of Indiana has to offer. After our ice cream breakfast, then, we drove to another small town, picnicked on take-out hamburgers in the park, then did some more small town sightseeing:

Luna hilariously did not know what to think of this giant water wheel:

We walked along the river, found an old-school playground with both a teeter-totter and spring riders, all of which have long been removed from all our local playgrounds. 

If only we'd found a metal slide and a merry-go-round, we'd have been in vintage playground heaven!

I was chilling on a metal glider, digesting my hamburger and lazily watching the kids teeter-totter, feeling sleepy and dreading the hike back to the car, when Matt, who always has too much energy, came back from walking further down the river path and told me that there was a cemetery off in the distance.

I got my energy back!

Jasper, this little town with the hamburgers and the water wheel, has a large population of people with German heritage, and so Will and I had a fabulous time wandering around this cemetery overlooking the river and finding all the old headstones written in German:


Afterwards, we walked back to the car, where I declared that this time I really was tired, but THEN we drove by a labyrinth so Syd and I jumped out of the car and walked that, and she found a hat, and then we finally drove home while listening to horror movie retellings on my newest favorite podcast--

--because it's October!

Ice cream for breakfast, hamburgers for lunch, an unusual rock formation, a working water wheel, an old-school playground, an even older cemetery, driving practice for both the teenagers, the unlocking of a core memory, new family memories added to the collection, and home before dark: it was a perfect day of small travel!

P.S. Here's another cool Indiana trail if that's a thing you, too, like to do.

P.P.S. Check out my Craft Knife Facebook page for more photos of Luna eating ice cream!

Saturday, October 23, 2021

How We Refinished This Thrifted Wooden Shield

 This tutorial was originally published on Crafting a Green World back in 2016.

Some things you just cannot pass by, such as a great toy hiding underneath a gross one. 

 On a recent trip to Goodwill, my kid showed me this wooden shield. It was finely crafted, made from a solid piece of wood with sturdy straps on the back, but man, it was a mess. It looked as if it had been given to a kid to paint, and then that kid had painted one hundred thousand layers of muddy paint on it.

 I am all about process-oriented art, my friends, but when it's done on a great toy, an heirloom quality wooden one that some other kid would be absolutely thrilled to have?  It bummed me out to look at it.

 So even though the kid is probably a wee bit too old for it, I told her we could buy it. At a buck, the price was for sure right, but also, I knew that very few people were going to look at that gross toy in that Goodwill and see what I saw: a great toy that just needed some sweat equity and some TLC. 

  Step one: sand that baby down! I made the kid do some of the sanding with our trusty palm sander, but I took over when she got tired of it, because it was a big, tedious job. 

Friends, there were a LOT of layers of paint on that shield!  

Hiding way, way, at the bottom was also a printed outline of a two-headed dragon, probably what the child was intended to color. My older kid would have loooooooved to color a shield with a two-headed dragon on it, but alas, this dragon had one hundred thousand layers of muddy paint on it, so it got sanded down with all the rest. 

 To do a really bang-up job, you could use sandpaper with progressively finer grit after you'd sanded all of that paint off, and end up with a shield face that was as smooth as butter. I didn't bother going too smooth, though, because I knew that the techniques we were going to use to refinish the shield wouldn't require it. 

  Step two: base coat. If it had been up to me, I would have painted a nice design on top of the bare wood, then sealed everything, leaving some natural wood to show and be pretty. This is my kid's shield, however, and she likes things to shine; she spray painted a base coat of gold on top of the bare wood.

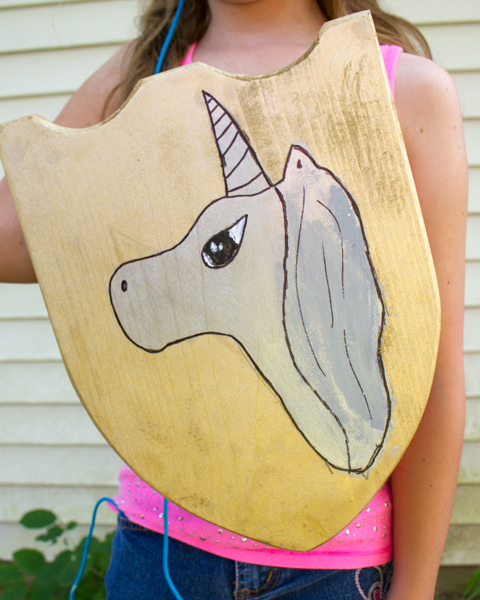
  Step three: draw a design. My kid worked on this for a while, because first she drew a bird, then decided that she didn't like it, so erased the entire thing and drew a unicorn. I had her draw her design in pencil so that she could erase it, but if that didn't work, it wouldn't have been a big deal to lightly sand the shield, repaint the base coat, and go again.  

After she was happy with the penciled design, she went over the pencil with black Sharpie to give her a better outline to color in. 

  Step four: paint the design. I gave my kid our nice artist's acrylics to use when she painted in all the colors on her unicorn. Craft acrylics are a good substitute, but artist's acrylics are thicker, and I think they're better for details and smaller projects.  

After she'd finished painting, she went back over the Sharpie lines, to cover any paint that had gotten out of the lines. The finished result looks neat and tidy. 

  Step five: seal the shield. This step isn't completely necessary, but the shield will last longer and hold up better to hard play if you do. I didn't want any of my kid's beautiful unicorn to chip off, so I sealed it with a clear sealant. 

 My kid and I are very pleased with the finished product--it's a great toy now, and is one hundred percent worth the buck that I paid for it. The wooden shield looks a million times better, will hold up for all kinds of pretend play and dress-up, and it's so lovely now, decorated with my kid's artwork, that I can certainly see it being a keepsake for her after she's grown.

 I mean, come one--she painted a unicorn on it. Can you get any more ten-year-old girl than that?


Wednesday, October 20, 2021

The Apple Orchard and the Pumpkin Patch


Unless Will goes to our local university, this will probably be her last autumn visit to our favorite apple orchard and pumpkin patch for a while.

Time to make every moment count and then cry about it!

We did all our favorite things, including wandering around instead of picking apples--

--sitting around instead of picking apples--

--picking apples but putting them directly into our mouths instead of the bag--

--and then accidentally picking more apples than will fit in the bag and so panic eating some:


Oh, and MY personal favorite: lying on a giant blanket underneath the apple trees, working puzzles, eating and drinking delicious things, and listening to spooky podcasts:

We took our family portraits and then wandered around until a mean bee stung Luna's paw, then Matt carried her back to the car and we drove over to the orchard's pumpkin patch:


Oddly enough, Luna seemed to feel a lot better once there were elephant ears and apple fritters around, so I might be doubting that bee story of hers a little bit...

The pumpkin patch leads on to the next magical family memory that a Will at a far-away college will miss:

For the past seventeen years I've lied to myself that next year I'll really splash out and splurge on one of those fancy professional-looking pumpkin-carving kits, and every year I just dig our exact same most basic kit possible out from the back of the junk drawer. It really holds up!

I swore that I was not going to go to the trouble of roasting pumpkin seeds this year because nobody eats them but me, the kids swore that they'd eat them this year if I made them, and so I went to the trouble of separating seeds from guts, soaking them in salt water, and roasting them with spices:


So far, nobody has eaten them but me.

But the Jack-o-lanterns are epic this year!


We're looking forward to the reinstatement of of some of our out-in-public Halloween traditions this year, including declaration that yes, my 17-year-old IS going to be one of those trick-or-treating teenagers that the memes talk about:


It feels like it might just be one last season of normality before our world gets shifted on its axis again next fall, and I'm so grateful to have it.

Monday, October 18, 2021

I Bought My Kid a Sticker Maker


I wasn't sure that this sticker maker was actually going to be a hit. Syd didn't touch it for the entire summer after I bought it for her birthday, and I'm the one who actually ended up getting it out early this autumn and messing around with it trying to figure it out.

But if there is one gold standard about parenting, it is this: if you want your kids to get interested in something, ignore them and get yourself interested in that thing. Whether it's dried apricots, The Lord of the Rings, or your latest awesome art supply, if you're into something and act like you don't know they're around, kids show up and try stuff out just to get into your business. 

On an unrelated note, ahem, I have also been woken up by the children from every single nap I have ever tried to take since they've been born. I swear that a kid can need nothing from me, can flat-out reject my company, and as soon as I close my bedroom door, lie down, get comfy, and doze off, I hear, "Mom?" And it's always something stupid, like where are the scissors or are we supposed to be saving the French bread for dinner or can we go to the bookstore this weekend.

Literally TODAY I lay down on my bed for like five minutes to TikTok as my reward for mostly-ish picking up the house, fell asleep, and fourteen seconds later Syd was all, "Mom?"

To be fair, she was calling for me to see if I was ready to drive her to ballet, but still! 

So when I got out the sticker maker stuff for the first time one day, set it all up at the kitchen table, figured out how to load and use the cartridges, and started cutting out some comic book pages that I thought might make excellent stickers--

--Syd found me and immediately figured out all the sticker stuff and off she went, making her own art into stickers:

Because you can't arrive at a dog's birthday party empty-handed!

Here are the sticker maker supplies that Syd now uses every week:

She uses the supplies entirely to make stickers from her own art, and she prefers the simple adhesive roll, rather than the roll that both adds adhesive to the back AND laminates the front, because she likes to continue to add to and embellish her art even after it's made into stickers.


I don't make art, and so I've made stickers from comics, vintage books, and clip art, digital images, and the kids' scanned artwork all printed on plain copy paper. I also prefer the look of the unlaminated stickers, although I suspect that my comic stickers aren't particularly archivally sound.

Syd was mildly horrified to see that I'd essentially made fanart of another one of her projects.

I'd be curious to price out about how much each square inch of sticker costs, but I'm too lazy to do that right now. It feels cheap enough, though, that I wouldn't be sad letting the kids make stickers when their friends come over or bringing it out at a Girl Scout meeting. 

I'm also very eager to try scanning, printing, and then making into stickers the fussy cut graphics that I like to decoupage onto wood blocks. I'd lose some eco-friendliness and the coolness of using the actual comic, but I could use graphics from comics that I'm not willing to cut up and a sticker might be more reliable and less messy than a piece of vintage low-grade paper and glue.

Christmas cardmaking will be VERY fun, too.

And I can't wait to see what Syd makes next, too!

P.S. I can't let you go without mentioning that I'm also super into DIY stickers that I make using repositionable glue. These were awesome especially when the kids were little and sticking stickers everywhere, because they peel right off any surface--and stick right down again somewhere else!