Sunday, June 25, 2017

DIY Spartan Armor from Duct Tape, Paper Bags, and Cardboard

We've been studying the city-states of Ancient Greece, and while I agree more with Athens, come on. Who doesn't actually love Sparta the best?

Well, I should really call it Λακεδαίμων,  because I'm trying to get my Greek phonics up to speed, but Sparta is what we've learned to call it, so let's go with that.

The kids and I read and studied the chapters in Story of the World volume 1 about Athens vs. Sparta and the Greco-Persian Wars. I'm hoping to get through the Peloponnesian War next week. Story of the World isn't a complete curriculum for the older child, of course, but it is an excellent spine, easy to look at and say, "Okay, this chapter is the Greco-Persian Wars, so let me find some more great resources and activities to give that more depth and context."

We found some websites and online videos--

--and read and watched some resources from the library--


While Syd was away at a slumber party, Matt and I even ordered pizza and let Will watch 300 with us. It's VERY violent, but the military reenactments are okay--you can see what a phalanx is, although in your head you have to imagine the soldiers as more rangy than ripped. We showed Syd just the iconic "This is Sparta!" scene, because it's in Story of the World, as well.

Our big project for this unit, however, was to make some Spartan armor. I saved some large pieces of cardboard from the box that my new treadmill (yay!) came in, and bought some gold duct tape. To that we added brown paper bags from the grocery store, a couple of Sharpies, scissors, and gold paint.

For the helmet, we followed the suggestions from this tutorial, using gold duct tape to make the helmet bronze, though, and of course my older kids were able to cut out their own helmets themselves:


I showed the kids (yet again, sigh...) how to use string and a pushpin to make a compass for circle drawing, and then the kids made their shields out of cardboard--shields three feet in diameter!!!

The most authentic Spartan shield embellishment would be a giant lambda, but even the Spartans at one point got to design their own shield embellishments, so those hand-me down shields would still have been seen at any battle, and why on earth would I deprive my younger child of the chance to fight with a unicorn on her shield?


We also didn't put on the horsehair crest--it was in vogue for a while, but not always, and the kids didn't really want to add anything else to their helmets.

Besides, don't you think that Syd is fierce enough without it?


We'll be too far north on our travels to see the location of Ancient Sparta, but we ARE going to drive right through modern Thermopylae!

Friday, June 23, 2017

A Children's Bedroom Update: Work in Progress

While the kids were at camp, you might think that I'd be in high gear prepping for our Greece trip, or perhaps whittling down my note-book-sized to-do list, or maybe even chilling out in bed with Netflix and ice cream.

Yeah... no. Instead, I decided that it was the perfect time for another bedroom revamp. The last time I've done anything with the kids' bedroom was when they were at camp two years ago and I ripped out the giant closet in their room to make a nook the perfect size for their bunk bed.

It was a big improvement at the time, but even then it sorely needed painting, and the walls were uneven and unappealing, and two years' worth of clutter and treasures and candy wrappers have since built up and been stuffed into drawers and bins and behind bookshelves every time the kids "clean."

So that's where I spent much of my five days--moving furniture, sorting stuff (so many candy wrappers. So many rocks!), spackling things, taping off, painting walls, visiting Menard's, visiting Menard's again, moving the furniture back, hanging all the kids' pretty treasures, and vacuuming about every five minutes.

The bedroom is by no means finished--Matt is right this second on his way to Menard's yet again to buy the materials to make a platform that will loft the bunk beds a little, and I need to sew curtains, and then after the bed is lofted we have a whole slew of other pretty things to display, and then we can figure out the outlets--but it was finished enough that we could pick up the kids from camp this morning, bring them home, and surprise them with what is practically a brand-new bedroom:


I'm surprised every time I do it by what a world of difference a fresh coat of paint makes. The kids' room, like the rest of the house, hadn't been painted since before we'd bought it, but while the rest of the house still looks okay, their walls had gotten pretty bad. Inspired by Will's collections of dragons and swords and Syd's collection of magical ponies, we were going for a vaguely medieval castle look, and so chose to repaint their room in grey. I've heard that grey is the worst for looking different in different lighting, and that's true, because this grey actually looks lavender in the morning sunlight, but lavender is also a lovely color, so there you go.


Will has been longing for a place to display her sword collection ever since she got that first one, so this was a priority. She's got a couple of kid-made swords (including this Minecraft one!), to add, but she'll have plenty of room on this wall to expand her collection.


This top shelf had been crowded with just everything--treasure boxes, more boxes filled with rocks, a couple of canisters filled with more rocks, fancy hats, tons of empty wine and beer bottles (fun fact: the kids collect interesting wine and beer bottles; Matt and I basically let them choose our alcohol based on the bottles that they like), and some old candy wrappers. You couldn't see or appreciate anything, and there was nothing on the walls.

I moved everything around, severely edited that bottle collection (they can surely get more!), and chose to display here just a few favorite things: Will's fencing mask, a couple of souvenirs from a past trip to France, Syd's crown from her first Trashion/Refashion Show, a dragon from Will's vast collection, two fancy masks, and a perfectly preserved butterfly that Syd found lying dead in the grass one day.


I gave this stained glass dragon to Will for Christmas, and only now found a place to hang it for her.


This is Syd's side of the dresser, and the shelves where I removed hundreds of candy wrappers and neatly rearranged the remaining treasures. Now Will has a full shelf for her dragon figurines, Syd has a full shelf for her treasure boxes, and there's still room for Will's Waldorf doll, her horseback riding trophy, and a few more containers of rocks.

Syd has her photo album, camera, bush knife, and ballerina doll in her basket, her solar lantern next to it, and her Nutcracker posters above it. The kids need to help me put some of the stuff back on their shelves, because I forgot who many of the little figurines and random bits and bobs belonged to, and you can tell that we deeply need those curtains that are on my to-do list.

There are still other plans to come--I'm refinishing their light switch cover and a couple more picture frames, and after the bed is lofted Matt is going to add shelves, and wire the room for more outlets, and we can mount the artwork that the kids want next to their beds--but an hour after arriving home from camp, the room makeover has already had one big payoff:


Toys that had been forgotten about are once again revealed!

Friday, June 16, 2017

Cut-off Shorts and Drawstring Pants

Every time the seasons shift, the kids and I go through the tedious chore of going through our huge off-season clothing tub and forcing the children to try on anything that looks like it might fit.

Will loathes this chore as much as anyone can hate something that's not facism, and requires at least one, and sometimes two, Come to Jesus talks before she can finally bring herself to do--the horror!--Something That She Does Not Want To Do.

The pro to this is that she'll wear anything that fits. Just does not care. Literally pulls the top items out of her shirts bin and pants bin and puts those items on and wears them, utterly oblivious to how she looks. Syd, on the other hand, although she is happy to try on all the clothes that I present to her, is far pickier about what she'll actually wear, and since by the time something is her size, it either goes to her or to the donation bag, there's more in-depth conversation about what might go with what else in her wardrobe, if something that she doesn't like now would be improved with a stencil or the judicious application of scissors or perhaps with vat dyeing, if maybe she'd rather wear it in the winter with something warmer underneath, etc.

You'll be simply shocked, I'm sure, to know that my wardrobe is a lot more simple. I made do with one pair of shorts last summer, but I wanted more this summer, so I went to Goodwill, found three pairs of pants that I liked, bought them, took them home, cut them off at the knees--


--and hemmed them. Done and done!

I also wear a lot of drawstring jammies around the house, so I figured that while I was at the sewing table, I might as well mend the ones whose drawstrings worked their way out over the past few months:

Done--


and done!


If you've never replaced a drawstring before, here's how to do it--it's super easy.

So that's our summer wardrobe taken care of, although I know that the kids long for more leggings, their favorite piece of clothing to wear (also the most fragile, easily stained and highly prone to tears, grr!). Leggings are actually pretty quick and easy to make, and I've even figured out a way to make them out of old T--shirts, so they're for sure on my to-do list...

Maybe for winter, though.

Wednesday, June 14, 2017

Homeschool Science: Yeast is Alive

The other day, Syd and I were baking bread together. She was making peasant bread for that night's dinner, and I had found that inexplicably, I have flaxseed in my pantry (where do I get these things?!?), and so I was making up the dough for a whole wheat and flaxseed bread recipe that I'd found on Pinterest.

I was pretty excited, because the dough also calls for steel-cut oats, which are all I have. Recipes NEVER call for the kind of oats that I have!

Although we've made that peasant bread recipe several times, it occurred to Syd on this day to ask why it has sugar in it, if the bread isn't sweet.

"The yeast eats it," I said, attention about one-quarter on her and three-quarters on my recipe. It calls for so many odd ingredients that I own but rarely use!

As soon as I finished speaking, the entire world seemed to pause, and then Syd belted out, "You mean yeast is ALIVE?!?"

It turned out to be the perfect afternoon for an impromptu homeschool science lesson!

Yes, yeast is alive. It's a lovely little fungi--in fact, it's this lovely little fungi.

I don't always encourage Wikipedia as a reference, but it's a great resource when studying living organisms, because there each entry has the entire order of classification; we like to click down the order, seeing how the categories narrow and how each species fits more specifically as they do, until finally you're left with just that one specific species of baker's yeast.

Brainpop also has an excellent video about fungi, with a lot of mentions of yeast. Syd really enjoyed it, and then came and told me all about athlete's foot while I was trying to eat lunch.

Years ago, Syd and I explored anaerobic respiration with yeast, so we repeated that same demonstration of putting a yeast and sugar solution into a bottle, then fitting a balloon over the lip of the bottle:


First there's not much to see, but after a few minutes there's already a change--


--and after an hour there's a BIG difference! That anaerobic respiration consumes sugar and expels carbon dioxide. It looks like this:


We made a second solution of yeast, sugar, and water, and as soon as that one was nice and frothy, we got out our microscopes to take a few peeks.

I LOVE our digital microscope, and we use it tons, but it wasn't suitable for viewing actual yeast cells. What we COULD see with it, however, was pretty cool--we could see the bubbles of carbon dioxide forming!


The halo of lights that you see in each bubble is not miraculous new life, but the reflection of the lights on the microscope. Syd was less wowed after I explained that to her.

Our Brock magiscope just got us to the 400x threshold for viewing the actual yeast cells. If Will continues to homeschool through high school, I am going to have to shell out for a more sophisticated microscope, but I will not be surprised if the Brock magiscope can see us completely through the middle school years.

Syd's not always terribly interested in the microscope, so this was one of her first times preparing her own slide. She kept wanting to mistake those same bubbles for the yeast cells, but I kept encouraging her to look past them, to look for the tiny dots in the background.

She found them!


I love watching a kid's absorbed face as she learns something new.

Even though the fact that yeast is a living organism was what blew Syd's mind, she's a baker at heart, and so of course we also had to explore yeast's role in baking. I saved this experiment to try another time, but instead the kids and I watched the Good Eats episode, "Dr. Strangeloaf," and then Syd and I finished our various bread loaves while Will...

Well, Will made lemon bars. There's no yeast in lemon bars, but they ARE delicious!

P.S. Check out my Craft Knife Facebook page! I share most of my homeschooling and crafty resources there.

Friday, June 9, 2017

I Also Made Girl Scout Perler Bead Cake Toppers

Because why pack for Greece when I can spend half the day making something that I won't need until October?

It's for the simple reason that there the kid sat, all companionable and listening to Sherlock Holmes audiobooks with me. How could I pass up the opportunity to blow off all the chores that I *need* to do and instead do something fun with my kid?

Even though I need to make another "4" cake topper before I turn 44 in three years, I decided that it would be ridiculous to make something that wasn't needed until 2020; instead, I made something that isn't needed until October, 2017:


Trefoil cake toppers for all of the girls in my Girl Scout troop!

I'm pretty proud of the design, which I futzed around with teeny Perler beads for a while to figure out. Happily, the design that I figured out also happened to be large enough that I was able to futz around and figure out how to add a monogram for each girl. The "A" and the "M" were the hardest to come up with:


And after all of these cake toppers, I finally got enough practice ironing that they mostly look pretty good. Ironing Perler beads is harder to get right than you'd think!


The plan is to make a cake something like this one for our Bridging ceremony in the fall, and have each girl's own cake topper on the part that represents her new level.

Perhaps I should also put the year on, since I have these lovely number cake toppers, you know...

Wednesday, June 7, 2017

I Made Perler Bead Cake Toppers For The Next 59 Years


Handicrafts afternoon with the little kid went well.

So well, in fact, that we spent this morning in handicrafts, too, back at the playroom table and messing around with Perler beads.

We listened to Homer Price, then the NPR Road Trips CD, then some Sherlock Holmes. The little kid made a giant Perler bead dolphin that is one of the annoying things about Perler beads, because where on earth is she going to put a giant Perler bead dolphin, and then a 3D Rubik's Cube that I have no problem finding a place for because it's awesome.

And I? Somehow I got sucked down into the vast rabbit hole of Perler bead cake toppers.

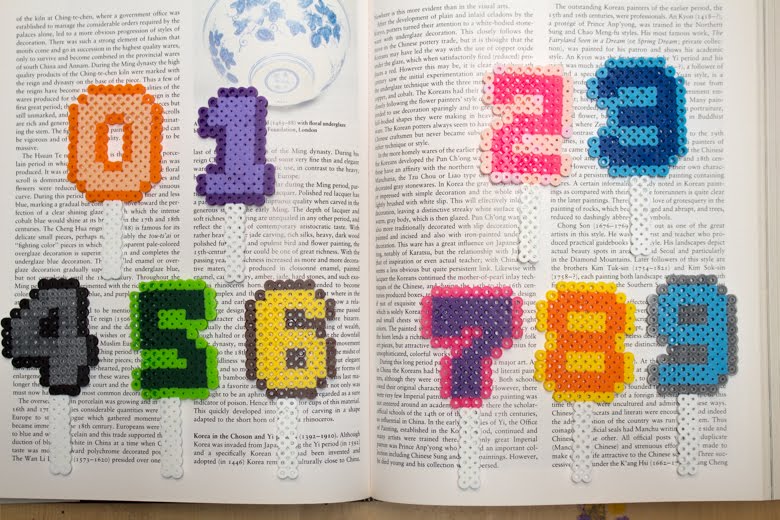
We always use my homemade rolled beeswax birthday candles for our birthday cakes (and so should you!), but I've been kind of wishing that I had something that would show ages, as well, because those big number candles are super cute. I started out trying to recreate the number candle--


--but it looked too on the nose, so I tore off the flame, and then made a whole set of digits 0-9, each number in its own colorway.

I could have gotten by for a couple of years with just the numbers 0-4, but what can I say? I'm a completionist! Anyway, they came together quickly enough, especially while listening to Sherlock Holmes, that it wasn't a chore to make the whole set.

I'm happy that I made each number its own colorway, so that nothing looks mismatched, because everything looks mismatched. Here's what the cake toppers will look like on the big kid's next birthday:


And then it's my turn--


And then it's Matt's--


--and before we know it, we'll be back around to the little kid again!


And if you think that I stopped making cake toppers right there... well, another time I'll show you what I made for my Girl Scout troop!

P.S. Here's what I used for this project:


Pro tip: Do NOT buy the big bin of assorted Perler beads, even though it's cheapish. It is no fun to sort all of those tiny beads, believe me. Buy the small single-color bags, and spend your life doing something you enjoy.

Tuesday, June 6, 2017

How-to: Make a DIY Honey Stick, If It's Really Important To You

My kids loooooove honey sticks! Whenever we go to the farmer's market, they always ask to buy 1) kettle corn and 2) honey sticks. I sometimes say yes to the kettle corn (it's spendy), but I always say yes to the honey sticks, because they're cheap. The honey stand at the farmer's market is actually the first place that the kids shopped at independently when they were just preschoolers, standing in line with a quarter each in their hot little hands (they've since gone up a bit, but are still less than a buck), picking out a honey stick and paying all by themselves, the woman running the cash box utterly thrilled, I'm sure, to receive damp and sweaty coins from the filthy hands of small children.

The kids just suck their honey sticks right down, of course, but I've long had the idea that a honey stick would also make an excellent single-serving container for the little cartons of Greek yogurt that we sometimes like to take out and about. So I tried my hand at making my own honey stick, and it's actually not hard, just tedious and annoying.

You will need:

  • a clear plastic straw
  • honey. I toyed with the idea of warming raw honey so I could pour it, but instead I simply used our regular container of honey with its little squeezey opening.
  • needle nose pliers and lighter
1. Use the pliers to hold one end of the straw, maybe a centimeter from the end:

My photos are kind of crap, because clear straws are hard to focus on, and also I needed both of my hands for this project.

2. Burn the end of the straw with the lighter, then drop the lighter in the dirt and slide the pliers to the end of the straw, pressing to seal it well. Repeat if you need to, because it just needs to be sealed; it doesn't need to look pretty!

This part took me a few tries, because you do have to move quickly in order to get your hand off of the lighter and onto the straw so you can move the pliers before the melted plastic hardens. I halfway thought about setting up my blowtorch for this, but I probably don't need to burn down my neighborhood just to make a honey straw.

3. Slowly pour honey into the straw. The opening of our bottle was just a smidge larger than the width of the straw, so I just held both steady and poured the honey in at a trickle. When you've got it full to your satisfaction, repeat the sealing process on the other side of the straw.


You can test it by squeezing the bottom end very, very gently--if you see a small bubble of honey come out, then reseal it. Flip it over and test the other side. I had to do this a couple of times for both sides, and it was a huge pain in the butt, but it did work in the end.

Verdict: do-able, in that I now have a honey stick to eat while out and about. It didn't even take *that* long to do. BUT it was super annoying, and hella frustrating, although to be fair that sealing part would surely come much easier with practice. So while I *can* DIY my own honey sticks, and it would probably be worth it if I had my own hive, or to do in smaller containers if I wanted to take little packets of raw honey camping, say, to use as an antibiotic ointment (which I don't, because Neosporin doesn't attract bugs to my cuts), but when I can buy a whole honey straw of local honey from the farmer's market for less than a dollar?

Well, I'll still probably make my own, because I AM that cheap, but I won't insist to the children that we have to make our own instead of letting them buy one each at the farmer's market, how about that?