Wednesday, April 23, 2008

Cloth Diapers How-to: Sew a DIY Cloth Diaper Insert from Stash Towels and Scrap Flannel


First, the bummers: I ate cookie dough for lunch today (urp!), the big kid lost one of the new ribbon headbands I made her, and my partner, who is, bless his heart, the most oblivious man, was for some reason wearing my favorite brown with pinstripes pants that I bought at the big Goodwill sale for $2, even though he is four inches longer in the inseam and narrower in the waist than I am, when he of course brushed against the fresh paint I'd applied in the downstairs bathroom and got green paint just all over them. Rest in peace, awesome pants.

In other news, I'm teaching a cloth diapering workshop at Barefoot Herbs + Barefoot Kids this Saturday, April 26, from 4:00-6:30. Cloth diapers are better for baby and better for the environment for a myriad of reasons, and overall they're also cheaper than an entire baby's worth of disposables, but they can have a large up-front cost. Fortunately, the actual diaper material that goes into the cute little moisture-proof cover is something that it's possible to make yourself with a bare minimum of sewing skills and using recycled/repurposed materials. This takes a LOT of the cost out of cloth diapers, and it's all terrific in that since a diaper's insides are purely functional, not necessarily attractive at all (though they can be!), you can use fabric so unsightly that there is hardly any other way to usefully repurpose them. To wit:
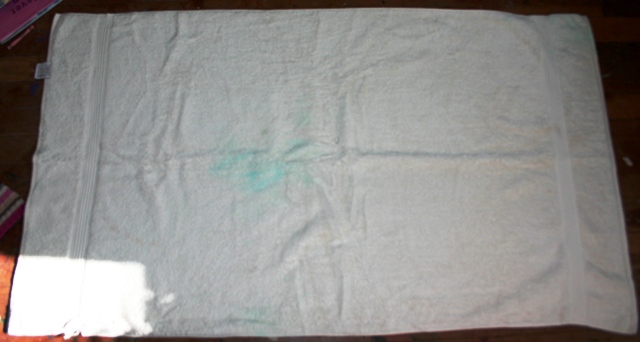
  1. Go through your linen closet and pull out all your old, nasty, beaten-down bath towels. You know you have them, and you know you need to get rid of them before company comes over. The one below is the one I'm going to be cutting up today. Notice the old fingerpaint stains in the middle, and the big tear there where the sun is shining in through the window. This was in my linen closet, y'all!2. Find a nice, big rectangle or square to use as a template. Below I'm using my 12"x18" cutting mat, which is a really nice size, but lots of sizes would work--pizza boxes make good templates, or large picture books.

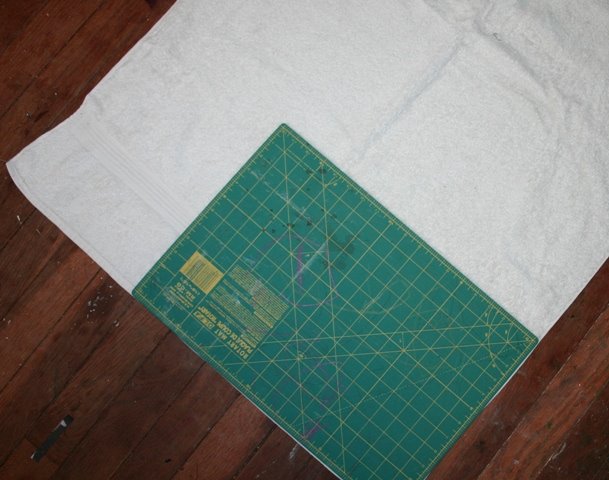
3. Cut up the towel using the template--with my template, I got five big rectangles. It's fine to include the stains, because this diaper is going to be purely functional here, but do not include worn parts of the towel--they won't last. Notice that you're going to have to vacuum later, because little bits of terry will get everywhere.

4. Using the towel as a template, now, cut a piece of 100% cotton fabric for the facing. I used some flannel leftover from the ring sling I made when the big kid was the baby, but stained cotton T-shirts are also really terrific--I often like to use fabric for these that is so ugly, stained or just stupid, that I'd never repurpose it in anything else. You can either cut out one piece of cotton fabric for each piece of terry, ending up with a diaper that is terry on one side and cotton on the other, or cut out two pieces and make a cotton-terrycloth-cotton sandwich out of it. I'm making an open-faced cotton-terry sandwich here.
5. Pin it or don't pin it, but put a sharp, strong needle in your sewing machine, and begin to stitch your two pieces of fabric together.
You will be interrupted at this point by a diaper-wearing child who is tired of independent play, and you'll likely nurse, read books, make a cheese quesadilla that no child eats, switch over the laundry, go to a children's dance class, etc., before you can get back to sewing. Frankly, I don't mean to be pessimistic here, but you may never get back to sewing.
6. However, if one child is at preschool and the other is napping for the moment, awesome, and don't forget to leave a space open so we can turn this puppy right side out when we're done. 7. Clip the corners so they'll turn right side out neatly......and turn that baby right side out. You can iron it flat, now, or just smooth it out some, but get back to the sewing machine and sew that opening closed. Sometimes I like to topstitch around all the edges to disguise the spot where I sewed the opening closed, but really, that's just fanciness, and regardless, your diaper will now look like this:


To see how it looks nice and folded inside a Bummis cover, check out the photo at the top of this post!

You can also stuff these inside a pocket diaper such as Fuzzi Bunz, and you can stitch on or just lay on top a nice rectangle of fleece if you want, which will wick moisture away from baby's butt and keep them feeling dry.

P.S. Want to follow along with my craft projects, books I'm reading, road trips to weird old cemeteries, looming mid-life crisis, and other various adventures on the daily? Find me on my Craft Knife Facebook page!

Tuesday, April 22, 2008

Dinosaurs on Film!


It's only 2:30 and so far:

  1. Since the little kid now has the high fever that tormented the big kid this weekend, we didn't go to storytime at the local library this morning, and so while the little kid napped fitfully in the other room, the big kid and I worked on the dinosaur quilt for her mid-July birthday. This consists mostly of looking at all the dino T-shirt panels and dino fabric we've collected, re-stacking and re-sorting them--she's not even four years old yet, and the big kid already knows the best part of sewing. We did make a plan, however. Here is the big kid's concept sketch of the plan:

It really is a pretty accurate sketch: basically, we decided that each T-shirt panel would be surrounded by a wide border of printed fabric. I'd like the border to have the pattern match perfectly on all sides and to be pretty seamless, like a picture frame, so a log cabin quilt it is!

2. After the little kid wakes up howling and we nurse, have snacks, read books, have more snacks, spill some milk, do some laundry, eat watermelon outside, read another book, and I bully the big kid into getting dressed (I may have raised my voice just a smidge, but honestly--what did she do with her toothbrush? We never did find it!) so my partner can come get her, he takes her to school and then puts the little kid down for a nap while I eat some Minute Rice and read some more of this awesome blog I discovered the other day. The author takes beautiful photographs, makes awesome recycled sweater creatures like I'm learning how to do, and is a self-taught sewist, as well. Her blog entry on the Simplicity 3835 shirt pattern actually sent me to ebay to bid on one for myself. If I win it, it will be my very first pattern ever, so don't snipe me, y'all, because I swear I always get sniped.

3. After I finish my lunch (it was actually pretty gross, so yay, calorie deficit!), I spend an episode of Friday Night Lights finishing up a super-large item for my Craft for My Kids swap on Craftster. I'm almost finished, with maybe one or two smallish-mediums or large-ish smalls to make for my partner's little girlie.

4. I go in to nurse the little kid back to sleep (Matt has gotten me into Superman, oddly enough, so I'm working my way through the Superman in the Sixties collection. It is so weird), then creeeep out, holding my breath, and actually have time to finish tweaking and printing the dino photos I'm going to put in the kids' downstairs bathroom. This is Sue, from the Chicago Field Museum:


These are some of the kids' dino toys. One night the big kid and I got down her Dinosaurs and Other Prehistoric Animals (Smithsonian Handbooks) (gift alert: the kids totally need all these Smithsonian Handbooks) and she actually found the right picture for each of these dinosaurs and spelled their names for me so I could label their bellies with a Sharpie. This here is a velociraptor up front, and possibly a pachycephalosaurus behind it:


4. And now it's 3:00, the little kid is now sitting on my lap pestering me while I finish up, and we're about to go get the big kid from school. We can't go to the YMCA like we usually do because of the little kid's fever, we can't go to Sam's even though we need cookie dough for my last day of class tomorrow because my wallet is MIA, so if we're lucky we'll get invited to hang out with another mom and gossip while the kids run around and get dirty, and if not we'll come home and rock the neighborhood playground, and if those are our choices for spending the afternoon, then that probably just makes us pretty lucky in general.

P.S. Want to follow along with my craft projects, books I'm reading, road trips to weird old cemeteries, handmade homeschool high school studies, and other various adventures on the daily? Find me on my Craft Knife Facebook page!

Sunday, April 20, 2008

Finally, Clean Lockers

At last, self-awareness--I've figured out why it takes me so, so long to clean up around here. So you can figure it out, too, I'll illustrate the process of my locker-cleaning this weekend:

  1. Willow was miserable with a high fever on Saturday, so instead of doing little girl stuff all day, she spent the entire day lounging in our bed watching movie after movie after movie--screen time is severely limited in our house, so this works as a stay-in-bed tactic. I decide that since my little girl helpers are halved, this would be a great time to tackle cleaning out those lockers. The first thing I pull out is a stack of thrifted and dumpster-dived T-shirts, some of which are tie-dyed. I've been working on a tie-dye T-shirt quilt for myself for a while and I also want to make another one to sell, so I separate out the tie-dyed T-shirts and spend a couple of hours cutting out quilt panels. I happily discover that all the T-shirts are large enough to also cut out the material for a baby bib and a set of coasters from each shirt. Sweet.
  2. I organize and restack the rest of the T-shirts and return them to the lockers. As I'm replacing the stack of baby clothes I'm using for a future quilt for the girls, I notice that one of Sydney's old shirts, size 18 months, has some mildew stains along the shoulder that disqualify it from quilt making. The sweet embroidery along the front is unaffected, however, so I cut that out, get on the computer and pull up all the photos I took of Sydney when she was 18 months old, crop and tweak the exposure, etc., print them out, and make this awesome scrapbook page, my best yet, I think:
  3. The Monsters, Inc. (Two-Disc Collector's Edition) DVD skips because it's been watched about 5 billion times, and so Willow comes in to see what I'm doing. To entertain her, I make her some ribbon headbands for her new short hair. They're very simple:
  • Measure the circumference of the kid's head where you want the headband to be. Willow is 19 inches.
  • Cut the majority of this length as ribbon. For each headband, I cut about 12-13 inches of ribbon.
  • Cut the rest from elastic. I used elastic the same width as the ribbon, and about 5-6 inches in length.
  • Sew the elastic to the ribbon at both ends with a very strong stitch, and trim the raw ends close to the stitching. I didn't include a hem allowance here because you want it to fit a little snug, so the finished circumference of the headband should be about an inch smaller than the kid's head--that's where the elastic comes in. Make them a little roomier for growing, if you'd like.
Here's Willow rocking one of her new headbands:
4. Something like 12 hours have passed, now. I re-organize the sewing stuff and put it back into one crate in the locker. I wonder where to put my knitting stuff. I still haven't completed any knitting projects--I want to make something useful and necessary (no scarves!), but easy enough to let me practice my skills and get them into muscle memory. Hmm, I think...washcloths! They're small and square, I can practice a variety of stitches, and we have practically no useful washcloths because I keep using them for cleaning and getting them stained and gross. I cast on for a six-inch square washcloth, using my Stitch 'n Bitch Nation as a reference, and happily knit away in a simple knit stitch for the rest of the evening.
5. It's the next morning, and since I was up with Willow pretty much all night, Matt let me sleep in until 10:00 am, and then took the girls out for breakfast burritos and to try to score a Sunday paper from outside some business closed on Sunday. I knit some more, hiding in the bathroom for most of one row when Matt returns home, since I don't know how to stop in the middle of a row and I'd told Matt I'd be cleaning while he was gone.
6. I do clean for a while, finding a box for knitting stuff and organizing and replacing my scrapbook stuff, and then I pull a Scrabble board out. I used these for bulletin boards and book covers last summer, but my latest issue of had a short tutorial about how to make a box out of a gameboard. I should probably see if it works before I decide what to do with the rest of the gameboards I have lying around. I make some modifications to the tutorial, covering the inside with flannel, reinforcing the edges with pretty duct tape, and altering the overall dimensions somewhat, and it ends up taking so long--at least a couple of hours--that I doubt I'll make any of these to sell, but I might make more to store stuff in the house. It looks pretty awesome, though:
7. Matt is starting to give me dirty looks every time he passes the doorway to the study, now, so I buckle down for 30 or so minutes and finish up:And yeah, that's why nothing is ever clean around here.

Saturday, April 19, 2008

Another Clean Table

At last, the work desk is clean:
I found some overdue library books, one of the girls' Planet Earth - The Complete BBC Series DVDs, a couple of tax forms, the clear packing tape we'd been looking for, a student's homework paper (oops!)--it was quite the treasure trove. I was even inspired, after looking at this very photo of the unattractive wall with the electrical cords hanging down and the one sad little postcard from our vacation to France when Willow, who is almost four, was 8 months old, to whip out my brand new duct tape in pretty colors and organize all the very, very many cords at my desk: It still looks a little wild, but they're not tangled, they're off the ground, I can see what goes with what, and they're relatively inaccessible to the babies. Up on top of the desk, now, I have a second power strip, and I've plugged all the power vampires--scanner, printer, back-up drive, laptop--into that power strip, even if I've taped their cords to the wall down below. I can easily reach the power strip on the desk top to turn it and the vampires off, and below the desk I've plugged in the stuff that isn't vampiric--desk lamp, pencil sharpener, sewing machine--and the wi-fi thingy, which needs to stay on regardless.

So I'm still going to do my next project, which is my supply lockers in the study--
--but otherwise this plan is a bust. All my previous projects--study floor, livingroom table, etc.--are as filthy again as they were before, and the rest of the house is even filthier because instead of lowering the overall filth factor of the house by a little bit every day, I've been spending most of my very short cleaning time just trying to lower the filth factor of my few project spots a lot. Sigh. So until a new plan emerges, we'll keep to our previous workable strategies of kicking stuff over to the walls when we need floor space and enforcing the rule that when you trip over something, you have to pick it up and put it away (Willow tries to get around this rule by, while getting back up after falling on her face, tears in her eyes and readying the screams, insisting, "I didn't trip over anything!").

Monday, April 14, 2008

Webbings

No fear--I redid my botched project this morning while the girls played with toy cars on the study floor and it totally looks even more awesome than it did before (I hope my swap partner thinks so, too!), and then I made another item for the little girl in the swap, and then I tried it on Willow, and then Willow begged me to make her one exactly like that one, so maybe I'll be making another one tomorrow...

My big adventures, lately, have been in the perusal and purchase of dinosaur fabric to include in the dinosaur T-shirt quilt I'm making for the girls this summer. I don't usually frame the T-shirts in my quilts, because I tend to like the simplest presentation for what can often be very busy or dramatic and large squares--
but with this dinosaur quilt I thought it might be fun to frame the shirts by showing off the diversity of dinosaur prints available--something along the lines of this quilt, but my designs are generally very bold and I plan to use a variety of fabrics for the framing.

I've already blogged about the numerous gorgeous dino prints I covet on the Web, and how they're all far too expensive for my meager budget. What's a girl to do? Ebay! My maximum price for each item, product + shipping, was $10, and now I've got this:

and this:

and this:and, awesomely, this:
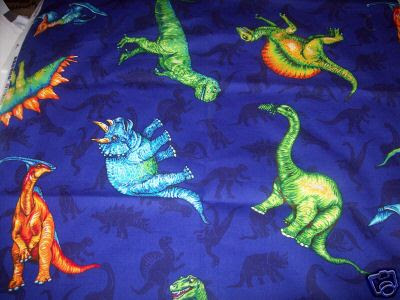
This latter I'm going to back and bind and hang as a tapestry in the basement bathroom off of the playroom, which the girls and I are currently painting a combination of aqua green and Incredible Hulk green. The other fabrics will be ample, I think, for the full-sized quilt I'm planning, plus some pillowcases and perhaps extra for dino quilts to sell.

It's really kind of crazy how dinosaurs have grown on me since Willow's own obsession began, way back when. Natural, though, considering that since she's three years old and I'm her mother, I spend as much time reading about them, looking them up on the Web, watching documentaries on them, visiting them in museums, and making up stories about them as she does. I might like them more than cats now.

In other news, I've now joined the community of awesome people with a wist. What's a wist, you ask? It's a Web thumbnail list, indexed by keyword, accessible to anyone. In non-librarian terms, you can put thumbnails of stuff you like--stuff you want to buy, stuff you want to make, stuff that inspires you--on your own page, and anyone can view them, search them by keyword, link through them to the original site, etc. This is my wist. What's yours?

Sunday, April 13, 2008

Stitch and Botch Sunday

So I spent a few hours today making something for the baby in my Craft for My Kids swap. Off and on all day, in between painting the front door, playing yo-yos with Willow, buying duct tape in awesome colors from Wal-mart, watching Matt's softball game, scrapbooking/collaging with the girls, eating pizza, etc., I worked on this thing while watching season one of Friday Night Lights on Netflix's Browse Instant feature. And I was proud, too--my stitching has never been so even, I got the tricky part just absolutely right through my own skill and intelligence, I even matched the thread, even. And then I snipped the last thread and evaluated my finished product, and...I made it twice as long as it needed to be, and only half as wide. ??? Totally botched the project; there's no fixing that width. Totally botched the fabric; it's good for nothing but scrap, now. Fortunately, I pulled a fabric from my stash that will be almost as awesome, or maybe even more awesome, depending on my partner's tastes, than my first choice, and I made Matt pause his video game to come in and do the simple arithmatic with me this time so I know I have a perfectly cut item to sew up tomorrow. On the grump side, I hate wasting fabric, because that wastes money, and we're very poor. On the non-grump side, I'm pretty stoked to be using stash fabric now--isn't everybody stoked when they get to use up some stash? Makes room for more stash!

In additional botchery, remember when I posted that I'd learned to sew Velcro for this swap? Um, no. I did a test wash today of one of the items I'd used the Velcro on ("test wash" is code for "Sydney mashed banana into it"), and it did not do so much of the staying on nicely thing that I'd hoped it would do. On the grump side, now I have to do that part over and I wasted money on stupid Velcro. On the non-grump side, I'm pretty stoked that tomorrow I'm going to buy some snaps and a snap-setter--I have always wanted to learn to set snaps!

And, um, finally...don't freak out, grandparents, but Willow's hair, which used to look like this:

today looks like this:She did the back middle (unsupervised, with "Momma scissors") and I evened out the sides. It's adorable, of course, and though there were dire consequences for using Momma scissors without permission, there were no consequences for the hair cutting--it's her hair, right? I firmly support her right to have control over her own body, within the limits of safety and public codes of conduct, but I do still get to cry quietly in the bathroom with the door closed. Adieu, sweet little baby curls. Adieu.

Friday, April 11, 2008

New Friday Findings


Lots of found stuff this week, a snapshot of what I've been up to: skill-building, kid-swapping, felt foods, craft fair applications, etc.

Brainstorming ideas for my Craft for My Kids swap, I came across this pattern for cloth baby shoes. I was always a weird parent, in that I never really got into baby shoes (or bibs, to many extended relatives' frustration--on a visit, a relative once tied a cloth napkin around my baby's neck when I wasn't looking), but I was actually thinking it might be really awesome to expand this pattern and try it out for adult slippers.

And here's a pattern for a little fabric house. Next rainy day, I can imagine making about a thousand of these with the kids, an entire city of little fabric houses to step over or, Godzilla-like, ON.

I found this blog during a Google Image search for felt food ideas--I love the fact that this author makes stuff for the kids, shops in thrift stores, and, ooh, scroll down until you see the Super Mario Bros. quilt--awesome!

In my search for indie craft fairs to apply for (or shop at!), I decided just to make a collection of all the ones I find, since they're still more rare than not. Stitch Rock, unfortunately, takes place in Florida, but I love its tag line: "bringing back old school crafting technique with new school flare." Black Sheep, also in Florida, also has a good one: "Be there or knit a granny square."

I could possibly attend something like the Detroit Urban Craft Fair--I'm thinking about driving-distance destinations with either relatives to visit or cool kid-friendly tourist stuff to do. That's how the St. Louis Rock-n-Roll Craft Show fits in, too, since they have a zoo and their hands-on science museum has animatronic dinosaurs.

And so you don't think that I haven't been reading real, live books this week, here are two I've been working my way through while drinking coffee or nursing: Bend-the-Rules Sewing: The Essential Guide to a Whole New Way to Sew, by Amy Karol, is such a useful resource for a self-taught sewist because it offers some pretty intricate projects that I can totally get into, but without using the technical language I never learned. I just realized, while flipping through it for an example, that there is something in here I am absolutely going to modify for my swap!--lips are zipped.

I'm still more of a peruser of knitting books than an actual knitter, but Twinkle's Big City Knits: 31 Chunky-Chic Designs, by Wenlan Chia, makes good perusing. Also peruse the list of errata, though, and no foul there, because manuals are hard to do. My editor, back when I wrote for The TCU Magazine, once told a story of being a proofreader among a team of proofreaders and being called to the carpet because 10,000 copies or something of some math book, like Advanced Geometry or something, had been shipped out and it took a high school kid, instead of an entire chain of command of publishers' employees, to notice that on the front cover, Geometry was misspelled. Anyway, I don't dress in girl clothes, and you know I don't really knit (yet), but for some reason I really love the downtown groovy sweater dress on page 16.

Know more? Share!

P.S. Want to follow along with my craft projects, books I'm reading, road trips to weird old cemeteries, looming mid-life crisis, and other various adventures on the daily? Find me on my Craft Knife Facebook page!

Thursday, April 10, 2008

Felt Food for Fun

Today was both a school holiday for Willow, an occasion that I love because I love having both my girls with me all to myself all day, and a rainy day--a double cause, therefore, for some weird, elaborate project that filths up the house and keeps us excited all day. And so today, the girls and I were felt food fools!

Look at the awesomeness we created:


We just kept on thinking of things to make for the entire day. The simplest stuff to make, of course, is in the "flat" category. Bread is just a brown bread shape with a white smaller bread shape stitched on--if you're into a pleasing shape, by the way, or you're just not a skilled hand-drawer as I am not, it's simple to find a template for most of this stuff by doing a Google Image search for, say, bread slice, printing out a picture that has a shape you like, and cutting it out. And once you have bread, all the other sandwich fixins are easy--cheese slices (don't forget a holey Swiss or my own personal favorite--American!), lunchmeat, the peanut butter and jelly I made above, etc., don't even require sewing, and items like lettuce leaves or tomato slices just need some embroidery for definition.


And with flat stuff, you can always pile on more flat stuff, and then you have...frosted cookie and slice of pizza! Even though we never have either sausage or pepperoni on our pizzas (we always, always order half sundried tomatoes or broccoli for me and half pineapple for Matt), Willow requested the above "saussaroni" on her pizza.


For foods that you want to have a little more body but that are still pretty flat, you can cut out two identical front and back pieces, sandwich another, slightly smaller piece of felt or low-loft batting or fleece or whatever scrap in between them, and sew around the edge for something like...

Mmm, pancakes, but I actually had to cook eggs over-easy for the girls this morning, because they'd never seen this exact food before.


And then you can quilt through your layers for additional detail if you want. And notice that this ain't necessarily super-realistic--if you want to make really elaborate and detailed and perfectly realistic felt food, that's awesome and you can, but that's something that's all about you. If it's something you're doing because it's cool to do with kids, then remember that kids don't want perfect, they just want you to finish up their grapes, already, so they can add it to their lunchbox and go on the pretend picnic.

Stuffed foods are a lot like the quilted foods except that instead of putting a layer of batting in between the front and back pieces, you leave an opening when you sew them up, then stuff them--in my case, with the fill out of an old pillow--then finish sewing. If you want to add a stem or leaves, don't forget to put it between the layers before you sew.


But probably the best part about making felt food is using your creativity and your three-dimensional constructions skills to make awesome stuff that doesn't fit into these easy categories. For the watermelon, for instance, you can start out with just a red circle, but then you've got to make and trim a paper mock-up of the rind to figure out just what shape and size it needs to be, and then you'll probably want to hand-sew it and stuff it. You can make seeds just by sewing back and forth through the stuffing to both sides of the flesh and taking tiny stitches. This was Willow's special request, and it's her favorite piece of food from today:


I'm the one who likes sushi, and these are really easy: roll up long rectangles, hand-stitch the felt nori closed, and take a few stitches back and forth across the whole piece to keep it all together.

The fortune cookie is another circle with a little hand-stitching to close it, but it's kind of weird to fold unless you pull up some real fortune cookies off of Google Image to look at for reference:

Such an easy, fun, and satisfying creative outlet. What felt foods do you make?

Wednesday, April 9, 2008

Craft for My Kids Swap

I am rocking this new swap that I joined on Craftster. In it, I get to make stuff for my awesome partner's awesome kids, and she's making stuff for my awesome kids. So if you're wondering why I haven't been posting my projects, it's because I don't want to spoil the surprise! I'll post everything when the swap is over, however, with tutorials when necessary.

Doing a craft swap is really excellent for a lot of reasons. Chances are, if you have a craft that you really enjoy doing, you do it a lot, and that results in a lot of finished projects...a lot for you, a lot for your family, a lot for your friends, a lot for your kids' friends, etc. For instance--and this is not something I'm making in the swap!--I loooove to solder, and particularly to make pendants out of old postage stamps sandwiched between microscope glass. So I made myself some out of some cool stamps, I made Willow a couple of dinosaur stamp ones, I made all the grandmas necklaces and all the great-grandmas ornaments out of a photo of the girls, I made some of Matt's cousins necklaces of photos of their respective babies (and only received a sweet thank-you note from one of them!), I made a couple dozen dinosaur and superhero ones to post on etsy...and now, whenever another mom compliments me on the necklace I made from the girls' photo, I say, "Give me a little photo of your kid, and I'll make you one, too." I have also offered to do everything from patch another child's torn pants to making my daughter's dance teacher her own no-sew tutu to making my librarian friend's son a [insert item I am crafting for my swap] of his own. So having another recipient (especially a willing one!) for something I love to make allows me to keep indulging in a relaxing and useful pastime.

Craft swaps are also really excellent as motivation for learning new skills. In my very first swap, I learned how to cut out quilt blocks not with a template, but with a clear gridded ruler. I also indirectly learned how to use fusible webbing. In this swap, I've so far modified an existing pattern and created my own take on a certain baby item and learned (sort-of) to sew Velcro (sticky needles!), and I plan to create some new patterns/recipes for new items before I'm finished. It's part of my obsessive personality that I really, really, really like to learn new things, so this, for me, is the best thing about crafting.

Finally, who wouldn't want to have, in exchange for these pleasures, a few beautifully handcrafted items lovingly made just for you (or in this case, your kids)?

Monday, April 7, 2008

A Clean Table

At last, at last! And mind you, this one took several days. Before...

  • diaper bag
  • stacking blocks
  • drywall screws
  • shelf board
  • circular saw (have I mentioned before that my partner has a habit of doing woodworking in the living room, using those two red chairs there as sawhorses?)
  • flashlight
  • dirty bowl
  • knit cap (temperature is in the 70s now)
  • seed packets
  • mail
  • big purple ball
  • Ziploc bags of Easter eggs
  • two shaggy rugs bought for the kids' playroom we're going to build in the basement
  • ornament hangers (from my last craft fair, not Christmas)
  • pants

And, um, that's just the top layer. Notice, again, that hardly any of this stuff is actually, you know, MINE. But I cleaned and cleaned and cleaned and my partner helped me clean and now we have:


Below the table of course, is an empty honey container and a sock and a library book and a sandal. We've eaten at the table now a couple of times, but that was yesterday, and tonight before bed I have to go back and clean the whole thing off again, because today is a new day, and a new day brings new stuff to bring into the house and pile on the table.

P.S. Want to follow along with my craft projects, books I'm reading, road trips to weird old cemeteries, looming mid-life crisis, and other various adventures on the daily? Find me on my Craft Knife Facebook page!

Sunday, April 6, 2008

Saturday, April 5, 2008

Let There Be Shorts

Um, still working on that living room table. I had an edge cleaned off this morning, but then the girls and I immediately used that clear workspace to start seeds in the peat pots we'd filled with dirt a few days ago. Gourd, tomato, brussels sprouts, and peppers before they got bored, and I'm totally cleaning off that table tonight!


More pressing matters are afoot, anyhow--the big garage sale fundraiser for Willow's school is next week, and in lieu of giving the school any meaningful monetary donation this year (except for the meaningful size of tuition) on account of we're very poor, I'm poring through our house, which really isn't crammed with stuff we don't need despite photos to the contrary, to find all the stuff we can donate. This coincides neatly, of course, with the seasonal transition of winter wardrobes to spring ensembles, and so what have I been doing? Cutting pants into shorts and long-sleeved shirts into short-sleeved shirts, of course.


This is a very useful thing to do, but with more than one kid, the calculations of what gets altered can be quite complex. Sydney is simple, since I don't plan to birth more babies: long pants that aren't fancy enough to attempt selling to Once Upon a Child and that likely will be too small in the fall are cut into shorts. Same for long-sleeved shirts. Long pants that Sydney grew too tall for during the winter are dragged back out and any her waist still fits into are cut into shorts. Weird stains I haven't been able to soak out are covered with jaunty fleece or uphostery fabric appliques. She tries them on, and cuteness prevails:

Notice that some fabrics do better with hemming, and with some, you don't have to bother: kids are the only group who can still pull off the frayed look.

Now with Willow's clothes, I have to set aside not only what she'll likely still be able to wear next fall, but also what is in good-enough condition to pass down to Syd. This winter was the first one in which Will was hard enough on her clothes to actually blow out the knees of numerous pants. Any pants with thin knees get cut into shorts. Pants that I hated the look of often look cuter as shorts. Don't forget to cut the shorts long--not only might you want to hem them after all, but with all the sunshine they're going to get, the kids are going to grow like weeds. I always cut the kids' stuff pretty long, anyway--I do NOT like the look of short shorts, even just girl-style short, on little girls. My girls are proud of their bodies, and I'm fine with them showing them, but this look just seems, maybe because teenage girls also like to get their hoochie on in short shorts, too sexualized for kids. So cut them long, hem them if you want, add appliques over weird stains.

Winter clothes--sweaters can be worn longer if you add a front zipper so you don't have to squeeze protesting heads through outgrown neckholes. Or, you can cut the sleeves off and hem them with a zigzag stitch for a cute vest. Or, you can cut them in half in the front and hem the raw edges and just let the kids rock it like that on a cool night.

The joy of bare knees and elbows after a long, wet winter--do you remember how awesome that is? If you don't, ask my kids. They'll tell you it's pretty sweet.