Showing posts with label refinishing furniture. Show all posts

Saturday, August 21, 2021

Easy Handmade Gift: Matted Photo in a Thrifted Frame

This tutorial was originally published on Crafting a Green World in 2016.

 Need a gift that's easy to make but still personal? A matted photo that you make yourself can be just the thing! 

You use a photo or artwork that lets your recipients know that you're thinking only of them, and yet the actual matting and framing of the photo takes less than an hour and costs less than five bucks. 

 Key to this project is the thrifted frame. If you've never gone thrifting for frames, I highly recommend it! Many people, when they get tired of what's inside the frame, just donate the entire piece, frame and all. Our local Goodwill stores have monthly 50%-off storewide sales, and whenever I go to them, I always look through their frames and take home the ones that I like. I generally repaint them for use in my own house, but this gold one that I pulled out of my stash (with the price tag on the back: $1.50!), even though I'd have painted it navy or slate for myself, will actually go perfectly well as-is in the recipient's home. That's one fewer step for me! 

 If you do want to refinish your frame, check out my round-up of the best methods. Scroll down to the paint and fabric tute to see how I refinish my frames 99% of the time. 

 The next thing that you need is a lovely paper to cover the thrifted frame's existing mat board. You're not making a piece that has to look perfect in a thousand years, so I don't worry overly much about the acidity of the papers that I use. This is a gift for your grandma or your girlfriend, not the Queen of England. 

In my own house, I have frames covered in dictionary pages, comic book pages, and wallpaper samples, but for this particular frame, I'm using handmade paper from a little book that has a looooong story, full of drama, from my wedding. So much drama that some of the pages ended up getting torn out. Ask me about it in the Comments and I'll tell you. Buy us a pitcher of margaritas, and I'll tell you some even worse stories of my wedding drama! 

 I decoupaged the handmade paper to the mat board, tearing the paper into strips and overlapping the edges into straight lines to make the piece look somewhat orderly. The handmade paper is neutral-toned, as well, so it doesn't distract from the photo. 

To attach the paper to the mat board, I just used double-sided tape. Now, tape is something that you DO want to be picky about, because a lot of tape is horrible and will begin to discolor your work within months, so it's best to have handy some kind of tape that says it's "document-friendly." 

 If you've got that document-friendly tape, you can also use it to attach the photo to the decoupaged mat board, but if you're worried, just use photo corners. 

That was such a beautiful road trip!

 Honestly, the biggest pain in the butt when using a thrifted frame is cleaning that glass! These frames have sat in someone's house for decades, sometimes, and I don't know what all they have on them, but it can be gross. I use straight vinegar in a spray bottle, scrubbed off with crumpled-up newspaper (this is also how I clean windows and mirrors), repeated until whatever gunk is all over the glass finally comes off. 

 The last thing that you have to do is simply re-assemble the frame, making sure that you have the hanger on the back correct. 

Wrap it up, add a pretty bow, and wait for the squeals of happiness when your thoughtful gift is opened!

Saturday, April 3, 2021

How to Refinish a Clock with a Coloring Page

 This tutorial was originally published on Crafting a Green World.

If you can get a clock with a dragon on it, always choose the dragon clock. Dragons are awesome. 

 But if you can't get a clock with a dragon on it--if ALL the clocks at the thrift store are boring and beige and dragon-free--then just choose one of the boring clocks, take it home, and put a dragon on it yourself. 

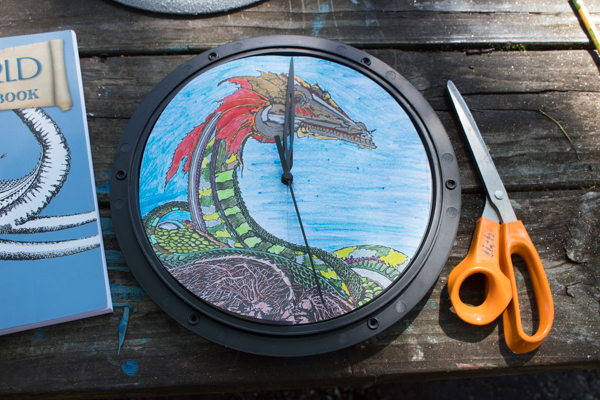
 This particular clock cost me a whole dollar at Goodwill. It wasn't exactly beige, but it wasn't anything special, either. I refinished it with my special secret paint method (which I'll share with you in a minute!) and a completed coloring book page, and now it's my new favorite thing. 

 Want to make your new favorite thing, too? Just follow along! 

 You will need: 

  clock. It should be in working condition, with a flat face (ie. no sticky-uppy numbers) and an accessible one--flip it over and look for the screws attaching the front to the back. If you can reach them, you can probably dismantle your clock, refinish it, and reassemble it without too much fuss.

  coloring page. You can also use scrapbook paper or wallpaper, of course--just make sure that your paper is acid-free, if you don't want to have to change it out every few years. 

  paint. As you'll see in a minute, I'm using three different paints on this clock: primer, a stone texture paint, and a silver glitter paint. It's what I needed for the exact effect that I wanted, but you can use whatever paint you prefer, as long as it will work on the surface of your clock. Plastic, for instance, will need a primer designed for plastic. 

  miscellaneous supplies. pencil, scissors, white glue and paintbrush, etc.  

1. Disassemble the clock and refinish the frame. Do NOT lose those little screws! This clock was intended for my kids' bedroom makeover back in 2017, which they have requested have a Medieval fantasy castle sort of theme. We're not going too far overboard, but we are painting their walls grey, displaying my older daughter's sword and dragon collections, and adding some small touches, such as this clock whose frame I wanted to look like it came from a treasure trove. 

 To get the effect, I primed the plastic frame, then sprayed it with two coats of stone texture paint. When that was dry, I sprayed it with two coats of silver glitter paint, making the whole thing super sparkly and mysteriously like a vein of silver torn from the rock. I've since also done it to a picture frame and a light switch cover, both also intended for the kids' bedroom, and they've all come out looking amazing. 

  2. Prepare the new paper background. To fit with the fantasy castle theme, I used a completed coloring page from the Tolkien's world coloring book. You can use any paper you'd like. Use the frame to help you trace a template of the clock face onto the coloring page, then cut it out. 

 Gently set the page on top of clock and mark the center; cut from the edge up to the center, then cut a hole in the center to accommodate the clock's stem. 

 3. Glue the new clock face down. Gently peel up the paper in sections, and paint the back side with a thin layer of white glue; press it well so that it doesn't bubble. 

 My hands are filthy because I was also working on the second coat of those grey walls. The kids were off at sleepaway camp, and I wanted to surprise them with their new room when they got home! 

  4. Reassemble the clock. This will probably involve cleaning the glass front of the clock, and then putting it all back together. 

 You can do other cute things with the clock face, of course, such as adding number stickers or stencils or decoupaging several different papers onto it, but double-check the placement of the clock hands, first--the minute hand on this particular clock was sooo close to the clock face that there wouldn't be room for more layers of paper and Mod Podge.

Thursday, August 27, 2020

My New DIY Treadmill Desk is Everything that is Awesome


I guess one of the okay things about living safe and sound at home during a pandemic is that various projects that we have put off for a variety of months and years are occasionally finally getting done.

Will incubated eggs like she wanted to last summer but didn't get around to doing before it got cold (I bought her this incubator for her birthday last year). I made the Christmas tree topper whose pattern I printed out probably this time last year. I'm almost finished with the quilt that I wanted to give to my kid last winter. Hell, I even just finished up two months of physical therapy to fix the shoulder that I busted almost exactly a year ago to this day!

One of the reasons why my shoulder got so bad (other than, you know, me ignoring my chronic pain...), suggested one of my physical therapists, was likely my professed habit, as I told them, of "spending most of my days hunched like a gremlin over either a keyboard or a sewing machine." I feel like over the course of my many visits, at one time or other every single physical therapist in the practice gently suggested to me that, you know, I NOT do that.

So now I spend some of that time sitting on a yoga ball instead, or standing with my laptop propped up on a big cushion--there's really not a great way to make a laptop ergonomically correct, it turns out, since the screen and the keyboard are so compressed together.

But the need to get some variety into my sedentary occupations reminded me that I LOVE vibing on my treadmill, and I have wanted a treadmill desk for probably a decade (Noel, when did you trade me your old treadmill for my old DVD player? Was that a whole decade ago?). 

And wouldn't you know it, but like many of my most procrastinated-against projects, my brand-new DIY treadmill desk took probably five minutes to make, maybe twenty if you count the time it took to pick out the materials in the big-box hardware store (I'm not going to count the drive there and back as time spent on the project, because we were there buying stuff for probably fourteen different projects, and also I was a little tipsy so I bought some plants I didn't need, too). 

Matt and I bought one finished board longer than my treadmill is wide but about as wide as the treadmill's horizontal handrails are long. We also bought two bungee cords the same length as the board.

Our sophisticated mounting system is to lay the board across the handrails and stretch the bungee cords underneath it, bungeeing it to the handrails and hooking the ends over the short ends of the board. Matt was all prepared to do more stuff to make it sturdy, but that's all it took! It's totally sturdy!

As I type this I'm trundling along at a happy 1 mph, my posture for sure not perfect (shoulders BACK, Julie!!!) but also for sure not hunched forward and slumped over in a way that makes the state of my scapulas absolutely shocking for a physical therapist to witness. It feels really nice to get some restless energy out when I've got a lot of writing to be going on with, and the desk is big enough that I can make myself a whole magpie's nest on top of it with all my stuff. 

It's a DIY win! I kind of even have the urge to go flip through all my planners from the past decade and find the one where I wrote "DIY treadmill desk" in some random to-do list next to some random week...

...AND CROSS IT OFF!!!!!!!

Saturday, July 18, 2020

How to Refinish a Picnic Table with Paint

I originally published this tutorial on Crafting a Green World.

You've got to paint a few coats of sealant on your picnic table, anyway, if you want it to last outdoors--you might as well paint something interesting onto it first!

You can do this project on a picnic table of any age. If your picnic table is old and care-worn, replace any rotten wood and sand the other surfaces down to clean boards, first. If your picnic table is brand-new, you can paint right onto the unfinished wood.

Supplies & Tools

Either way, you'll need the following supplies:

  • Water-based outdoor primer. 
  • Water-based outdoor paint. Avoid oil-based paint, which generally has more VOCs than water-based paint, and requires paint thinner to clean up. You can use any water-based outdoor paint, and look for the smaller, approximately 200 mL "sample" containers to avoid waste. For this project, I bought 200 ml containers of Dutch Boy Maxbond Exterior in satin. There's just enough paint to refinish my two picnic tables, one old and one new, and freshen up the work on the deck chairs that I refinished here on CAGW four years ago.
  • Paintbrushes. I used large paintbrushes for the primer and the sealant, and a selection of small artist's brushes to paint the colorful details onto my picnic table.
  • Measuring and marking tools. These might include a pencil, meter sticks or rulers, and masking tape.
  • Polyurethane sealant. Buy water-based polyurethane sealant to make this project more eco-friendly. I used to be reluctant to use polyurethane sealant altogether because of its environmental footprint, but watching my deck furniture rot and need to be replaced after just a couple of seasons of Midwestern weather taught me that it's better to do what it takes to make things last. If you know of a better alternative, do me a favor and let me know in the Comments below!

Directions

1. Prime the picnic table.

You only need to prime the area that you'll be working on, as you can otherwise seal the bare wood of the underside of the picnic table and benches. I used white primer, but I'd actually recommend avoiding white unless you really want that specific color in the background of your design, or you plan to completely cover the white with another color. Even after several coats of sealant, white quickly looks dirty, and that happens all the more quickly outside. If I had this project to do again, I'd have instead started with a slate grey or blue for the picnic table's top.

2. Sketch out the design.

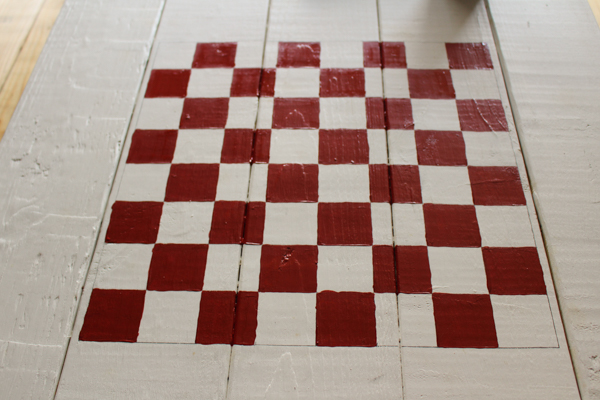
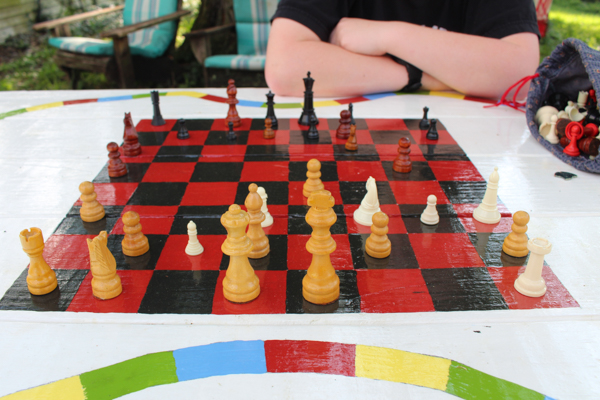
You can draw your design with a pencil directly onto the primed surface of the picnic table. I wanted this picnic table to have a chessboard, tic tac toe board, and colorful board game path painted onto it, so I first sketched them all in with pencil.

For the chessboard, I used two-meter sticks to measure out a 16x16" square, centered between the two picnic benches, and then I divided the square into an 8x8" array.

For the board game path, I used masking tape to lay a curving path around the perimeter of the picnic table. Masking tape can even be used to make smooth curves if you tear off and layer short pieces.

I traced the path in pencil, tore off all of the tape, and then divided the path into 2" steps.

I also used masking tape to lay out the tic tac toe board, then traced around it in pencil and tore off the tape.

3. Paint the picnic table.

This part of the process takes the longest, because you must wait for a color to dry before you can begin painting an adjacent color, and each color might require 2-3 coats before it looks saturated.

After the entire picnic table is painted, you can paint on the polyurethane sealant. This also takes a while, since there are several coats to add, and it can take up to a week for the last coat of sealant to fully cure for use.

But the time-intensive process is well worth it when you see the beautiful result!

The well-sealed surface of our picnic table ensures that we can use it as-is for all of our other outdoor projects and fun, but there's nothing like sitting down to a quick game of tic tac toe using twigs and leaves while we're waiting for one last person to finish getting ready before we all hop in the car, or grabbing the bag of mismatched chess pieces for one game of chess that turns into eight games on a lovely spring evening.

That's a lot of multi-purpose fun from just a few colors of paint!

Wednesday, May 15, 2019

DIY: Rainbow-Painted Pegboard To Organize a Teen Crafting Space

Will can occasionally muscle a puzzle onto the kids' shared playroom table, but mostly it's Syd's domain, held by the simple means of attrition. How can a kid stretch out a 1,000-piece puzzle or a coloring book and her pencils when another kid already has the entire table covered in fourteen different slime recipes, all halfway done and half-spilled across each other? And the one bit that doesn't have slime has Perler beads and polymer clay AND a bunch of paint tubes and a wet canvas?

It's madness, and hugely messy, but Syd adores her space, and spends much of each day at that table, listening to audiobooks or YouTube video tutorials of even more weird crafts, crafting her heart out and happy as a clam.

Last summer, in an attempt to contain at least some of the mess (and, more importantly, to keep Syd off of MY work table as much as possible!), I created a couple of giant pegboard organizers for the walls adjacent to that table.

I bought a small and a large pegboard, and taped them into seven sections--the best thing about pegboard is that you can just count holes to make your measurements. The green stripe is going to be slightly narrower than the others, though. That is never not going to bother me.


If I had this project to do over again, I think that I would have bought real paint. They have these "sample" sizes of paint that you can buy that are like just a cup's worth; those and small paint rollers would have been soooo much easier to use, and I wouldn't have had to do so much taping off.

Oh, well. With the spray paint that I used, I had to tape off the area that I wasn't painting, for every single stripe, and it was terribly tedious:


And it got spray paint overspray all over the driveway, but y'all know that has NEVER been something that I've been concerned about.

I think it turned out quite lovely, even if my poor photography skills mean that you can't see how nice the purple stripe looks. Bossy blue washes out shrinking violet!


Matt mounted the pegboards for me, and the next step of the process involved more purchases than I prefer, and the revelation that there exist in the world TWO DIFFERENT SIZES OF PEGBOARD HOLES. So there we went, returning half our purchases and trading them in for a slightly different size.

We've actually had this setup in place for almost a year now, and while it doesn't look as tidy as I'd dreamed, it does contain the mess and chaos and nonsense and keep it off the table and the floor... mostly:


She's organizing her glitter stash in rainbow order, obviously.


That right there is everything that you need to make slime or polymer clay creations, or repaint Monster High dolls or squishies.

Next up: wouldn't it be nice to organize and contain all of the American Girl doll mess and chaos and nonsense?

Friday, June 23, 2017

A Children's Bedroom Update: Work in Progress

While the kids were at camp, you might think that I'd be in high gear prepping for our Greece trip, or perhaps whittling down my note-book-sized to-do list, or maybe even chilling out in bed with Netflix and ice cream.

Yeah... no. Instead, I decided that it was the perfect time for another bedroom revamp. The last time I've done anything with the kids' bedroom was when they were at camp two years ago and I ripped out the giant closet in their room to make a nook the perfect size for their bunk bed.

It was a big improvement at the time, but even then it sorely needed painting, and the walls were uneven and unappealing, and two years' worth of clutter and treasures and candy wrappers have since built up and been stuffed into drawers and bins and behind bookshelves every time the kids "clean."

So that's where I spent much of my five days--moving furniture, sorting stuff (so many candy wrappers. So many rocks!), spackling things, taping off, painting walls, visiting Menard's, visiting Menard's again, moving the furniture back, hanging all the kids' pretty treasures, and vacuuming about every five minutes.

The bedroom is by no means finished--Matt is right this second on his way to Menard's yet again to buy the materials to make a platform that will loft the bunk beds a little, and I need to sew curtains, and then after the bed is lofted we have a whole slew of other pretty things to display, and then we can figure out the outlets--but it was finished enough that we could pick up the kids from camp this morning, bring them home, and surprise them with what is practically a brand-new bedroom:


I'm surprised every time I do it by what a world of difference a fresh coat of paint makes. The kids' room, like the rest of the house, hadn't been painted since before we'd bought it, but while the rest of the house still looks okay, their walls had gotten pretty bad. Inspired by Will's collections of dragons and swords and Syd's collection of magical ponies, we were going for a vaguely medieval castle look, and so chose to repaint their room in grey. I've heard that grey is the worst for looking different in different lighting, and that's true, because this grey actually looks lavender in the morning sunlight, but lavender is also a lovely color, so there you go.


Will has been longing for a place to display her sword collection ever since she got that first one, so this was a priority. She's got a couple of kid-made swords (including this Minecraft one!), to add, but she'll have plenty of room on this wall to expand her collection.


This top shelf had been crowded with just everything--treasure boxes, more boxes filled with rocks, a couple of canisters filled with more rocks, fancy hats, tons of empty wine and beer bottles (fun fact: the kids collect interesting wine and beer bottles; Matt and I basically let them choose our alcohol based on the bottles that they like), and some old candy wrappers. You couldn't see or appreciate anything, and there was nothing on the walls.

I moved everything around, severely edited that bottle collection (they can surely get more!), and chose to display here just a few favorite things: Will's fencing mask, a couple of souvenirs from a past trip to France, Syd's crown from her first Trashion/Refashion Show, a dragon from Will's vast collection, two fancy masks, and a perfectly preserved butterfly that Syd found lying dead in the grass one day.


I gave this stained glass dragon to Will for Christmas, and only now found a place to hang it for her.


This is Syd's side of the dresser, and the shelves where I removed hundreds of candy wrappers and neatly rearranged the remaining treasures. Now Will has a full shelf for her dragon figurines, Syd has a full shelf for her treasure boxes, and there's still room for Will's Waldorf doll, her horseback riding trophy, and a few more containers of rocks.

Syd has her photo album, camera, bush knife, and ballerina doll in her basket, her solar lantern next to it, and her Nutcracker posters above it. The kids need to help me put some of the stuff back on their shelves, because I forgot who many of the little figurines and random bits and bobs belonged to, and you can tell that we deeply need those curtains that are on my to-do list.

There are still other plans to come--I'm refinishing their light switch cover and a couple more picture frames, and after the bed is lofted Matt is going to add shelves, and wire the room for more outlets, and we can mount the artwork that the kids want next to their beds--but an hour after arriving home from camp, the room makeover has already had one big payoff:


Toys that had been forgotten about are once again revealed!

Friday, July 11, 2014

Graffiti on our Lockers

I've had these old lockers from the IU Wrestling Team's locker room for a LONG time, and that whole time they've always been the same chipped black and red paint with IU Wrestling stickers on, because they were so freakin' heavy that there was just absolutely no way that I was going to be able to move them across the house, down the stairs, into the yard, and back again.

Our new house, however, has a wheelchair ramp! Matt is god-like in his strength, and the man can move anything if he's got a ramp. He moved those lockers out of our old house (and I don't know how the hell he managed that, but he did), onto a trailer borrowed from a friend, off that trailer at our new house, and set them in the driveway for me, with the agreement that he'd move them inside and put them where I wanted them whenever I wanted him to.

Because I'm a pretty tacky person at heart, I didn't want to refinish the lockers to look cute or anything like that, mind you. Instead, I wanted to camp them up with graffiti!

I primed only the front of the lockers, because priming them was an insanely, stupidly difficult job (that steel mesh made brush-on primer a Sisyphean ordeal of constantly mopping up drips, and it also absolutely soaked up spray-on primer to very little effect, since 98% of it simply went through the mesh):
No matter where we live, you'll always be able to tell which driveway is ours!
On Independence Day, after the parade and the park, we went to the hardware store and bought spray paint in every rainbow color, plus black. I couldn't find a silver that I liked, and we already had gold at home, because Syd had wanted to make a PVC pipe "light saber" for a friend's birthday the previous week.

Off and on for the rest of the long weekend, whenever the kids had a mind to, they took spray paint to lockers, and oh, my goodness, they had a fabulous time with it:


I really just needed them to get down a random base layer that looked like decades of old graffiti that had been painted over tons of times, and they did a masterful job.

We also spent a lot of time talking about graffiti as an art form, which explains Will's little lecture on graffiti art in this video:

That kid is going to be a superb politician/professor one day: she can parrot back parts of her reading or one of my lectures or something heard on NPR, mix in stuff she knows on her own, and add in whatever VERY firm stance that she has immediately taken on the issue, presented as fact, and will defend unto death. Currently, you should hear her talk about the drug industry--a Michael Jackson song came on the radio yesterday, which got us talking about him, which got us talking about drug overdoses, which got us talking about drug abuse, which got us talking about pain management, which got Will ranting about how someone needs to finally map the human brain, dang it, so that people can alter their brains to do what they want without drugs (I don't know how that became the takeaway, but there you go--add mad scientist to her future career possibilities).

When the kids had happily covered every square inch of the lockers with color, I added some text. I had wanted Matt to do something really stylized, but he was spending the day at our old house and I was impatient, so I just did it myself with my junior high bubble letters:


It's part of Matt's last name, plus if you're going to do graffiti you have to have a Doctor Who reference, plus the year that we moved into our new house. 

With all of these house projects that must be done before we can stop living in chaos, preparations for our impending road trip have taken a serious hit. If you know me, you will be shocked to hear that the children and I have not intensively studied for this trip yet! We plan to listen to the Little House books during our trip, not before, and the entire Little House and paleontology unit studies are now going to have to be completed AFTER our trip, not before as they clearly should be. 

I must take deep, calming breaths as I think of that, and remind myself that a vacation can still be fun even if you haven't spent two months studying for it...